Leaderboard


Popular Content
Showing content with the highest reputation on 06/05/2021 in all areas
-
Great stuff. Thanks, Rhodes.1 point
-
Correct, you do indeed have a Hero helmet so you will need to add top rivets to your Stunt belt, you can't apply with mixed versions. Here are the CRL's for each if you would like to check anything Hero https://databank.501st.com/databank/Costuming:TK_anh_hero The holster is affixed with four fasteners, two on the top, two on the bottom (two per strap). Fasteners may be rivets, snaps, or Chicago screws. Stunt https://databank.501st.com/databank/Costuming:TK_anh_stunt The holster is affixed only two fasteners at the bottom, one on each side. Fasteners may be rivets, snaps, or Chicago screws.1 point
-
Left some feedback on your pre approval thread, you may need to supply a few more high resolution images as a few details cant be made out. Most of us can't sit, or we awkwardly try, I find sitting on a corner of a table or chair isn't too bad. Arm movement is restricted and depends on what gaps your arms have, I can just put my blaster in with one hand.1 point
-
Green is OK. You can change to the blue one if you want later. But not the contrary. Just take care to not pass the ridges as per the Crl.1 point
-
Stuck at a cross roads guys - I've seen a mobility cut that I thought looked pretty good a while back for Centurion approval (right/blue); but the more I examine, screen accuracy is definitely left/green and seems to fit more with the SW era/universe/theme. Any thoughts or guidelines I should be aware of? I'm debating but I think I need some community feedback to push me over to one or another.1 point
-
Hope it works for you.1 point
-
Thank you @TKSpartan!!! …for both the advice and the photos!!! It’s also a huge relief that you’ve done this with an RWA kit so I know it can be done..! Much appreciated!!1 point
-
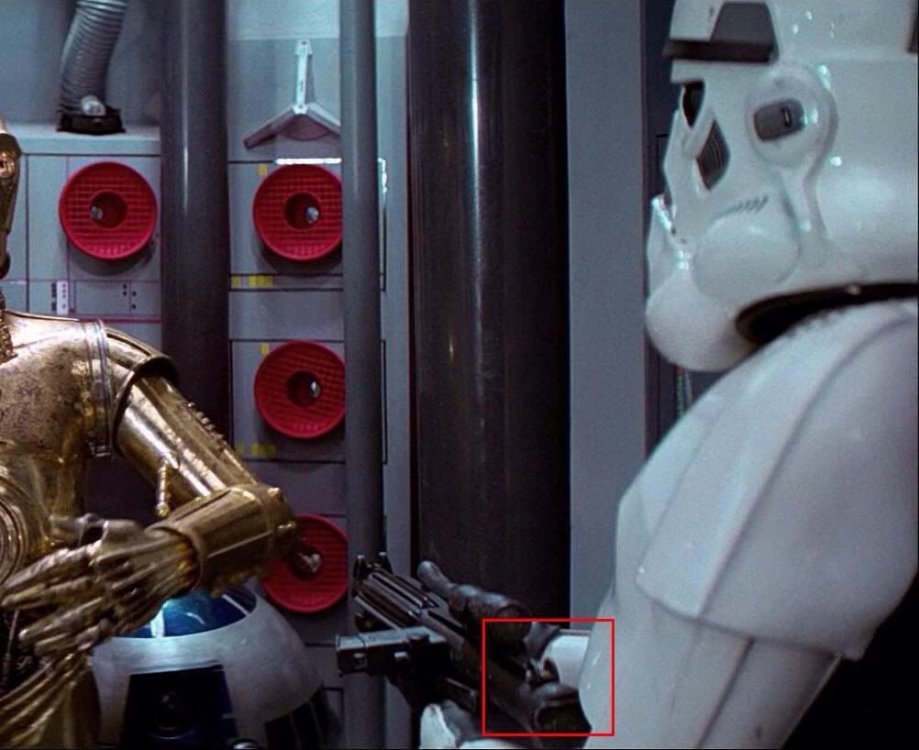
On a separate note from the Hex Nut and Bolt is the final Mounting Method the prop department resorted to for the Counter and Power Cylinders. After initially being Glued on and falling off during production the Counters and Power Cylinders were eventually mounted to the blasters with a wire simply wrapped around them. As you can see after initially being glued on and falling off while filming(especially the trash compactor scene) the Counters were finally mounted to the blaster with a wire wrapped around the base of the scope feet. The ‘Power Cylinders’ eventually utilized the same type of mounting method the prop department resorted to for the counters; A wire was wrapped over the ‘Power Cylinders’ and around the mag well of the Sterling Sub-Machine Gun. Here are several more photos of the Counters mounted with a wire wrapped around the base of the scope feet. some of these images almost look like it could possibly be a thin zip tie too. There was definitely some kind of Wires and Electrical Tape connected to the socket terminals on this Hengstler Counter, old news I know but 4K resolution gives us some new insight. This image also shows the Hex Nut just over Leia’s shoulder.1 point
-
Just as The5thHorseman and I posted about this here 5-6 years ago, the 4K version on Disney+ pretty much confirms the rear sight and pivot pin being removed and replaced with a Hex Nut and Bolt through the rear sight guard as yet another variation of the mounting method for the rear end of the scope rail. I know this is kind of old news but I think we can consider this one confirmed now. Another angle of the Hex Nut & Bolt, which appears to have a Slotted Head. Notice the Scope Rail is bent at an upwards angle behind the Hex Bolt holding it down. More angles showing the Slotted Head. Also a good view of the Greeblie on top of the Scope.
 1 point
 -
Standard images required are Front, Side, Back, Side, Action and Helmet Off, but others may also be requested, depends on your GML (garrison membership liaison) Take photos with a blank background, contrasting to what you are wearing. You can post your images for feedback in the pre approval area https://www.whitearmor.net/forum/forum/193-request-tk-pre-approval/ I believe UKG has an armorer program, check out on their forum, they also have a slightly different way of doing the approval process so you will need to check those details too https://www.ukgarrison.co.uk/forum/1 point
-
No worries, it's not the worst that could happen. I can use the old one to get the correct dimensions making the new one easier to get right. Every mistake is an opportunity to learn, right? [emoji1] There are no induction events scheduled in the UK yet anyway, so I may as well use this time to go for the advanced levels (and document my mistakes along the way) Sent from my SM-A715F using Tapatalk1 point
-
TK-46116 reporting [emoji16] All cleared at basic, and just waiting for an induction troop (hopefully not long). Thanks to everyone for their help and input. Couldn't have done it without you. Big shout out to CableGuy (Dan), my UK Garrison armourer. He has the patience of a saint!! Will start getting my pics together for EIB [emoji106] Sent from my SM-A715F using Tapatalk1 point
-
Welcome aboard Chris! I have a MTK kit that I built to ESB / Expert Infantry level. So it's really not a matter of can the MTK meet 501st requirements but more what your goals are. For basic, it should be straight forward. For higher levels just visit the respective pages to see what you need to do the get there. I recommend shoot higher, it isn't that much more effort and since you will be representing both the 501st and FISD as well as yourself - go for it! Here is my build thread from many moons ago but much of it still applies. TK24336 ESB Build https://www.whitearmor.net/forum/topic/26919-my-first-esb-tk-build-mtk1 point