Leaderboard


Popular Content
Showing content with the highest reputation on 05/27/2021 in Posts
-
Nice work on those teeth, your dentist would be proud3 points
-
Did a bit of work on the handle today Used the dremel to shave off the resin screw Got it nice and smooth Found the center point and drilled the hole: Screw in. Easy! Question: should I leave this "turnable" or would anybody recommend gluing it in there? Next I looked at the screw on the bottom. Seemed pretty like another quick win, so I went for it After routing out the hole I put it in backwards to make sure I had cleared enough material for it to fit in And there we go, its in. I know the progress here is minimal, but I've got to say that it feels pretty good to have just a few things done on the handle here. I'm feeling much more comfortable with the material and ready to get into the nitty gritty of it.3 points
-
Sent from my iPhone using Tapatalk3 points
-
scraped a little more off the bottom of the middle tooth and finished the ends...2 points
-
Sent from my iPhone using Tapatalk2 points
-
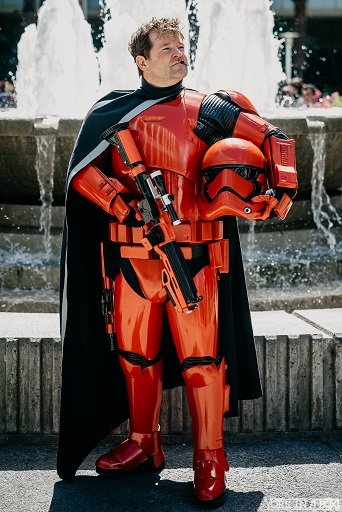
I am not sure where to post this, but I am starting a Captain Cardinal Build, since the Black Series figure is coming out in September. Since the current pictures do not show his boots or blaster, the new figure will make it possible to complete the build and hopefully get a CRL approved. At this time, i have a KB Props TFA almost complete (personal kit). I am going to modify it and use an Anovos TFA Helmet. I have on that has some finish issues, so it will be a prime candidate for repainting. I will only be able to take this so far, until i get my hands on a figure, but there are things I can start on and post some of the reference photos and book excerpts that contribute to the details of the armor.1 point
-
Hello, Troopers! On behalf of the Command staff I am proud to announce that we have a new member of the team! Chemi (TK 30173) from the Spanish Garrison will be moving from his position of Imperial Attache to Deputy Deployment Officer. As a Centurion level TK (and one heck of a nice guy) he will be working with Mario and I and using his TK expertise to approve costumes at the higher levels. I'm sure he will be a great addition to the Staff, so please join me in welcoming him to his new rank! Way to go, Chemi, and I look forward to working with you, mi hermano!1 point
-
1 point
-
Yea I was thinking about that also but seen I already had these 2 pieces ready so went that route.1 point
-
no worries at all, @TKSpartan!! Thank you for the outlines image; love me some toothpick removal on these helmets!! I’ll get on that and finish up for more questions/pics..!1 point
-
Nice work so far. For the grip side screw, I like things to be turnable. If the screw already sits fairly snug and you can turn it then that is good. If it is a bit loose you could drill a wider hole and insert a tube that you can tighten the screw into .1 point
-
Excellent thanks heaps[emoji4] Sent from my iPhone using Tapatalk1 point
-
Some return edges will need to be there, like bottom of the chest and sides of the back/yoke. When in doubt check out the gallery sections1 point
-
As a side note.... Big thanks to @Chemi for the imgur link. Made linking things here a lot easier! When I went to register for an account it said I already had one (though I had no memory of making it). I went through the password recovery process and was able to access an account I apparently made back in 2015. There was only one photo (see below) that I had apparently uploaded to post somewhere. What you're looking at is a painting I made during at a "fun-datory" work holiday party the week of TFA's release. Obviously my mind was elsewhere and I couldn't be bothered with holiday cheer - I remember the instructor not being amused. Figured this crew would enjoy!1 point
-
I bought the helmet individually a little earlier in the year, it needs a bit if work but have started to sand it back already. I’ll post a photo of it[emoji4] Sent from my iPhone using Tapatalk1 point
-
Trimming can be done in numerous ways, depending on your skill and what tools you have handy, some use score and snap, you run a sharp knife along a line a few times then with pressure hold down and snap the excess away. There are also scissors and dremels for those able to use power tools. You will pick up a lot of info looking through build threads, here are just a couple of different ways to trim.1 point
-
850 are making updates all the time to their armor range, looking forward to seeing the progress, good luck1 point
-
For a RS set I fixed I ended up putting a piece of ABS behind the whole shoulder straps which gave a little more strength especially to the sides.1 point
-
Hey Nick just checking in to see how you are going with this build. looks like we will be the official home for this costume after discussions with Spec Ops Detachment, so let us know when you are ready and we can start work with you on creating the CRL.1 point
-
Hello there, How is this build coming along bud? You looking at modelling for the CRL? I am just starting this costume, and wanted to follow others that are doing the same. Thanks!1 point
-
First night was pretty straightforward (and pretty messy). Cleaned out the holes in the barrel -- Started with my smallest drill bit to get a pilot hole in the center of each one, then switched to my largest bit clear most of the material out. From there I used the routing tool in my Dremel to clean off the sides. Some of these might benefit from some finer sanding, but I'm saving that for another day. I realize most of the holes I drilled out here will be obscured anyway, but I really wanted to get a feel for the resin in a low-pressure place. Also pictured is the canned air -- super helpful in clearing dust/flakes from the barrel and making sure I could see what I'm doing.
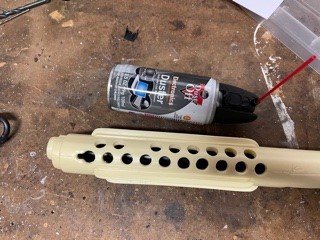 1 point
 -
Got some more painted this weekend and was able to assemble almost all of the upper pieces. I am going to need to figure out how to keep this scratching easily. I will take Glen up on the advice of putting the foam pieces under the yoke to abs so it does not scratch so easily. Since these are fiberglass, it does not give as much. If this keeps happening, I might need to go with the ABS yoke and abs. I am ordering the boots and gloves for Giovanni. Cape will be from Geeky Pink, once I get clarification on the border (silver or no border). Biceps will be next, I have some rework to do on the seams first (need the etch in the lines better and fix my overlap issue).1 point
-
Ill add these
 1 point
 -
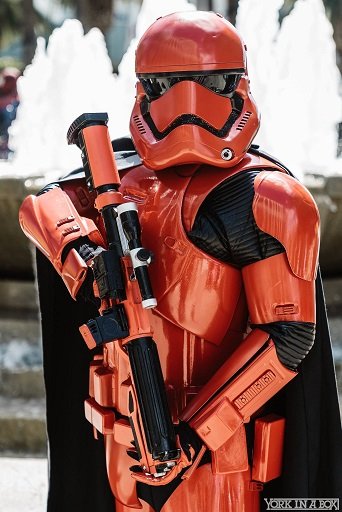
Finished the helmet (with some minor detail work left). Below are the photos showing the painting and the removal of the tape. Finished Helmet: Next I will begin the chest armor, yoke and backpiece.1 point
-
Cardinal red for Cardinal!1 point