Leaderboard


Popular Content
Showing content with the highest reputation on 05/05/2019 in Posts
-
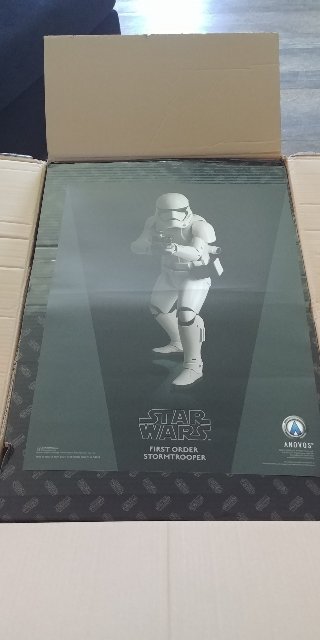
Got my BBB today!!! 2 years and 7 months on the nose.2 points
-
Well....Its here. 2 years and 7 months waiting. I'm going to attempt a build thread here to document my progress and maybe help some others along the way. I'm a noob so I'm sure I'll be learning just as much as well. I will be building this for TFA and NOT TLJ so there will likely be some mods along the way. Also, I will be putting this together using a mix of the Anovos instructions which can be downloaded from the website and Ukswraths build thread. (A staple in my opinion) Since this is an upgraded kit, there will be plenty of differences. Feel free to chime in with any advice. I promise to respect and treat it as just that. Advice. Thanks in advance!!! Ok.....so.....Here we go!!!!
 1 point
 -
I have built a couple of KB props FO's for my garrison mates, I currently have a couple of video on Youtube on how I did it. I also just helped a member in AZ finish her KB Phasma, she just needs to paint it. I have also helped some Californians build there armor, one mailed it to me and two others came down and I helped them build the armor over three days.1 point
-
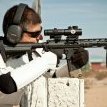
Screen used armor from Lucas archives1 point
-
Ok first up repainted the tube strips... I wore my Armour for a bit today walking about on my balcony to get a feel and to make adjustments... Ad to chest plate left side (Facing me) needs adjusting..,, next adjustments required thighs... when people say Armour bite I have no idea lol after walking about I now know.. lol More shaping of the thighs are required. at the moment they are to round. Big thighs from years of service ;-) (edit) hot bath I think A good 2.5 cm give there, currently they are touching as you can see from this pic my idea was to hot bath them and flatten them a bit (edit) Fronts they stop just above my knee. adjustment so it all lines up. (edit) Left shin adjustment to line up, under suit required.. shins molded to my weird calf's.. no hooks attached yet. with the bra hooks and foam the shins do not move... left left side picture.. to do the cut out piece on the kidney both sides... Strap on the side top of the kidney to pull the ad part in more.. Right side kidney cutout required.. white elastic missing from shoulder straps.. forearm adjustment only have one here cause I clued the poppers on my other arm the wrong way round, do not drink and build.. will have to wait 24 hours torture.. I am not happy with the forearms I think i need to trim more of the wrist and then redo the forearms and allow more elastic from the bicep to the forearm for more moment... checking movement and and dressing issues that might occur.. lots of walking the thighs are killing me, they are rubbing against each other right side hurts more than the left happy with the shins not moving once I clip the straps on (Bra hooks) did some climbing on a step was manageable .. Things to buy or do... E11 I have a doodpy doo but that takes time I feel like its a journey to make and tradition.. Neck Seal the next seal I have is good but it feels like i need to have Velcro on the bottom to make it feel flat for me anyways I cant really see if its flat etc I am thinking I like one with a bigger bib or part of the under suit itself Undersuit I need a decent under suit, I have uniglo and my sports under suit at the moment looking like a mine artist. Fans / Cooling System OMG you defo need to have fans unless you live in a cold climate (A camel pack would be good or a drinking system of some kind) Gloves I have glued my hand guards to my gloves however I am not 100% satisfied, is there anywhere that sells them already glued? Need to get cotton undergloves due to the sweat.. will await feedback before making any adjustments tomorrow. slow progress on the DLT-19..1 point
-
In regards to gaskets. I'm definitely hearing Geeky pinks are the best right now. Also just as an FYI. I have heard rumblings, speculation, etc. That the TLJ gaskets may in fact be cloth or fabric gaskets.1 point
-
well the right one when i trimmed the back of it, i trimmed a bit too much, and with the left one i was trying to make it feel less tighter but i am not sure weather i need to make the left one tighter or try to fix the right one i bit more. but if the gml says its fine then i wont really change it1 point
-
I might look in to a praetorian, the have a nice M19. This could be possibly a Christmas gift from the mrs’s this year!1 point
-
Well they are ”funny”. I ordered without helmet as I already have a TFA one but then figured why not get a TLJ helmet so I can Troop both and I contacted Anovos asking if I could get a TLJ helmet as ad on to my order although it was a TFA kit and they said: Yes you can but we’d appreciate if you don’t mention this to anyone as you are the first person to be offered this and we are making this official after the holidays (read Christmas) I was worried I’d still end up with a TFA but I guess I don’t need to be now1 point
-
I asked Anovos that question specifically last week. They replied and said "as advised last year.." the kits are TLJ and will not ship with a TFA helmet (even if requested). It will definitely be a TLJ helmet. So much for their earlier email updates saying "you'll be able to build either version". More BS from Anovos. I'd hoped they'd at least ship with both cod versions? But that's not happening.1 point
-
Cricket! Its going very slow unfortunately. I have trimmed off all of the flashing bits for all the pieces. Still nervous about removing something I am not supposed too =) Right now, I'm digging / researching into making sure I trim the correct measurements for biceps and forearms. Like cover-strip dimensions and overhang and what needs a return edge or not. I bought a bench belt sander and have been working on sanding / leveling and evening out plastic on some scrap pieces before I move to the real deal. OH I can crack walnuts with my bare hands now from the workouts from the lexan scissors and the ABS plastic. Totally worth it though. =) Im getting there. Thanks for checking in, and sorry for the late reply. I try to put in about 2 hours on the weekends most of it right now is making notes on things, and then finding visuals (im a very visual person when it comes to DIY and I second guess myself a lot.) Ill post some pictures of progress soon, once I figure out the picture limit barrier. Im a tech guy, but this is my first venture in "forums" and its love hate right now. Side note--- My wife is working on her Jawa build now too. She didnt want me to have all the fun. We got the monks cloth and brown dye. Shes really excited to start the cutting and building. -Shawn1 point
-
I came up with these some time ago and they work great keeping the butt in place1 point
-
I am amazed my photos are still up, like many others I have had trouble with photo bucket removing all of my links... still not not finished this build properly... it’s been well trooped in though...
 1 point
 -
Nice work! If I had anything to add it would be to build your armor in such a way you're not too dependent on a handler or anyone else for that matter to help you get dressed, or insure your armor is installed correctly. Yes, it is very nice to have an attentive and educated helper however, I can't tell you how many times I've trooped with something out of sorts and no one said a thing, even after I asked someone to check. On a more positive note hopefully there will be Centurion or Specialist level troopers with you who actually care about what everyone around them looks like, because they want everyone else around them to look their best.1 point
-
The thighs are glued together but I have yet to do the thigh pack, that could be done today. Ok my shins, has anybody worked out what's going on with them yet? Both of my shins are identical and are made if I am not mistaken, remember I am not an expert, of the outer left and outer right parts. This is why they are so wonky looking from the front. When I put in my order with TM, he asked if I wanted any doubled up parts, and I told him to surprise me... there is another doubled part somewhere, have you seen it? Measure from the very top above the raised edge and drill small holes, just big enough to get the hooks through, 45mm down, 225mm down and 340mm down. You want to go in about 10mm from the edge of the joint so the hooks pull them in slightly when closed. While a lot of people add joining strips to the inside of the shins its not accurate. If you are worried you can run a bead of glue on the inside joint like I did. Again the elastics are just glued directly into the shins, try to match them up to the holes, but dont sweat it if they are not an 100% match.. The elastic with the number 4 hook sits about half way along the outer joining strip on the back of the shin, this will pull the shin closed nicely when worn.1 point
-
Day X+1 Ok so here is what I got up to yesterday, Bell elastic is in Bicep hooks made and fitted Wrist return edge gone - I used a junior hacksaw to remove it Holes drilled and strapping added to shins, knee plate glued to middle of left shin, I will complete the sides later Is there anyone here that has yet to name their armour parts? Steve and Wayne are screen accurate names but I went with Mark.. Until next time - please give peas a chance...1 point
-
Ok so TM has turned it around and sent the remaining parts to my kit and its all hands on deck.. the post lady arrived at my door just after I finished washing my car this morning.. But this weekend I am going away to visit family living right next door to Stonehenge, so while I am away with the fairies, or is it the Druids? Anyway while I am away you guys and girls can look at this lot and wait patiently for Monday to arrive when I will get on with something. Alas with my odd working hours this week and Wimbledon on the telly, not much has been done... Don't worry if this little lot looks confusing, ive built a suit with these before and its very simple. I will talk you through it as I do it. Thanks again Paul.1 point
-
Ok so I went for a well known maker of fine stormtrooper armour from England known only by two capitol letters, T and M. It came well packed and tidily stacked in the aforementioned big brown box, anyone would think he has had plenty of practise at this.1 point
-
apart from just bumping it against all sorts of edges and corners, I also used actual dirt (how ingenious! ), some rubber trim and - probably the "main" ingredient - an aquarelle pencil in black. It allows you to make "scratch marks", but it will also smudge with a bit of moisture and leave a "layer" of black/greyish grime on it. You should give it a shot, works quite well for me1 point