Leaderboard


Popular Content
Showing content with the highest reputation on 07/04/2018 in Posts
-
or this photo luc
 4 points
 -
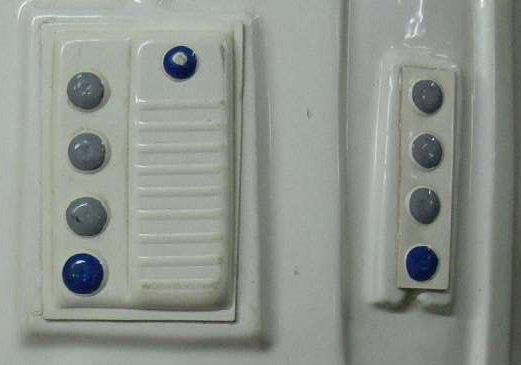
The two extra rivets are for the knee ammo pack. I would also assume the short one is for the cod rivet. Not sure why you only have three washers...Ideally, you should get some more and use them for anywhere the rivets are functional. Lastly, here's a reference pic for the small ab button plate. I believe it should be trimmed a bit more.3 points
-
As for the belt I recommend trimming the edges down to canon specs, as you mentioned Martjin. Reference photo
 3 points
 -
Update 09: - armor in the box For those who are wondering, if and how the TK with standard strapping fits into that box, here is how I pack it for a troop. Tetris level 1 Everything fits fine into the 113 liters box, including helmet, boots, blaster and the voice amp. Between some armor parts, there is still space left for food and drinks, emergency repair kit and spare clothes. Because the box is pretty full, you can store it vertically without everything getting mixed up inside - always good when using an elevator. Maybe this helps a few other troopers here in the decision process…2 points
-
Many thanks for your kind words! Much appreciated! Having a few days of this week and determined to get things done. Summer is here, and wow that TM-kit is shiny white! Currently working on the bucket and I would like to check if the placement is alright. I've added dots where I would like to place the screws. Unfortunately there isnt a lot of overlap between the two parts on the inside so space is limited. What do you think? Would this work?2 points
-
Hi ! I think the staff are going to ask to send more foto’s . in the link is a checklist for the fotos that are required for EIB . ‘‘Tis is how the fotos should look like Goodluck with your EIB application !!! Godspeed trooper !!2 points
-
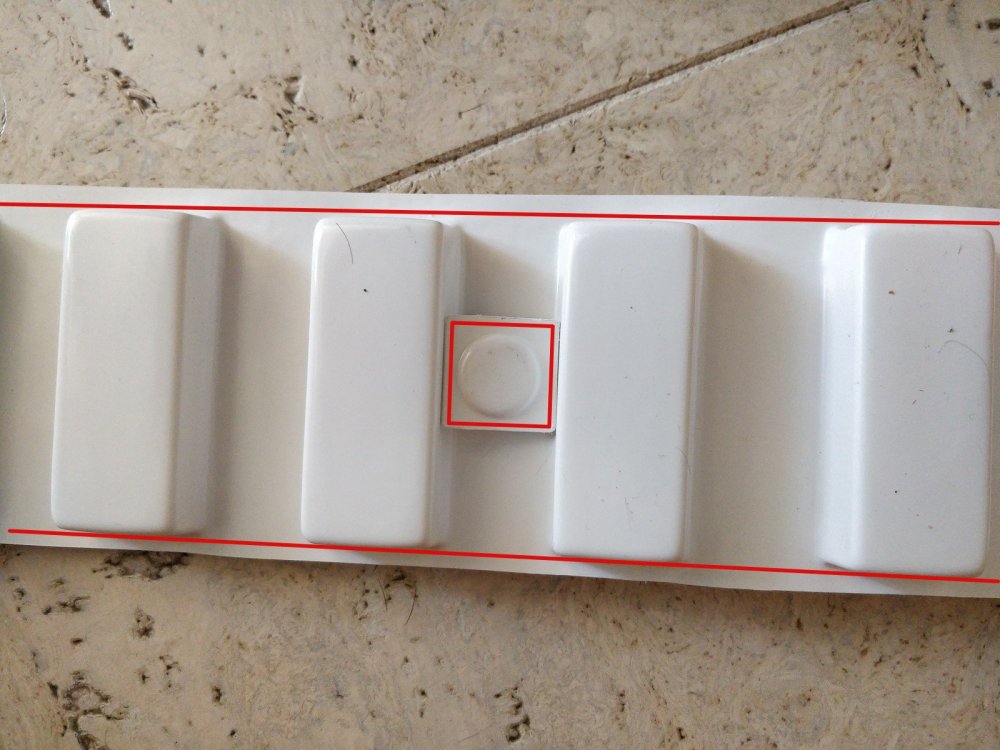
Hi mate. Just a couple of things. I’ve read before to be careful of a reaction between the metal of the poppers and the ABS plastic when the glue is touching. It looks like you’re using black nylon webbing for your poppers. Try to keep the glue on the webbing only to avoid any possible reaction with your armour. Also, you might want to consider the score and snap method with your ammo belt. This isn’t meant as a criticism, however the top and bottom of the belt currently look a little ‘wavy’. If you use a nice long straight edge (eg long metal ruler, metal spirit level) and gently score many times with a very sharp blade, eventually you’ll be able to snap off the excess and be left with a lovely straight edge. Also, you could probably get away with losing a few millimetres anyway, so this will all tie in nicely. Here’s a nice example of the ammo belt. Just a few millimetres above and below. The square tabs a just a little bigger than the circle in the middle so just trim to size. Again, the score and snap method will help to get lovely straight edges. Keep up the good work. :-)2 points
-
I agree with David2 points
-
Hahahahahahaha! Finished my helmet and it's the coolest thing ever! My wife took a pic... What you don't see is the big, dumb grin on my face. I still need to install padding and do something more permanent than masking tape for the lease and mesh, but I'm loving it. I also sanded that smaller ab plate: Tony, does this look acceptable? Next I'm going to start assembling the torso. Seems logical to me, for the sake of fit, to build that first and add the limbs from there. I feel like I'm making progress and, in case anyone missed it, I'm having more fun than....well, a really fun thing.2 points
-
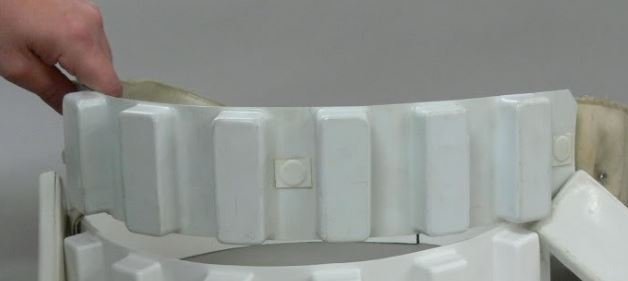
Trying to show the contour and " cup bend" of the guard.,,, hard to get a great pic...2 points
-
Hey everyone, Pleasure to meet you all. Just a bit of an introduction. I am living in Prince Edward Island, Canada and have been a long time Starwars fan since a young age. I was introduced to the 501st by a current member who lives close to me and could not be more excited to get things together. I have recently purchased my untrimmed TK armour from AP (Helmet Trimmed) which was delivered last week and am very pleased with it so far. I have since started to trim everything and am having alot of fun doing so. Here it is unpacked.1 point
-
Hello all! I received my TK ID a couple weeks ago but totally forgot to post here until now. Thanks for the reminder @Twosolitudes. If Only You Knew: - No matter how much you budget to spend, make sure you add some additional cushion. While there are ways to save money, this project adds up! - Be patient. With everything. I started out rushing and made some sloppy/careless mistakes. Research EVERYTHING, multiple times. If in doubt, ask and wait for an answer. Oops!: - I goofed up big time on my thighs (see above about being patient) and created far more work for myself than was necessary. However, I was able to salvage them through the help and feedback of others. See my build thread for details: Shout Outs: - Thank you to Frank75139, Neb Sgird, ABS80, lucnak, wook1138, TheSwede, gmrhodes13, justjoseph63, GilFran007, and Twosolitudes. I'm looking forward to many troops to come. My first official troop looks like it will be August 4th at a benefit for a little boy recently diagnosed with cancer. I'm stoked that it will be for such a great cause! My church is also having a Dave and Busters themed game night on August 3rd that I plan to make an appearance at. I figure it will be a good way to troubleshoot and feel out an event/working a crowd before I do anything official.1 point
-
Let's see now. Where the hell was I? Oh, yeah... It's been a long time ago (see what I did there?) that I started this build thread, ain't it? Excited as all get out when I got the BBB, and almost immediately dove in to building my TK. Started with the Thermal Detonator, and wrapped that up in short order. Then I decided to do something major and tackled the helmet, which came out great. And then... And then... And then we picked up and moved from one state to another. And then Mrs. Stormtrooper retired. And then there was a prolonged family illness (that did not end well, sadly). And then there was getting my shop set up and in working order so I could make money, which the newly retired Mrs. Stormtrooper insisted is kinda important. And then, just when everything was settling down and I was ready to bask in the aroma of freshly cut ABS once again, a got an enormous editing assignment that took a couple months. And then, within just a few weeks of wrapping up that assignment, and even bigger one came along that took another couple months. And then... Well, and then it's now. Big assignments are all done. My workshop is done except for some minor stuff. The household is all settled. And lo and behold I'm starting up my build again. Now, although I've been letting my BBB gather dust, I've continued to read build threads here. And I have to say, by the way, that you folks amaze me and are an inspiration. But as part of reading so, so much about so many builds, a couple questions have come up for me that seem to have too many answers. With that in mind, I'd like to restart my build thread with a couple of questions. First, have I got these shins correct? Maybe I have armor dyslexia, or maybe my old-fart eyes just can't see it, but I have one hell of a hard time telling one side of a shin from the one that's supposed to have the S-shape. So, have I got these right? I think so, but really want to get confirmation before I start hacking away at plastic. If I may, I'll just run down my other questions as a quick list. 1) Cover strip ends -- Angled corners or rounded corners, or just leave them squared off? I'm seeing all three things done in the various builds (and all seem to be acceptable), so does it really matter? Personally, I rather liked them slightly rounded. 2) Terminology -- Are "poppers" the same thing as "snaps?" 3) Snap plates -- Webbing or ABS squares? Personal preference aside, is one any better than another? 4) Webbing snap plates -- And if you do use webbing for the snap plates, why does everyone use black and not white? Seems that white would be more logical. 5) Hovi Mic Tips -- The outside is black and the inside is white, but what about the thin forward edge, the "rim" of the opening -- black or white? 6) Kidney -- Are the 22x22 notches still required at any level? I've seen contradictory info. OK, I think that's it for now. I plan to start trimming in the next couple days, and I'll probably start with either the forearms or the shins. I've seen that most folks like starting with the forearms, but the thought of working from the ground up kind of appeals to me. Thanks, as always. A.J.1 point
-
I hate the ears....walked away from them for awhile. Now trying to put together the rest of the puzzle. I'm 5'2" 110 lbs. Definitely a challenge. Lots of cutting. Sent from my SM-G955U using Tapatalk1 point
-
Looking great! I'm still working on my WTF ANH stunt build. The ears, the ears! Spent most of my time there. Hoping to get Centurion but will settle for basic at this point.1 point
-
Or use non corrosive snaps like Fasnap or DOT, marine grade and non corrosive even with E6000 Edit, actually not sure if these manufactures make the poppers, I take that back sorry1 point
-
My pleasure, Giles. I will be looking for your EI submission as soon as you get your 501st approval! Speaking of which, the first thing you should do after you get your official TK# is to request Trooper Status here: https://www.whitearmor.net/forum/topic/16-501st-trooper-status-requests-include-link-to-your-501st-profile-in-your-request/1 point
-
A good advise from Ilan and exactly what I had in mind, too. You can also have a look in other (successful) EIB request threads and check them. As you currently only have 8 posts I just wanted to mention, you can edit your first post here in this thread and add missing photos there. So all information will remain in that first post, what makes it easier for the staff people to check your request. What I noticed on the armor: looks like your drop boxes are mounted in slightly different positions on the belt What I noticed on the blaster: the Hengstler counter could sit a bit closer to the scope, but I doubt this will cause any serious problems Good luck with your EIB request1 point
-
Floor heater is good also, the reason I mention spot light is not only do they create heat they help eliminate shadowing, but yea.1 point
-
I have used a portable electric heater before and had it running for a couple of hours to warm up the garage, it helped a lot in the cold weather. I would suggest some heat source or you could end up with runs and a dull finish.1 point
-
That's the way to go mate, good job! So fun isn't it once you're started! The ab buttons lool good... Did you check them where they're supposed to go on the ab to see how they fit? Keep up the good work! Sent from my LG-M470 using Tapatalk1 point
-
Still need to take some pictures, but making good headway on the trimming. Have a few more pieces left which I will get done tonight (following ukswrath thread for trim order, I am done to the shoulder bells.) Next will be to do some sanding to cleanup edges, then the daunting part (to me anyway) of how to tie everything together.1 point
-
https://www.ebay.com/itm/1232284265831 point
-
Did not think that the 3d and resin cast guuys would need these but i guess steel trigger guards may hold up better ........1 point
-
Fantastic! Looking great the both of you.1 point
-
Wow! You (both) look awesome1 point
-
Slow but steady progress. Finished the paint on my helmet today: Obviously I need to go back and clean up the edges with thinner on the tube stripes, but I'm pleased with how it turned out. Trooperbay's stencils are quite good. I had a little trouble curving it to fit the shape of the helmet, but after cutting it in a few places along the bottom edge I got it to stick down more-or-less flat. You can see I also added a bit of gray for the 5th tooth on each side. I don't know if that was necessary but I noticed a number of AP ANH Stunt builders applying for Centurion with that part painted. I figure it can't hurt. I need to touch that up with some thinner also but it's not bad. I touched up the traps and tears since my last post too. Fiddly work, but having been a miniature painter for decades it wasn't very difficult. I also got the ab plates painted: I just free handed them. Hopefully they are good enough. Held at arms length they look fine to me. I don't think anyone is going to look at them as close as the above pic allows. : ) Oh, yeah! Lest I forget, you may notice I also did a little dry-brush with some white on the hovi mic tips. You can see it on the first pic if you zoom in. So, again, no questions really. Just checking in with my progress. Comments are welcome and encouraged. If you see any errors please don't hesitate to say so. I'm aiming for Centurion status so any helpful suggestions are most welcome.1 point
-
The rear belt shot is mainly to check for the inner drop box. but it also shows if the loop that holds the drop box is fastened/glued to the cloth belt or not, which is the major cause of misalignment, a very common problem. If it isn't fastened to the cloth belt with rivets or glued it is something that we (or anyone) can suggest to keep it in place. The rear shot also usually shows a closer shot of the approved fasteners, (rivets, snaps, Chicago screws). The inner box can be held in place with whatever holds it there securely... glue, magnets, chewing gum, (well, maybe not chewing gum). Some Troopers make them where they can be opened/closed to store keys. etc. As long as the inner one is in place all is good at level 3. Hope this helps!1 point
-
My credit card is ready and waiting1 point
-
tons of e11 tubes..............1 point
-
You could always join the ranks of the HWTs, (hint hint, wink wink, nudge nudge).1 point