Leaderboard


Popular Content
Showing content with the highest reputation on 06/28/2018 in Posts
-
tons of e11 tubes..............6 points
-
Long time, no post... Mind you, I haven't been slacking, well not much anyways. I made it up to a garrison shop night last Thursday, definitely what I needed to size forearms, thighs, and shins. The past week has been cutting, gluing, and starting on some strapping. It has been pretty slow moving mostly due to cure times (E6000 all the way), and that I've been doing one side of interior shims at a time. Webbing snaps take up some clamps and magnets as well. Bunch of tedious stuff, so I have skipped a bunch of "now gluing this side" posts. Think I'm going to have to redo one of the interior shims, on a forearm, just didn't hold that well, there is a lot of tension when completing the circle, and I may not have let it set a full 24 hours on the left forearm. Anyways, have the basic vertical strapping on the torso done. The shoulder straps are just rigged up with Velcro (and black elastic, will ultimately be white) so I could keep tweaking to ultimately discover where the snaps are going to go. Have put reinforcement strips on the Ab, but not the kidney yet (on today's glue list). Think I'm ready for rivets... haven't made the grundle strap yet, but it will only help. Sent from my HTC One M9 using Tapatalk3 points
-
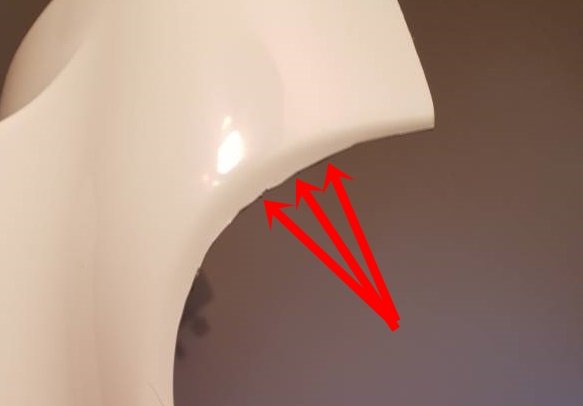
I would trim something like this, a bit shaky but you get the general idea2 points
-
Ahhh just like music to ones ears2 points
-
But I want it all to stay new and shiny!!!2 points
-
You could round off the lower edge and eliminate any chaffing, other than that welcome to the real trooping world2 points
-
I wanna throw a costume party for my bday now,lol2 points
-
As per my GMLs recommendation to bring my bell straps down to cover the biceps more, I have reinstalled the bicep hooks These just pull the strapping down to cover over the bicep more. I have not had a chance to test fit these not too sure if I have too much white on the hook showing or not.....easy to pull off and re-position as necessary. Now to start looking over EIB requirements, and fine tune anything there before submitting2 points
-
Nice edition to the collection arrived today2 points
-
Looks much better than my early test fits ;-) Must be exciting - you’re getting really close to the big reveal. :-)2 points
-
Thanks! It’s a real rough test fit, but I’m pretty happy with it so far.2 points
-
Been making a little progress here and there. Just need to paint the details on the body, finish the ab buttons, make some final adjustments and then work on the helmet. It feels nice to see it all coming together!2 points
-
Well, like you said, just test it. I can tell you that even vinyl strap e6000’d onto ABS has to be removed with plyers, a lot of twisting and elbow grease like crazy. But the rigidity, that's another matter.2 points
-
Bulldog Props Resin 1943 M38 Telescope Review I contacted Brian Hall owner of Bulldog Props in Japan through his Bulldog Props Facebook page on May 9th 2018. I was familiar with his products from his post here in FISD and on RPF. I knew Brian made resin cast versions of the 1942 M38 scopes used on E-11s in the OT; however, these were not just a cast of the outside of the scope (like DoopyDoo’s). These were a complete reconstruction of the entire scope in resin parts. The scope can be completely assembled and disassembled and the price is less than $50.00 shipped. Anyway, I contacted Brian on May 9th inquiring about him making a 1943 version like the ones used in Rogue One. In our conversation Brian pointed out that they used the 1943 resin scope made by DoopyDoos for the film. I found his honesty and candor refreshing and asked him if he could make a version of his 1942 into a 1943. He advised me that he could not alter the 1942 model but he did have a 1943 scope and would be happy to attempt to cast it. Casting these small parts is very tricky given the level of detail in the threads and how the parts fit together. Timeline: 05/09/18 Contacted Brian with request 05/12/18 Disassembly began on the original scope 05/27/18 Mold Making 06/05/18 Molding 06/08/18 Mold Complete 06/09/18 First Casting 06/17/18 Completed and shipped 06/25/18 Received and reviewed After receiving the package sooner than I had expected, I examined it and determined the packaging was well protected and professional. Once I removed the outer wrapping and bubble wrap I expected a simple box with the scope inside wrapped in bubble wrap since this was the first cast and not a production item. I was surprised with the presentation. I recalled Brian testing out ideas on how to package the 1942s and M19s on RPF and I thought his advertisement sheets and packaging were first rate. Well, not only did I get the scope which looks awesome but also two sets of instructions on different types of paper. These were not an extra set of instructions from a 1942 scope but a 1943 specific instruction sheet. Apparently Brian is all set to produce and sell these 1943 scopes. All the small parts were packaged and wrapped in protection then neatly secured in the shipping box under the scope. Brian put some serious thought into how he would package these scopes and parts. Once I unwrapped everything I discovered just how detailed the scope was and how much time and work Brian put into this. All the parts are a resin plastic that is slightly flexible and less rigidly shatterable if that makes any sense? In other words, I do not think it would shatter if dropped and you are more likely to scratch and dent it than you are to crack it. For anyone who 3D prints, its more like ABS than it is PLA. This is also a pleasant surprise for me because I was concerned just how fragile this scope would be to drops and trooping. All my concerns are now set aside for basic trooping. Anyway, the lenses are crystal clear and two of them are convexed on one side. The screws are all machine thread and look to be near perfect matches for the original screws in the original scope. So what to expect from a resin cast scope. The small thin parts (like the locking rings) are brittle and cannot take a lot of force. They don’t just break like a rigid plastic would, instead the plastic will deform and peel away like nylon would if you forced it with a tool. Once Brian finished making the first scope, Brian notified me that one small ring not screw into one of the lens subassemblies properly but that it would most likely not be needed. Brian even included a few extra rings in case I damaged some in the assembly process. This is obviously one area where actual metal parts win out but it was not the goal of this product and I did not want a metal version of the scope. Regardless, this is the first version of this product and I do not know if Brian will make an attempt to address this issue. Even if he does not, I am very happy with the results. Next, due to the molding and casting process, most of the screw holes need to be drilled out. For this you will need some very small bits (which you can get at harbor freight or in Dremel kits). Brian notes this in the instruction sheet and suggests using a bit that is slightly smaller than the screw. The only difficult part in drilling these is making sure they line up properly with the parts. There are a few screws that pass through two or more parts and must be aligned properly. Once you get one drilled, the rest are fairly simple. Lastly, the prism cell is a cast part and does not have any reflectivity, so actually looking through the scope is not possible unless I alter the prism. This is because the objective lens is not aligned with the eye piece. I will toy around with some mirror vinyl when I have time and see if this works but to be honest I wanted this scope to add a reticle and LEDs and possibly the small micro display made by Trooper Amps. Looking through the scope was never my intention. So far the only issues I have found are the two things that Brian told me about before I agreed to purchase the scope. There is a small bubble defect in the Eyepiece Mounting Plate which is an internal part and will not be seen and does not affect the scope in any way. The other issue is the Ocular Lens Retaining Ring not screwing in properly. So to address the Ocular lens subassembly I put a piece of aluminum tube on my lathe and machined it to fit inside the subassembly. This is necessary because the actual lens from the original scope is thicker than the one furnished by Brian. Once I milled the sleeve (yellow arrow), I cut it to fit inside the subassembly and then screwed in the retaining ring. It will only screw in three or four threads but that is all that is needed to hold the sleeve and lens in place. After that I finished assembly and I am very pleased with the results. So I wanted to also compare this scope to other options available. For a 1943 scope like the ones used in Rogue One and Solo, there are only three other options that I am aware of: 1. DoopyDoos resin cast scope which is only the outside of the scope. I believe it is solid and most of the builds I have seen, people have drilled out the scope to add lenses. It sells for 9.99 British Pounds or $13.08. This is not including shipping to the US. Also keep in mind that it would still need to be sanded before painting. 2. An actual 1943 M38 Sherman Tank Sight Scope if you can find one for sale goes for about $185.00. 3. A 3D print of the scope, I found one version on Shapeways for $32.00 and I do not know if that includes shipping. With some time I could probably find a free version of the model but like this paid version, it is just the outside body like the DoopyDoos; however, it is hollow and modifying it would be less work in my opinion than the DoopyDoos. Also keep in mind that it would still need to be sanded before painting. The other available M38 scopes out there are 1942 versions like the ones used in the OT. There are some really nice options for the 1942 versions made in brass and aluminum ranging from $169.99 for the brass version, $105.00 for a hybrid version of aluminum and brass parts, or 79.00 for the all-aluminum version. All of these are completely assemble and disassemble capable; however, I have not found a 1943 version of these and there are enough differences that for a Rogue One or Solo build, you really need the 1943 version. Overall, I am very impressed and pleased with this product. Personally I feel for the price and the detail, you cannot beat this option. Last month I asked Brian to make something new. Something he was not already making and had no way of knowing if it would sell. This scope was a special request to fit my needs and Brian achieved this. I appreciate his willingness and professionalism. I recommend this product and doing business with Bulldog Props. I have been in contact with Brian and we have discussed many of the things I have mentioned here. I also suggested that he make a video and post it showing the assembly for those people who are not as mechanically inclined as he or I am. Brian has been very receptive and open in our conversations.1 point
-
Hi All! I’ve been getting a lot of offline requests to share how I got TrooperTalk to work really well lately, so I figured it makes sense to create a topic with all my info in one place. I just want to say, I absolutely love TrooperTalk. It took quite a bit to get it to the place where it’s useable for me, but it was well worth it! Now, it’s just not useable, I personally think it’s amazing. Here are the details. FYI, I got an iPhone 5 just for using this (a white one no less). When I troop and am using the background chatter, I have a USB battery plugged into it to extend the use for the entire troop. My settings: I’m using the mic that came with my Aker 1505 (it's better than the more expensive after-market one I bought). I’m sure there’s better out there, but it works really well. Voice volume (in app setting): -20 I have "voice volume threshold" at 0.05. I found that higher than that, as soon as my mic wasn't perfectly positioned my voice wasn't always coming through. I went with a slightly higher static burst volume (-25), especially for louder environments. Lowpass: 1540 Highpass: 2070 Radio Distortion: OFF Compression: 0 Don't play with voice pitch either. Just creates unnecessary distortion and latency (lag): 1.00 Echo Delay: 0 Voice Static: Unchecked So, with these basic settings I think it still sounds really really cool, and more importantly, it's way more usable to me. Easier to understand me, etc. etc. Very importantly, there is no feedback and not even any tinny feedback tones in the voice, when used with proper dampening and mic position. A really nice by-product of having these settings off is that your phone battery will last way longer, and the voice lag is very close to gone. On dampening: In early days, once my helmet was on, it loved to feed back. When I had my mic plugged straight into the Aker, with no helmet on, this wasn't an issue, as those high distortion-y sounding frequencies weren't being pinged so harshly. The sound of the app, mixed with the smooth parabolic surfaces of the helmet's interior are a recipe for feedback disaster. I was able to completely solve the feedback only with a 3-pronged approach of app settings, sound dampening inside the helmet and mic position. The dampening setup: Instead of hanging the Aker amp around my neck, I velcro'd it to the chest, at the speaker side. So, the velcro is directly over the speaker. I put a bit of foam inside the chest plate, just below the neckline, blocking sound from coming up through the neck and into the helmet. I bought 1/4" x 3/4" x 10' insulating foam tape, and I covered all the surfaces of the inside of my helmet, from about the temples down. Even the foam surface will be uneven with lines going different ways for extra dampening. Remember to cover ALL of the surface in the front of the helmet around the vocoder…even the rounded ones, cavities etc. The only place I didn’t dampen, was the top, rounded crown of the helmet. I found it wasn’t necessary, and I didn’t want any insulation up there to hinder the fans keeping my helmet cool. One more tiny but very important bit of feedback…even with total helmet dampening, when I have it loud, there will be a little tiny bit of tinny feedback in the voice when my mic is put directly in front of my mouth. However, when I have the mic a little bit off to the side of my mouth there's absolutely none. Solid as a rock. With voice static and/or radio distortion on, there's still more tinny feedback tone than I'm comfortable with. However, I find that it still has pretty close to the same quality of distortion through the app and the tone of the voice that I'm looking for, without them. I don't hear a lot of "stormtrooper quality" voice gained by either of those two features to even think about justifying the noise that comes with them. I'm very happy with the sound of the voice! Trooped with this, outdoor, in a very loud setting with kids, with my Aker cranked yesterday. No issues. Everyone understood me. Used 10% iPhone battery in 1.5 hours. Thanks again to Andrew for such an amazing app, and for those who’ve also helped by testing the settings and got back to me with their feedback!1 point
-
Correct. They're there to prevent separation. It's possible to make different internal rigging that can prevent overlap, however. That's not what the stock strapping does, however, with your armor's make.1 point
-
Looking at the photos I would remove more, atleast half of what`s left….were Tony pointed those nifty Arrows And...I´m soooo looking forward seeing you all suited up - you`re almost there1 point
-
Hiya. Do you have your undersuit yet? Ideally, you want to measure up with your undersuit on so you get the best possible fit of your armour parts. :-)1 point
-
Hahaha! you have a mannequin? put it there and that's how it will stay. You don't want Vader to look at you funny for being a "Shinny"1 point
-
1 point
-
Remove a good majority of the return edge at the top corner. This will help prevent splitting in the event you don't soften the plastic enough.
 1 point
 -
No disrespect to the GML but I'm not exactly sure why he would say bring the bells down lower. So long as they cover the outer 2/3s you should be fine. Heck in quite a few scenes biceps were below the bells. Anyway, gotta do whatcha gotta do I guess.1 point
-
Yeah, definitely looking good!1 point
-
Nice work!1 point
-
Looking good, keep it up!1 point
-
Any updates on your progress, Oliver? Some pics of the repairs would be great!1 point
-
oh ok, hopefully it’s a minor adjustment. I’ll have to follow it, so I can learn how to do it. Mine are hiked up pretty high and the bottom comes just below the top of my knee. Funny thing is I’m shorter than you, but my thighs must be longer? Crazy how people’s proportions can be different.1 point
-
Thanks Rat! What’s happened to the thighs? I haven’t been on here for awhile.1 point
-
It sure is! Really appreciate all the help that everyone has given!1 point
-
Wow - that’s coming together really nicely. :-)1 point
-
What material is your shim? Is it ABS? Method 1 is much more structurally sound. You're correct that it'll be more work to clean it all up, but people have definitely done that much and far more. Method 2 might work, but honestly just seems wonky to me. Hard to envision how it'll look, or if the ramp will be visible, really. And that's actually going to require a lot more ABS paste, and be quite tricky to get perfect. Method 1 is much simpler in that regard. I ask about the shim material, because if it's not ABS, the ABS paste (and E6000 for that matter) may not adhere as well. Some plastics are quite resistant to adhesives, and some are not affected by acetone, which is how the ABS paste melts and fuses onto the existing plastic. But if it's a compatible plastic, I'd lean towards Method 1. It's a stronger connection, and because the cover strip will run right down the middle, you have a lot less surface area to cover with paste. Covering large areas with paste gets dicey.1 point
-
Surface actually looks pretty good Sent from my iPhone using Tapatalk1 point
-
ABS paste lends zero strength. It's quite weak, structurally. The shims, as he has constructed them, are definitely more than strong enough, once it's all glued together. I'm all for interior cover strips. Although the shim, in this particular joint, essentially becomes an interior cover strip, so no need for that with this piece.1 point
-
Agreed... no need to ABS paste that if it's entirely covered. Nice how that worked out, too, because there won't be any extra work sanding and polishing!1 point
-
Man the way your pumping out full builds these days !!! Your new handle should be..... THE ARMS DEALER !!!!! Sent from my SM-G930V using Tapatalk1 point
-
1 point
-
My credit card is ready and waiting1 point
-
Following along. Looking good so far, James!1 point
-
Just Like Greg said - no need to worry, the glue holds just fine just make sure you aligne those lower details, front and back1 point
-
I just did this same thing with 2mm ABS - no issues. If you want, you could give the thighs a quick hot bath and try to shape them a little, but I think ample E6000 will work just fine. Good job on your build!1 point
-
Location Outpost Attaché Attaché contact Area served BOLIVIA Bolivian Outpost Needed ------ ------ BRUNEI DARUSSALAM Brunei Outpost Needed ------ ------ CHILE Chilean Outpost Needed ------ ------ CANADA Arctic Outpost Needed ------ ------ CROATIA Croatian Outpost Michael @Addertime Zagreb ANH-S, Master Scratch Builder ** ** CYPRUS Cyprus Outpost Needed ------ ------ EL SALVADOR El Salvador Outpost Needed ------ ------ ESTONIA Baltic Outpost Needed ------ ------ GREECE Hellenic Outpost Dimitris @Tzag Athens ANH-S ** ** GUATEMALA Jaguar Outpost Needed ------ ------ INDIA India Outpost Needed ------ ------ ISRAEL Israel Outpost Needed ------ ------ KOREA Korean Outpost Needed ------ ------ LATVIA Baltic Outpost Needed ------ ------ LITHUANIA Baltic Outpost Needed ------ ------ LUXEMBOURG Luxembourg Outpost Needed ------ ------ MACAU Macau Outpost Needed ------ ------ MALTA Malta Beach Outpost Needed ------ ------ MONACO Monaco Outpost Needed ------ ------ PANAMA Panama Outpost Needed ------ ------ PARAGUAY Outpost Paraguay Needed ------ ------ PORTUGAL Portuguese Outpost Needed ------ ------ ROMANIA Romanian Outpost Needed ------ ------ RUSSIAN FEDERATION Russian Outpost Needed ------ ------ SAUDI ARABIA Saudi Arabian Outpost Omar @OAB1 ANH-H, HWT, CO ** ** SLOVAK REPUBLIC Slovakia Outpost Needed ------ ------ SOUTH AFRICA South African Outpost Needed ------ ------ TÜRKIYE Turkish Outpost Needed ------ ------ UKRAINE Ukraine Outpost Needed ------ ------ UNITED ARAB EMIRATES United Arab Emirates Outpost Needed ------ ------ U.S.A. Aurora Borealis Alaskan Outpost Needed ------ Alaska Pacific Outpost Needed ------ Hawaii URUGUAY Uruguay Outpost Needed ------ ------ VENEZUELA Outpost Venezuela Needed ------ ------ VIETNAM Vietnam Outpost Needed ------ ------1 point
-
A cheaper alternative is a scuba diving lycra suit available at amazon. https://www.amazon.com/gp/product/B004AI71SW/ref=oh_aui_detailpage_o02_s00?ie=UTF8&psc=11 point