Leaderboard


Popular Content
Showing content with the highest reputation on 08/30/2017 in all areas
-
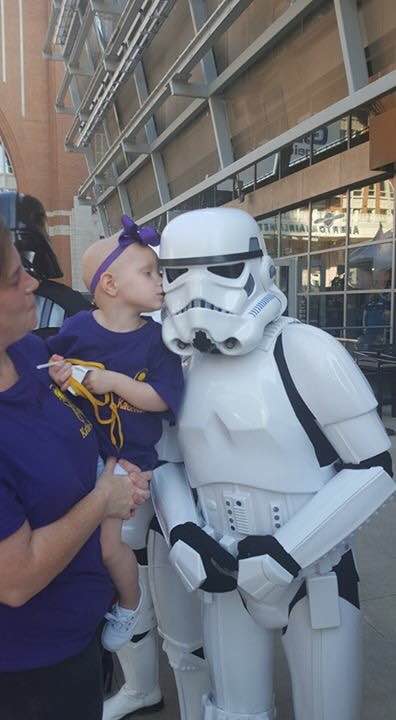
I once had a girl with cancer kiss me on the cheek; her mom called me a hero. But in truth, they both were mine.
 2 points
 -
I'm crossposting this over here for John (the other half of the PB Team) Sent from my iPhone using Tapatalk1 point
-
You are really knocking this kit out. Your progress has been steady and well done, too. Keep up the good work!1 point
-
Hmm good catch. I've seen a few satin and few others with gloss vocoder and details. I think it might be up to the user? The CRL doesn't clarify any colors needing to be gloss or satin or otherwise. Although, their reference pic for the helmet shows what looks to be a satin vocoder. Thanks for the catch though! I definitely want it to be as accurate as possible. Anyone else wanna chime in on this? Thanks Alberto!1 point
-
Yeah, I started to realize that after I got started and saw the ears on the helmet were just never going to sit 100% flush and by then, it was too late to turn back . I'll see if I get a chance between tonight and tomorrow to give it another whirl and I'll definitely post some pics.1 point
-
Sorry can't edit posts but the link is for white, it's obviously available in black and usually $7 cheaper than in the store for the same quantity.1 point
-
If you find yourself using a lot of it later it's cheaper to get it through Amazon. https://www.amazon.com/dp/B0006HWYJM/ref=sxts_bia_sr_2?pf_rd_m=ATVPDKIKX0DER&pf_rd_p=3182441022&pd_rd_wg=p60H6&pf_rd_r=EMQJN7VGNFAC7RSZCM0J&pf_rd_s=desktop-sx-top-slot&pf_rd_t=301&pd_rd_i=B0006HWYJM&pd_rd_w=wbFCh&pf_rd_i=VELCRO+Brand%2C+Industrial+Strength+-+2+ft+x+15+in+-+Black&pd_rd_r=VV3RKWQVK3TB4WFW52B0&ie=UTF8&qid=1504112814&sr=21 point
-
Glad it helped. I use hard hat liners all all my costumes. When I first started using liners I glued as you did but after a few troops things began to come loose, I now use industrial strength velcro. As for the cooling fans I use the same velcro for them as well, it's strong enough to hold the fan in almost every condition imaginable. The industrial strength especially is thick enough to elevate the fans off the helmet which provides shock absorption and noise reduction. Hope this helps1 point
-
Hey Guys. Just an update. We're nearing completion on this new DLT-19 project. We've done a few things that we think will make you all proud; 1. We've molded the receiver cover separately so you will get some detail and depth where is should be on the receiver. 2. We've separated the barrel tip for venting to get rid of the loss of detail at the butt stock. 3. The charging handle will be removable and will have a threaded steel insert in the blaster body. This will give you a metal anchor for the charging handle that won't strip out. 4. The Bipod comes glued in place and is not functional. 5. The barrel tip detail is molded separately to give a deeper, more realistic business end to the blaster. 6. These will come painted black as a standard. 7. The fins will come wire wrapped as a standard option. 8. We will offer weathering and butt stock woodgrain (although not canon -Just FYI... A bakelite stock that is painted black is canon for the film.)1 point
-
In fact, you need a bit of gap between the sides to avoid them rubbing against each other.1 point
-
After losing my wife to cancer and our youngest with Asperger's I felt that I couldn't help anyone. Being a Stormtrooper let's me give back. Sent from my SM-G930P using Tapatalk1 point
-
Thanks guys, I'm kinda winging it here with this first foam build. So far it's working out OK. I didn't get to work on anything yesterday other than shop-vacuuming water out of my basement. We got hit with some freak thunderstorms yesterday evening and got several inches of rain in about a couple hours. Not too serious but did chew up most of my night. luckily nothing was damaged. So, with the basement dried out it was time to get back to work and start on the belt. I looked at my TK belt and proportionally scaled it down to a size that seemed correct for my sons armor. The main section is 6mm foam, 4mm may have looked more accurate but I wanted it thicker to make it less likely to tear. The ammo boxes on my TK are pretty thick, they stick out quite a bit from the face of the belt so to replicate this I used my foam floor mats, doubled up to be about 10mm thick. These were glued using contact cement. I cut the raw pieces bigger than the final size to leave room for trimming and cleaning up edges. As you can see, once glued the long edges aren't perfectly aligned. That's okay, I just used a very sharp box cutter and cut both long edges down to size to get the correct height for these ammo boxes thingies. Here it is after trimming those long edges. Next I laid out the pieces. The finished boxes would be 2.5" wide so I laid out (6) of them at 3" wide again to give me extra material on the sides as I wanted to cut these at a slight angle which would match my TK belt. Once they were cut out I marked the belt center and loose laid them out to get the spacing. Here you can see how I cut the sides of these pieces at an angle. Next step was to replicate the little plates that cover up the pop rivets on a real TK belt. These were cut from 2mm foam sheets and glued using the Omni-stick as contact cement is too tricky on these small pieces. After gluing down the buttons, I contact cemented the larger ammo box pieces onto the belt. Note that I marked their positions in pencil so i'd know where to apply the cement. I probably should have take the time to sand down the waffle pattern that's on the back of these floor mats. But I didn't. So, to fix this I used a bit of filler sealant. Apply a bit along each edge that has gaps and work it into the joint smoothing it out with your finger. You could use a small flat putty tool if you have one. Same method as smoothing out caulk. Get it packed in the joint. Then let is set for a couple minutes to stiffen up. Dip your finger in some water and rub over the joint. This will smooth out the sealant and wipe away the excess. You don't need much water. Also keep a paper towel handy to clean your finger tip. Here's what I used. Got this tip from Punished Props. Here's the smoothed out joint. Let it sit for a couple hours to dry. I may try sanding it with fine sandpaper. I figure once I spray prime this, the joint will be barely noticeable. To make the drop boxes which hang below the belt, I used the 5mm floor mat. This time I sanded the back on my belt sander as this should be smooth on the front and back. There's a learning curve to this which I'm still working out. Too little pressure and nothing happens, too much and you create grooves. I think the trick may be a piece of 2x over the piece while sanding to distribute the pressure evenly. It's also easy for the sander to grab the piece and fling it. Here's one of them. The square edges look too sharp and need to me rounded off. Here's another Evil Ted trick, glue sandpaper to paint sticks. This gives a nice, stiff sanding tool to round down foam corners. I glued 80 grit and 120 grit on opposite sides of this stick. Then, lightly sanded off the corners. I finished up with some loose 320 grit I had laying around. The actual belt part will be made from extra 2" white elastic that I have laying around. I have to figure the best way to attach the foam to the belt. E6000 or maybe hot-glue it. The back of the belt will have traditional Velcro to close it. The drop boxes will get hot glued to elastic straps. Here it is, before final assembly. I still have to prime and paint the foam before gluing it to the elastic. That's all I have for tonight. Next step may be the thermal detonator. I'm running out of things to work on. Really need the family to get home from vacation so I can test fit all these recently made pieces and do the final adjustments. Looking at this phot, the drop boxes look a little wide, maybe I'll trim them down a bit. What do you think? Items I still have to make: TD Thighs Holster Boots...gotta figure that one out...maybe sneakers that get covered in foam to look like boots. ???? Then the painting process.1 point
-
Well, the delay sucks but on the plus the wait sounds like it would be worth it. I think the PR is fine - I mean unless you are a 501st type of person, it's the only game in town.1 point
-
I read on fb that this is a paraphrased version of every excuse update they write. Tbh, I think some of it is true and some of it isn't. Sent from my iPhone using Tapatalk1 point
-
I guess one should give them the benefit of the doubt but, honestly, I think it's a marvellously created story. I *almost* feel sorry for them [emoji23] Sent from my iPhone using Tapatalk Pro1 point
-
Congratulations and welcome to the ranks trooper1 point
-
Congrats Jared and welcome to Centurion!1 point
-
Ok last post for the night. I got my TK Boots in the mail a few weeks back, but never got a chance to post them. These things are legitimately top notch. The quality is next level. And I'm mega bummed to hear they won't be making boots anymore! At least I got a pair while I could! And yes I tried em on and they fit amazing! Sent from my iPhone using Tapatalk1 point
-
That could very well be the best "Aren't you a little short..." comeback I've ever heard!1 point
-
Occasionally after someone takes a photo with me, I ask to see their phone and announce "This is the droid we've been looking for", or "I think I had my eyes closed". Always gets a laugh or at least a big smile.1 point
-
Ask them how tall a stormtrooper should be...1 point
-
it’s not only wearing my amor with pride and honor but also there’s nothing better than spreading happiness to those who need it most1 point
-
Do you have any worries about popping the magnets off trying to pull it apart to get it off? Cool idea though!1 point
-
my Hovi tips are here stainless steel mesh1 point
-
The back plate painted 1st coating my cod and ab armor connection shins my belt modification the helmet painted 1st coating1 point