MapleTK Posted February 17 Report Posted February 17 Greetings, thanks for sharing your thread. A question regarding your boots - how did you find the process of changing them to white? Any problems of issues you wish to share, or something you would do differently? I'm having a tough time finding proper white boots and may just get a black pair to strip and paint. Thank you, and congratulations! Quote
Andor_FX[TK] Posted February 20 Author Report Posted February 20 (edited) Am 17.2.2026 um 21:55 schrieb MapleTK: Greetings, thanks for sharing your thread. A question regarding your boots - how did you find the process of changing them to white? Any problems of issues you wish to share, or something you would do differently? I'm having a tough time finding proper white boots and may just get a black pair to strip and paint. Thank you, and congratulations! Hi Randall, I'd be happy to answer your questions about the boots. 1. Finding the right fit: It's extremely important that the shaft is high enough so the shins don't slip over the boots when you're trooping. Also very important: The opening of the shaft should be snug so the boots don't bunch up too much at the front (where they meet the shins). 2. Dyeing: The leather boots need to be degreased and roughened with fine sandpaper. I tested two different acrylic leather dyes. Both adhered well and are reasonably flexible, but they don't really penetrate the leather. This means you'll have to touch up any chafing after every troop. Most of these dyes are only available in pure white, which means you might need to mix them with a tiny drop of yellow or brown acrylic paint to match the color of your armor. You'll need about three complete coats of paint until the color is opaque. In summary: Yes, I would consider dyeing Chelsea boots a viable option; this was excatly what the Lucasfilm costume department did as you know. However, the dye is very susceptible to scratches, and the finish needs to be refreshed regularly. Feel free to ask any questions. Right side: to wide shaft and also a bit to short (not high enough) After two coats: Edited February 20 by Andor_FX Quote
Andor_FX[TK] Posted February 20 Author Report Posted February 20 (edited) Update regarding the fit of the backplate and the shoulder bridges. My fellow trooper Frank, living just around the corner, helped me to get a better fit. I cut the bridges to the correct lenght and bend them a bit more at the loose end. Next step is to attach the rubber band at a fixed position underneath the backplate. This is for two reasons: hold them in position and bring the bridges down a bit more. Speacial thanks goes also to my other fellow troopers Luca and Tino, which answered a lot of questions how to make things looking good. Edited February 20 by Andor_FX 1 Quote
gmrhodes13[Staff] Posted February 20 Report Posted February 20 7 hours ago, Andor_FX said: Note in this image your chest is sitting higher than your backplate, this will be causing the shoulder straps to bulge. I would try to bring your chest down a little and see if that reduces the bulge, shoulder strap should have a curve and sit flush with the backplate. "The bridge should also lay flush against the back" Quote
Andor_FX[TK] Posted February 21 Author Report Posted February 21 Thank you very much Glen, very good hint. I wil give this a try! 1 Quote
MapleTK Posted February 23 Report Posted February 23 Congratulations, and thanks for sharing the information about the boots! 1 Quote
Andor_FX[TK] Posted May 6 Author Report Posted May 6 (edited) Update: The issue with the shoulder bridges are allmost solved and I'm ready for new approval pictures (not this ones here). I also shortend the lenght of the right bridge after the fitting test here, because the bridge touches the 0II box. Edited May 6 by Andor_FX 2 Quote
gmrhodes13[Staff] Posted May 6 Report Posted May 6 Looking much tidier, good luck with approval 1 Quote
Sly11[Admin] Posted May 6 Report Posted May 6 Looking good Andreas, best of luck with your approval. 1 Quote
Andor_FX[TK] Posted May 10 Author Report Posted May 10 (edited) Hello Troopers, I can report that yesterday I had a test troop with my armor, during which one of my GMLs was present. The armor hasn't fully proven itself during wear yet, as the shoulder bridges still stick out too far upward with slightly more arm movement (the radius is too small and they flare out). Second point: The shoulder bells keep rotating backward, which causes them to no longer sit flush against the chest plate at the front. My proposed solutions: Sand down the "return edges" of both bridges — this will allow them to bend much more easily, and if necessary, cut off (trim) a segment at the back. Secure the shoulder-bells at the center front with an elastic band and snap button, additionally attaching them to the chest plate, so that they point forward and the gap is reduced. What do you think? I also forgot to mention that my left shin rotates outward while walking, causing the sniper plate to stick out to the side a bit. Is there a good solution to prevent this? Edited May 10 by Andor_FX 2 Quote
TikiTechie[TK] Posted May 10 Report Posted May 10 (edited) My take is that taking photos for approval is different than taking them after actively trooping for awhile. I guess it's a GML call, but when I am in kit I tweak things periodically and things get out of place due to movement. I don't know of anyone who's kit looks perfect after moving around. Also, photos of the 2 said points would be helpful for feedback. ;) I can see that your knee plate from the back looks a little wide, do you have any front non-action photos that would show it? Edited May 10 by TikiTechie 1 Quote
gmrhodes13[Staff] Posted May 10 Report Posted May 10 15 hours ago, Andor_FX said: Sand down the "return edges" of both bridges — this will allow them to bend much more easily, and if necessary, cut off (trim) a segment at the back. Secure the shoulder-bells at the center front with an elastic band and snap button, additionally attaching them to the chest plate, so that they point forward and the gap is reduced. Trooping is definitely different than approval photos, tweaks can definitely help. Not sure if you have elastic from your shoulder bells to biceps, this can help pull them in when moving. Also having the connections further to the front on your shoulder straps elastic can help angle inwards when arms are at rest. Adding velcro or elastic with straps to the inside of the boots and shins can help. Here are just a few mods 2 Quote
Mworm1974[TK] Posted May 17 Report Posted May 17 Hang in there, we have all been there at some point, it’s sometimes hard to hear that your hard passionate work isn’t up to a standard, the S trim is an easy fix just remove the trim and locate the join under the chin, baggie under suit see if you can get a tighter compression shirt, with the armour strapping sometimes it might be worth looking at another method especially if this one isn’t working, some methods don’t work on certain body types, you might need to strip the current strapping and start fresh, simple is key in this situation, I personally use the original method and it’s lasted since 2018 with the elastic being replaced several times, and as the others have said photos for approval are 100% an audition for approval, you might look at getting another member to help you suit up and take the photos, hand in there and it will happen. 1 Quote
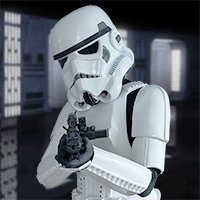
Andor_FX[TK] Posted May 19 Author Report Posted May 19 (edited) Thank you all for your encouraging words; I’ve continued working on the problem areas, i.e. I reduced the return edges on the bridges to about one-third of its original size—this makes them much more flexible. I also trimmed off the last segment of the bridges, as it was frequently bumping against the OII box. Now for the most important part: I’ve added foam padding to specific areas of the chest plate and back plate. I’m a slender trooper and hadn't really lined the chest plate much before; now, however, it fits significantly better (in my opinion), and the two halves sit much more comfortably on my shoulders because they are now held slightly apart. Photos will follow as soon as possible. A very nice fellow trooper (TK) lives just 500 meters away. I’m going to ask him if he’d be willing to take my approval photos. If you’re reading this, Frank—I’d really appreciate it! :) Me at a not registered "test troop" to find out what I have to improve, esp. after 6 hours of wearing the armor. Edited May 19 by Andor_FX Quote
Andor_FX[TK] Posted May 24 Author Report Posted May 24 (edited) The result after fixing the shoulders and some other issues: Edited May 25 by Andor_FX 2 Quote
Andor_FX[TK] Posted May 25 Author Report Posted May 25 Thank you very much Glen. Now I'm waiting for the feedback of my GMO's. Fingers crossed 1 Quote
gmrhodes13[Staff] Posted May 25 Report Posted May 25 2 hours ago, Andor_FX said: Thank you very much Glen. Now I'm waiting for the feedback of my GMO's. Fingers crossed Fingers crossed Once you receive approval you can request higher TK access below, so you don't miss out on any FISD merch 1 Quote
Andor_FX[TK] Posted May 26 Author Report Posted May 26 APPROVED! thank you so much my fellow troopers for supporting me. I didn't make it without you. Special thanks goes to: Frank, Luca, Tino, Christoph and Glen. TK 30046 reporting for duty. Quote
flynn[TK] Posted May 26 Report Posted May 26 Congratulations! You really deserved that one. Looking forward to our next stormtrooper deployment! 1 Quote
Andor_FX[TK] Posted May 26 Author Report Posted May 26 Thank you very much Frank, you are part of this success! Quote

Recommended Posts
Join the conversation
You can post now and register later. If you have an account, sign in now to post with your account.