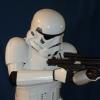
Skypig[TK] Posted August 4, 2015 Report Share Posted August 4, 2015 Michael Martin Garrison Titan Mandatory Information Armor - AM v2.0 Helmet - AM v2.0 Blaster - Hasbro/DD conversion Optional Height - 6'2" Weight - 225 Boots - TK Boots Belt - Trooperbay Hand Plates - Trooperbay Electronics - Aker/iComm system. Echo Fan system Neck Seal - Darman Holster -TKBondsrvnt Armor Photos Full Body Front Full Body Back Full Right Full Left Right Side Detail Left Side Detail Helmet Detail Front Left Side Right Side Rear Hovi Tip Detail [/url Lens Color Accessory Photos Ammo Belt Neck Seal Blaster Left Side Blaster Right Side Thermal Detonator Back Action Shot Optional Interior Strapping Abdomen Detail Thank you. Quote Link to comment Share on other sites More sharing options...
BIGDEAL[TK] Posted August 4, 2015 Report Share Posted August 4, 2015 Looks good. The one thing standing out is your TD clips, they need to be right to the ends, touching the end caps. Quote Link to comment Share on other sites More sharing options...
Skypig[TK] Posted August 4, 2015 Author Report Share Posted August 4, 2015 Thank you. Fixed Quote Link to comment Share on other sites More sharing options...
BIGDEAL[TK] Posted August 4, 2015 Report Share Posted August 4, 2015 Perfection. Quote Link to comment Share on other sites More sharing options...
starsaber25[Admin] Posted August 4, 2015 Report Share Posted August 4, 2015 Hi Michael. You did a great job on your build! I have a couple of minor suggestions for you. First the dropboxes should be moved out to the end of the ammo box on the belt. The outside edge of the dropboxes should line up with the outside edge of the ammo box. My second suggestion would be to raise up the belt itself so it is touching the bottom of the ab buttons like shown below: Anyway everything else looks good. Good Luck! 1 Quote Link to comment Share on other sites More sharing options...
Chills[TK] Posted August 4, 2015 Report Share Posted August 4, 2015 Hi Michael. You did a great job on your build! I have a couple of minor suggestions for you. First the dropboxes should be moved out to the end of the ammo box on the belt. The outside edge of the dropboxes should line up with the outside edge of the ammo box. My second suggestion would be to raise up the belt itself so it is touching the bottom of the ab buttons like shown below: Anyway everything else looks good. Good Luck! The ammo boxes should be at the edges, but that's a requirement for Centurion and not EIB. I think his belt height is ok, too. He's a taller trooper, 6'2", and the belt lines up with the bottom of the button plates. The one thing I see that hasn't been mentioned is the right side of the belt: the canvas belt isn't centered on the plastic belt, there's more gap on the bottom than the top. The left side looks spot on. Overall, a very nice build. Best of luck to you! Quote Link to comment Share on other sites More sharing options...
ukswrath[Staff] Posted August 4, 2015 Report Share Posted August 4, 2015 (edited) Hey Michael, very nice AM sir. Great job! With the exception of the TD clips you addressed you're spot on for EIB. EDIT: Missed something, the center ab button plate needs to have a return edge (flashing) on it. I don't see on one yours. As for Centurion, there may be some things to address once we see more detailed pictures however, until then I suggest holding tight on making any other adjustments. Edited August 4, 2015 by ukswrath Quote Link to comment Share on other sites More sharing options...
Skypig[TK] Posted August 5, 2015 Author Report Share Posted August 5, 2015 EDIT: Missed something, the center ab button plate needs to have a return edge (flashing) on it. I don't see on one yours. Is that in the CRL? Quote Link to comment Share on other sites More sharing options...
ukswrath[Staff] Posted August 5, 2015 Report Share Posted August 5, 2015 No but Steve will surely mention it. Here's a build thread he mentioned it on. http://www.whitearmor.net/forum/topic/32225-ryth-s-wtf-build/page-3 It's up to you to hold off till he gets back. He will have the final say but I would be prepared to get another one coming. Quote Link to comment Share on other sites More sharing options...
Skypig[TK] Posted August 5, 2015 Author Report Share Posted August 5, 2015 Not trying to be a jerk, but Abdominal details are optional according to this. http://www.whitearmor.net/forum/topic/22583-expert-infantry-application-guidelines/ Quote Link to comment Share on other sites More sharing options...
Skypig[TK] Posted August 5, 2015 Author Report Share Posted August 5, 2015 But, I understand, Steve will have the final say. Quote Link to comment Share on other sites More sharing options...
ukswrath[Staff] Posted August 5, 2015 Report Share Posted August 5, 2015 I wouldn't sweat it too much Michael. Your armor build is beautiful and there's no hurry to go and make repairs. Wait till Steve gets back. I only bring it up because he has in the past. 1 Quote Link to comment Share on other sites More sharing options...
SeanTX Posted August 5, 2015 Report Share Posted August 5, 2015 Since you seem to have the characteristic AM 2.0 brow lean too. What is the communities opinion on trimming the front of the dome a few mm just to make it straight? I know most people say they fiddle with the screws but I think most of us are committed to the hole placement once drilled. Quote Link to comment Share on other sites More sharing options...
ukswrath[Staff] Posted August 5, 2015 Report Share Posted August 5, 2015 (edited) Since you seem to have the characteristic AM 2.0 brow lean too. What is the communities opinion on trimming the front of the dome a few mm just to make it straight? I know most people say they fiddle with the screws but I think most of us are committed to the hole placement once drilled. The low brow is ok where it's at if that's where he wants it. The helmets vary so much in the movies it isn't funny. Heck just look at the pic provided above, positioned on the eyes, or at least it appears from this angle. SWAT level Sandtroopers helmets are the only helmets where the brows are scrutinized. Don't get me wrong you can't just put it where you want it on a TK but as long as it looks remotely close Steve will roll with it. Edited August 6, 2015 by ukswrath 2 Quote Link to comment Share on other sites More sharing options...
gazmosis[501st] Posted August 12, 2015 Report Share Posted August 12, 2015 OK OK!! First off, thank you, Mike for your EIB application. Obviously much to go over here so let's get to it!! CRL and EIB Application Requirements: Although one pic was technically missing (cod/butt attachment) this is clearly seen. all other required photos have been posted. There is one point on your armor that will need to be repaired before we can go forward with the EIB badge. You did great in repairing your thermal detonator. The requirement is "little to no gap" between the clips and end caps and on a thermal detonator any more than a little, is just too much as you first had it. Nice work!! But the issue is on your thigh pack. This needs to be trimmed down so that the upper corner of the pack is even with the back corner of the molded ridge on the bottom of the thigh. Then the speed or split rivet is to be installed in the upper corner like this. Unfortunately, you have it mounted directly in the center (red circle). I marked in white where the proper location needs to be. There will be a little ABS paste work needed to repair the hole, but it's small and an easy enough fix. Other-Armor Fit/Assembly: In this section I will go over the observations of your fellow troopers and and ones I have made. Sometimes a suggestion for a change is made. If these changes would affect any application, I will specify that requirement and/or have it listed in the Centurion section below. Let's start with your great build. This armor was made for muscle troopers as yourself. You did a great job fitting this to yourself. Stay away from Vader, though. You might be taller. Spectacular ab button painting. Nice work on that Hasbro conversion and removing the proper T-track from the lower magazine side. How in the world are you keeping your lens visor attached?? Your fellow troopers had some good points so I will go over those things now. There seems to be a bit of focus regarding your belt. I will further mention your drop boxes in the Centurion section below. Your overall belt position is fine, though. As long as the belt is resting against or slightly overlapping the button plates (as in the screen grab) it is fine.The only time I request adjustment here is when there is a visible gap/droop in the belt away from the button plates Which you do not have. I would, however, add another attachment or a little more glue at the top securing the strap better so it doesn't pull away from your belt . As for the centering, that seems to only show on the shot where the belt is on the table so no need for concern there. Now the center button plate itself. First, you are not being a jerk. It's perfectly fine to question everything. We are on your side. ANYHOO!!! Since I don;t have a photographic memory, I went back and looked at my comment as presented by Tony. I didn't mention the flashing on the outside (or lack there of) as a violation just a concern regarding if this is trimmed off you have no gluing surface. You have obviously found a way to make it work so as long as there are no huge gaps on the sides, it fine with me. As for the AM brow...yes I have seen it have some droop in the front. A lot. I cannot say from experience why this is but I have seen builds where it's not there. If people like the low brow......you like low brow. I have used the post construction trimming of the brow under the trim but this will never be a required step. My own suggestion. This JUST came up on a recent application regarding excess return edge on the back and that annoying corner on the butt plate by your hip. It would benefit the look of your armor to trim those back. Here are my suggestions: WHEW!! Centurion Suggestions: As I try to spot everything, final centurion accuracy is up to the trooper. I am sure we will see a centurion application from you. There are a couple things that nee upgrading before you can do that. First, you will need a Sterling based blaster. You will ned to incorporate the kidney notches on the lower front corners of your kidney plate Re-mentioning your drop boxes, they need to be positioned so the outer edge of the boxes align with the outer vertical edge of the belt. Please make sure this appears in your Centurion full body photos. Regarding full body photos, please re-take the back shot to include your repair on the Thermal Detonator. Since I couldn;t see your crotch rivet, just make sure there is no paint on it. Take care of that thigh pack rivet location and trimming first and the rest will come later!! Great work! Quote Link to comment Share on other sites More sharing options...
Skypig[TK] Posted August 12, 2015 Author Report Share Posted August 12, 2015 (edited) Thank you for the review. The thigh pack has already been addressed in my build thread, http://www.whitearmor.net/forum/index.php?/topic/31919-Skypigs-ANH-Stunt-%28AM-v2%2E0%29/page__view__findpost__p__411241, but I didn't update the pictures here. Let's remedy that. I removed the pack, filled the hole with ABS paste, sanded it smooth, trimmed and reattached it the proper way. Let me know if you need additional pictures. Thank you. Sent from my iPhone using Tapatalk Edited August 12, 2015 by Skypig Quote Link to comment Share on other sites More sharing options...
Skypig[TK] Posted August 12, 2015 Author Report Share Posted August 12, 2015 Oh, and the visor is being kept in by a combination of tension, and e6000. Sent from my iPhone using Tapatalk Quote Link to comment Share on other sites More sharing options...
Skypig[TK] Posted August 12, 2015 Author Report Share Posted August 12, 2015 Cod / Butt attachment. Sent from my iPhone using Tapatalk Quote Link to comment Share on other sites More sharing options...
gazmosis[501st] Posted August 13, 2015 Report Share Posted August 13, 2015 Your build slipped by me. Everything is in line now so congratulations!!!! Please make sure that if you apply for Centurion that you show no pics of the old thigh pack. Quote Link to comment Share on other sites More sharing options...
ukswrath[Staff] Posted August 13, 2015 Report Share Posted August 13, 2015 Awesome! Congratulations Michael 1 Quote Link to comment Share on other sites More sharing options...
Skypig[TK] Posted August 13, 2015 Author Report Share Posted August 13, 2015 Thank you. I'm very excited about this. I plan on getting some troops under my belt, and incorporating the changes you suggested and then submit for Centurion. Sent from my iPhone using Tapatalk Quote Link to comment Share on other sites More sharing options...
yoshix[TK] Posted August 13, 2015 Report Share Posted August 13, 2015 Congrats! Nice build! 1 Quote Link to comment Share on other sites More sharing options...
Kredal[TK] Posted August 15, 2015 Report Share Posted August 15, 2015 Congrats, welcome to the club! (: 1 Quote Link to comment Share on other sites More sharing options...
gmrhodes13[Staff] Posted August 15, 2015 Report Share Posted August 15, 2015 Congrats and welcome to the ranks trooper 1 Quote Link to comment Share on other sites More sharing options...
Snaps[TK] Posted August 15, 2015 Report Share Posted August 15, 2015 Congrats and welcome the the ranks! 1 Quote Link to comment Share on other sites More sharing options...

Recommended Posts
Join the conversation
You can post now and register later. If you have an account, sign in now to post with your account.