Mutter Posted February 1, 2015 Author Report Posted February 1, 2015 I spent some more time working on the armor this afternoon and cut the side returns on the back plate. I hadn't sanded the return on this one yet. I'm quite happy how they came out. Huge thanks to Nick (SCTrooper) who provided the guidance for the cut lines. They would not have come out as well if not for him. Now I'm working on the shins and strapping system. I'm hoping to provide an update again tomorrow. 1 Quote
Mutter Posted February 1, 2015 Author Report Posted February 1, 2015 Oh, one other question. On NE armor, are there a left and a right shin or is it the same for both legs? I'm looking at these and it seems like I have 2 left shins. The "larger" piece belongs on the inside of the calf. Am I crazy? The tops of the shins are uneven. I would have assumed the low side would be on the outside and the high side would be on the inside (or vice versa) but I could be totally incorrect. Quote
SCTrooper[TK] Posted February 1, 2015 Report Posted February 1, 2015 The shins look good, line the tops up and trim all the return off the bottoms. The inside curve is clearly the inner shins. You have them correct. all the parts are unique. Looking Good. Quote
Mutter Posted February 1, 2015 Author Report Posted February 1, 2015 I threw in the strapping for the butt, kidney and back plates this morning. I didn't want to wait for E6000 to cure so I used Zap-A-Gap to glue the snaps (made with ABS not webbing). It may have been how I used it but most of the snaps were popping off. Most came off the butt plate (no fat a$$ comments please ). I'm going to remove as many as I can and use E6000 instead and use it with the rest of the snaps. I also had to heat and reform the left shoulder tab on the back and chest piece. My left should is higher than my right and it hasn't been sitting properly. If sits great now. This is how it looked before reforming (again) My kidney plate seems to flare out a little more than the back plate on the left side, not so much on the right side. I haven't cut the kidney to size yet. Hopefully, this will resolve the flaring. If not, more heat gun. Thoughts? comments? Quote
Mutter Posted February 1, 2015 Author Report Posted February 1, 2015 The shins look good, line the tops up and trim all the return off the bottoms. The inside curve is clearly the inner shins. You have them correct. all the parts are unique. Looking Good. Thanks for looking, Nick. I'll glue them together then! Quote
Mutter Posted February 4, 2015 Author Report Posted February 4, 2015 Thanks, guys! Walter, you're a picture mad man, holy crap, talk about documenting your build. Nice! With the consensus on the shins, I moved forward with sizing. And the inside, front shims being glued I bought 50 magnets thinking that would be enough. Each magnet is doubled for extra pressing power. My advice to everyone out there, buy at least 100. I now have to wait 2-3 day to finish the shins before I can begin gluing the thighs. Sigh. So I went back to my bucket and decided to finish it. First off was to paint the teeth, cheeks and traps and the varcoder I realized I pretty much suck and hand painting. I waited until the paint was pretty dry to clean up the lines. A toothpick, paint thinner and a fine paint brush cleaned it up nicely. Then came hand painting the vent lines and outline trim on the rear traps and cheeks. Do NOT drink caffeine before doing this! I also added the blue stripes. These were not hand painted, I feel so ashamed And the helmet is finally done! 1 Quote
Pencap510 Posted February 4, 2015 Report Posted February 4, 2015 For someone who, as you put it "sucks" at hand painting-- WOW- nice work! Just shows that even if your not the best at detail work, a little time an patience can work wonders. Well done- looking great Quote
Mutter Posted February 8, 2015 Author Report Posted February 8, 2015 (edited) Ty, shaky hands and painting fine lines don't go well together. There were a lot of touch-ups done, but I do appreciate the compliment! And thank you too, Scott! I've assembled the thighs and shins, added the sniper plate and began adding strapping. I'll add pictures as soon as I can. The belt is under progress now. I saw a thread somewhere that said the thickness of the drop boxes should be 12mm. Is this correct? Mine are 16mm and I need to know if I have to trim them down. Edited February 8, 2015 by Mutter Quote
Mutter Posted February 12, 2015 Author Report Posted February 12, 2015 So I haven't posted in a while but I've made quite a bit of progress. In the pics below, the thighs are not supported yet, the shins don't have a closure on the back and I hadn't widened the shoulder bells yet either. But here's the progress so far. I have the garter belt hooked up and supporting my thighs. I'm thinking I might need to trim the tops a bit to raise them. The backs are shoved in the crease between my buttocks and thighs. Thoughts? Opinions? Suggestions? 1 Quote
Pencap510 Posted February 12, 2015 Report Posted February 12, 2015 Looking really good so far! Your sides are lining up nicely - and the chest/codpiece looks like it's fitting well. I thing maybe your sniper plate will "untuck" from your thigh once you secure the back , but if it doesn't a little foam in the front of the shin helped me. Also- it looks like both of your forearms are rocked out to the sides- are they connected yet? Quote
Redforce[TK] Posted February 12, 2015 Report Posted February 12, 2015 Looking great so far Greg! Quote
Scarlisian[TK] Posted February 15, 2015 Report Posted February 15, 2015 Mutter, thanks for the great thread. I'm just starting work on an AM 2.0 build (first ever armor), and am running into many of the same issues you are. Your posts are very educational. Thanks again for sharing. 1 Quote
sve5mh Posted February 15, 2015 Report Posted February 15, 2015 Greg looks amazing...great job. I know i’ll be seeing you soon out there!! Quote
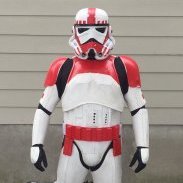
Mutter Posted February 17, 2015 Author Report Posted February 17, 2015 Ian, I'm glad my build thread was helpful. I've used an incredible number of others to guide me too. I've finished my build. I will need to make some adjustments as I move around more and remove a few bite points and adjust the strapping as well as add more padding behind the sniper plate. Pictures have been submitted and approved by my GML for membership. Waiting to hear from the Legion for a final nod and receive my TK ID. Here's how I look: Thank you, everyone, for all of the help and support your provided during my build. It was greatly appreciated! 1 Quote
Scarlisian[TK] Posted February 17, 2015 Report Posted February 17, 2015 Everything looks great, I'm sure you'll get final approval. Thanks again. Quote
Quadan[501st] Posted February 17, 2015 Report Posted February 17, 2015 Your knee plate looks like its trying to hide in your thigh piece. other then that, awsome Quote

Recommended Posts
Join the conversation
You can post now and register later. If you have an account, sign in now to post with your account.