maxsteele
-
Posts
865 -
Joined
-
Last visited
About maxsteele

Recent Profile Visitors


-
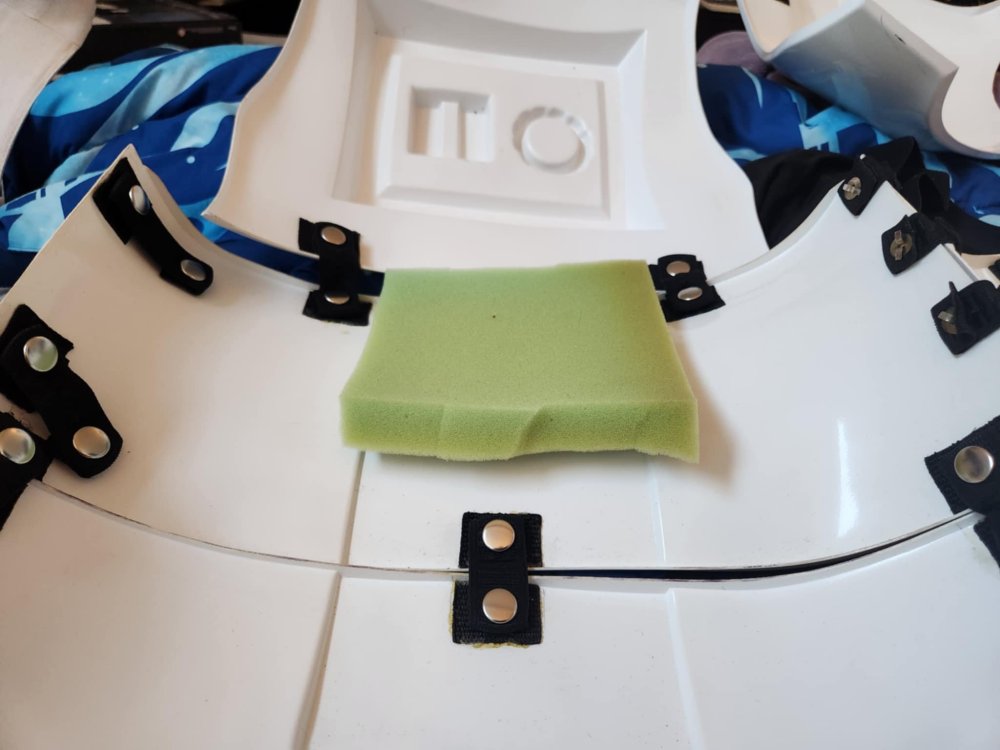
 Thanks for the suggestion! Putting a piece of foam there works *fantastic*! You can't see it when it's on, and it leaves just enough of a gap so the return edge doesn't touch my back.
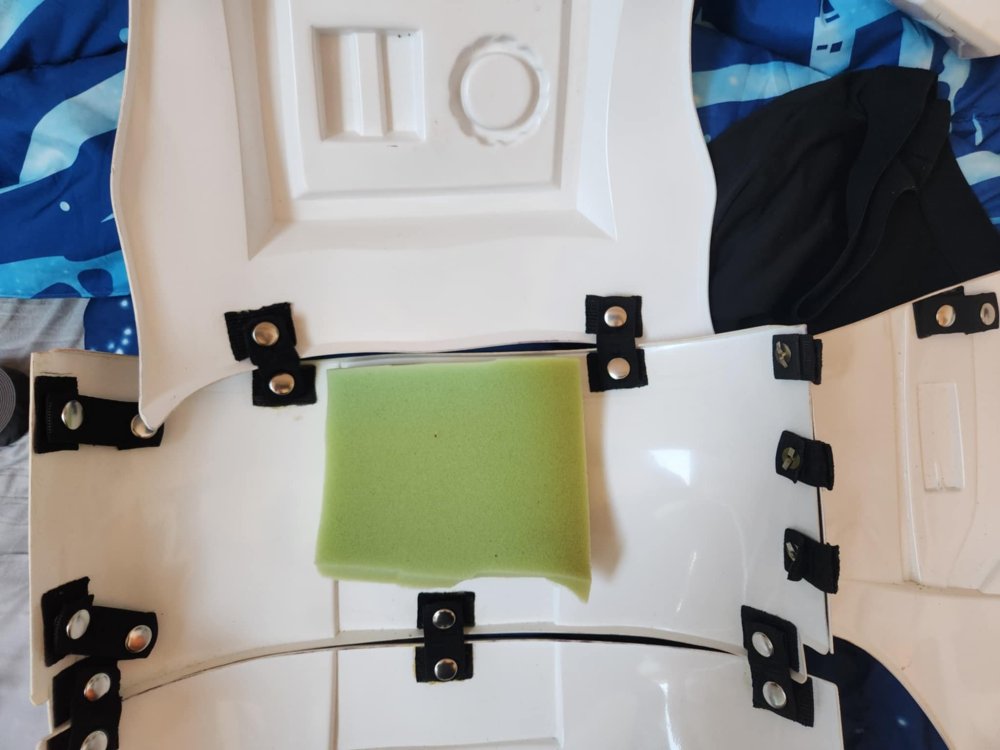
-
Like, put a block of foam here?
-
And that's why I asked. :) Yeah, I see what you mean. If the kidney's sitting flush, it can slip right underneath the back plate. I'll have to think about that one. Thank you!
-
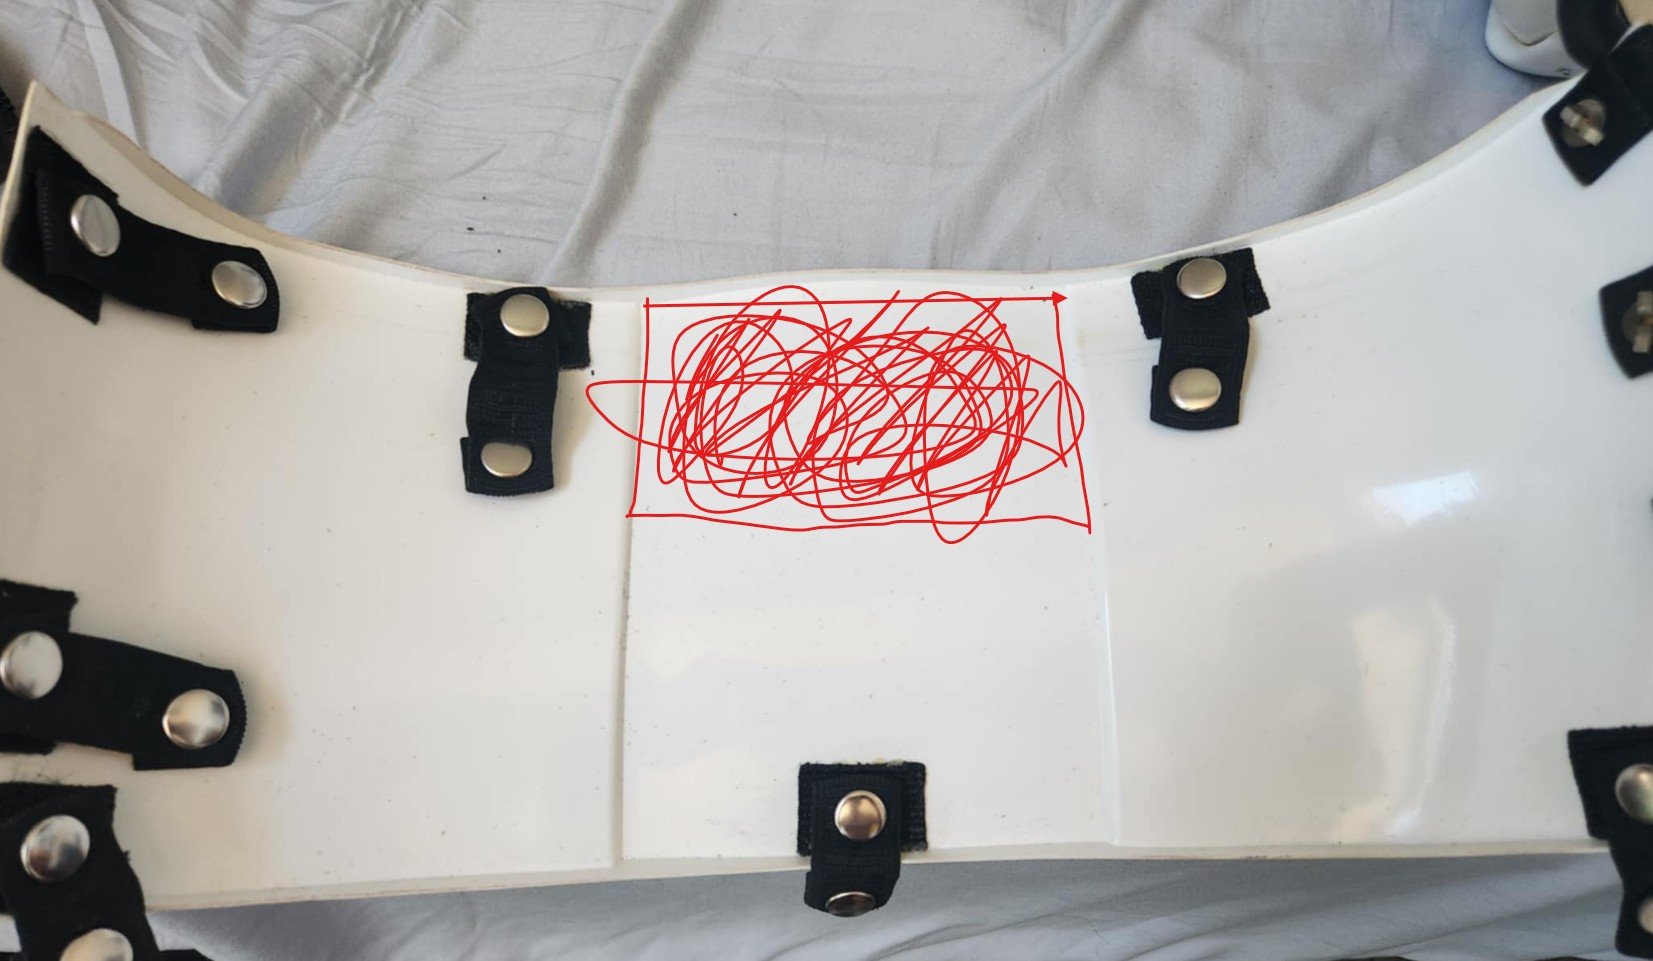
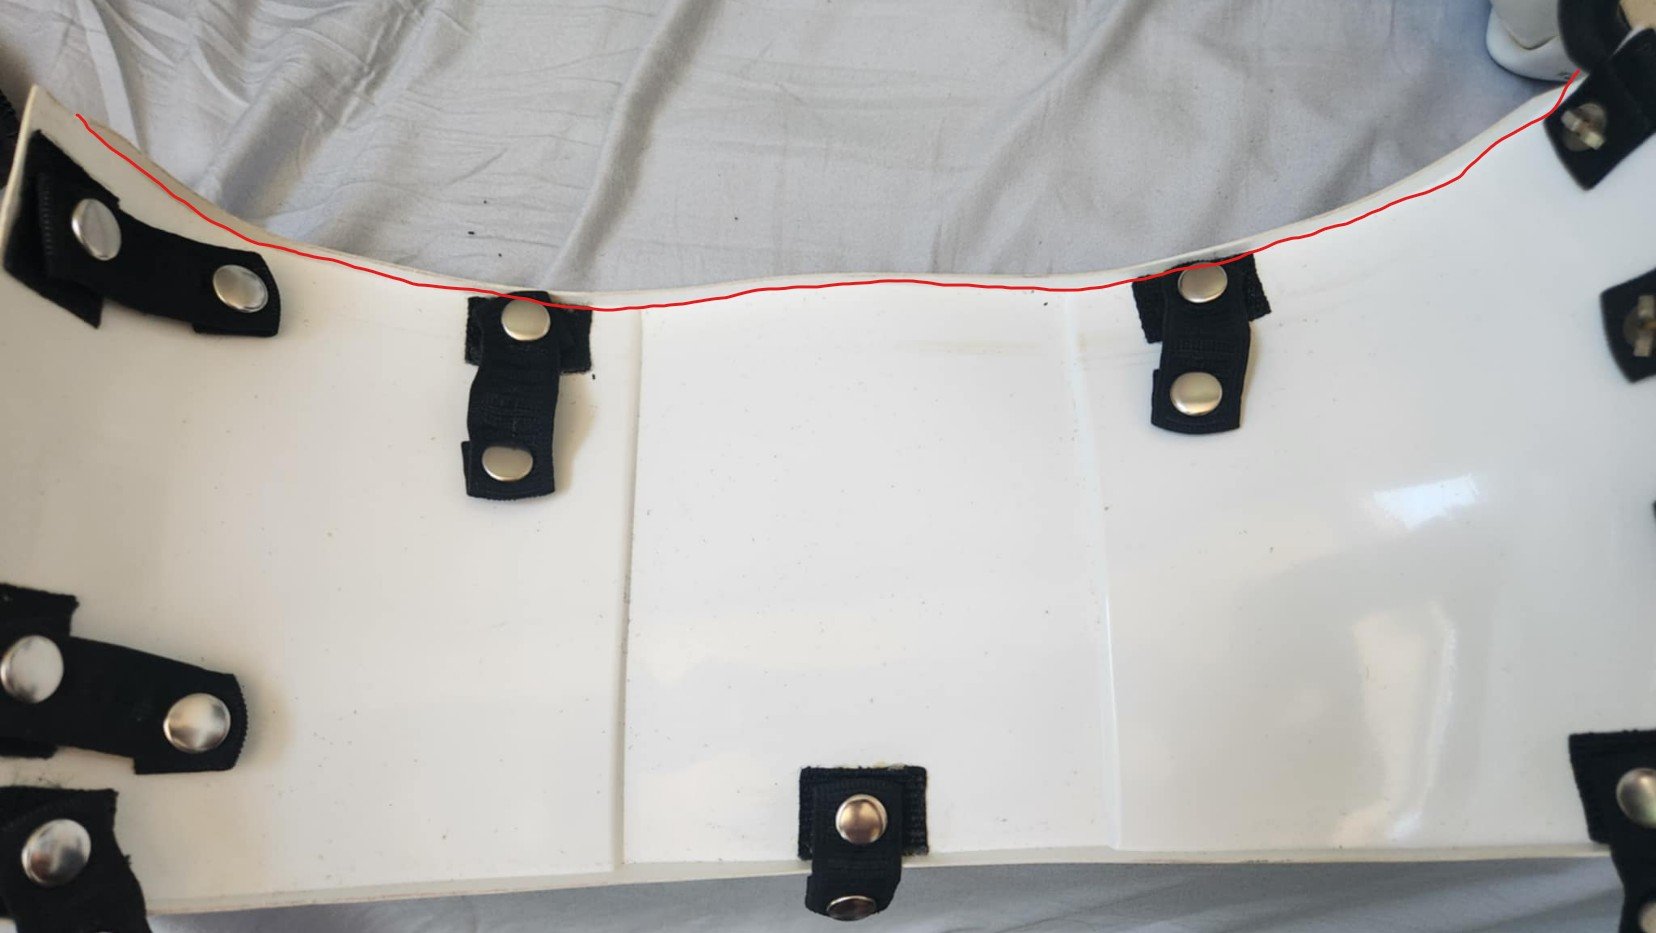
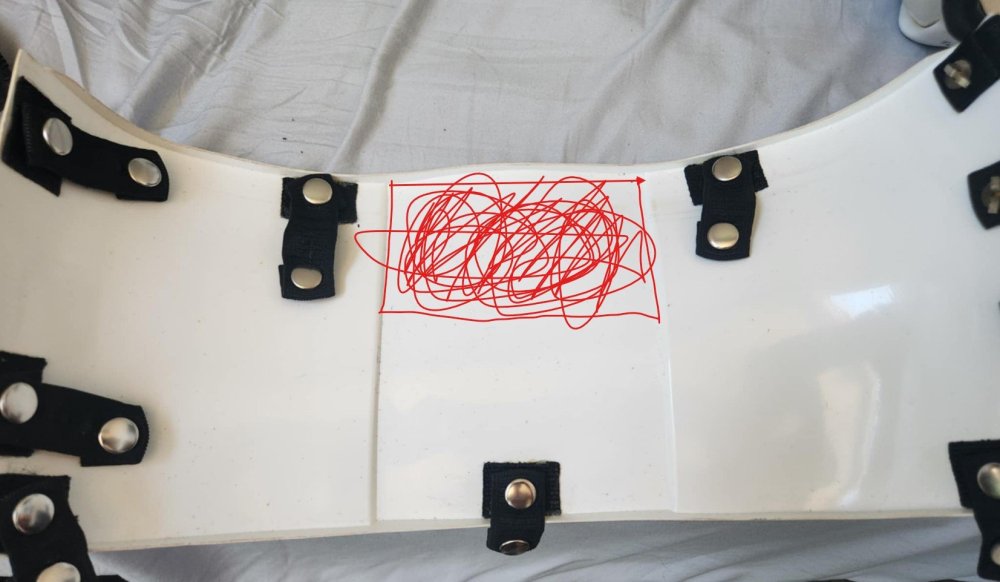
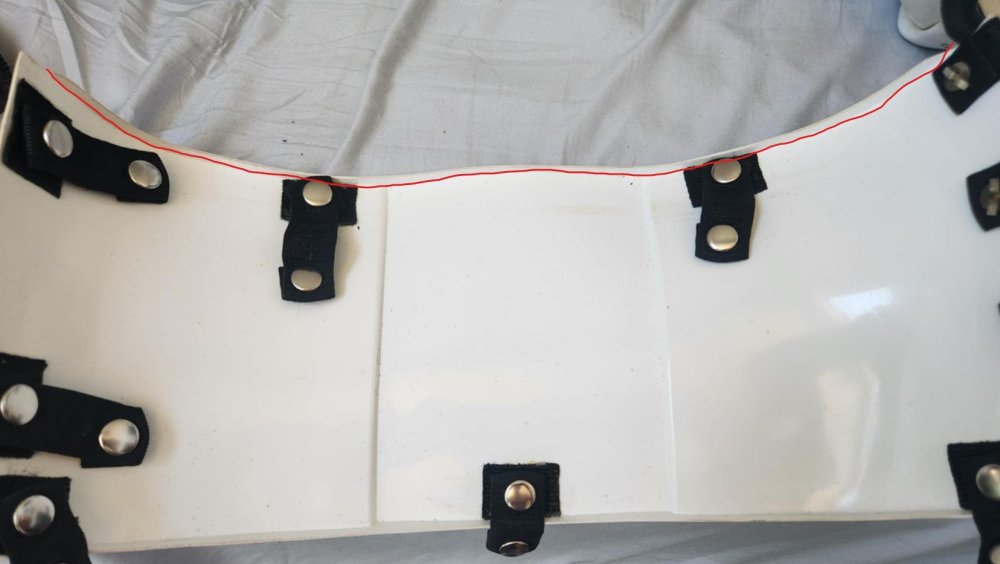
Hey everyone! I've had my ANH-S for 11 years, and as I've gotten older, I've noticed the return edge at the top of my kidney plate really digs into my back, causing aches / spasms after wearing it for an extended period of time. Does anyone see an issue with me cutting off the top return edge of my kidney plate completely, making the top of the kidney plate fit flush against my back? I don't want to throw off the fit anywhere else because of this - I'm just not sure if it would or not.
-
Hm. Are these helmets supposed to be Stunt or Hero? They installed flat lenses, so I guess they're supposed to be Stunt. Here are some of my observations: The traps and ears look to be done well. I feel like there's too much plastic around the eyes, though reference photos tend to contradict that. The blue stripes should be at most a pencil-width from the cheek. These are considerably lower. The gray on the frown should come to a point, not end abruptly on the fourth tooth.
-
Karpouzian's (50677) Anovos TK build
maxsteele replied to Karpouzian's topic in Build Threads Requireing Maintenance
I have a thread going on my local Garrison's forums for people who are getting Anovos armor. This is what I've posted so far: I wouldn't go with the loop method Anovos suggests. I would use either the bracket method or I would use the snaps and straps system that myself and many others have used. I would also suggest for snap plates to use polyfiber webbing instead of pieces of ABS to secure the snaps on. It will form to the inside of your armor better as it's flexible. Also cover the back of the snap with tape before gluing it to prevent scraping and possible glue interaction with the plastic and metal. Some suggestions with the armor itself: A) No return edge at the wrist end of the forearms No return edge at the foot end of the shin pieces C) Use 2 inch white elastic to connect the front plate to the back plate at the shoulders -
Reboot - NE Armor: 2 years in the Making!
maxsteele replied to BBQTrooper's topic in Build Threads Requireing Maintenance
Hey ya Roger! Glad to see you back at the kit! Research and pics, just like Steve says. You have the same armor kit I built (except for the helmet - I got an ATA). Feel free to PM me any questions you have, and document your build here as you go. -
AnjelRedemption's ANH stunt build (NE)
maxsteele replied to AnjelRedemption's topic in Build Threads Requireing Maintenance
Hi Andrew! I got a set of NE armor back in August 2013. It certainly can accommodate larger troopers, and I trimmed a bunch off it to fit my 5' 10" / 175 lb frame. Just make sure the armor fits you, and trim as much as you need to get it to do so! Regarding your helmet, I've drawn red where you can cut outward to. When looking at the teeth on your helmet, you'll notice the shadow between the two different areas of the teeth. That will really help you to see visually how far to cut out. That's what I used as the guide for the lines I drew: I have an ATA helmet, but here is an un-painted view of how far out I trimmed my teeth: And here's painted: I believe most of the current NE kit is the same construction as I did. I'm more than happy to give advice when you need it. Please feel free to send me a message if you get stuck. -
Question about Anovos’ Armor
maxsteele replied to AmyLynn98's topic in Getting Started - Read this First!
Hi Amy! Please keep in mind that no armor is 501st approvable right out of the box. Approval is dependent on the fit of the armor to each individual. Anovos armor may work for base approval or beyond, but that will only be determined once someone gets the armor, fits it to their person, and submits for approval. As for sizing, any armor you get will need to be trimmed to fit you. The type of armor you get will be based on your height and weight. -
Stormtrooper Armor For Beginner
maxsteele replied to tk21994's topic in Getting Started - Read this First!
Hi Thomas, What is your budget for this suit? -
It doesn't violate any regulation. You got enough screws. I use the bottom screw for the ear to hold the bottom part of the helmet together. I use the one silver screw for holding the top two pieces together, then two of the long brass screws in the top through the ear pieces, and one long brass screw through the bottom. Here are some markers on how I placed the holes that the long brass screws go into: And here you can see that the silver screw is covered up, and you can see the two brass screws through the ear (and both pieces of the helmet) on the top, and one brass screw at the bottom (that goes through both pieces of the helmet) And then you paint the screws white:
-
I used the screws that came with the ATA helmet kit. No rivets. Holds up just fine.
-
Mutter's NE ANH Stunt Build
maxsteele replied to Mutter's topic in Build Threads Requireing Maintenance
You are braver than I am Greg! I would have been more of a nervous wreck than I was if I had done some of the modifications you have. I held my breath when you cut the top of the kidney off and put on a new return edge! It certainly looks good! In the past, I have suggested to people to get the straps in place before doing any heat gun modifications, because pieces sit differently when they're securely in place vs. tape. Make sure to re-check all your fitting once you get a permanent strapping system in place. The trimming lines on your back plate look good. I chickened out and didn't trim my back plate all the way. I'm still concerned that when I do it it will throw off the entire fit of my top half, so I'm still procrastinating doing it. Make sure you check out your fit again after you remove the return edge pieces you're cutting, to make sure your shoulder fit isn't thrown off. It seems like your shoulder tabs on the back plate were bent much more than mine are. I can certainly see why you wanted to heat bend them to have less of a curve. Here's a closeup of what mine look like: One other suggestion - from here on, make sure you're wearing your undersuit when doing all of your fitting. That's what will really tell you how the fit with everything is. I also suggest to get the top half of your armor completely strapped up before you start to do any trimming on your cod and thigh pieces to get those to fit properly. Everything gets pulled this way and that once you get it all strapped up and you'll have a better idea how the bottom half will match up once the strapping is in place for the butt / ab / kidney / back / chest plates. One other thing I noticed - it seems the shoulder tab on the back plate is a little lower on the left side than on the right side. I'm not sure how an adjustment could be done, but you may try to get the over-all backplate to sit up a little closer to your neck. -
Mutter's NE ANH Stunt Build
maxsteele replied to Mutter's topic in Build Threads Requireing Maintenance
Hey Greg, here's how I cut the ab / kidney / butt plates of my kit: Butt plate trimming: I ended up trimming more from that return edge on each side, which really helped with a flaring issue I was having when connecting the butt plate to the bottom of the kidney. Here's how I cut the tab on the butt plate also: I did quite a bit of trimming on the top and bottom of the ab and kidney to get a nice clean connection. I didn't get that ab line on the ab to line up with the top of the kidney notch. I lined up the top of both the ab and kidney, and got the fit you see. If I had tried to line up that ab line with the notch on the kidney, there would have been quite a bit of trimming off the top of the kidney plate for me, and I'm not sure I would have wanted that. I didn't get that piece of advice when I got to this point, but the fit is fine for me the way I constructed it. You may have better luck. Notice I also flattened out the transition between the top part of the ab and kidney. I actually removed the return edge completely up there to get a nice flat transition. It fits nicely against my body and looks good as well. I did the same thing at the top of the kidney / ab connection on the right side as well. Here's how it looks all together: Can't see that lineup because it's under the belt. -
Shoulder strap elastic source...
maxsteele replied to justjoseph63's topic in Hard Armor (General Discussion)
Dritz 2" white elastic from Joann