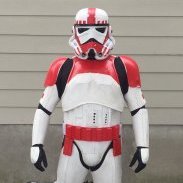
Mutter Posted January 6, 2015 Report Posted January 6, 2015 (edited) Christmas came a little late for me this year. A large brown box of goodness was waiting for me when I got home last night. Obligatory pic: And it was filled with lots and lots of pretty, shiny white pieces of plastic. My daughter watched me carefully unwrap each individual piece and lay it out on the floor. She didn't seem to be as excited as I was. Kids these days. Yet, when I quickly taped together the helmet, who was the first to try it on? This will be my first build (excluding blaster) and my goal is to bring it to Centurion standards. I welcome any and all comments, critiques, advice, funny limericks, anything which may aid me in the build process. I think I'll start with the 3 piece helmet first..... Edited January 12, 2015 by Mutter 1 Quote
PGHtoolman Posted January 6, 2015 Report Posted January 6, 2015 http://www.whitearmor.net/forum/topic/26301-ne-helmet-build/ I can’t recommend this thread enough, its a great place to start Quote
Mutter Posted January 6, 2015 Author Report Posted January 6, 2015 Thanks, Tim. Already bookmarked and viewed multiple times! Quote
Mutter Posted January 8, 2015 Author Report Posted January 8, 2015 (edited) I had some free time last night so I decided to start building the helmet. Wouldn't you know it, the forum was down. Without the comfort and support of Darth Voorhees's NE helmet build thread, I nervously glued the back to the cap. For my first time out, I used a little too much glue and will need to clean up my mess. I hope to be able to add the face piece and begin working on the ears tonight. Edited January 8, 2015 by Mutter Quote
ERROR[TK] Posted January 8, 2015 Report Posted January 8, 2015 I just noticed that we started our build threads on the same day! I look forward to seeing your progress. Good luck, friend. Quote
gmrhodes13[Staff] Posted January 9, 2015 Report Posted January 9, 2015 Nice start, looking forward to the rest Quote
Mutter Posted January 9, 2015 Author Report Posted January 9, 2015 Ryan, that's too cool. Gonna follow your build for inspiration! Good luck! As I mentioned, I had used a little too much E6000 and it oozed out a bit in the seams. After easily cleaning up the excess (I love E6000!), I realized there is a gap at the seam. Is this too large and should I redo it or is it acceptable? Quote
Mutter Posted January 9, 2015 Author Report Posted January 9, 2015 While I await on guidance regarding the gap in the cap, I started to work on the frown. Being a little overly cautious, I marked the teeth to be removed on the inside of the face piece and then got out my trusty Dremmel and sanded most of the material with the mini drum sander just to the point where I could remove the remainder with an exacto blade. I used a few small files to remove the excess and here is the frown. Comments? After cleaning and filing, the final result. Quote
Mutter Posted January 9, 2015 Author Report Posted January 9, 2015 (edited) With the frown completed, I focused on the eyes. They were already trimmed when I received the armor so I only needed to do some minor cleanup. A piece of green film was included in the package but I purchased a green welders replacement faceshield and decided to go with that as it is much thicker. First thing was to create a template from the mask. Each eye was slightly different. In fact, I'm learning rather quickly everything is slightly different (more on that below). So much for symmetry. And that's as far as I got on the lenses. I haven't determined how I want to mount the lenses yet. Need to do more research. EDIT: After doing more research, I've decided not to use the individual lenses but to use the single strip across both eyes. With my momentum on the helmet at a standstill, I focused on the forearms. I removed the return edge on each piece and then taped them to mark for rough sizing. Left arm (11 dimples) done. The right arm (12 dimples) almost done but definitely different from the left. When I was fitting them, I had a devil of a time getting the right wrist tight enough, yet allowing my wrist to go through. The left forearm fit great. This is looking down from the elbow to the wrist. Notice the larger bulge in the right forearm (on the right). This is looking from the wrists to the elbows (right forearm is on the right). The right forearm is on your right. The inside right forearm has a much bigger cut-in at the elbow joint (elbow at top, wrist at bottom) and its curve at the wrist isn't as sharp. This is, in my opinion, not allowing for a proper fit around the wrist. I'll have my daughter take some pictures of the fit and I'll post them later. A few questions: 1 - Are the inside forearms suppose to be this different? 2 - Should I heat bend the right inside forearm so I get a tighter/proper fit around my wrist? 3 - Should I do a rough trim first and see how it fits then? Any help would be greatly appreciated. Thank you! Greg EDIT: I took the forearms apart and notice significant differences. Jeepers! (Left forearms on the left, right forearms on the right) Looking from the elbow to the wrist From the wrists to the elbows Edited January 10, 2015 by Mutter Quote
gmrhodes13[Staff] Posted January 9, 2015 Report Posted January 9, 2015 Coming along nicely, you will find a difference in sizing, I used heat on one of my forearms just to get it a little more oval like the other side. Heat is a tricky thing to uses on ABS if you are going to try it I would suggest testing with some scrap ABS first. I use a heat gun but I've done it a few times, some use hot water which just softens the ABS enough. Quote
Mutter Posted January 10, 2015 Author Report Posted January 10, 2015 Thanks for the feedback, gmrhodes13. I've been reading more NE build threads and the different shaping on the forearm pieces is normal. I'll probably do the hot water treatment first and see how it goes. . Quote
T-Jay[TK] Posted January 10, 2015 Report Posted January 10, 2015 A very clean work on the frown and the eyes so far. Some use hot glue to keep these in place. Have also seen screws to do that job. Looks like the left inner forearm needs a cut at the elbow (like the right one has). Otherwise it'll be difficult to move this arm later (for example to hold your blaster). Use your gloves with added hand guards to check, if trimming of forearms towards your wrist is required. The hand guards need some space left to allow you full movement here. The difference between the hot water and the heat gun is, the water will warm up the whole part while the heat gun can be used to a specific area or spot. Ah, and your signature currently lacks the link to this build Quote
Mutter Posted January 10, 2015 Author Report Posted January 10, 2015 Thanks, Tino. I' m doing away with the 2 piece lenses and will use a single strip instead (more accurate). I'll see how the mobility is before cutting away the forearm, but you're probably right. I already messed up with removing the return edge on the outer forearm so I'm a little gun shy at the moment. Thinking if I need to add the return edge back or not. Quote
T-Jay[TK] Posted January 10, 2015 Report Posted January 10, 2015 No return edge at the front of the forearms (you've mentioned to go for Centurion) Seeing you've updated your signature Quote
Mutter Posted January 10, 2015 Author Report Posted January 10, 2015 Right, no return edge at the wrist, but I also removed them at the elbow. Not a deal breaker but it does look better. Thanks for pointing out the signature Quote
Mutter Posted January 12, 2015 Author Report Posted January 12, 2015 I made more progress on the helmet over the weekend. I had some issues getting the lid to sit straight across the face piece. The back end of the tubes on the face piece seemed to not allow for a tight fight so I removed a little from each side. Removing that piece and changing where the mount screws were located seemed to fix the issues With the face piece mounted it was time to tackle the ears. The left ear, as most agree, was "simple". The ears were pre-trimmed so they didn't require much work on my part. However, there was still quite a bit of sanding, fitting, marking, sanding, fitting, marking, repeat, repeat, repeat. The right ear was a PITA! There is still a bit of a gap on the right ear. As you see in the above photo, I placed the screw much lower on the tubes for the right ear. This closed gap on the front part of the ear but left a huge gap in the back. So I moved the screw higher up under the ear. This allowed the back of the ear to fight tight but opened up the gap in the front. My question to whomever may be able to help: 1 - Is this gap too large for Centurian approval? If I can heat up the tube and bend it a bit, I might be able to close the gap. Here's the helmet so far: Quote
Mutter Posted January 12, 2015 Author Report Posted January 12, 2015 With the helmet in a holding pattern, I'm returning to the forearms. The right forearm has the curve near the elbow so you could bend your arm. The left has no such curve so I decided to put one in because I couldn't bend my arm. I overlayed the right forearm on top of the left and traced out the curve. I backed off about 1/2 inch from the line to give me some room for adjustment and then used a pair of curved lexan scissors and started cutting. And after some sanding the end result: Quote
Mutter Posted January 12, 2015 Author Report Posted January 12, 2015 Now it's time to size the forearms, starting with the left. This set of armor has no ridge line for cover strips so I had to determine where they should go. I sized and taped the forearm on my arm. I was just able to squeeze my hand through the wrist. Here's how it looks. The upper forearm was snug, but I was concerned about the wrist. Does the it look tight enough? Starting at the dimples on the outer forearm, I measured the circumference at various points. Half the circumference should be the center line of the inner forearm. A quarter of the circumference should be the two seam lines. I backed off about half an inch from the seam lines and drew my cut lines. The cut lines will remove the bulk of the excess and allow a half inch on each piece for fine adjustments and fitting. Before I cut, I was hoping for some feedback if my approach was a correct one or if I'm totally off. Thanks for reading! Greg Quote
maxsteele[TK] Posted January 19, 2015 Report Posted January 19, 2015 From what I'm seeing, your measurements are looking good. Make sure to look at screen captures for cover strip placement and you'll see exactly where the cut line is supposed to go. a 15mm cover strip is what you want, with 7.5mm on each part of the forearm to hold the pieces together. I had the luxury of having ridge lines on the front cover strip area, so I was able to cut that ridge to 7.5mm on each piece and then measure it up on the back cover strip area so it was directly across from it. As long as your cover strips are in the middle in the front and in the middle in the back, it's just a matter of getting the sizing right and cutting off the excess. The fit in the front looks good. With that pic where you're wearing the forearm and have the glove on, it looks like one half of the forearm still has a return edge on it. It could just be the way the flash hit the ABS, but just make sure you have no return edge on the wrist-end for both halves of the forearms. Quote
Mutter Posted January 28, 2015 Author Report Posted January 28, 2015 (edited) Thanks for the feedback Ron. What looks like a return edge on the forearms is just the angle of the camera. I've been making sure my seams line up between the forearms and biceps. I've finished the biceps and the last forearm is curing. It should be done tonight. I'm trying upload some more pics of my progress so far. Edited January 28, 2015 by Mutter Quote
Mutter Posted January 29, 2015 Author Report Posted January 29, 2015 (edited) I've been able to finish the forearms and biceps. It as a challenge as there were no raised ridges for cover strips so I had to measure and carefully line up the seems with the biceps. Here are a few pics: While working on the above, I also fitted the TD to it's correct length. The one I received was 7 5/8 inches. I wanted to shorten the overall length to 7 3/8 and allow a 3/4 inch space from the caps based on an original: Before After Edited January 29, 2015 by Mutter Quote
Mutter Posted January 29, 2015 Author Report Posted January 29, 2015 I tackled shortening and trimming the belt and knee pack. I shortened the edges of the belt so they were 1 1/2 inches and recut the 45 degree edges so they were about 15mm at the diagonal. (I'm not sure why Photobucket couldn't resize this picture properly. Sorry about that) And the knee packs. I'm waiting on building the shin before cutting to length. Quote
Mutter Posted January 29, 2015 Author Report Posted January 29, 2015 (edited) I'm now fitting the ab, kidney, butt and back plates together. It looks like the armor included the deformations from the strapping in the originals. I'll need to straighten the return edges on the back and kidney plates so they sit better. In addition, the back plates have a little flange on the ends that will need to be removed/modified so it sits properly on the kidney plate and of course there's more trimming to do on the ab plates and butt plates on the side. I was planning on removing the areas I shaded with pencil. Would this be correct? Edited January 30, 2015 by Mutter Quote
gazmosis[501st] Posted January 29, 2015 Report Posted January 29, 2015 Actually, line up the horizontal line that goes across the ab with the top of the kidney notch. Do a side by side with the above pic compared to yours Quote

Recommended Posts
Join the conversation
You can post now and register later. If you have an account, sign in now to post with your account.