Barcoder[TK] Posted December 6, 2013 Author Report Posted December 6, 2013 Side topic - I tried my hand at Pandatrooper's tutorial on getting a good bend on your belt using a heat gun.... It did not go well... I think there are too many varying thicknesses around the corners and the base. Before the base got even close to being able to bend, the inside walls of the boxes started to warp, slightly... That was my cue to stop & step away from the heat gun. Maybe I'll deal with that another time...and another way? Quote
Barcoder[TK] Posted December 6, 2013 Author Report Posted December 6, 2013 YIPEE! First partial fitting of the armour. (I may or may not have squealed) *Sorry for the crap resolution - couldn't find the actual camera* I hate the gloves & will be going with the Nomex flightgloves... The strapping I made is a little big for these gloves and as a result, they don't sit where the should. (I think they should be higher up a bit.) I am open to some advise on fitting, or if there are glaring issues I am failing to see... Quote
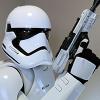
Barcoder[TK] Posted December 7, 2013 Author Report Posted December 7, 2013 The belt & shins finally finished setting. Time for a full length pic! -Shins are a little difficult to close with the hooks...without a lot of effort. Have to work on that.... (But they fit nicely!) -Waiting on some split rivets to close the sides and do the crotch strapping... -Need to attach the shoulder straps, sniper knee and ammo belt... -Still not sure how I will hold up the thighs. Unsure about garter system of attaching right to the ab section with snaps... Must do more research.... -Need to glue on the ab button plates.... Quote
Nagedzi[TK] Posted December 7, 2013 Report Posted December 7, 2013 I just made a simple belt sewn with a wide elastic for each leg. They are secured with a pair of snaps on the thighs. That way you put your thighs and belt on first and it is very secure. I'd be reluctant to snap directly to the ab. Of course the original strapping employed a belt with straps directly glued to the thighs.... Quote
Barcoder[TK] Posted December 9, 2013 Author Report Posted December 9, 2013 I just made a simple belt sewn with a wide elastic for each leg. They are secured with a pair of snaps on the thighs. That way you put your thighs and belt on first and it is very secure. I'd be reluctant to snap directly to the ab. Of course the original strapping employed a belt with straps directly glued to the thighs.... Hmm, that was my original plan...just a belt system. Maybe I'll stick to that plan. Thanks! Quote
Rawgee Posted December 9, 2013 Report Posted December 9, 2013 Looking very nice man! Keep us posted on how you manage to hold the thighs in place! Very nice build! Quote
walt[501st] Posted December 13, 2013 Report Posted December 13, 2013 I quickly noticed a few oddities about this armour...and probably the way it was cast? There are numerous indents or divots around sharper points. It is most noticeable on the knee ammo belt. Is this due to unskilled vacu-forming? How prevalent is this occurrence on other armour types? I am curious if ABS paste could be used to fix these... The holes are to big on the molds ...thats why you see them Quote
troopermaster Posted December 13, 2013 Report Posted December 13, 2013 The holes are to big on the molds ...thats why you see them And in the wrong place too. Quote
Barcoder[TK] Posted December 14, 2013 Author Report Posted December 14, 2013 Ah ha. I was very curious as to what caused those marks. Having never done vacu-forming, I had no frame of reference. Thank you both for the information; I appreciate it. Quote
Barcoder[TK] Posted December 15, 2013 Author Report Posted December 15, 2013 Finally completed the belt. I have been fighting with the sniper plate... I got it to sit straight from the front view... As a result, the left side is a little wonky & a bit off... However, with a little elbow grease and maybe a heat gun, it should line up where I'd like it to sit... Quote
Barcoder[TK] Posted December 15, 2013 Author Report Posted December 15, 2013 I was right in the middle of working on the side rivets, thigh garter & reinforcing the butt joints....but life has other plans for me... Since it's Star Wars related, I thought I'd share... I have started work on a 3 ft. long, custom Styrofoam carving of the Millennium Falcon for a client. This will be a fun commission! Quote
Tolo[TK] Posted December 15, 2013 Report Posted December 15, 2013 (edited) However, with a little elbow grease and maybe a heat gun, it should line up where I'd like it to sit... You can put it in hot water. I think it's safer that a heat gun. Sent from my iPhone 5 using Tapatalk Edited December 16, 2013 by Tolo Quote
Barcoder[TK] Posted December 16, 2013 Author Report Posted December 16, 2013 You can put it in hot water. I think it's safer that a heat gun. Sent from my iPhone 5 using Tapatalk Hmmm, agreed. I think the heat gun gives me anxiety. lol. I have visions of the ABS just suddenly melting & warping out of control.... Quote
Rawgee Posted December 16, 2013 Report Posted December 16, 2013 I tried heating, it works a lot but I suggest practicing on scraps before, I was suprised how soft/flabby it was... Quote
Barcoder[TK] Posted December 16, 2013 Author Report Posted December 16, 2013 Yeah, it's crazy how soft the ABS can get! I have used my heat gun more than a few times already, but it always makes me incredibly nervous. I am thinking I should give the "hot water" method a try when I do my shoulder straps. Quote
Barcoder[TK] Posted December 17, 2013 Author Report Posted December 17, 2013 Millennium Falcon Project update - 15 hours worth of work = carving & construction complete. Now on to painting & detailing... Quote
Cantina Security[501st] Posted December 17, 2013 Report Posted December 17, 2013 Wow Peter , looking fantastic. Good work. Quote
Barcoder[TK] Posted December 19, 2013 Author Report Posted December 19, 2013 Wow Peter , looking fantastic. Good work. Thanks! I am quite pleased with it. I think the client will be very happy. Quote
Barcoder[TK] Posted December 19, 2013 Author Report Posted December 19, 2013 ....and the Millennium Falcon is finally finished & ready to make the run. Now, back to my build! Quote
Cantina Security[501st] Posted December 21, 2013 Report Posted December 21, 2013 Sharp, amazing detail. Looks fast,lol... Quote
Cantina Security[501st] Posted December 29, 2013 Report Posted December 29, 2013 Any progress on your build Peter ? Quote
Barcoder[TK] Posted January 1, 2014 Author Report Posted January 1, 2014 Thanks to Christmas holidays, there was little done on my build lately.... However, I did squeeze in a few things.... Started gluing the strips on the inside of the thighs. (Now I can finally get the snaps in place for the harness.) Did some bending on my ammo knee belt with the heat gun. (Less anxiety this time around.) I was able to get a pretty close match to the shape. Again, the brown packing tape came in handy to help hold the shape while it cooled off. I do believe I won my battle against the sniper plate.....barely. I am not 100% happy with it, but I will deal with it later. Due to re-cast, the thicker ABS of the sniper plate is a pain to work with... Quote
Barcoder[TK] Posted January 1, 2014 Author Report Posted January 1, 2014 (edited) Upon my return from holidays, 4 surprises awaited me... ...Split & Cap rivets via Echo. (Yipee! I can finally close the Ab section & attach the ammo belt.) ...Nomex flight gloves arrived & fit perfectly! (Great deal at camouflage.ca) ...unassembled holster via Darman. (Looks awesome!) ...& my E11 kit from DoopyDoo's finally made it from the UK. (No damage/all intact.) I am really looking forward to building my own blaster! More progress soon! Edited January 5, 2014 by Barcoder Quote
The5thHorseman[501st] Posted January 1, 2014 Report Posted January 1, 2014 The Sniper knee plate looks fine to me. Front is centered, ridges are aligned, and wings ends are straight Quote

Recommended Posts
Join the conversation
You can post now and register later. If you have an account, sign in now to post with your account.