Barcoder[TK] Posted November 18, 2013 Report Posted November 18, 2013 Welcome to my build, which doesn't start off with the obligatory “brown box†pic, full of excitement and promise. No, this one begins with a blue plastic recycling bag full of armour. (I am not including a photo out of embarrassment. lol) I figured I would start a build as I will probably need a lot of advise and tips along the way... Needless to say it began with the usual beginner’s excitement & “what the hell have I gotten myself into!†thoughts... My initial excitement quickly turned to despair as my research on the FISD indicated this set was from a known recaster out of Arizona. However, a glimmer of hope appeared as further research indicated that someone had gotten basic 501st approval with this armour. With some elbow grease, creativity and buttloads of effort, I can make the best out of this unfortunate situation. (Personally, I am aiming for EIB) Enough back story, on to the armour... The kit included all the required pieces of untrimmed armour for an ANH stunt build and that’s it. No extras like brow & neck trim, extra ABS pieces for strips, TD clips, hardware, etc... The helmet (only one set of ears) included decals and basic mic tips (no mesh). I have read "you get what you pay for" more than a few times on this forum. I understand completely, now. Quote
Barcoder[TK] Posted November 18, 2013 Author Report Posted November 18, 2013 My first instinct was to work on the helmet. Admittedly, I did start to trim the teeth & eyes first before realizing I really had no idea what I was doing... If you are going to do something, it’s best to learn from those before you. (The thought of trimming the ears actually caused a bit of anxiety.) <Insert 4 weeks of scouring the FISD for information, watching tutorials and compiling a supply shopping list> Side note - Finding a supply of neck & brow trim, not including Trooperbay/FISD, is not easy. Especially in Canada. DirectSeals in the UK seemed like the natural choice... Quote
Barcoder[TK] Posted November 18, 2013 Author Report Posted November 18, 2013 To help get my feet wet and a feel for working with the ABS, why not start with the small stuff? Ab buttons, hand guards and ammo belt-I am coming for you... Side note-the ABS is quite thick; I’m guessing thicker than normal? There is no quick score, bend and snap with this stuff. After watching some videos on Trooperbay, I had expected it be easy. Not so much. Scoring requires a lot of pressure. Using tin snips has proved very useful in breaking the excess into smaller sections, especially on curved areas. Quote
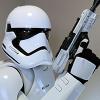
Barcoder[TK] Posted November 18, 2013 Author Report Posted November 18, 2013 I quickly noticed a few oddities about this armour...and probably the way it was cast? There are numerous indents or divots around sharper points. It is most noticeable on the knee ammo belt. Is this due to unskilled vacu-forming? How prevalent is this occurrence on other armour types? I am curious if ABS paste could be used to fix these... Quote
Locitus[Admin] Posted November 18, 2013 Report Posted November 18, 2013 CTM are recasters and they probably don't care that much about the quality of their product, which would explain your soft details (thickness of ABS also accounts for some of that) and the recycling bag it was delivered in. Quote
pattrooper Posted November 18, 2013 Report Posted November 18, 2013 So that is a CTM props kit? Quote
Locitus[Admin] Posted November 18, 2013 Report Posted November 18, 2013 So that is a CTM props kit? That's what the title says anyway. Quote
Holnave (evan_loh)[TK] Posted November 19, 2013 Report Posted November 19, 2013 ABS paste has done wonders for me. Might as well call it wonder-paste. I'm not sure how effective ABS paste would be on the numerous "indents or divots" though. It tends to give a rough feel you'll have to sand it down after the past has dried (well most of the time not always). What I have used ABS paste for so far is sealing holes or reinforcing cracks. Quote
Cantina Security[501st] Posted November 19, 2013 Report Posted November 19, 2013 Looks like you have a steady hand, nice edging, take your time and keep up the good work. Quote
Cantina Security[501st] Posted November 19, 2013 Report Posted November 19, 2013 Divots give your armour character ... Quote
Barcoder[TK] Posted November 19, 2013 Author Report Posted November 19, 2013 ABS paste has done wonders for me. Might as well call it wonder-paste. I'm not sure how effective ABS paste would be on the numerous "indents or divots" though. It tends to give a rough feel you'll have to sand it down after the past has dried (well most of the time not always). What I have used ABS paste for so far is sealing holes or reinforcing cracks. Thanks for the info. I will give it a try on some of the excess pieces; to see if it`s an option. Quote
Barcoder[TK] Posted November 19, 2013 Author Report Posted November 19, 2013 Divots give your armour character ... LOL. Then this set has got a fair bit of character already. Quote
Nagedzi[TK] Posted November 19, 2013 Report Posted November 19, 2013 Hello fellow Garrison mate! My initial foray into TK armour started off as an art project--I wanted to paint some armour with First Nations art. I was clueless about all the nuances of the armour and eventually found my way onto FISD. I couldn't believe that anyone cared about such geeky details and thought it was a bit ridiculous. Little did I know, I would soon become obsessed like everyone else! Following common recommendations and my pocketbook, I got on ATA's interminable wait list for a full kit. I was able to order a couple buckets to satisfy my obsession for a while, but I was chomping at the bit to get the full armour. Anyways, I found CTM Props and thought I'd practice my skills on that kit until my ATA came in. By the time my armour order was ready, my finances were not so I had to regretfully cancel my ATA order. I'm sure someone else on the list was happy, though.... Rather than wallow in self-pity, I finished up the CTM kit (with ATA bucket) and applied for the 501st. I figured I may as well get into this trooping bit, too. Anyways, long story short, I made it work and it looks pretty decent. I'm still debating if I should apply for EIB or not. With that said, my next full kit is definitely gonna be Troopermaster.... If I can answer any specific questions, let me know.... Here's a picture of me on the beach yesterday: Quote
DroidHunter Posted November 19, 2013 Report Posted November 19, 2013 Good luck with the build my friend. Sorry to hear about all of the bad luck but it looks like you will be able to turn this thing around. Quote
Barcoder[TK] Posted November 20, 2013 Author Report Posted November 20, 2013 Might as well trim the rest of the armour while I wait for some ABS sheets to arrive. (Trooperbay looks to be a great “one stop†shop for a lot of stuff.) I have already done a lot of running around for supplies but decided to use Trooperbay for the cover strips, helmet assembly kit and the lenses. Here’s some of the the progress... The suggested amount to leave for the return edges seems to vary and seems to be based a lot on comfort? (Minus the 501st requirements on specific pieces of course.) Quote
Barcoder[TK] Posted November 20, 2013 Author Report Posted November 20, 2013 The return edges on the arms are done.I assume this is enough? I think the left forearm is gonna give me some trouble. One side is bit more flared/curved than the other... Might be trying my hand at using a heat gun to re-shape it. Quote
Barcoder[TK] Posted November 20, 2013 Author Report Posted November 20, 2013 While I continue to wait for supplies, might as well tackle the mic tips... As I mentioned earlier, the ones that came with the kit were very basic. Plain black with no mesh. A coat of flat black and white on the insides. I thought about buying new ones but figured I could use the experience of finishing these ones... I had no idea fitting wire mesh into the tips would be such a pain... Very annoying. However, I think they turned out not bad. (After a bit of swearing and numerous jabs to the fingers from the wire.)I had no idea fitting wire mesh into the tips would be such a pain... Very annoying. However, I think they turned out not bad. (After a bit of swearing and numerous jabs to the fingers from the wire.) Couldn't find the mesh that is normally used so I went with the woven wire kind. Easy enough to find; a strainer form the Dollar Store. I think I may go over them again with a semi-gloss black. I don't think flat black is correct? I managed to paint the ab buttons, with the correct colours. Testors 1138 & Humbrol French Blue. Quote
Cantina Security[501st] Posted November 20, 2013 Report Posted November 20, 2013 It is supposed to be curved, let me try to find the thread. Quote
Cantina Security[501st] Posted November 20, 2013 Report Posted November 20, 2013 http://www.whitearmor.net/forum/topic/24737-rs-props-build-in-progress/ Is this the one? Quote
Cantina Security[501st] Posted November 20, 2013 Report Posted November 20, 2013 http://www.whitearmor.net/forum/topic/24056-my-ata-stunt-tk-build-thread/?view=findpost&p=303178&hl=%2Bcurved+%2Bforearm This one is closer to your kit. Look down a few pictures to see the forearms are not identical. I for get which thread I read that stated the fact about the forearms , it is a trait of the accurate screen used armour. I have been reading so many threads they are all running together...lol, it is specific for one side. Coming along nicely. Quote
Cantina Security[501st] Posted November 20, 2013 Report Posted November 20, 2013 I just noticed the link shows the biceps, scroll to the top, and look at the second pic down that shows all the parts, the difference is clearly visible. Quote
Barcoder[TK] Posted November 20, 2013 Author Report Posted November 20, 2013 It is supposed to be curved, let me try to find the thread. Thanks for the info. The curve on each half of the left forearm doesn't exactly match; one end flares out much more. I figured it might be tricking lining them up when gluing. Maybe I'll try gluing one side at a time? I have read so many threads as well; they do tend to blend together. lol Quote
Barcoder[TK] Posted November 21, 2013 Author Report Posted November 21, 2013 Alrighty, finally doing something other than sanding... Cut the ends of the belt to the required 45 degrees... Finally gluing some parts together!!! Silly as it sounds, it was very exciting. lol Working on the biceps and forearms... My God, E6000 smells awful! I had no idea what to expect from all the comments, but I did not expect that. While I wait for parts to dry, I will keep myself busy with other stuff. Making snap plates thanks to Pandatroopers tutorial using rivets... As I am sick of sanding, I chose to use the cross-hatch method...giving the glue something else to hang on to. Gluing the snap plates in place on the back panel & shoulder bells. I have decided to add plates to where I'll be gluing the black elastic on the shoulder bells. If I ever have to replace the elastic I figure it might be less of mess on the armour? Quote
Barcoder[TK] Posted November 21, 2013 Author Report Posted November 21, 2013 So, I've had my first experience with a heat gun... It went better than I thought it would. Once I trimmed & fit my left thigh, I had some alignment issues... first thought was to just trim it off, but I would be left with no return edge. As I don't have a hobby iron, I gave the heat gun a try. (I practiced of a few scrap pieces first....as I was nervous as hell.) It wasn't a major issue to begin with but it gave me some confidence using the gun. The back of the thigh turned out even better. Forgot to take the before pic. Quote

Recommended Posts
Join the conversation
You can post now and register later. If you have an account, sign in now to post with your account.