Rawgee
-
Posts
90 -
Joined
-
Last visited
Content Type
Profiles
Forums
Gallery
Articles
Everything posted by Rawgee
-
 Requesting 501st access TK-88881 http://www.501st.com/members/displaymemberdetails.php?userID=17594
 -
Hi Ron, first off don't panic bud! They seem fitted perfectly, no worries on the right one its minimal... If you are not happy you could always re-do it... Thanks to E-6000 I would love to see a picture a little bit further to get an overall look, and the back as well. Personally mine were doing the same thing when i fit tested them, but for some reason now they are just fine... So i would suggest to continue with the build, if you feel they are too tight in the bottom you could always make larger cover strip in the back to give you more space inside. (For your info mines are tight but not too much) If it still does that after, you could use some foam inside to prevent them to twist, usually people seem to put the foam at the top of the shin. As for the shin poping out, im not sure why they are doing this, too loose or too tight? I've seen some using a snap on both "pullers" of the boot (those little black loop in the front and back of the boot) and the other part of the snap inside the shin. Hope that helps... Martin Edit: Looking good on the shoulders and biceps, but try to take a look in the Expert Infantry and Centurion request pictures and try to post pictures that resemble those, it will make easier for us to see how they are fitting.
-
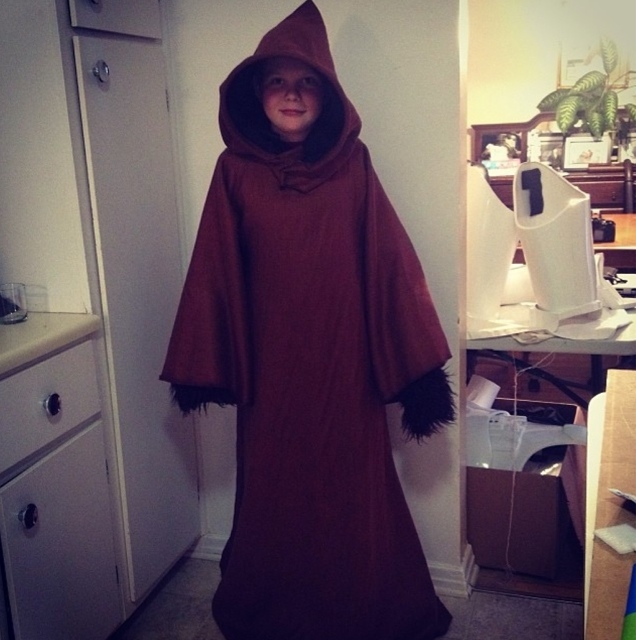
Trooper not done yet... But here's my sons Jawa progress

-
Thanks guys, appreciate the nice comments! Its coming along nicely, i am almost done, a few tweaks here and there on the fitting, i should be done in a few days, i'm doing a Jawa costume for my son at the same time
-
Congrats Peter! My turn pretty soon!
-
That's some very nice and clean work Peter! Good luck with your approval! You don't need any luck here, that's a check in the box already but i'm just being polite! haha!
-
Here is the link for Pandatrooper ATA helmet build, and good luck! http://www.whitearmor.net/forum/topic/14806-how-to-assembling-ata-abs-helmet-1
-
If you are very skinny, thighs and biceps might be the biggest challenge, I suggest buying another helmet though... The one that come with this kit is in 3 pieces, the ears are a big problem as well... Check out my build http://www.whitearmor.net/forum/topic/25853-big-brown-box-has-arrived/ I am 5'10" 180 pds... Just keep in mind it is a big kit that will need a lot of fitting... Other than that I highly recommend it, it's nice and very glossy and cheap... Good luck
-
That's it buddy!
-
NE Build (with a few questions)
Rawgee replied to hikeba's topic in Build Threads Requireing Maintenance
What Locitus said! For the button plates, this is how they should look like: I am a bit concerned about your shins, if you are aiming for Centurion or EI, the back must be constructed using the butt joint and cover strip method, overlap is not allowed... And they seem to be closing more to the right than the middle? Yours: What it should look like: (make sure they close facing inside) Right leg: (Closing facing inside) <--- Hope that helps... -
Thanks Eric! Just finished the paint on my helmet. My biggest advice to newcomers that are reading this, if you want to use trooperbay's template or any other template, fine, but make sure it is properly stuck to the surface with no air bubbles and then use a good amount of paint, not too much but enough that you just have to do one pass, as soon as your done, remove the sticker immediately, don't let it dry! Otherwise get ready to do some cleaning around the design... Here's the results: Make sure to give it a white coat first: Front view: Right Side: Left side: Rear view:
-
Yup! haha! So here's the final result of the neckseal, again thanks for the idea and detailed photos on your build Peter! At first i wanted to make it velcro closing but zipper is way better Finally received my rivets from Echo so i fixed the knee ammo pack: I've started to cut some 1,5 x 1,5 inch square for the snaps but i paused that... Really considering doing a harness like Pandatrooper... I'll sleep on that so more to follow tomorrow... And like i said in a previous post, i re-used an inside liner of an old atv helmet to put inside this one. I've stick some velcro on top of the liner and inside the helmet so it doesn't move and put two pieces of foam on both side to make it more tight inside so i don't look like a bobblehead when i move my head. It works like a charm, really comfy, i love it, on the plus side, it can be removed and washed in a washing machine! (a picture is worth a thousand words)
-
Haha! Awesome Peter! Told you huh! Looking very good bro! Yeah its better to take a break sometime, i understood that especially during the ear pieces process... that took me 2 days btw...haha
-
Sewing day, neckseal almost complete, i have to thank you Peter, i took your idea for the neckseal! A bit of a pain in the butt to do when you're not an expert but we're getting there...
-
I'll be watching your build closely, I might order this kit as well!
-
I do like them as well! good work on that helmet Peter!
-
Thanks guys i will definitely trim some more but not now, i want to finish the whole suit first! Thanks again really appreciate your advices!
-
All right so here's the helmet, wow what a journey assembling this thing, trimming the ears... Your thoughts?
-
Here is how they turned out. Is that acceptable?
-
Thanks Glen, i tried your pencil trick, worked well for the right ear, i've got it flush i just need to trim it some more to make thinner. I'll post photo later today, but i think i just screwed up left side, i don't know what happened everything was going well and then one half is perfect and the other half has a big gap.. i'll take photos later... I hope i will be able to fix that otherwise i'll have to order new ear pieces... Peter take your time my friend! But NE helmet ear pieces are crap... So don't get scared because of me, left side of the helmet is where it needed the biggest trimming work and the ear piece has less material to trim... Anyway i hope i can fix that... Martin
-
So i am in the process of finishing my helmet. Trimming the ears has been a hard and complex process, more than i thought... I would like to know if you think i should trim some more? If i remove more i think the top of the ear will be very thin, will that look weird? When i hold it down its more flush but i still have some trimming to make it perfectly even... Side view: Some more trimming needs to be done in the back, not sure where to make it more even?
-
I'll take that as it's good! Thanks Eric, appreciate your help and advices! So here i am right now, mic tips installed, helmet assembled, i think i've found how i want the front part to be, low brow style, so i am about to put another rivet to fix it and then move on to the ears... Does that seems ok? Before i rivet it for good and i can't come back... Did i mention the ears scares the crap out of me.. :/
-
Here is an update of my helmet, unfortunately i have not receive Trooperbay stencil yet, so i will have to wait to finish the painting, i'll do a second coat on the gray tomorrow... Turned out better than i thought, i am enjoying this so much right now! Feel free to chime in if you see something wrong or that needs to be improve, i am all ears!
-
Testors/Model Master - Gloss Black 1147 - Semi Gloss Black 2740 - French Blue 2715 - Blue Angel 1772 (Do i need that? I have seen some have French blue on buttons and on stripes as well...) - Gloss Gray 1138 - Gloss White 1145 (For touch up) Vocoder and mic tips first coat:
-
Ok good that's what i thought, thanks Eric! What about the painting? Am i on the right path? Just did the Ears: