gazmosis[501st] Posted January 1, 2014 Report Posted January 1, 2014 You should be happy with that sniper! Every sniper plate is a battle. You won! Quote
Barcoder[TK] Posted January 3, 2014 Author Report Posted January 3, 2014 You should be happy with that sniper! Every sniper plate is a battle. You won! The Sniper knee plate looks fine to me. Front is centered, ridges are aligned, and wings ends are straight YAY! Thanks guys! I appreciate the feedback. Quote
Barcoder[TK] Posted January 3, 2014 Author Report Posted January 3, 2014 Alrighty...back on track after the holidays. Attached the battery pack to the thigh, using cap rivets. (Instead of a washer on the inside I used a piece of ABS-worked well.) I will be painting them white I think... Cod strap is attached via split rivet & snaps are in place. Building up some depth on the shoulder straps so there will more surface area to attach them... Attached the straps to the holster & the belt. (Holster hangs 1 inch below belt.) Quote
Barcoder[TK] Posted January 3, 2014 Author Report Posted January 3, 2014 Today I also tackled the dreaded split rivets to finally close the Ab section. It went better than I had thought, but it was as much work as I had expected it would be. (Bending the split rivets was easier than I thought-the claw of a hammer worked pretty good. After they were bent I just flattened them with a few hits with the hammer.) I chose to use strips of ABS, instead of plates, to reinforce the rivets...saw it on a few builds & liked the way it looks. I have one set of snaps gluing on the other side-I hope to use that & the belt to close off the clam shell... However, I am not sure it will be enough. Tomorrow's test fit will decide... Quote
Barcoder[TK] Posted January 3, 2014 Author Report Posted January 3, 2014 I have also made some progress on the thigh harness... Using nylon, I made a V section with 2 loops...the elastic & snaps will attach to the bottom of the V. (Once I make them.) Side note - I also glued in a thin panel of ABS in between the loops..that will give some stability on the belt & allow for smoother adjustment on the belt. (I'll post pics tomorrow.) Quote
gazmosis[501st] Posted January 3, 2014 Report Posted January 3, 2014 SEE THIS!!!!!! This is the way side rivets should look. Nice work!!! As for your garter, make sure the attachments you have coming off the belt don't show too much in the space between your thigh and the cod. Quote
The5thHorseman[501st] Posted January 3, 2014 Report Posted January 3, 2014 Nice progress! Keep up like that Quote
Cantina Security[501st] Posted January 3, 2014 Report Posted January 3, 2014 Fantastic Peter, Looking Really Nice, Perfect Placement of those rivets too... Quote
Barcoder[TK] Posted January 4, 2014 Author Report Posted January 4, 2014 Fantastic Peter, Looking Really Nice, Perfect Placement of those rivets too... Nice progress! Keep up like that Thanks guys. Research is paying off! Quote
Barcoder[TK] Posted January 4, 2014 Author Report Posted January 4, 2014 SEE THIS!!!!!! This is the way side rivets should look. Nice work!!! As for your garter, make sure the attachments you have coming off the belt don't show too much in the space between your thigh and the cod. Thanks for the compliment Steve! I was a little nervous but am pleased my hard work & research is paying off. I had spent so much time reviewing Centurion builds to make sure I got them correct. As for the garter.... Yes, that is a concern of mine too. My plan is just to have a single elastic visible. (I made the V section short so that it hides perfectly under the ab/cod section.) Quote
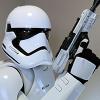
Barcoder[TK] Posted January 5, 2014 Author Report Posted January 5, 2014 So, I finished the harness/garter for the thighs... (Glad to put that project to bed! Took forever!) (I think I will be adding a white imperial cog to the front of buckle - just for looks.) Here's a close up of the V section with the ABS strip glued in for reinforcement. Quote
Barcoder[TK] Posted January 5, 2014 Author Report Posted January 5, 2014 ....and on to the Thermal Detonator..... I had expected some issues, and I was right.... Trimmed the end caps with the Dremel, using the cut-off discs. (Worked pretty good.) Since this armour is re-cast, the end caps are quite big/wide. They do not fit a 2 inch pipe..at all. They are WAY to big for a 2 inch pipe, and just a little too small for a 3 inch pipe. (I needed something around 2 3/4".) What to do? I thought about buying one, pre-made... I thought about trying to make my own end caps.. (That went horribly wrong. lol) What I ended up doing was hunting through various stores looking for anything that might work... Plastic bottles, tubes, cardboard tubes, containers, etc... In the end, I found a plain stainless steel water bottle that fit the end caps perfectly! All I had to do was cut the bottle down to size... (Cut-off discs worked great-a little smelly & smoky-but great.) I had never cut steel with my Dremel before...so it was a little nerve wracking at first. ...did a test fit with the front panel & BANG! A Thermal Detonator. All I have to do is make some clips & attach, paint the tube grey & glue. Quote
Tolo[TK] Posted January 5, 2014 Report Posted January 5, 2014 ....and on to the Thermal Detonator..... I had expected some issues, and I was right.... Trimmed the end caps with the Dremel, using the cut-off discs. (Worked pretty good.) Since this armour is re-cast, the end caps are quite big/wide. They do not fit a 2 inch pipe..at all. They are WAY to big for a 2 inch pipe, and just a little too small for a 3 inch pipe. (I needed something around 2 3/4".) What to do? I thought about buying one, pre-made... I thought about trying to make my own end caps.. (That went horribly wrong. lol) What I ended up doing was hunting through various stores looking for anything that might work... Plastic bottles, tubes, cardboard tubes, containers, etc... In the end, I found a plain stainless steel water bottle that fit the end caps perfectly! All I had to do was cut the bottle down to size... (Cut-off discs worked great-a little smelly & smoky-but great.) I had never cut steel with my Dremel before...so it was a little nerve wracking at first. ...did a test fit with the front panel & BANG! A Thermal Detonator. All I have to do is make some clips & attach, paint the tube grey & glue. Good idea! Sent from my iPhone 5 using Tapatalk Quote
Barcoder[TK] Posted January 11, 2014 Author Report Posted January 11, 2014 It's been slow progress lately... I am nearing the end of the armour build, so maybe I am savoring the last steps. lol Thermal Detonator is in progress... Just finished the first coat of Testors 1138. Shoulder straps have been glued on. (Some heat bending might help them lay flatter on the back section.) Ab buttons are glued on. The ab section is now completely finished. All closed up! Time to suit up again for the final fit & adjustments. I am itching to get started on the helmet!! Quote
Cantina Security[501st] Posted January 11, 2014 Report Posted January 11, 2014 That is a good looking set of armour. I would have been tempted to leave the TD shiny silver. Good work improvising. Your strap placement looks like it was made on the Death Star itself, right out of the imperial factory. Nice work Peter ... Quote
Barcoder[TK] Posted January 13, 2014 Author Report Posted January 13, 2014 Thanks Jason; I am quite happy with how it's turning out. Trust me, I was VERY tempted to leave the TD canister the original brushed steel. I thought it looked perfect, but it must be all grey. Quote
Barcoder[TK] Posted January 13, 2014 Author Report Posted January 13, 2014 Alrighty, picture time. All suited up for final adjustments & fit... So. Freaking. Cool!!!! After viewing the pics, there are a few things I noticed... -Shoulder straps need to be re-glued to sit lower on the chest. Too much overhang on the back section. (Need to add the elastic too.) -Back section maybe needs to be lowered? -Need to add bicep straps. Biceps keep slipping out... -It's VERY interesting walking up/down stairs. Any issues I may not be aware of? Quote
Rawgee Posted January 13, 2014 Report Posted January 13, 2014 Lol, love that happy face! Good job Peter! I'll let more experienced Troopers chime in for your back but it seems ok, maybe it's the kidney that is too low... I just started my helmet tonight, it's fun but and frustrating at the same time, mine is in 3 pieces... Arrgh Your looking great Pete, happy for you, your almost done bud! Martin. Quote
The5thHorseman[501st] Posted January 13, 2014 Report Posted January 13, 2014 That's a really good fit for a first full-suited test! Good job! And yes, the junction between the kidney plate and the back plate needs to be tightened. I think you'll need to reduce the length of the straps between them and also lower the back plate by increasing the shoulder bridges' length (in this case, wait to do it before regluing you shoulder bridges). Also, don't forget to paint your side rivets and think about wearing your neck seal when suiting up. Just to check if it hides the logo on the back of your undersuit and also if the chest plate doesn't choke you too much. Quote
Barcoder[TK] Posted January 13, 2014 Author Report Posted January 13, 2014 (edited) Lol, love that happy face! Good job Peter! I'll let more experienced Troopers chime in for your back but it seems ok, maybe it's the kidney that is too low... I just started my helmet tonight, it's fun but and frustrating at the same time, mine is in 3 pieces... Arrgh Your looking great Pete, happy for you, your almost done bud! Martin. Thanks so much Martin! The end is in sight; I can't wait to start the helmet. The ears make me nervous.... (I think I'm might change my mind about the shin hooks - they are a pain. Velcro would be SO easier... lol) Edited January 14, 2014 by Barcoder Quote
Barcoder[TK] Posted January 14, 2014 Author Report Posted January 14, 2014 That's a really good fit for a first full-suited test! Good job! And yes, the junction between the kidney plate and the back plate needs to be tightened. I think you'll need to reduce the length of the straps between them and also lower the back plate by increasing the shoulder bridges' length (in this case, wait to do it before regluing you shoulder bridges). Also, don't forget to paint your side rivets and think about wearing your neck seal when suiting up. Just to check if it hides the logo on the back of your undersuit and also if the chest plate doesn't choke you too much. Thank you for the compliment & advice Germain! I really appreciate it. I completely agree with your suggestions; I knew the back plate had to come down. Once that is done, I can assess the should strap length; there is a chance it may be ok. I plan on painting the rivets last, just so they don't get banged around while doing last minute adjustments. And yes, the neck seal does cover the logo - but I plan on removing it with paint thinner to be sure. No worries on the chest plate choking issue. I had already dealt with that. (I have two snap positions on the chest for adjustment.) Thanks again. Quote
Barcoder[TK] Posted January 16, 2014 Author Report Posted January 16, 2014 Happy to report the Thermal Detonator is finally finished. The required more effort than I thought... But in the end, I am happy how it turned out. ...and that basically finishes up the build! The armour is done. All that is left is continuous tweaking, mods, refinement & polishing. lol Now, it's time for the helmet... WOOHOO! Quote
Barcoder[TK] Posted January 18, 2014 Author Report Posted January 18, 2014 The work on the helmet has begun... and it started off on a sour note... I had left my neckseal sitting on top of the cap, as I though it was a good place to store it while I worked in the disaster that currently is my office. Nope. bad idea. Whatever material I used for the ribs stained the top of the helmet. I had a nice little ring of dark purple... FML. ...after MUCH sanding & swearing, I was able to get most of it out. There is a stain by the left trap that refuses to come out completely...but I can live with it. Needless to say, I am left with a very dull cap that needs shining up... Anyway... I managed to get the teeth cut out & files nicely. Bit of a pain but I think they look good. Mounting the back & cap on the faceplate was a stressful as I anticipated. Thank God I did the armour first; I am sure I would have messed the helmet up. (despite the confidence I gained from the armour build, I still had butterflies in my tummy as I drilled the holes...) My first attempt at attaching the faceplate failed. My traps were off slightly (yes, there was more swearing.)...and that would have driven me mad. So I had to drill another hole on the right side. In the end, this is what I have ended up with.. (I have opted for a very low brow....cuz it looks super-cool.) Tomorrow the inside of the helmet gets a coat of matte black... Quote
Minuteman Posted January 18, 2014 Report Posted January 18, 2014 Good work so far! Don't worry about the dull cap, nothing that could not be polished with novus. One thing I don't get: why do you want to paint the inside black? It has no advantages, if you use a proper neckseal and wear the helmet correctly nobody will see your eyes. In the film NO helmet was painted black, but so many troopers Form the US do this. Weird thing. Gesendet von meinem XT1032 mit Tapatalk Quote

Recommended Posts
Join the conversation
You can post now and register later. If you have an account, sign in now to post with your account.