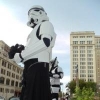
Gep Posted September 26, 2012 Report Share Posted September 26, 2012 (edited) Name: Bryan Goeppner (Gep) ID: TK 7939 Garrison: Bloodfin Hight: 6' Weight: 160 lbs Armor: AM Helmet: ATA w/ Dave M decals and Trooperbay ear stripes Undersuit: Eastbay 2 Piece Neck seal: Trooperbay Boots: TK Boots Belt: White canvas, AM parts, TK0812 inner boxes Holster: Ebay - bmlt1138 Gloves: Hatch BNG190 Flight Hand plates: AM ANH Thermal detonator: AM with custom clips Blaster: Hasbro with Doopy mod and a lot of customization Electronics: Aker amp and dual Allelectronics squirrel fans Yes, I left a lot of plastic on the scrap pile to get this AM kit to fit my frame. I used Pandatrooper's AM build as a rough guide for this build. Hedji's WIP was also really helpful, as he ran into some of the same issues I did. Note that I'm NOT taking this to Centurion. You won't see the side rivets and extra snaps in the cod/butt. That said, I did do some extensive work on the back plate to scale it down a bit and add a new return edge. I also put a fair bit of extra work into the Doopy mod, adding the scope rail, lower cooling holes, bolt, spring, and improved LED/driver circuit. Inner drop boxes have also been added to the belt. I will be cutting the AM hand plates down about 25% and putting on a new return edge. I'm holding that off until I finish my wife's TX build. This was a fun build and I'm looking forward to repeating it for my wife. With scissors, heat gun and hobby iron, the AM kit is quite flexible. Here goes...... Bucket off and my best smirk. EDIT: I just noticed that I left out the foam bit on the back plate that pushes it out from my back to almost flush with top of the kidney plate. Forgot to hot melt that piece in. Hard to tell since this is a butt joint, but the Velcro closure is seamed on the inside of the calves. Took a ton of ABS off the button plate so it sits more flush with the AB plate. Canvas belt courtesy of my wife! Rivet covers installed on belt. 3x Hovi closeup EDIT: Added side pic of bucket showing screws and paint work Holster rivets. Chamfer put on belt edge. Used Pandatrooper's method for the clips. The TD is not going to fall off with this thing in place. Doopy/Hasbro. Scope rail, bolt spring, and bolt added as well. Charge cables and extra vent holes added here. Site and trigger milled out. Cadillac tail lamp replaces Hasbro stock and is REALLY bright with new drive circuit. So, here it is. Thanks for taking a look at this! Edited September 26, 2012 by Gep Quote Link to comment Share on other sites More sharing options...
Scootch[TK] Posted September 26, 2012 Report Share Posted September 26, 2012 You did a very nice job! I like it. Quote Link to comment Share on other sites More sharing options...
captsafe66[Admin] Posted September 26, 2012 Report Share Posted September 26, 2012 Looks great Gep!! But it still smells like a dirty, smelly Tusken...LOL! Good Luck! Quote Link to comment Share on other sites More sharing options...
TKRalf[TK] Posted September 26, 2012 Report Share Posted September 26, 2012 Looking great! And yea I smirk in my buckets off pic too. Quote Link to comment Share on other sites More sharing options...
Gep Posted September 26, 2012 Author Report Share Posted September 26, 2012 Looks great Gep!! But it still smells like a dirty, smelly Tusken...LOL! Good Luck! I keep showering, but that stink just stays, Mark. Thanks! Quote Link to comment Share on other sites More sharing options...
flashpoint0214[TK] Posted September 26, 2012 Report Share Posted September 26, 2012 Nice looking build! Quote Link to comment Share on other sites More sharing options...
bigironvault Posted September 26, 2012 Report Share Posted September 26, 2012 (edited) Nice work. Purely cosmetic but wondering if your shoulder bells could come in a little closer to your chest straps? Right bell more so it looks like in the pic. Ps. Remember me? Was that guy that helped you fix your strap in the hallway at GenCon Edited September 26, 2012 by bigironvault Quote Link to comment Share on other sites More sharing options...
theisaac Posted September 26, 2012 Report Share Posted September 26, 2012 Right on! Another AM! Good luck bro! Quote Link to comment Share on other sites More sharing options...
TK5492[TK] Posted September 26, 2012 Report Share Posted September 26, 2012 Excellent work. With how big that AM is, you did an awesome job fitting it. Looks to be a quick pass. Clean work on the blaster, too. Quote Link to comment Share on other sites More sharing options...
Locitus[Admin] Posted September 26, 2012 Report Share Posted September 26, 2012 Not bad. Approved. Quote Link to comment Share on other sites More sharing options...
Gep Posted September 26, 2012 Author Report Share Posted September 26, 2012 Thank you all for the compliments! Nice work. Purely cosmetic but wondering if your shoulder bells could come in a little closer to your chest straps? Right bell more so it looks like in the pic. Ps. Remember me? Was that guy that helped you fix your strap in the hallway at GenCon Yeah Keith, I totally remember you. I was trying to get to the vendor area for an appearance we signed on for and you saved my butt with a hallway strap fix! Roger that on the shoulders. We tweaked them a lot on the picture setups. As large as they are, they tend to scoot around a bit. I will look into securing them better. Not bad. Approved. Thank you for the quick approval! Quote Link to comment Share on other sites More sharing options...
magicmemories2[TK] Posted September 26, 2012 Report Share Posted September 26, 2012 Congratulation, you have a nice set of armor, glad you made it. Quote Link to comment Share on other sites More sharing options...
Clamps[TK] Posted September 26, 2012 Report Share Posted September 26, 2012 Congrats...nice fitting kit! Quote Link to comment Share on other sites More sharing options...
Dazauto[TK] Posted September 26, 2012 Report Share Posted September 26, 2012 Congrats on your EIB, Top work trooper Quote Link to comment Share on other sites More sharing options...
bigironvault Posted September 26, 2012 Report Share Posted September 26, 2012 Congrats! Quote Link to comment Share on other sites More sharing options...
Gep Posted September 27, 2012 Author Report Share Posted September 27, 2012 thx again everyone! Fitting the AM kit on a 5' 6" female is the next challenge for me. I think this project was good training for that. I see a lot of work with the hobby iron and return edges in my future. Quote Link to comment Share on other sites More sharing options...
captsafe66[Admin] Posted September 27, 2012 Report Share Posted September 27, 2012 Congrats Gep!! Now you need to post your request for the Fire Team on the Garrison Forum!! Quote Link to comment Share on other sites More sharing options...
theisaac Posted September 27, 2012 Report Share Posted September 27, 2012 Well done sir! Congrats! Quote Link to comment Share on other sites More sharing options...

Recommended Posts
Join the conversation
You can post now and register later. If you have an account, sign in now to post with your account.