roony2311 Posted January 2, 2012 Report Posted January 2, 2012 (edited) Hello ! I just wondering about the sides of the helmet,when i squeeze the sides as they hopefully are going to be when i have set the rivets in it the top of the helmet ( Buckle ? ) kind of raise,and i think the faceplate has a big gap from the top ? Or will this be ok when i have put rivets on the correct places ? Edited January 2, 2012 by roony2311 Quote
darksideemt Posted January 2, 2012 Report Posted January 2, 2012 Even if you're going for the crooked brow look I think you need to lower it just a little. Once you put the side screws in it will bring the sides tighter, then when you put on the ears that will cover the gap. You need a gap across the front of the brow so the brow strip can fit on there, just make sure you don't cut the strip short. You need it to be tight across there so it will hold on. Quote
TK_LEPER Posted January 2, 2012 Report Posted January 2, 2012 (edited) Get some more magnets to hold the parts in place... adjust it the way you want, and make your holes. The rivets will hold the sides down, no worries there. Just use a pencil to make marks for trimming, as well adhere the parts should go when you reassemble. Edited January 2, 2012 by TK 4702 Quote
roony2311 Posted January 2, 2012 Author Report Posted January 2, 2012 Ok :-) Thank you :-D Im a little worried about the left side,it seems to be more out of shape than the right one...But i guess and hope thats is correcting itself when i mount it Quote
FIVE[501st] Posted January 2, 2012 Report Posted January 2, 2012 And do one rivet on each side while working on it (after the magnets, etc.) so you can "pivot" it. Also... remember your ears can hide numerous "oops" holes. Of course you don't WANT that... but if you look under the ears of my old TE2 helmet you'd be like, "WHOA!" Quote
roony2311 Posted January 2, 2012 Author Report Posted January 2, 2012 Thank you guys :-) I have drilled two holes now at the bottom..And i stopped..I didnt dare to go on :-D Im am so afraid that my ears wont cover my faults..I do something wrong..But i guess i have to do it anyway..But i think the whole helmet was tight,so i guess i have to cut some more of it.. But if you look at my photo `s do you think its enough "ears" on the bucket ? And will the ears cover the whole thing ? What if it doesnt ? Quote
FIVE[501st] Posted January 2, 2012 Report Posted January 2, 2012 You'll be amazed at yourself... don't worry! BUT... measure twice... cut once! (I'm sure you know that by now.) Quote
gazmosis[501st] Posted January 3, 2012 Report Posted January 3, 2012 I would strongly recommend you put your brow trim on before riveting anything in place. You can still remove it once things are riveted, but this will make sure you have everything fitted properly. Quote
skyone Posted January 22, 2012 Report Posted January 22, 2012 (edited) On 1/3/2012 at 1:11 PM, gazmosis said: I would strongly recommend you put your brow trim on before riveting anything in place. You can still remove it once things are riveted, but this will make sure you have everything fitted properly. as i did i also used the magnets to keep assembled before drilling an hole on each side (i didn't used the rivets but the 2 screws i presume assigned to the green visor that i am not going to install). Anyway i am getting troubles more than i could expect on both "ears". They are not going to cover the gap with the helmet so i think i have to trim a bit more the borders of the the helmet and, after installed the third screw, i am going to use hot air to shape a bit the abs around the "ears" and fill the gaps. What i noticed is that "ears" are cloned, there is no difference between left and right, maybe that affect the shape in the wrong way. ------------- Edited January 17, 2021 by gmrhodes13 link not working, removed gmrhodes13 2021 Quote
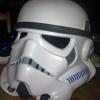
Locitus[Admin] Posted January 22, 2012 Report Posted January 22, 2012 I'm thinking the gap you see here will be much less once you tighten the ears with screws. Quote
skyone Posted January 22, 2012 Report Posted January 22, 2012 (edited) i hope so but i think i will have to shape with hot air anyway a bit because the ears' shape doesn't match the curve of the helmet may i know why we have 2 ears kit inside the box? they differs only for the rectangle size i think Edited January 22, 2012 by skyone Quote
Locitus[Admin] Posted January 22, 2012 Report Posted January 22, 2012 i hope so but i think i will have to shape with hot air anyway a bit because the ears' shape doesn't match the curve of the helmet It won't ever be a perfect match since it's derived from an original helmet and those didn't line up very well either. But sure, just keep at it until you're happy, but don't worry too much about it. Quote
skyone Posted January 22, 2012 Report Posted January 22, 2012 (edited) no way to fill the gap, i also tryed with hot air but the gap is too large to fix and not nice to see, it can't hide the inside helmet borders i dont' understand what's wrong with ears, i trimmed them following the clear shape but it doesnt match then to the helmet. now i have 2 options - remove the ears from the helmet and use hot air to shape them to better match the helmet or - do a new trimm using the other ears kit, trying to trim less (but there is'nt much space between the clear shape and the raw area) ---------------- Edited January 17, 2021 by gmrhodes13 link not working, removed gmrhodes13 2021 Quote
gazmosis[501st] Posted January 22, 2012 Report Posted January 22, 2012 I am seeing all sorts of red flags here. The main thing is that we don't want to see your helmet "FUBAR"ed. I know what you tried to do. You wanted the top of the ears to be right along the underside of the brow trim. However, the brow trim seems to be installed quite a bit higher than one normally sees it. As a result, the ear was positioned higher than it was inteded to be. There is NO amount of heating you are going to do to your helmet that will make up the gap on the front of the ear curves. Sadly, too much of the front of the ears was removed. You start trying to manipulate the already thinner plastic of the helmet with heat and disaster is imminant. My suggestion.....a rivet is easily drilled out. Reposition the cap-n-back a little lower on the face. It looks like you have about 1 1/4'' of space between the brow and the top of the eyeline. In viewing a buttload of trooper reference pics, very few helmets had more than 1/2'' gap in this area. Keeping in mind that the stunt helmets were slapped together for the shooting of the original film. There was obviously no real set standard for assembly in '76. We have the luxury of time here. By lowering that gap, that curve of the ear will come closer to the top of the cheek. It still looks like a bit enthusiastic amount of material was taken out of the front of the ears. You may need to ask ATA to send you some new ears. I would rather see you start there than to make a mistake with heating a very sensitive area of the helmet. Quote
mailman70 Posted January 22, 2012 Report Posted January 22, 2012 Hey Manuel ... Like everyone has already said, once you start securing things more permanently, much of your gap should disappear. I'm in the process of finishing up an ATA helmet build as we speak (pics will be posted soon!!). As to your ear issue, there are indeed 2 sets included with the kit....and there are 2 distinct rights and 2 distinct lefts. If you look closely at the lower portions that cover the cheek tube area you should see 2 different, however subtle, swoops (for lack of a better term). I freaked out a little bit when I got to the ears...that is until I noticed the subtle difference between R and L. It's really hard to describe, check back later today if you are still struggling and I should have some pics up... Good luck!!! Quote
skyone Posted January 22, 2012 Report Posted January 22, 2012 thanks for your info, i sent an email to ATA asking him a new ear kit. But i do remember to have cutted only the raw part from the shape.. Also, i don't understand why we have 2 kits of ears. There is any purpose in left and right? I installed the kit with the larger rectangle, even if they are both identical (no L/R) as for the brow tim, the difference is very little, it doesnt' affect to the gap left between the helmet and ears, i tested it. Quote
gazmosis[501st] Posted January 23, 2012 Report Posted January 23, 2012 ATA provides two sets: one for a stunt helmet and one for a hero helmet. As for the left and right sides there is a definate difference. Sadly, without them in front of me, I can't really point out which is which. As for trimming the ears, don't star by trimming on the mold marks. Every helmet is a little different. You need to go slow taking alittle material at a time untill you get to the fit you want. Here is a build thread of a helmet I did a while ago. I hope it helps.http://forum.whitearmor.net/index.php?showtopic=16570&hl=%2Bmtk+%2Bhelmet&fromsearch=1 Quote
skyone Posted January 23, 2012 Report Posted January 23, 2012 (edited) thanks for the link the problem with my "ears" is that i had to cut exactly the shape given from the mold, because the extra part was raw, can't be included to give another shape ------- also, to my eyes, the 2 kit are both unique (no L/R) this the kit HERO (small rectangle) ----------- Edited January 17, 2021 by gmrhodes13 link not working, removed gmrhodes13 2021 Quote
darksideemt Posted January 23, 2012 Report Posted January 23, 2012 Gazmosis was right the ears are too high and that is what is causing your problem. If you do what he says and use the other ears you can fix the problem. I had to use one of my extra ears due to too much trimming of the ears and they are still not totally flush against the lid but look fine. I honestly thought it was just an extra set of ears incase you mess up, I didn't know they were different and I'm not sure what combo I have on now. Gonna have to look. Quote
SuperTrooper Posted January 23, 2012 Report Posted January 23, 2012 Actually the kit comes with two sets of stunt ears. It looks like you built the kit with two right ears. Quote
gazmosis[501st] Posted January 23, 2012 Report Posted January 23, 2012 (edited) I am sorry, Terrell....he mentioned different size "squares" so I thought it came with hero and stunt. I stand corrected. A picture speaks a thousand words. What Terrell speaks is gospel! Edited January 23, 2012 by gazmosis Quote
skyone Posted January 23, 2012 Report Posted January 23, 2012 (edited) On 1/23/2012 at 6:03 AM, gazmosis said: You wanted the top of the ears to be right along the underside of the brow trim. hello again, that was the main problem it was my mistake to drill the trace of the holes on the surface of the helmet without looking if was ok with the ears assembled. Now i understand that each assembly is a unique event and i cant follow previous traces. So i removed the ears, made new holes (lower) and now i fixed the gap! thanks for your suggestions now i have to trim the Right ear (the one that i assumed as Hero version) and install it as well. --------- ----------- Edited January 17, 2021 by gmrhodes13 link not working, removed gmrhodes13 2021 Quote
darksideemt Posted January 24, 2012 Report Posted January 24, 2012 Ears look good. Personally I think your brow is still too high, but that it is just me. Quote
captsafe66[Admin] Posted January 24, 2012 Report Posted January 24, 2012 Here, take a look at my EIB thread, I just built an ATA helmet. Hope it helps a bit. http://forum.whitearmor.net/index.php?showtopic=18228 Quote
skyone Posted January 24, 2012 Report Posted January 24, 2012 Here, take a look at my EIB thread, I just built an ATA helmet. Hope it helps a bit. http://forum.whitear...showtopic=18228 very well done! Quote

Recommended Posts
Join the conversation
You can post now and register later. If you have an account, sign in now to post with your account.