AJCG Posted November 3, 2007 Author Report Share Posted November 3, 2007 Excellent paintjob. You said you spraypainted it... Did you use some kind of Airbrush or just out of a can? Sorry for the late answer, no I did not use airbrush, just a can, it took a good time to make it look decently good. Besides I live in San francisco and I had to paint it in a 1mx2m balcony and is very windy. So in my first try I had to removed the paint and start from scratch again Quote Link to comment Share on other sites More sharing options...
Ciscotiger Posted November 3, 2007 Report Share Posted November 3, 2007 Bro, that is one great paint job. I painted mine and it didn't even come close looking that great. But I'm going try your method with the Ultra Sheen Gloss with my AP helmet, see if it even comes close. BTW, did you apply to the Golden Gate Garrison yet? I put in my app a couple of weeks ago...no word yet. Anyway, back to the garage/workshop... Quote Link to comment Share on other sites More sharing options...
AJCG Posted November 3, 2007 Author Report Share Posted November 3, 2007 Bro, that is one great paint job. I painted mine and it didn't even come close looking that great. But I'm going try your method with the Ultra Sheen Gloss with my AP helmet, see if it even comes close. BTW, did you apply to the Golden Gate Garrison yet? I put in my app a couple of weeks ago...no word yet. Anyway, back to the garage/workshop... No I did not apply to the Golden Gate Garrison. . By the way if you have any questions feel frre to PM me. Nico, I did paint the ears in white as well as the rest of the helmet. TK-4935, I just saw your helmet on MEPD, is looking really nice, congrats mate. Thanks guys for your kind words. Cheers A Quote Link to comment Share on other sites More sharing options...
Stomper Posted December 30, 2007 Report Share Posted December 30, 2007 Armando, FREAKIN' SWEET BUCKET!! It will go NICELY with your E-11!! Quote Link to comment Share on other sites More sharing options...
AJCG Posted January 24, 2008 Author Report Share Posted January 24, 2008 Armando, FREAKIN' SWEET BUCKET!! It will go NICELY with your E-11!! Thanks Tony, I am glad you liked it. BTW, I am adding some of the last pictures I took with a different lighting set up. Cheers A Quote Link to comment Share on other sites More sharing options...
firebladejedi[TK] Posted January 24, 2008 Report Share Posted January 24, 2008 Awesome, just awesome Quote Link to comment Share on other sites More sharing options...
Smitty Posted January 24, 2008 Report Share Posted January 24, 2008 Thats just str8 up sexy there. Can you troop in it? Lots of rich detail, wondering how thin your material was....man that looks good. Quote Link to comment Share on other sites More sharing options...
AJCG Posted January 27, 2008 Author Report Share Posted January 27, 2008 Thanks firebladejedi Thats just str8 up sexy there. Can you troop in it? Lots of rich detail, wondering how thin your material was....man that looks good. Hey Smitty, Thanks for the kind words. Of course you can troop in it . It is quite thin and the HDPE is very flexible so after troop in it for a few times it may start to chip off like the original ones Cheers A Quote Link to comment Share on other sites More sharing options...
bobby fletcher Posted January 27, 2008 Report Share Posted January 27, 2008 As i have said before Well done! Funny we use the same paints and i have not come close to that look. Wonder if it has something to do with how well pant takes to styrene VS HPDE ? Quote Link to comment Share on other sites More sharing options...
Sgt Steve Posted January 27, 2008 Report Share Posted January 27, 2008 That is very good work. I have made a few models over the years and know how hard it is. I do have to ask, why is the surface rippled? Or why is there small lump's on the dome part? Quote Link to comment Share on other sites More sharing options...
ManInWhite Posted January 27, 2008 Report Share Posted January 27, 2008 Because the original ROTJ helmet it was cast from had them. So it is more of an accurate representation of what was used on screen. I'm sures someone with more knowledge as to why there are bumps on the helmet in the first place can chime in on this. Quote Link to comment Share on other sites More sharing options...
RoCKo[501st] Posted January 27, 2008 Report Share Posted January 27, 2008 someone with more knowledge as to why there are bumps on the helmet in the first place can chime in on this. thats still one of the unsolved mysteries of the original helmets... there are rumors about flaws on the moulds but nothing confirmable! WHO knows??? (grabs popcorn and a coke) Quote Link to comment Share on other sites More sharing options...
Guest T*E Posted January 29, 2008 Report Share Posted January 29, 2008 thats still one of the unsolved mysteries of the original helmets...there are rumors about flaws on the moulds but nothing confirmable! WHO knows??? (grabs popcorn and a coke) The bumps are due to a failed mold OR overheating the molds and constant pulling. The bumps are actually inside the resin and are metal filler called 'shot'. The heat can make these rise and cause the bumps after repeated forming and not allowing the molds to cool down. Since not all helmets have the bumps, this is the most likely solution. Tamping can also create this problem, but again, since not all the helmet have this problem scenario #1 seems to be the most likely cause. T*E Quote Link to comment Share on other sites More sharing options...
AJCG Posted January 29, 2008 Author Report Share Posted January 29, 2008 As i have said before Well done! Funny we use the same paints and i have not come close to that look. Wonder if it has something to do with how well pant takes to styrene VS HPDE ? Hey Gundamzeppelin, yeah you are right, I know I used the same paints, actually I asked your for advise. Probably is the helmet material. Still I went a little futher and I apply a coat of Krylon Triple-Thick Crystal Clear Glaze to obtain a glossy finish. Give it a try,...it may helps. Thanks for your help pal. Cheers A Quote Link to comment Share on other sites More sharing options...
AJCG Posted January 29, 2008 Author Report Share Posted January 29, 2008 That is very good work. I have made a few models over the years and know how hard it is. I do have to ask, why is the surface rippled? Or why is there small lump's on the dome part? Thanks Sgt Steve Iam glad you liked it . Actually the helmet is a HDPE bumpy cup, the bumps or lumps make a more acurate representation of the screen used helmets. Even the originals have a rippled surface like the the Brian R helmet or the ESB helmet from Christies. The ripples in the ESB version is more noticible since they have a glossy finish. thats still one of the unsolved mysteries of the original helmets...there are rumors about flaws on the moulds but nothing confirmable! So it is more of an accurate representation of what was used on screen Hey guys thanks for your clarifications. You are right Rocko, only AA knows abouts those flaws on the moulds and probably we never will know the truth about it Cheers. A Quote Link to comment Share on other sites More sharing options...
AJCG Posted February 22, 2008 Author Report Share Posted February 22, 2008 The bumps are due to a failed mold OR overheating the molds and constant pulling. The bumps are actually inside the resin and are metal filler called 'shot'. The heat can make these rise and cause the bumps after repeated forming and not allowing the molds to cool down. Since not all helmets have the bumps, this is the most likely solution. Tamping can also create this problem, but again, since not all the helmet have this problem scenario #1 seems to be the most likely cause. T*E Thanks Matt for sharing that info with us. I still have not idea how I did miss your post. Cheers A Quote Link to comment Share on other sites More sharing options...
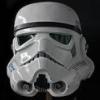
ManInWhite Posted February 23, 2008 Report Share Posted February 23, 2008 I had a question about the ears. I noticed one, the left one when you look at it straight on, looked likes it is straight up and down, but the other, the right side when you are looking staight at it, looks like the ear is turned more towards the back of the helmet. Is this how they are suppose to be for a TE? I have a TE that I am working on it right now, I'm scraping all the paint off and going to redo this helmet completely. I have completely disassembled it and am wanting to know before I start putting it back together. Also, please PM me any tips on what to look out for when painting this HDPE helmet. Quote Link to comment Share on other sites More sharing options...
AJCG Posted February 25, 2008 Author Report Share Posted February 25, 2008 I had a question about the ears. I noticed one, the left one when you look at it straight on, looked likes it is straight up and down, but the other, the right side when you are looking staight at it, looks like the ear is turned more towards the back of the helmet. Is this how they are suppose to be for a TE? I have a TE that I am working on it right now, I'm scraping all the paint off and going to redo this helmet completely. I have completely disassembled it and am wanting to know before I start putting it back together. Also, please PM me any tips on what to look out for when painting this HDPE helmet. That is correct, the left ear is turned towards the back of the helmer while the right one is in a more vertical position. You can see the difference in this pictures. Which material is your TE bucket made of? If it is made of HDPE plastic you need to scuff the surface with a scotch brite before apply any paint. I can PM you the paint brands that I used for mine if you wish. Cheers A Quote Link to comment Share on other sites More sharing options...
TK-4510[TK] Posted February 25, 2008 Report Share Posted February 25, 2008 Awesome work!!! Quote Link to comment Share on other sites More sharing options...
Daetrin[Admin] Posted February 25, 2008 Report Share Posted February 25, 2008 Pristine seems an inadequate word - just beautiful Quote Link to comment Share on other sites More sharing options...
AJCG Posted March 6, 2008 Author Report Share Posted March 6, 2008 Thanks guys for the kind words , I am glad you liked it. BTY Mike, your TE2 Hero bucket it is looking Great, one of the best I have seen so far Quote Link to comment Share on other sites More sharing options...
TK-4510[TK] Posted March 6, 2008 Report Share Posted March 6, 2008 I think your helmet outshines anything I have seen in a long time dude. The hand painting is just amazing. Your attention to detail is incredible. You really did well. Send it to me for inspection and I can really give you my full opinion Quote Link to comment Share on other sites More sharing options...
ManInWhite Posted March 6, 2008 Report Share Posted March 6, 2008 That is correct, the left ear is turned towards the back of the helmer while the right one is in a more vertical position. You can see the difference in this pictures. Which material is your TE bucket made of? If it is made of HDPE plastic you need to scuff the surface with a scotch brite before apply any paint. I can PM you the paint brands that I used for mine if you wish. Cheers A Thanks for the feedback. It is HDPE gray with a textured surface. I've been reading up on 2 component urethane which from what I've gathered is what you are suppose to use when painting HDPE. I just have to find where I can get some and see what kind of "white" they offer in it. If it's not a close match, I might take it to my local body shop guy and see what he can do with it. The only problem I'm really having right now is getting this paint off. I think Matt used an epoxy paint, so paint thinner doesn't seem to work on it. I saw some stuff at Home Depot that you can use to removed epoxy paint, but I held up on getting it. I'm gonna see if my brother think he can use his sandblaster possibly to take this off, unless he or anyone thinks it might be too harsh for the HDPE. So that's where I'm at right now. The reason I don't want to use some of the other paints mentioned is because I want to possibly troop this helmet. Quote Link to comment Share on other sites More sharing options...
AJCG Posted April 3, 2008 Author Report Share Posted April 3, 2008 Hi guys, I have been getting some questions regarding the blue tube stripes, so I decide to explain the process I used for it. I hope it is helpful and easy to understand. Basically I tried to recreate with masking tape the shape of a pair of a tube stripes decals I got from ebay. You can use a piece of plastic to stick the masking tape strips, a coin to get the righ shape and a X-acto knife for cutting the tape. I drew the desired number of lines with a pencil on the masking tape strip and cut them with the help of a coin and X-acto knife. Then I transfered all of them from a piece of plastic to the helmet tubes one by one. This part can be tricky so that is why I use a pair of tweezes to place them. It does not matter if the distance between all of them is not exactly the same or the masking tape stripes are not 100% simetrical. Try to keep an aprox distance of 3-4 mm between each stripe. Once they are place correctly on of the tube of the helmet, cut a pair of masking tape lines and stick them slightly on top of both side of the masking tape strips already applied on the helmet tube. Then paint the tube stripes with testor color(Ford&GM engine BLUE). Try to apply thing coats of paint and be as quick as possible. After apply the paint on the tubes; remove the masking tape very quickly but gently. If you get unplesant results as I did on one of the tube stripes(see picture) ;use the X-acto knive to remove and re-shape the tube stripes while the paint still is fresh. You also can retouch the surface with blue and white paint until you get the desire shape. Once you are done with one side repeat the same operation with the other. I hope this help. The left side was a pain since I never did it before, but the right side was super easy. It takes time and patience but the final result is rewarding Cheers A Quote Link to comment Share on other sites More sharing options...
TK1491 Posted April 3, 2008 Report Share Posted April 3, 2008 easily one of the best paint jobs I have ever seen. Thanks for your pics and info, Armando. They (you) are a fantastic resource! Quote Link to comment Share on other sites More sharing options...

Recommended Posts
Join the conversation
You can post now and register later. If you have an account, sign in now to post with your account.