Search the Community
Showing results for 'cover strips'.
-
Handy thing that with the nylon plates, and yeah that one was a little rounder than I would've liked, so I'll be sure to mark them out for later ones. Speaking of cover strips are the strips for the legs thicker or are they the same width as the arm strips?
-
I use these for snap plate holders, especially when using nylon snap plates, clamp one piece on either side Just watch trimming the ends of the cover strips I noticed this one looked a little round, screen where just trimmed angled
-
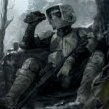
I hope I'm in the right place for this question. Will these front cover strips on my thighs be approved. Just wanted to check before I rip them off and replace them with the tops being straight across. I got crazy on the belt sander making them comfortable before I looked at a couple photos of the CRL. Thank you!
-
I got to spend the majority of the day working uninterrupted Anyway I took the clamps and magnets off the forearm and it looked good so I stuck the final cover strip on and hung it up, along with one of the interior cover strips on the right bicep. After I hung those up I discovered a simple but excellent way to catch ABS waste, that being a tupperware. I also got to work on the legs, and trimmed pretty much the entire left leg, only thing I didn't get done was the top of one of the shin halves. I trimmed the top of the thighs and bottoms of the shins completely, I left the bottom of the thighs at at 5mm and the tops of the shins at 10mm, tomorrow I'll work on the right leg, and fitting. Today was quite productive. (Pictures have been added!)
-
After a long, annoying, and frankly wasteful day of work I figured I'd try and make some good of today by cutting and gluing the cover strips on the right forearm, I got 2/3 (I already had one done prior) glued so there's only one left after this, did some trimming as well and got more scrap bits for the paste/slurry (which I am keeping free from contamination) also set up a radio for some tunes while I'm working, so woo Not too much for today but hey, progress is progress.
-
 Below is an amended Nightrooper/R1 CRL. Items known to not be on the costume, such as cod and posterior, have been committed. Please remember this is a work in progress and is not final. Required Costume Components The following costume components are present and appear as described below. General Construction Notes All costume elements are painted and weathered to match the specific visual references for this costume. At basic level, level 2 gold or gold colored leaf is not required. At basic level cracks can be painted on, but must be engraved to obtain EIB (Level 2). All Armor is constructed from a durable material such as Metal, Fiberglass, Resin, Sintra, HIPS, PVC, PLA, Vac-formed ABS, or similar. EVA foam & Similar materials are not appropriate. 3D printed components must have no visible print lines or joins. Armor is scaled proportionately to the wearer. Please Note: All damage must be 100% screen accurate if individual wishes to obtain EIB (Level 2) approval from Detachment. Helmet Helmet is based on the Rogue One/Anthology style stormtrooper helmet. The face plate is gold in color Vocoder (vertically ribbed chin detail) is painted black. Lenses are black or grey in color. Lenses sufficiently dark enough to obscure the costumer's eyes. There are two cheek tubes that extend from the ears. Two vent greeblies are present in the end of each cheek tube at the bottom front of the helmet. Trapezoids on dome and tears on the cheeks of helmets are grey. Rear traps and tears have vertical black lines. There are 2 red imperial cogs on the front dome of the helmet. The cogs are positioned symmetrically, one on each side. The cogs have light weathering. The cogs are rotated as per references. Light to medium weathering as per references. Cracking as per references. Cracks may be painted on surface in metallic gold paint. Gray and gold color patches as per references. Note: The helmet is accurate in detail and proportion to official references. OPTIONAL Level two certification (if applicable): Eye Lenses are domed in shape. Cracks are engraved into the surface. Ear screws must not have a visible slot mark and be flush to the ear. Any gap between the ears and helmet will only appear to be a seam, not any bigger. OPTIONAL Level three certification (if applicable): Face plate and gold patches are covered with gold colored leaf. Cracks are filled with gold colored leaf. Vocoder is tubular in nature with 7 vertical tubes. A visible gap must be present between the Vocoder and the helmet. The inside of each rear trap will be a raised area that is grey, with 13 engraved black vertical lines, hand painted lines like ANH are not permitted. The inside of each side trap will be a raised area that is grey. Neck Seal Black with horizontal ribs, fitted to the wearer, and extending from the base of the neck to conceal the entire neck. Under Suit Dark Burgundy, non-textured material, either one-piece or two-piece construction with no visible zippers or logos/designs. OPTIONAL Level two certification (if applicable): Where visible shall be fully ribbed with all horizontal ribbing on the arms, legs, and back. The centre of chest and back may be mesh as long as it is covered by armor. OPTIONAL Level three certification (if applicable): All ribbing on knees, arms, chest, and back must be proportion to official references. Where visible around the neck the under suit is black. Shoulder Straps They may be affixed with Velcro or adhesive. Light to medium weathering as per references. OPTIONAL Level two certification (if applicable): OPTIONAL Level three certification (if applicable): These shall be inserted behind the chest tabs and into slots of the backplate. Shoulder Armor One on each shoulder. The shoulders are considered effectively symmetrical; but are not interchangeable. Left shoulder must be gold colored. Right shoulder must have 1 gold colored area per references. Light to medium weathering as per references. Cracking as per references. Cracks may be painted on surface in metallic gold paint. OPTIONAL Level two certification (if applicable): Cracks are engraved into the surface. OPTIONAL Level three certification (if applicable): There is no swoop on the shoulder bell raised area. There is no elastic strap that wraps around the inside of the bicep. Gold sections are covered with gold colored leaf. Cracks are filled with gold colored leaf. Upper Arm Armor The front strip is bevelled and approximately ⅛" thick that does not extend beyond the bicep, and has a smaller cover strip layered thereon. Light to medium weathering as per references. Cracking as per references. Cracks may be painted on surface in metallic gold paint. Left side is approximately 3/4 grey as per references. Right side has 1 grey area that wraps the part as per references. OPTIONAL Level two certification (if applicable): Cracks are engraved into the surface. OPTIONAL Level three certification (if applicable): Cover strips will cover both the front and back joints. Biceps are loosely held closed in the back with elastic, shock cord (bungee cord) or white Velcro and are designed to remain flexible. Cracks are filled with gold colored leaf. Forearm Armor The front strip is bevelled and approximately ⅛" thick that does not extend beyond the bicep, and has a smaller cover strip layered thereon. Light to medium weathering as per references. Cracking as per references. Cracks may be painted on surface in metallic gold paint. OPTIONAL Level two certification (if applicable): OPTIONAL Level three certification (if applicable): Forearms are loosely held closed in the back with elastic, shock cord (bungee cord) or white Velcro and are designed to remain flexible. Cover strips will cover both the top and bottom joints. Gold sections are covered with gold colored leaf. Cracks are filled with gold colored leaf. Hand Plates Roughly pentagonal in shape, the hand plates are mounted securely over the back of the glove. As an alternative to plastic, these may be made out of latex or latex-like material. Light to medium weathering as per references. Cracking as per references. Cracks may be painted on surface in metallic gold paint. Left handplate is gold colored. OPTIONAL Level two certification (if applicable): Hand guards shall be made of plastic. Cracks are engraved into the surface. OPTIONAL Level three certification (if applicable): Hand guards should follow the correct RO shape, ANH hand guards are not acceptable. A small indent in the front of the hand plate shall be present. Cracks are filled with gold colored leaf. Left handplate is covered with gold colored leaf. Gloves Dark Burgundy, leather or leather-like, enclosed fingered, non-textured, (normal leather grain/texture/lines are acceptable) fitted style. No buckles, straps, or decorative stitching. OPTIONAL Level two certification (if applicable): OPTIONAL Level three certification (if applicable): Chest Armor Chest plate overlaps the abdominal plate. Light to medium weathering as per references. Cracking as per references. Cracks may be painted on surface in metallic gold paint. Right side must have 1 gold colored area per references. OPTIONAL Level two certification (if applicable): Cracks are engraved into the surface. There are raised trapezoids at the top of the shoulder section beneath which the straps insert. The chest and back sides shall be connected by black extensions pieces. OPTIONAL Level three certification (if applicable): Top pectoral out lines swoop correctly outward. Gold sections are covered with gold colored leaf. Cracks are filled with gold colored leaf. Back Armor There are raised trapezoids at the top of the backplate section beneath which the shoulder straps insert. The backplate continues past these trapezoids towards the top of the shoulder Right side There is a black square shaped greeblie with a circular gold recess detail Left Side There is a rectangular raised section. There is a black colored rectangular frame. There is a gray section on the left. There are 2 raised vertical bars that are gold in color. Lower section There is a black square greeblie below the right greeblie. There is a small vertical rectangle to the right of the black square greeblie. There is a small rectangular greeblie with rounded ends below the right side black greeblie. Light to medium weathering as per references. Cracking as per references. Cracks may be painted on surface in metallic gold paint. There is a gold colored section along the bottom of the armor as per references. OPTIONAL Level two certification (if applicable): Cracks are engraved into the surface. Top of box wall has a trapezoidal indentation. OPTIONAL Level three certification (if applicable): Bottom of backplate is curved and extends past abdominal back cover plate. Gold sections are covered with gold colored leaf. Cracks are filled with gold colored leaf. Abdomen Armor The abdominal armor consists of a one-piece corset design with a vertical opening centered on the back. The back opening is covered by a rectangular cover plate that is worn under the back armor. There are 3 vertical ribs centered on the front of the abdomen and two (one left and one right) ribs further spaced to each side of the center. There are two (one left and one right) angled (approximately 70 degrees) ribs on each side of the abdominal armor. There are two (one left and one right) angled (approximately 70 degrees) recessed ribs on each side of the abdominal armor behind the raised angled ribs that are black Any side shims added are to be added to the white areas of the armor. The center front detail consists of a raised rectangular panel. On the right half of the panel, there is a vertical column of 4 buttons approximately ⁷⁄₁₆" (11mm) in diameter. The bottom button is blue while the other three are grey. On the left half of the panel, there is a vertical column of raised evenly spaced horizontal gear teeth with a recessed trapezoid at the top of the column. The rectangular inside bottom of the trapezoid is black. The left front detail consists of a raised rectangular panel with an angled top. There is a vertical column of 4 buttons approximately ⁷⁄₁₆" (11mm) in diameter. The right front detail consists of a primary raised rectangular panel with an additional secondary raised rectangular panel covering the top ⅓ of the primary panel. There is a column of three thin horizontal evenly spaced raised lines across the top ½ of the secondary panel. The abdominal armor is accurate in detail and proportion to official references. Light to medium weathering as per references. Cracking as per references. Cracks may be painted on surface in metalic gold paint. The armor is gold in color. OPTIONAL Level two certification (if applicable): Cracks are engraved into the surface. The right front detail panel is centered between the two outer vertical right ribs. The left front detail panel is centered between the two outer vertical left ribs. OPTIONAL Level three certification (if applicable): The abdomen armour is covered with gold colored leaf. The abdomen armor has two horizontal recessed rectangles centered above the center front detail panel and on each side of the center rib. All 8 Button details are recessed and bordered with a thin edge, only the recessed portion is painted. The center front panel column of raised gear teeth has only 9 teeth. There is a recessed edge (approximately ⅛" 3mm wide) along all four sides around the face of the center front panel The right front detail panel is centered between the two outer vertical right ribs. The left front detail panel is centered between the two outer vertical left ribs. There is a recessed edge (approximately ⅛" 3mm wide) along the sides and top around the face of the left front detail pane The abdominal armor back cover plate has two protruding tabs along the bottom that rest inside the back hard belt. Kama There is a red fabric waist band approx 2.5-3x the width of the belt. The top fabric band is level with the bottom of the 3rd button down on the abdomen. There are 2 padded fabric panels at the font, these panels are not rectangular and have a slight trapezoid shape. The front panels end approximately at the knee. There is a third padded front panel, rectangular in shape behind the front two, and approx 2/3rds their length. There are two trapezoidal quilted hip panels, these panels end mid thigh. The quilting forms a vertical diamond pattern. There are two rear padded panels THIS NEEDS CONFIRMATION FROM REFERENCE, could it be pleated? The panels are same length as the front panels. The panels do not wrap past the front of the hip. The panels over lap by approx 6" at the rear, left over right. All panels have a border and backing that matches the waist fabric. Kama is lightly weathered. Belt Is made from black leather, or leather like material. Sits in the middle of the fabric band of the Kama. Is approx XXmm wide MUST CONFIRM There is a front rectangular section approx XXm tall MUST CONFIRM and is rounded on the right side. There is a raised section on the left side which is pointed on the right end. A thinner top strip runs the length of the belt and over laps the front section, with a pointed ends, forming the detail on the front of the rectangular section. Is closed at the rear. There is a single popper shortly before the holster. Staps There are two straps approx XXmm wide MUST CONFIRM that loop down from the belt. Mount to a short strap at the rear that hangs vertically on each side, and is looped over the belt. There is a single belt loop to the left of the rectangular section, level with the strap. Holster Is made from black leather, or leather like material. Is worn on the right hip Hangs from a single wide loop. Has 2 black poppers just under the belt loop. Thigh Armor The thigh armor is mirrored for each leg and not interchangeable. The cover strips are beveled and approximately ⅛" thick that does not extend beyond the thigh and has a smaller cover strip layered thereon. The top edge of the thigh armor is unadorned, and the bottom edge has a raised detail that fallows the bottom edge contour. Light to medium weathering as per references Cracking as per references. Cracks may be painted on surface in metalic gold paint. Right Side The thigh is predominantly gray There is a gold colored section at the bottom of the thigh There is a white colored section at the bottom of the thigh The small ammo belt consists of 5 evenly spaced rectangle ammunition boxes and is installed on the bottom of the right thigh, there are no visible screws or rivets. The ammo belt it gold in color Left Side White in color There is a gold colored section on the outside of the thigh at the bottom. OPTIONAL Level two certification (if applicable): Cracks are engraved into the surface. Thighs are loosely held closed in the back with elastic, shock cord (bungee cord) or white Velcro and are designed to remain flexible. Cover strips will cover both the front and rear joints. OPTIONAL Level three certification (if applicable): The bottom outside edges of the small ammunition belt are angled at approximately 45 degrees. Thigh armor is suspended by a black strap approximately 1" 25mm in width with a plastic side release buckle that is covered by black webbing or elastic that runs down the side seam of the leg. Gold sections are covered with gold colored leaf. Cracks are filled with gold colored leaf. Lower Leg Armor The greaves are mirrored for each leg and are not interchangeable. The top edge of the greaves has a raised detail that fallows the top edge contour. The bottom edge of the greaves flairs out to cover the top of the ankle and boots. The cover strips are beveled and approximately ⅛" thick that does not extend beyond the greave and has a smaller cover strip layered thereon. Greaves are loosely held closed in the back with elastic, shock cord (bungee cord) or white Velcro and are designed to remain flexible. Cover strips will cover both the front and rear joints. The trapezoid knee plate (sniper knee plate) is affixed to the top of the left greave and there are no visible screws or rivets. Sniper knee plate must be aligned with the vertical cover strip and the top raised edge detail on the greave and is accurate in detail and proportion to official reference. Light to medium weathering as per references. Cracking as per references. Cracks may be painted on surface in metallic gold paint. OPTIONAL Level two certification (if applicable): Cracks are engraved into the surface. The sniper knee plate has raised detail that fallows the top edge contour. The sniper knee plate has 3 trapezoidal lugs on each side and 2 on the center bottom edge (totalling 8) of the knee plate. OPTIONAL Level three certification (if applicable): Gold sections are covered with gold colored leaf. Cracks are filled with gold colored leaf. Boots Boots are above ankle height and the same style as the First Order TK. Chelsea type boots in the style of OT TK are not acceptable. Boots are all white and made of leather or leather-like material Flat black soles without a heel. Patent leather or high gloss is not permitted. Light to medium weathering as per references OPTIONAL Level two certification (if applicable): There is no seam present on the front of the boot. The wearer's inner side of the boots have zippers and no side elastic. OPTIONAL Level three certification (if applicable): Optional Accessories Items below are optional costume accessories. These items are not required for approval, but if present appear as described below. If adding in an accessory after initial approval, the item still needs to be submitted to local GML for approval before use. Captain Enoch SE-14 Blaster The blaster has an extended cone shaped barrel. There are 3 gold colored rings on the blaster 1 on the extended barrel 1 at the start of the barrel 1 at the rear of the blaster There is a narrow scope that runs approximately from the rear of the blaster to the top front sight. The scope is flared out at the rear Hand grips are white in color.
 -
Hey Jeff - I'm a fan of lexan shears for rough cutting (but it helps to have a couple different types/shapes of scissor because you will absolutely get blisters or hand cramps), then I smooth out my cuts with a belt sander and one of these big flappy wheels on a Dremel/rotary tool, and finish with emory boards for a smooth, pinch/bite-free, slightly-rounded edge. Links for inspiration, but shop around. Luckily on Anovos kits, the cut lines on the inside edge of the armor are easy and like 90% accurate if you're a standard sized trooper, so I usually mark them with a pencil, rough cut, then sneak up on my line with sanding. I only use a utility knife (AND A CUT GLOVE) and a metal ruler (with some magnets) to cut my coverstrips in straight lines really, which isn't needed for this kit (unless you make inner cover strips, which you should!). I know some people score-n-snap, but I haven't found many places on the armor that it's super practical/safe for me to do. Oh and wear a respirator. Hope that helps!
-

TK ANH Stunt by CloseTheBlastDoor
CloseTheBlastDoor replied to CloseTheBlastDoor's topic in ANH Build Threads
I did end up contacting Walt, and he will send me a new ammo pack. While I waited, I thought that I’d run through the rest of the thigh construction. I cut 20mm wide strips for the fronts, and again like for the shins opted for an inner strip as well for strength. On the left thigh, I aligned the lower edges. The upper ones came together pretty close, so that was great. On the right thigh, I aligned the top edges instead. The outer half had a bit of a curve to it, so some of the ridge comes out under the cover strip there. I glued the front and rear strips on both thighs first before fitting. For fitting, I followed @gmrhodes13’s advice of a finger’s width spacing, and will do the refinement later when everything starts coming together. I cut and glued the rear strips at 20mm, but didn’t double that up in case I needed to make adjustments. I also added a small backing strip at the bottom front of the left thigh, to make it look more even. Lower left thigh, front, with backing strip in place: Back view: Then I smoothed all edges and strips of both thighs. I thought I was done. But now looking at the left thigh, there is a glaring issue that I can’t believe I didn’t catch before. The ridges are spread out! I don’t know how I could have measured so poorly, and in all the gluing not have noticed, but it is pretty obvious now! Is this going to be a problem? Now that I have doubled up with front and back strips, it’s going to be even harder to get them off if I indeed need to fix this. If so, any advice on getting the strips off? -

G'day there - new TK recruit from down under
gmrhodes13 replied to Slouch's topic in New Member Introductions
Looking good May be your photo but looks like you may have over trimmed your large ab plate, small ab plate looks like it needs trimming more. Also did you need as wide biceps as your cover strips are very small compared to the raised ridges. Should strap appears to be sitting high, you may want to tighten the strapping so they sit better on the rear. You can see the loose elastic under your shoulder strap better on the image below. Normally if they cover better you can also trim 1/2 the larger ridge but appears yours are just covering the backplate. Posterior is being pushed away from your kidney, V tabs can help this Note the elastic helps keep the shoulder straps stay flat. NOTE: As seen in the photos below, there are no large tabs on the rear of the shoulder bridges. This is not specifically mentioned in the CRL, but removing them is highly recommended if possible. V Tabs With a heat gun (or heat in oven) you bend strips of ABS plastic into the shape of a V, only glue one side and the other remains free to allow movement when you bend. Just helps stop the butt plate from pushing back from the back plate. Thigh ammo strip corner a little too much You may need to do some hot water bath work, your shin rears are not sitting very flat, left is not covering the velcro completely You can also post here for pre approval feedback before submitting to your GML -

Will these front cover strips pass
MaskedVengeance replied to Firemantrooper's topic in Request TK Pre-Approval
Exactly what Glen said. My cover strips are angled to follow the contour of the two halves of the leg pieces, much like yours (as well as the screen references for that matter). Thighs by difference armor makers come together differently, and thus there is variance in the angle of the cover strip ends. Also like Glen said, you may consider sanding the corners a bit to avoid poking or snags. -

Legacy Fem, Version A Build
Tilheyra replied to Tilheyra's topic in Legacy Stormtrooper Build Threads
Progress!!! I finally figured out a way to glue the wide cover strip to the inside of the forearms! As noted a few posts up, I decided to use wide interior cover strips to increase the circumference of the forearm armor, as well as decided to glue the cover strip to one side of the joint before gluing the other side. I then figured I could finagle things to where the other side of the cover strip would be able to be glued in prim and proper fashion. Welp...the cover strip and the other side of the joint would not line up properly in terms of their angles, so I had to think things through further. Shaping is key in this issue, but I figured it would be easier to shape this cover strip if it were not attached to anything. I decided to cut the glue on one side of the cover strip to free it from the forearm armor. I then put on (the stove) a pot of boiling water and dropped the cover strip in the boiling water for 90 seconds. After fishing the cover strip out of the boiling water, I then put a small curve into the cover strip along the center of its length. This photo gives an idea: Now I had a cover strip with a slight curve, but needed to now glue it to both sides of the joint, all while accounting for the increased circumference that I want in the forearm piece... Spacers!!! I can cut spacers with a width according to the increased circumference (I remeasured and got 2cm)! But how do I keep the spacers in place to do their job? The forearm pieces are rigid enough that I only need a spacer on each end of the cover strip, and I can use the clamps to keep the edges of the spacers aligned with the edges of the forearm armor! Having the claps clamped on the spacer joints will keep everything in line! Here's what that looks like now that I have everything glued (I got a little glue on the spacer, so I'll have to cut that when I remove the spacer): Getting it all glued was a challenge, and the photo below shows that I got glue in many areas I did not want, but I'm not going to mess with it further for fear I could undo all of my work. Only one forearm is being glued right now. I'll glue the other one when I see the results of this forearm: -
Normally we try to add any extra material on the rear as this is not seen as much by the public, but some add additional sizing to the front and rear, at the end of the day it would be best speaking with your GML as they will be reviewing the armor and may not allow larger cover strips, best to check . A thread on the subject of larger cover strips
-
Will these front cover strips pass
gmrhodes13 replied to Firemantrooper's topic in Request TK Pre-Approval
Should be fine (albeit entirely up to your GML), there is no requirement about the ends of the cover strips being straight or angled, you can take the corners off too if you wish. Also note the lower ridge seam filled, either ABS paste or Sugru -
Anovos TK kit Instruction
themaninthesuitcase replied to rpglover1983's topic in Hard Armor (General Discussion)
No it wouldn't sorry. Things like the cover strips need to be glued on to look right, and a layer of velcro instead, would not only not be up to the job, it would not look right and so not be clearable. This is why glues like E6000 are recommended as if a mistake is made of change required it's a reversible bond than you can remove and re do. -

G'day there - new TK recruit from down under
Slouch replied to Slouch's topic in New Member Introductions
Hi Brains-trust - an update after I finally received the parts my kit was originally missing. I was nervously checking the tracking from the US for weeks. It took two weeks to scoot around the East coast of the US, then one day to San Fran and then next day it was at my house in Australia! New shoulder bells and button covers for my belt have made me (well, my kit) complete! I do have a spare ammo thigh belt that I'll replace at some point as I don't love the original. I *think* I have finally finished my kit and am about to submit for basic level approval, but if you see anything that needs fixing in the meantime, I'd really appreciate your feedback. Hopefully some quick adjustments I can make to get everything looking tip top. Going off the previous (much appreciated) advice, I changed over the cover strips on my shins to the correct sides. I adjusted my strapping as best I could to balance it out and it's feeling good to wear. Also heat bent the ABS belt to better contour to my body and it's a big improvement. Full Front - Helmet on Full Back - Helmet on *I'll get a better image for my submission with the velcro lined up, but it was an oversight for these pics. Left Side - Helmet on - Holster measurements were all checked. The leather is a bit softer than I'd hoped and gapes a bit, making the straps look crooked, but they'd 100% correct according to the CRL. Right Side - Helmet on Waste Up - Helmet off Action Shot *I probably should have thought of something more creative, but my wife laughed when I said that was a requirements, so we wrapped up the shoot. Any feedback would be awesome and hopefully I'll be joining your ranks soon! Cheers - Chris -
Legacy Fem, Version A Build
Tilheyra replied to Tilheyra's topic in Legacy Stormtrooper Build Threads
The excess material has been removed from the inner joint of the forearm (the joint that faces my sides when my arms are down). The excess material was left at 8mm, which was the most I could leave it and the material still be smooth, but that was not enough. Turns out I need roughly 10mm to 11mm on each side of the joint, so I have bumped this up to 12mm on each side for wiggle room. This means I need to fill in a 24mm gap beyond the original design on this inner side of my forearm armor to allow for my hands to fit through the armor pieces when putting on and taking off the forearm armor. I decided the option providing the best strength was one wide cover strip spanning the full gap, which would then be followed by 2 strips 12mm in width laid in the gap and pasted to show only 1 seam in the middle. As such, the interior cover strip fills the full 24mm gap to provide the material to glue the 2 out strips to. I allowed a 1cm overlap on each side beyond this 24mm gap, so the interior cover strip is 44mm wide. The cover strip is also 20cm long. As I didn't want to use the extra sheet of ABS that came with my armor (and is a color match to the ABS used in my armor) for interior cover strips, I purchased extra ABS sheets from Amazon. These sheets from Amazon will be used for interior cover strips and any other material needed for places out of sight, and the extra ABS sheet that came with the kit will be used for any visible material. Given the tension involved in gluing this cover strip to fill the gap needed in the forearm armor, I am gluing one side at a time and allowing 48 hours of drying/curing time. Here's one of the forearms just after gluing on the cover strip. My pencil lines can clearly be seen to help me know where to glue the opposing side when the time comes: -
 First and foremost... There is no one 'best' armor. There is a 'best' armor for *you* depending on a few factors: 1) Your budget 2) What your body size is (yes, different armors lend themselves for different body types) * 3) How experienced are you at building armor 4) It's not the kit, it's how it's fitted to the wearer that counts * While FISD does not endorse any particular armor maker, below are sellers who have proven themselves time and again in terms of customer service, honesty, and quality. All makes below can be made to be both 501st and FISD acceptable. MATERIALS Armor is made from either HIPS or ABS. HIPS --- Pros: generally less expensive, easier to trim. --- Cons: needs painting or serious polishing to look shiny. Most HIPS will not be as durable as ABS or take the stress of ABS --- Suitability: will hold up fine for regular trooping ABS --- Pros: no need to paint, high durability --- Cons: may lack the detail of HIPS, usually harder to trim --- Suitability: will hold up fine for regular trooping plus take a lot of abuse OTHER TERMS Untrimmed: means the kit comes untrimmed and you'll have to trim the parts before starting assembly. Trimmed: parts are pre-trimmed and you can start assembling right away ANH Derived: traces back to a screen used helmet. Armor came from an incomplete ROTJ suit that was supplemented with parts from a tour suit, with this base being modified to be more ANH accurate in detailing. Parts will need to be butt joined with a finishing strip glued on top. * ON SIZING ANH Derived armor (TE2, AP) was sculpted for a typical UK actor circa 1976, e.g. 5'10" and 165lbs. While good for smaller body types, it has been successfully made to fit people as large as 6'4" 235lbs though requires a bit of shimming to pull this off. 1. If you are taller or larger in frame/girth, you may want to consider AM, RT, or TM armor makes for easier fitting. 2. If you are shorter, while ANH derived armor may lend itself to your size, even FX armor has been made to fit and look good on people as small as 5'6" and 115lbs (and smaller!). 3. RT has upsized his helmet by 4-5% which makes it equivalent to the size of the old FX but is more accurate in appearance. So, while it's true that every kit has a certain ideal body type, every make has been made to fit every body type and still look good. WHO TO AVOID 1. Be aware that this site - http://www.stormtroo...s.com/home.html - is not considered commercially available. It is run by a person selling recast parts, and at a healthy premium over what you can buy direct from vetted sources. You've been warned... 2. Do not buy from e-bay - kits are over-priced, the quality is often dubious, and always recast. 3. Also see this thread: https://www.whitearmor.net/forum/topic/19329-where-what-and-whom-to-avoid-when-buying/ COMMISSION BUILDS Please be aware before purchasing a "commission build" (assembled by any of our vetted sellers listed below) or a completed costume sold by reputable members, does not mean an automatic pass at our higher levels of approval. As with all costumes, the armor will be under the same level of scrutiny as one you assemble yourself. It must fit well and follow correctly the requirements as set out in the current CRL. Please also bare in mind, you could be requested to make modifications and corrections when applying for Expert Infantry and Centurion levels where additional reference materials are used over and above what is written in said CRL's. Some example are sniper plate positioning, rivet placement and the finer details scrutinized at Centurion. VETTED MAKERS While there are many other sources for armor, the list below only contains those who have proven track records of honest business dealings, quality craftsmanship, and that are free from recast debates. You are certainly free to buy where you will, but if you vary this list we strongly encourage that you at least do your due diligence inquiring about the seller's quality and reputation before parting with your money. === ANH DERIVED ARMOR === Type: ATA (Affordable Trooper Armor) Sadly Unavailable until further notice Country: USA Contact: Kit: ABS (HIPS by request), untrimmed, ANH derived Availability Assembly: Armor needs to be trimmed, parts butt joined with finishing strips, HIPS needs to be painted. Comments: The quality of HIPS material is such that it is the most durable of all HIPS armor makes. ABS is a custom made ABS for color, gloss, and durability, so you can order it either way and feel confident. Type: Authenticprops (AP) Country: Canada Contact: authenticprops@hotmail.com Kit: .080 gloss white ABS, ANH derived can be ordered Untrimmed, Fully trimmed (ready for assembly) or Fully built Ready to Wear out of the box. All kits include ANH Leather holster, rubber gloves, rubber hand guards, canvas belt, TD metal clips and all correct hardware to build your armor to centurion specs. Helmet is screen derived but cleaned up with a smooth cap and back, The AP helmet includes hovi mic tip replicas, Centurion approved painted look vinyl decals, green acetate lens, rubber brow/neck trim, frown mesh, all correct hardware to assemble helmet. Availability: No known problems obtaining this, usual wait time 4 to 8 weeks Options: UNTRIMMED KIT all parts require trimming/sanding FULLY TRIMMED KIT all parts come perfectly trimmed ready for assembly FULLY BUILT READY TO WEAR out of the box (Custom built to your size) HELMET ONLY (untrimmed, trimmed, fully built) ARMOR ONLY (untrimmed, trimmed, fully built) Assembly: requires cover-strip and butt-joining for assembly like the movie original Comment: AB and Kidney plates have 3" inch extensions to the sides to fit larger waist sizes without the need of shimming, can be easily trimmed down to perfectly fit your waist size or left to original movie size. All kits include ANH style Leather holster, rubber gloves, rubber flexible hand guards, canvas belt, TD metal clips and all correct hardware to build your armor to centurion specs! Type: RS Prop Masters Currently not offering build your own kits, only commission built BUT kits will be returning to their website very soon (29/12/2023). Refer to the "COMMISSION BUILD" section above in this post. Country: UK Contact: studio@rspropmasters.com or http://www.rspropmasters.com/ Kit: 1.5mm ABS or 1.5mm PVC, untrimmed or ready-to-wear, only 1st Generation cast of an original ANH armor. Comes with all accessories needed for Expert Infantry level build and Centurion ready with very little extra parts needed. Note again, commission builds from RS are not always up to our EI and Centurion level and may require additional work to be approved. Availability: 3-5 days Assembly: Parts are untrimmed and requires cover-strip and butt-joining for assembly. Can be ordered pre-assembled for an additional fee. Options: 1. Helmet + Armour - Kit 2. Armor only - Kit 3. Helmet - Kit 4. Helmet - Fully finished and hand painted 5. Armor + Helmet - Armor trimmed to your specification but not assembled + Fully finished helmet. 6. "Fully loaded" - Accessory package, when bought together with armor. Contains strapping kit, latex handguards, rubber gloves, canvas belt, etc.. All prices are excluding shipping. Comments: The only 1st Generation cast of an original ANH armor. Comes unaltered with all the good and bad that brings. May require more skill to assemble than other kits. Extremely accurate when assembled with care. Armour is more generous than SDS or AP, but not as large as RT-Mod or AM. Type: RWA (RWA Creations) Country: Isle of Wight, UK Contact: Email to rwacreations@gmail.com .. Facebook: RWA Creations Availability: 6 weeks Kit: ANH, ESB untrimmed kit in 1.5mm ABS, 2mm ABS, 2mm Acrylic capped. Black or White. Options: Helmet assembly service or fully finished (excluding padding). Neck seals, Canvas Belts, Aluminium Thermal detonator clips. 2" longer shins available on request. XL parts for taller troopers: See: XL Thighs - https://www.youtube.com/watch?v=rLyH1nb4fPQ, XL Shoulder bells - https://www.youtube.com/watch?v=qySuQk4DI-Q, XL Torso parts - https://www.youtube.com/watch?v=m4W5GQZ-opQ, XL Kidney Section - https://www.youtube.com/watch?v=fOo-aTzPJhY Type: T/MC Country: USA Contact: tray@traynichols.com or PM Tray on the FISD boards Kit: .090 ABS, untrimmed, ANH Derived. Helmet is screen derived. Armor similar to TE2 and AP but with some parts being different and others being modified. The left inner shin is a duplicate of the right outer shin. The arms (Bicep, forearm and shoulders) are the same, there is no unique left and right arm. The helmet comes with resin cast hovi mic tips, which are acceptable for EIB use, and all assembly material excluding paint. Comes with your choice of Smoked gray bubble lenses or flat dark green lenses. This is most comparable to AP with some slight changes. Availability: 3-4 months for delivery and sometimes sooner than that. Assembly: Seams are overlapping joints making it a reasonably easy build, though one can use finishing strips instead. Comments: The armor is ABS, not bright white and glossy like FX. Due to material thickness lines are a little softer than some other makers. Should shine well with Mr Sheen. NOTE: available in black too! Type: WTF (Walt) Country: USA Contact: Walt on FISD Kit: ABS, untrimmed, ANH derived Availability Current wait times are 6-8 weeks. Assembly: Armor needs to be trimmed, parts butt joined with finishing strips. Comments: No issues with quality or service reported to date. === ANH FAN SCULPT === Type: RT-Mod (RT) / RT-Panda Country: Canada Contact: rtmodpanda@gmail.com Kit: ABS, close trimmed, fan sculpt. Updated bucks for the majority of the armor and helmet in 2018 to meet Centurion level standards (separate ab button plate, kidney notches, etc). Availability: Currently about 8 month wait. Assembly: Parts are "close trimmed" (a thicker return edge is left on all parts for those seeking more accuracy for strapping brackets etc. Final trimming is far less work than "untrimmed off the buck" armor. Designed to be easy to put together (regarded as one of the easiest kits to assemble as all "halves of lumbs etc. line up to one another without problems). Designed for butt joined limbs with a formed ridge with cover strips. Some parts can be formed without ridges present. Helmet comes as a kit as of 2019. Options: ANH stunt, ESB hand armor Comments: Designed especially for taller/larger body types and has more capacity to fit these troopers (without shims) than most makes of armor. There are 2 sizes of back armor, 3 sizes of thighs, 2 sizes of shins / calves, and the ab / kidney will accommodate approx 40" waist without shims. The thighs are wider and can accomodate a wide range of sizes. Female troopers often order thighs / shins to accommodate wider hips etc. The armor and helmet are sculpted at 4% larger than an original kit. The difference is subtle but makes fitting/sizing much easier for taller/larger troopers (has been worn very easily by troopers from 6' to 6'5"). Type: AM (Armor Master) - Dave’s Darkside Depot Country: USA Contact: davesdarksidedepot@gmail.com or https://www.facebook.com/Daves-Darkside-Depot-1188080927989611 Kit: ABS. All body armor components including face piece and ear pieces are .090 ABS. The one piece dome/back is formed using .125 ABS, as this piece is formed over a rather deep mold and anything thinner can cause thin regions which can eventually crack or fracture. White .060 ABS blanks included to cut as cover-strips. TD clips, rubber gloves and black Nomex flight gloves, flexible hand guards and all Centurion level hardware included. Availability: Normally 4-6 weeks or less. Assembly: Comes trimmed out of the box, but you will still be required to adjust for proper fit to your body size. Good choice for large troopers, but can be cut down. Can be ordered completely pre-assembled for an additional fee. Comments: Chest and back molds have been updated to address past concerns, and are now acceptable to Centurion level. They are now including a custom, die-cut Imperial cog themed helmet liner for the helmets, mounting Velcro included. Hovi tips are professionally cast aluminum. Hero helmets are now available. Type: MTK (Mike's TK) Country: USA Contact: mtk_armor@cox.net Armor is made of .70 gauge (1.778 mm) satin gloss white ABS and will withstand the rigors of trooping. Kit comes trimmed for shipping and requires final trimming/fitting. Kit comes with: All ABS plastic required for assembly to include helmet, body parts and joining/cover strips. Helmet accessories include lens material, rubber S trim, Hovi tips, helmet decals (choose between ANH, ANH Sandy & ESB versions) screws, rivets, washers and screen mesh for the frown. Gloves This kit does not include: Blaster, under-suit, holster, boots, Velcro or any instructions but many of these items are available at trooperbay.com Kits can be built to Centurion level when following the correct CRL MTK is owned and operated by a trusted 501st member Availability: Kits generally available on request, spare parts also available and on hand. === ROTJ ARMOR === Type: CFO - note this is for ROTJ armor only (ideal for ROTJ, TK Commander, or Incinerator Troopers). Country: UK Contact: PM Sskunky on FISD Kit: ABS or HIPS untrimmed. Kits can come in lite, full, assembled and weathered please inquire for prices and custom orders. ABS is standard and screen accurate. We can make the armour in any colour HIPS with a 25% deposit. Kits come complete with all plastic parts. Helmets come with resin mic tips cast from an original, black rubber trims, decals and lenses all subject to availability and stock. Availability: Kits available at all times with approx 4 week turnaround time. We have a US distributor who will be able to ship kits within the USA. Assembly: Parts are trimmed and designed to be easy to put together - along with RT is the easiest kit to build. Comments: These suits are cast from original therefore there will be warps, lumps, bumps etc. present on the plastic. The original suits were made to fit actors in the region of 5'10" and 180lb.... there is some flexibility as with all armour which is down to assembly. This armour is no way sanitised or idealised, it is a true representation of what is seen on screen in STAR WARS "The Return Of The Jedi". Other Notes: Hand guards O2 canister/detonator detail and end caps, belt, knee belt and shoulder straps are own sculpt. Necessary/minimal sharpening was done to the moulds to attain the correct level of sharpness lost from the original fibreglass moulds obtained from Cameron Oakley. The original shape and contours are intact and the details and edges have been sharpened as documented in various threads on the FISD and other prop forums. === ROGUE ONE (Mandalorian / Obi Wan / Ahsoka / Enoch / Night Trooper) ARMOR === Type: Jimmiroquai Country: PI Contact: email jimmiroquai@yahoo.com Kit: Kits are lightweight flexible fiberglass. Availability: PM to ask, varies Assembly: Fully trimmed and partially assembled, e.g. if it fits out of the box one can go straight to rigging and painting. Comments: No issues with quality or service reported to date. Type: 850 Armor Works Country: USA Contact: FB: https://www.facebook.com/groups/205514516516535/ website: https://850armorworks.com/ email: 850armorworks@gmail.com Kit: ABS plastic Availability: PM to ask, varies Assembly: No Comments: No issues with quality or service reported to date. === FIRST ORDER TFA / TLJ / TROS === Type: Jimmiroquai Country: PI Contact: email jimmiroquai@yahoo.com Kit: Kits are lightweight flexible fiberglass. Can come with both TFA or TLJ details. Availability: PM to ask, varies Assembly: Untrimmed. Comments: No issues with quality or service reported to date. Type: 850 Armor Works Country: USA Contact: FB: https://www.facebook.com/groups/205514516516535/ website: https://850armorworks.com/ email: 850armorworks@gmail.com Kit: ABS plastic Availability: PM to ask, varies Assembly: No Comments: No issues with quality or service reported to date. Type: Denuo Novo Country: USA Contact: FB: https://www.facebook.com/Denuo_Novo website: https://www.denuonovo.com/collections/new-star-wars email: customerservice@denuonovo.com Kit: ABS plastic Availability: PM to ask, varies Pre orders, pre built, spare parts and kit form available. Assembly: YES Comments: No issues with quality or service reported to date. First Order TK armor full vendors list available. HERE === NO LONGER MADE === Type: TE2 Country: USA Contact: HDPblues on FISD Kit: HIPS, untrimmed, ANH derived Availability: None, since a long time. Best to look elsewhere. Assembly: Armor needs to be trimmed, parts butt joined with finishing strips, then painted. Comments: Helmet is considered very screen accurate. While he rarely makes armor anymore, he's a solid buy if you find any. Type: FX Availability: No longer made. Do not buy this armor - we list it only for posterity in case you pick up a suit second hand from a current Legion member. Kit: ABS, trimmed, fan sculpt. Comments: The armor can be made to be FISD EI acceptable for about $50 and an afternoon of work. The helmet is not acceptable by any Detachment's program, and many GML's are no longer allowing it to be accepted at the Legion level. Type: Older/Original AM (1.0) NE Country: USA Contact: troopergear@gmail.com Kit: .090 gauge ABS - trimmed - Fan sculpt Availability: N/A Assembly: Butt joining required for the legs. Arms can be overlapped but trimming those overlaps off and butt joining is recommended. Comes trimmed out of the box, but you will still be required to trim for proper fit to your body size. Comments: An updated version of the older AM kits with a more accurate helmet and some other accessories. Best suited for the larger troopers who can have problems fitting into screen-sized kits. Comes in full or "lite" kits. Lite kits come without helmet, ABS cement or polish.
 -
Please forgive the noob question. About 20 years ago, I obtained a Gerardo Fallano movie suit kit (not the armor fx but the one he cast from Matt Gauthier (trooperexpert on the RPF) So this poor thing has been sitting in a box for a long time. I decided it’s time to build it. I’ve been reading 20 years of updates and one thing the old kits never had were the cover strips on the arm leg seams. (Older armor kits just provided enough space to overlap at the seams) The problem is sourcing a matching plastic sheet for this ancient kit. I tried the trooperbay strips but they really don’t match. This old kit is more bluish white than warm white. I imagine I will have the same problem all around. Probably not too much I can do about it. Does anyone have any advice? Suggestions? Is this kit possibly worth anything to anyone. It’s got a good lineage and it’s beautiful.
-
If you reference the ROTK images you can tell it's outside over inside, it's pretty much the same with most costumes (same as the thighs) Note position of the cover strips too, closer to the outside
-
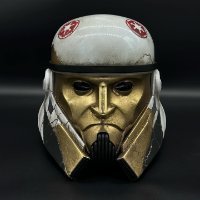 Is it a safe bet that similar armor pieces to the R1 and Night trooper would follow similar build techniques for higher levels? IE for the Rogue 1 TK Biceps: OPTIONAL Level three certification (if applicable): Cover strips will cover both the front and back joints. Biceps are loosely held closed in the back with elastic, shock cord (bungee cord) or white Velcro and are designed to remain flexible.
 -
I've always had to leave jagged edges of excess material when trying to get my clippers around curves. I usually go back and cut away almost all of the remaining excess with an Xacto knife and then sand tiny bit of remaining excess away. That is a bit more time consuming than what others do, so many here will recommend a Dremel for that. The cover strips for the biceps are commonly the same width as the forearm cover strips, so 15mm would be the typical width for both. I say that as I see your notes indicate 12mm for the bicep cover strips.
-
TK ANH Stunt by CloseTheBlastDoor
gmrhodes13 replied to CloseTheBlastDoor's topic in ANH Build Threads
The ridges are a tad wide towards the bottom. There can be a little width but normally closer to the top as you can see in this reference Personally I know it's a pain to rework but it will pay off in the end and look much better. Shouldn't be too hard to pry off the cover strips, once you have lifted an edge the pressure of pulling should release them. -
Correct, you can go larger if required, many add to the rear to leave the front standard sized. It's entirely up to your GML what they consider approvable so best check with them before going too big. You'd be amazed how many threads there are looking for cover strip sizes but using the search function can help https://www.whitearmor.net/forum/search/?q=cover strips&quick=1 You can even find measurements in the RS photo gallery A helpful video on cutting cover strips
-
-- EDIT 08/31/2022-- Future Jason here, I just wanted to provide this colorful edit to help explain how I'm going to handle additions to this original post. Initially, I was striking out verbiage as it was written, then adding new text, but it was getting messy. I will continue using strike through text whenever I remove something from the existing CRL, but will follow that up with red text indicating the agreed upon change. Of note, I will try not to make any of these changes unless it's captured in this conversation, but I am receiving input from detachment leadership in addition to what's captured here. If anything ever appears in the CRL text below that a person does not recall discussing, please let us know so the discussion can continue. What I absolutely refuse to do is create ambiguous text, or what I refer to as a "moving target CRL." Any edits to my original post will be written in yellow so you can follow the changes easier; I will also date any revision/ edit. So again, CRL changes/ additions in red instructions/ original post edits in yellow. Thanks, TK-51923 Fellow TKs. After several discussions regarding the inclusion of Remnant Stormtroopers, as seen in The Mandalorian seasons 1 and 2 into the Databank, we have decided to move forward with the creation of a CRL. The goal in developing this thread is to create a CRL specific to the heavily weathered Remnants serving Werner Herzog's "The Client" as well as those seen in Season 2 episode 7 The Believer, working in the rhydonium refinery on the planet Morak. For previous discussion on this topic, please see the following thread: https://www.whitearmor.net/forum/topic/48305-new-anthology-tk-crl/ Additionally, for reference, please see the following picture: Additionally, since we have several new references to draw from since the creation of the original Rogue One TK CRL and it's subsequent revision in 2020, this thread will also serve to address revisions to the current ROTK CRL and the potential creation of a separate CRL for the New Generation/ Anthology TK. Discussions are ongoing regarding how to handle this generation of TK armor that has become synonymous with the Anthology films and various Disney+ series. This includes the existing ROTK, which could be renamed, receive additional variations, remain unchanged, or none of the above. However, one item that has been emphasized to me from detachment staff is that we have to clearly show that this is a unique set of armor without stating "it's dirty." Additionally, we have found several instances in which items were either missing, broken, or taped together by the costume department for the respective productions; these discrepancies will not be included in any new CRL or revisions to existing CRLs. The goal of this thread is to identify the unique attributes of the costume that are uniform throughout all of it's appearances in Anthology films and Disney+ productions, not to capture broken or missing items. Things that will not be considered: broken thigh armor, drop boxes tucked into the thighs or missing altogether, missing TDs, and "$#1++y wardrobe dressing or stunt men with gaffer tape." I'm not going to say who's quote that was. With that said, we obviously have an ANH OT bucket resting atop Rogue One style armor. These are on prominent display, but there's other unique characteristics as well. This is our opportunity to post them up and start hashing out the details. Please take a look at the aforementioned thread, but I also intend on posting several of the pictures here. To get started, I will post the verbiage from our current ROTK CRL, and include the wording from the ANH Stunt helmet. I will continue updating everything as we go along and highlight any changes in red. Additionally, even though this isn't a New Generation/ Anthology CRL, we need to capture anything in the New Generation gear that hasn't been covered previously. If there's new things that have been discovered, please post them. Let's get started: Helmet Moderate to heavily weathered 8/24/2022 Traps (trapezoids on dome of helmet) and tears (area beneath the corners of eye lenses) are gray. Rear traps and tears have vertical black lines. Lenses are flat material, green in color, sufficiently dark enough to obscure the costumer's eyes. The “ear” bars have three or four bumps and are gray or painted gray, with a black outline. Painting the bumps with rank stripes (highlighted) in black is optional. Frown is painted gray and does not leave the teeth area. A total of 8 cut outs in the teeth area of the frown are present. Tube stripes are medium blue, numbering between 9 and 16 per side with the curve bends extending backwards. Vocoder (vertically ribbed chin detail) is painted black. Aerators/Hovi-MIX tips (cylinders on either side of the vocoder) are black or painted black. Tears, traps, and tube stripes may be hand painted, decals, or decals that replicate hand painted. Mesh may be used behind the frown to obscure the face of the wearer. Note: The helmet is accurate in detail and proportion to official references. Many commercially available helmets or those considered disproportionate in size or shape are ineligible. OPTIONAL Level two certification (if applicable): Ears shall have three screws per side, one above and one below the ear bar and one at the base of the helmet. Ear bars have four bumps only. Not three. Traps/tears and tube stripes shall have the correct ANH TK details. Ideally, the tube stripes are positioned approximately a pencil width from the side of the cheek. Fall of tube stripe tops ideally lean toward the front. Correct Aerators/Hovi-MIX tips are present. Screens used shall be of a wide type mesh, with the rim of the mic and the inside white or painted white. OPTIONAL Level three certification (if applicable): Ear bars shall have only one bump painted in black (rank stripes). Ideally, placement of ears (and screws) should closely follow the rear angle of the trap above them Neck trim shall be of an s-type profile rather than a u-type profile. Tears/traps shall be hand painted or use decals that emulate hand painted (with correct ANH TK details). Ear screws shall be slotted, flat topped, countersunk and painted white. The vocoder must be integrated into the helmet, and not a separate piece. Neck Seal Moderate to heavily weathered 8/24/2022 Black with horizontal ribs, fitted to the wearer, and extending from the base of the neck to conceal the entire neck Under Suit Moderate to heavily weathered 8/24/2022 Black non-textured material, either one-piece or two-piece construction with no visible zippers or logos/designs. OPTIONAL Level two certification (if applicable): Top, where visible shall be fully ribbed with all horizontal ribbing on the arms, chest, and back. The centre of chest and back may be mesh as long as it is covered by armor. Pants shall be black non-textured material and have horizontal ribbing at the knees only. Knee gaskets are allowed as long as they correctly match top ribbing material, spacing and color. The hip section shall not have ribs. OPTIONAL Level three certification (if applicable): All ribbing on knees, arms, chest, and back must be stitched between each rib in detail and proportion to official references. The armpit area shall have the correct hexagonal mesh detail Shoulder Straps Moderate to heavily weathered 8/24/2022 They may be affixed with Velcro or adhesive. OPTIONAL Level two certification (if applicable): OPTIONAL Level three certification (if applicable): These shall be inserted behind the chest tabs and into slots of the backplate. Shoulder Armor Moderate to heavily weathered 8/24/2022 One on each shoulder. The shoulders are considered effectively symmetrical; they may be worn interchangeably on the left and right shoulders and may have a black elastic strap that wraps around the inside of the bicep. OPTIONAL Level two certification (if applicable): OPTIONAL Level three certification (if applicable): There is no swoop on the shoulder bell raised area. There is no elastic strap that wraps around the inside of the bicep. Upper Arm (Bicep) Armor 8/31/2022 Moderate to heavily weathered 8/24/2022 Both biceps are symmetrical and interchangeable. The front strip is bevelled and approximately 1/8" thick that does not extend beyond the bicep, and has a smaller cover strip layered thereon. OPTIONAL Level two certification (if applicable): OPTIONAL Level three certification (if applicable): Cover strips will cover both the front and back joints. Biceps are loosely held closed in the back with elastic, shock cord (bungee cord) or white Velcro and are designed to remain flexible. The biceps are suspended from the shoulder armor via shock cord (bungee/ framilon cordage) via "J hooks" at the top of the biceps per the screen references. 8/31/2022 A separate piece of white 1" webbing or elastic, extends from the shoulder armor, through a slot in the bicep per the screen references. 8/31/2022 Forearm Armor Moderate to heavily weathered 8/24/2022 The front strip is bevelled and approximately 1/8" thick that does not extend beyond the bicep, and has a smaller cover strip layered thereon. OPTIONAL Level two certification (if applicable): OPTIONAL Level three certification (if applicable): Forearms are loosely held closed in the back with elastic, shock cord (bungee cord) or white Velcro and are designed to remain flexible. Cover strips will cover both the top and bottom joints. Hand Plates Moderate to heavily weathered 8/24/2022 Roughly pentagonal in shape, the hand plates are mounted securely over the back of the glove. As an alternative to plastic, these may be made out of latex or latex-like material. OPTIONAL Level two certification (if applicable): Hand guards shall be made of plastic. OPTIONAL Level three certification (if applicable): Hand guards should follow the correct RO shape, ANH hand guards are not acceptable. A small indent in the front of the hand plate shall be present. Gloves Moderate to heavily weathered 8/24/2022 Black in color, made of either rubber, Nomex, leather, or leather-like material, with no visible straps or logos/designs. The fingers are enclosed, non-textured. OPTIONAL Level two certification (if applicable): Gloves shall not be made of rubber. OPTIONAL Level three certification (if applicable): The base material of the gloves will be a black synthetic material similar to Lycra, Spandex, Elastane, or Nylon. Palms of gloves shall be shiny black fabric or leather or leather-like material. On the index finger shall be a stitched piece of fabric made from the same material as the hand's underside that while stitched to the finger has one cutout towards the end of the finger that reveals the netted material underneath. Gloves shall have the correct leather pattern along the fingers/palm. Chest Armor Moderate to heavily weathered 8/24/2022 Chest plate overlaps the abdominal plate OPTIONAL Level two certification (if applicable): There are raised trapezoids at the top of the shoulder section beneath which the straps insert. The chest and back sides shall be connected by black extensions pieces. OPTIONAL Level three certification (if applicable): Top pectoral out lines swoop correctly outward. Bottom of ribcage flares correctly outward. Back Armor Moderate to heavily weathered 8/24/2022 Back plate contains an "O II" design. There are raised trapezoids at the top of the backplate section beneath which the shoulder straps insert. The backplate continues past these trapezoids towards the top of the shoulder OPTIONAL Level two certification (if applicable): Top of box wall has a trapezoidal indentation. There is a roughly 8mm circular indent near the right top corner of the backplate. OPTIONAL Level three certification (if applicable): Bottom of backplate is curved and extends past abdominal back cover plate. The O cog shall have 16 spines. The 11 bars have 5 horizontal evenly spaced raised bars on the bottom of the face. There is a rectangular tab protruding from the bottom of each of the two raised trapezoids at the top of the backplate. Abdomen Armor Moderate to heavily weathered 8/24/2022 The abdominal armor consists of a one-piece corset design with a vertical opening centred on the back. The back opening is covered by a rectangular cover plate that is worn under the back armor. There are 3 vertical ribs centered on the front of the abdomen and two (one left and one right) ribs further spaced to each side of the center. There are two (one left and one right) angled (approximately 70 degrees) ribs on each side of the abdominal armor. There are two (one left and one right) angled (approximately 70 degrees) recessed ribs on each side of the abdominal armor behind the raised angled ribs that are black Any side shims added are to be added to the white areas of the armor. The center front detail consists of a raised rectangular panel. On the right half of the panel, there is a vertical column of 4 buttons approximately 7/16” (11mm) in diameter. The bottom button is blue while the other three are grey. On the left half of the panel, there is a vertical column of raised evenly spaced horizontal gear teeth with a recessed trapezoid at the top of the column. The rectangular inside bottom of the trapezoid is black. The left front detail consists of a raised rectangular panel with an angled top. There is a vertical column of 4 buttons approximately 7/16” (11mm) in diameter. The bottom button is blue while the other three are grey. The right front detail consists of a primary raised rectangular panel with an additional secondary raised rectangular panel covering the top 1/3 of the primary panel. There is a column of three thin horizontal evenly spaced raised lines across the top ½ of the secondary panel. The abdominal armor is accurate in detail and proportion to official references. OPTIONAL Level two certification (if applicable): The cod armor is separate from the abdominal armour. The right front detail panel is centered between the two outer vertical right ribs. The left front detail panel is centered between the two outer vertical left ribs. OPTIONAL Level three certification (if applicable): The abdomen armor has two horizontal recessed rectangles centred above the center front detail panel and on each side of the center rib. All 8 Button details are recessed and bordered with a thin edge, only the recessed portion is painted. The center front panel column of raised gear teeth has only 9 teeth. There is a recessed edge (approximately 1/8” 3mm wide) along all four sides around the face of the center front panel The right front detail panel is centered between the two outer vertical right ribs. The left front detail panel is centered between the two outer vertical left ribs. There is a recessed edge (approximately 1/8” 3mm wide) along the sides and top around the face of the left front detail pane The abdominal armor back cover plate has two protruding tabs along the bottom that rest inside the back hard belt. Move to "kidney armor" section. Cod Armor Moderate to heavily weathered 8/24/2022 The cod armor consists of a body shape formed triangular plate with a raised center rib and raised lower portion and is accurate in detail and proportion to official references. The cod shall be a separate piece from the abdominal plate 8/31/2022 Removed from Level Two certification. Having this as a level 2 requirement instead of basic may lead people to use OT amor in constructing their kits or create abdominal/ cod pieces that are not accurate to any available references for this costume. OPTIONAL Level two certification (if applicable): The cod shall be a separate piece from the abdominal plate. OPTIONAL Level three certification (if applicable): Kidney Armor Moderate to heavily weathered 8/24/2022 The kidney armor is separated in the back and covered by a rectangular kidney/ trauma plate. 8/31/2022 The rectangular plate is separate from the posterior armor and sits above the rear hard belt. 8/31/2022 OPTIONAL Level two certification (if applicable): The kidney/ trauma plate is large enough to cover the entire gap present in the rear of the abdominal armor and extends up underneath the back armor. 8/31/2022 OPTIONAL Level three certification (if applicable): The kidney armor cover plate has two protruding tabs along the bottom that rest inside the back hard belt. Posterior Armor Moderate to heavily weathered 8/24/2022 The posterior armor shall be a separate piece from the abdominal armor OPTIONAL Level two certification (if applicable): Belt Moderate to heavily weathered 8/24/2022 The Ammunition belt consists of a hard belt made of the same or similar material as the armor in two separate parts front and back (with overlap). The back front belt overlaps the front rear belt on the sides. 8/31/2022 There are 6 ammunition boxes mounted to the belt. There are 2 (one left and one right) drop boxes suspended by black webbing approximately 2" (50mm) wide. Drop boxes must be accurate in detail and proportion to official references. The ammunition belt is accurate in detail and proportion to official references. OPTIONAL Level two certification (if applicable): The only detail visible on the front belt is the mounted ammunition boxes unlike the squares present on ANH belts. The top edge of the front belt has protruding teeth that nest inside gaps between the ribs and detail panels of the abdominal armor. The two center ammunition boxes are thinner than the other mounted ammunition boxes. The second and fifth mounted ammunition boxes are slightly wider than the two center ammunition boxes. The two outermost ammunition boxes are almost square. The two drop boxes are rectangular and as wide as the mounted square boxes. OPTIONAL Level three certification (if applicable): The ammo boxes across the front are all made separately from the main belt and are secured to it The two drop boxes hang no more than 1” 25mm below the front belt and the black strap is visible. The second and fifth mounted ammunition boxes have a trapezoid detail on the top of each ammunition box. The trapezoid detail is a triangular prism that has no rounded edges. 8/31/2022 The front belt protrudes past above all mounted ammunition boxes above and below by approximately 1/8”-1/4” 3-6mm. The front belt protrudes approximately 1/2" below the front 4 ammo boxes in a trapezoidal shape that extends from the center of both medium sized ammo boxes where it tapers to 1/8"-1/4" (3-6mm) below the ammo boxes across the remaining span of the belt per the official references. 8/31/2022 All ammunition boxes, including the drop boxes, have slightly bevelled chamfered edges on the face of each box. 8/31/2022 Thermal Detonator Moderate to heavily weathered 8/24/2022 The thermal detonator consists of a grey tube approximately 3” 76mm in diameter and 8” 203mm long approximately. There are two white endcaps and a white control panel. The white control panel has a horizontal row of white rectangles along the bottom of the control panel and a grey “D” shaped recessed on the left side of the horizontal row. There is an oval greeble that protrudes from the control near the top right side. The thermal detonator is mounted to the rear hard belt and there are no visible screws or clips and is accurate in detail and proportion to official references. OPTIONAL Level two certification (if applicable): The thermal detonator mount should be fully enclosed with solid walls on all four sides. The center of both end caps is gray. OPTIONAL Level three certification (if applicable): The control panel bottom detail is a raised panel with 7 raised rectangles, all are evenly spaced except the right most rectangle. There is a panel line approximately ¼” 6mm from the edge around the control panel. There is a panel line approximately 1/8” 3mm from the edge of each endcap. The inside edge of both endcaps is bevelled. The oval greeble consists of an oval tube protrusion with the top edge slightly extending past the tube wall thickness and is visually similar to the Deathtrooper chin greeble. The thermal detonator is made separate from the mount and secured to it. 8/31/2022 I added this due to the number of instances in which we've seen the TD disconnected from it's mount or missing on screen. Similar to the belt boxes, the TD should be separate, but fixed to the mount appropriately as per the screen references. Thigh Armor Moderate to heavily weathered 8/24/2022 The thigh armor is mirrored for each leg and not interchangeable. The cover strips are bevelled and approximately 1/8" thick that does not extend beyond the thigh and has a smaller cover strip layered thereon. The top edge of the thigh armor is unadorned, and the bottom edge has a raised detail that fallows the bottom edge contour. The small ammo belt consists of 5 evenly spaced rectangle ammunition boxes and is installed on the bottom of the right thigh, there are no visible screws or rivets. OPTIONAL Level two certification (if applicable): Thighs are loosely held closed in the back with elastic, shock cord (bungee cord) or white Velcro and are designed to remain flexible. 8/31/2022 Thigh armor has been seen several times separated (flexible) in the rear, but never worn in the same manner as the arms (bungee cords/ framilon cordage). Cover strips will cover both the front and rear joints. Rear cover strips will close outside over inside, i.e. left over right for the left thigh and Right over Left for the right thigh. 8/31/2022 OPTIONAL Level three certification (if applicable): The bottom outside edges of the small ammunition belt are angled chamfered at approximately 45 degrees. Thigh armor is suspended by a black strap approximately 1” 25mm in width with a plastic side release buckle tri-glide buckle that is covered by black webbing fabric or elastic that runs down the side seam of the leg. 8/31/2022 Lower Leg Armor Moderate to heavily weathered 8/24/2022 The greaves are mirrored for each leg and are not interchangeable. The top edge of the greaves has a raised detail that fallows the top edge contour. The bottom edge of the greaves flairs out to cover the top of the ankle and boots. The cover strips are bevelled and approximately 1/8" thick that does not extend beyond the greave and has a smaller cover strip layered thereon. Greaves are loosely held closed in the back with elastic, shock cord (bungee cord) or white Velcro and are designed to remain flexible. Cover strips will cover both the front and rear joints. The trapezoid knee plate (sniper knee plate) is affixed to the top of the left greave and there are no visible screws or rivets. Sniper knee plate must be aligned with the vertical cover strip and the top raised edge detail on the greave and is accurate in detail and proportion to official reference. OPTIONAL Level two certification (if applicable): The sniper knee plate has raised detail that fallows the top edge contour. The sniper knee plate has 3 trapezoidal lugs on each side and 2 on the center bottom edge (totalling 8) of the knee plate. OPTIONAL Level three certification (if applicable): Boots Moderate to heavily weathered 8/24/2022 Boots are above ankle height and the same style as the First Order TK. Chelsea type boots in the style of OT TK are not acceptable. Boots are all white and made of leather or leather-like material Flat black soles without a heel. Patent leather or high gloss is not permitted. OPTIONAL Level two certification (if applicable): There is no seam present on the front of the boot. The wearer's inner side of the boots have zippers and no side elastic. OPTIONAL Level three certification (if applicable): Optional Accessories Items below are optional costume accessories. These items are not required for approval, but if present appear as described below. If adding in an accessory after initial approval, the item still needs to be submitted to local GML for approval before use. E-11 Blaster Weathering is optional 8/24/2022 Manufactured by BlasTech Industries, the E-11 is standard-issue for many Imperial troops. Light, compact yet powerful, the E-11 blaster is always in high demand throughout the galaxy. "Note, the E-11 holster as seen in the Original Trilogy movies is not an authorized accessory for rogue One armor". Based on a real or replica Sterling Airsoft Gun, Sterling Sub-Machine Gun, scratch-built, or a modified commercial toy Stormtrooper blaster. A small flashlight shall be mounted on the right side of the blaster centred over the T-Tracks. OPTIONAL Level two certification (if applicable): Blaster shall be based on a real or replica S&T Sterling L2A1 AEG Airsoft Gun. (Folding Stock does not need to function) D-Ring shall be present on the rear end cap. Scope shall be a real or replica M.H.R. (Minneapolis Honeywell Regulator Co.) M38 Telescope. 1943 model is preferred. Counter shall be a real or replica Hengstler 400 Series counter. Eagle logo is preferred. Power Cylinders shall be mounted on top of the magazine well. R1 style power cylinders are preferred over ANH style. 6 rows of T-Tracks cover the Sterling receiver holes except for the lower left row with the bayonet lug. Flashlight shall be a real or replica Element M300A Mini Scout Light. 3D printed blasters can not contain visible print lines and must be sanded smooth for a more realistic appearance. OPTIONAL Level three certification (if applicable): Scope shall be a real or replica 1943 M.H.R. Co. M38 Telescope, 1942 model is not allowed. Counter shall be a real or replica Hengstler 400 Series counter with Small eagle logo. Large eagle logo is not allowed. Power Cylinders shall be R1 style, ANH style is not allowed. SE-14r Light Repeating Blaster Weathering is optional 8/24/2022 SE-14r Light Repeating Blaster. The barrel detailing is evident with the cocking lever and slider in place. The ejection port is also evident. The scope mount looks similar to the magazine but smaller in size. OPTIONAL Level two certification (if applicable): E-22 Blaster Weathering is optional 8/24/2022 Based on a real or replica Sterling sub-machine gun, scratch-built, cast, 3D print or a modified commercial toy Stormtrooper blaster. It has a extended stock attached at the rear and a extended front housing with second lower barrel. Tactical flashlight (Surefire scout M300 or replica) mounted on right side of barrel. Magazine is extended length. Power cylinder is larger with 2 outer cylinders and 2 smaller central cylinders Scope is a M38 1943 version Scope rail is fitted onto rail blocks, one inside the rear sight and the other at the front end of the rail. There are 3 swivel studs fitted, one on the rear stock and one each side of the front barrel housing. Sling is 25mm webbing strap that is adjustable using a silver 25mm 3 fixed bar webbing buckle (optional). Sling is fitted with Talon quick release 25mm swivel or replica (optional). Red lights fitted on both sides of the rear housing, Hengstler fitted with a red light for the 3 forward tubes and 2 small red lights fitted into the rear barrel housing under the torch, the lights are permanent and are non flashing or pulsed (optional hero version only). OPTIONAL Level two certification (if applicable): Base is based on S&T Airsoft sterling with closed working parts (no spring) Screws used are M4 x 25mm Allen screw/bolts and sunken Allen screws for power cylinders Sling is fitted with Talon quick release 25mm swivel. Pauldron Rogue One Pauldrons denote rank or mission specialization. The Rogue One Pauldron is specific to Rogue One and differs from the original trilogy in color and stitching. Original trilogy Pauldrons are not an authorized accessory for Rogue One armor. An Orange, white, or black ornament made of leather plastic or leather-like material, worn over the right shoulder. The Orange is specific to Rogue One and a different shade from the original trilogy. A red pauldron as seen in The Mandalorian Chapter 14, may be worn as part of the New Generation TK costume, but not as a Rogue One stormtrooper. 8/31/2022 The colored panel is divided into three sections by color matched stitching to conform to the wearers shoulder and has black piping around the outside edge. The remainder of the Pauldron is black and divided by black stitching into 10 segments. The neck closure is black and has two black snaps visible. There is a black elastic strap that runs from back to front and is worn under the bicep to hold the Pauldron in place. The strap is conned to the Pauldron on top by two black snaps inlayed in black “D” shaped leather or leather-like ends. The underside of the Pauldron is white regardless of top color and is divided with white stitching into 13 segments. The entire outside edge is finished with black piping and the underside of the neck closure is black. OPTIONAL Level two certification (if applicable): OPTIONAL Level three certification (if applicable):
-
 Below is an amended R1 TK CRL, I have ommitted items like the batton and Pauldron and some blasters that were not seen in use in the Ahsoka series . Required Costume Components The following costume components are present and appear as described below. Helmet Traps (trapezoids on dome of helmet) and tears (area beneath the corners of eye lenses) are gray. Rear traps and tears have engraved vertical black lines. Lenses can be flat material, green in color, sufficiently dark enough to obscure the costumer's eyes. The “ear” bars are gray or painted gray, with the largest bar oval cutout painted black. Frown is painted gray and does not leave the teeth area. The space between the 8 teeth is hollow and backed with Black or Dark grey wire screen mesh. Tube stripes are medium blue, numbering 12 per side. The stipes are straight, not curved like ANH. Vocoder (vertically ribbed chin detail) is painted black. Aerators/Hovi mix tips (cylinders on either side of the vocoder) have a black exterior and silver in color screen mesh. Tears and traps may not be hand-painted. Tube stripes are recessed, and the recessed section painted blue or backed by blue mesh. Note: The helmet is accurate in detail and proportion to official references. Many commercially available helmets or those considered disproportionate in size or shape are ineligible. The Black Series helmet is approvable if modified to meet the level 1 CRLs. Light to medium weathering as per reference images. Cracks may be painted on surface in metalic gold paint. OPTIONAL Level two certification (if applicable): Lenses have a very slight curve and are convex in style. Flat lenses and ANH style bubble lenses are not permissible. Rank bar area on ear must be of the correct RO style and pattern, no ANH style ear bumps allowed. Head opening has black trim running all along the edge. Brow trim should be positioned ¼" above the eyes. Ear screws must not have a visible slot mark and be flush to the ear. Any gap between the ears and helmet will only appear to be a seam, not any bigger. Correct 'Hovi mic' aerator tips. Chin section has a well defined seam from the angles of the mouth. Light to medium weathering as per references Cracks must be dremmelled or engraved into helmet. Cracks may be painted in metalic gold paint OPTIONAL Level three certification (if applicable): The Tube stripes are completely hollowed out with a blue section underneath. Vocoder is tubular in nature with 7 vertical tubes. A visible gap must be present between the Vocoder and the helmet. The inside of each tear will be a raised area that is grey, with 8 engraved black lines, hand painted lines like ANH are not permitted. The frown shall be recessed to the proper depth, unlike standard ANH. The inside of each rear trap will be a raised area that is grey, with 13 engraved black vertical lines, hand painted lines like ANH are not permitted. The inside of each side trap will be a raised area that is grey. There is a small bump in the right eye socket (when worn) under the lens as an intended flaw to pay tribute to the original trilogy designers. Green LED that can be switched on and off representing both living and the reserected Night trooper shall be fitted behind the lenses. TK anh stunt neckseal.jpeg Neck Seal Black with horizontal ribs, fitted to the wearer, and extending from the base of the neck to conceal the entire neck. Cracks must be dremmelled or engraved into helmet. Cracks must be gold leaf, gold paint is not permitted. Under Suit Black non-textured material, either one-piece or two-piece construction with no visible zippers or logos/designs. OPTIONAL Level two certification (if applicable): Top, where visible shall be fully ribbed with all horizontal ribbing on the arms, chest, and back. The centre of chest and back may be mesh as long as it is covered by armor. Pants shall be black non-textured material and have horizontal ribbing at the knees only. Knee gaskets are allowed as long as they correctly match top ribbing material, spacing and color. The hip section shall not have ribs. OPTIONAL Level three certification (if applicable): All ribbing on knees, arms, chest, and back must be stitched between each rib in detail and proportion to official references. The armpit area shall have the correct hexagonal mesh detail Shoulder Straps They may be affixed with Velcro or adhesive. Light to medium weathering as per references Cracks may be painted on surface in metalic gold paint. Weathering details, Gold and gray adorntments etc to be added. OPTIONAL Level two certification (if applicable): OPTIONAL Level three certification (if applicable): These shall be inserted behind the chest tabs and into slots of the backplate. Shoulder Armor One on each shoulder. The shoulders are considered effectively symmetrical; they may be worn interchangeably on the left and right shoulders and may have a black elastic strap that wraps around the inside of the bicep. Light to medium weathering as per references Cracks may be painted on surface in metalic gold paint. Weathering details, Gold and gray adorntments etc to be added. OPTIONAL Level two certification (if applicable): OPTIONAL Level three certification (if applicable): There is no swoop on the shoulder bell raised area. There is no elastic strap that wraps around the inside of the bicep. Weathering details, Gold and gray adorntments etc to be added. Upper Arm Armor Both biceps are symmetrical and interchangeable. The front strip is bevelled and approximately ⅛" thick that does not extend beyond the bicep, and has a smaller cover strip layered thereon. Light to medium weathering as per references Cracks may be painted on surface in metalic gold paint. OPTIONAL Level two certification (if applicable): OPTIONAL Level three certification (if applicable): Cover strips will cover both the front and back joints. Biceps are loosely held closed in the back with elastic, shock cord (bungee cord) or white Velcro and are designed to remain flexible. Weathering details, Gold and gray adorntments etc to be added. Forearm Armor The front strip is bevelled and approximately ⅛" thick that does not extend beyond the bicep, and has a smaller cover strip layered thereon. Light to medium weathering as per references Cracks may be painted on surface in metalic gold paint. Weathering details, Gold and gray adorntments etc to be added. OPTIONAL Level two certification (if applicable): OPTIONAL Level three certification (if applicable): Forearms are loosely held closed in the back with elastic, shock cord (bungee cord) or white Velcro and are designed to remain flexible. Cover strips will cover both the top and bottom joints. Weathering details, Gold and gray adorntments etc to be added. Hand Plates Roughly pentagonal in shape, the hand plates are mounted securely over the back of the glove. As an alternative to plastic, these may be made out of latex or latex-like material. Light to medium weathering as per references Cracks may be painted on surface in metalic gold paint. Weathering details, Gold and gray adorntments etc to be added. OPTIONAL Level two certification (if applicable): Hand guards shall be made of plastic. Weathering details, Gold and gray adorntments etc to be added. OPTIONAL Level three certification (if applicable): Hand guards should follow the correct RO shape, ANH hand guards are not acceptable. A small indent in the front of the hand plate shall be present. Weathering details, Gold and gray adorntments etc to be added. Gloves Black in color, made of Nomex, leather, or leather-like material, with no visible straps or logos/designs. The fingers are enclosed, non-textured. Rubber ANH style gloves are not permitted. Weathering details, Gold and gray adorntments etc to be added. OPTIONAL Level two certification (if applicable): The base material of the gloves will be a black synthetic material similar to Lycra, Spandex, Elastane, or Nylon. Palms of gloves shall be shiny black fabric or leather or leather-like material. On the index finger shall be a stitched piece of fabric made from the same material as the hand's underside that while stitched to the finger has one cutout towards the end of the finger that reveals the netted material underneath. Gloves shall have the correct leather pattern along the fingers/palm. Weathering details, Gold and gray adorntments etc to be added. OPTIONAL Level three certification (if applicable): Chest Armor Chest plate overlaps the abdominal plate Light to medium weathering as per references Cracks may be painted on surface in metalic gold paint. Weathering details, Gold and gray adorntments etc to be added. OPTIONAL Level two certification (if applicable): There are raised trapezoids at the top of the shoulder section beneath which the straps insert. The chest and back sides shall be connected by black extensions pieces. Weathering details, Gold and gray adorntments etc to be added. OPTIONAL Level three certification (if applicable): Top pectoral out lines swoop correctly outward. Bottom of ribcage flares correctly outward. Weathering details, Gold and gray adorntments etc to be added. Back Armor Back plate contains an "O II" design. There are raised trapezoids at the top of the backplate section beneath which the shoulder straps insert. The backplate continues past these trapezoids towards the top of the shoulder Light to medium weathering as per references Cracks may be painted on surface in metalic gold paint. Weathering details, Gold and gray adorntments etc to be added. OPTIONAL Level two certification (if applicable): Top of box wall has a trapezoidal indentation. There is a roughly 8mm circular indent near the right top corner of the backplate. Weathering details, Gold and gray adorntments etc to be added. OPTIONAL Level three certification (if applicable): Bottom of backplate is curved and extends past abdominal back cover plate. The O cog shall have 16 spines. The 11 bars have 5 horizontal evenly spaced raised bars on the bottom of the face. There is a rectangular tab protruding from the bottom of each of the two raised trapezoids at the top of the backplate. Weathering details, Gold and gray adorntments etc to be added. Abdomen Armor The abdominal armor consists of a one-piece corset design with a vertical opening centered on the back. The back opening is covered by a rectangular cover plate that is worn under the back armor. There are 3 vertical ribs centered on the front of the abdomen and two (one left and one right) ribs further spaced to each side of the center. There are two (one left and one right) angled (approximately 70 degrees) ribs on each side of the abdominal armor. There are two (one left and one right) angled (approximately 70 degrees) recessed ribs on each side of the abdominal armor behind the raised angled ribs that are black Any side shims added are to be added to the white areas of the armor. The center front detail consists of a raised rectangular panel. On the right half of the panel, there is a vertical column of 4 buttons approximately ⁷⁄₁₆" (11mm) in diameter. The bottom button is blue while the other three are grey. On the left half of the panel, there is a vertical column of raised evenly spaced horizontal gear teeth with a recessed trapezoid at the top of the column. The rectangular inside bottom of the trapezoid is black. The left front detail consists of a raised rectangular panel with an angled top. There is a vertical column of 4 buttons approximately ⁷⁄₁₆" (11mm) in diameter. The bottom button is blue while the other three are grey. The right front detail consists of a primary raised rectangular panel with an additional secondary raised rectangular panel covering the top ⅓ of the primary panel. There is a column of three thin horizontal evenly spaced raised lines across the top ½ of the secondary panel. The abdominal armor is accurate in detail and proportion to official references. Light to medium weathering as per references Cracks may be painted on surface in metalic gold paint. Weathering details, Gold and gray adorntments etc to be added. OPTIONAL Level two certification (if applicable): The cod armor is separate from the abdominal armor. The right front detail panel is centered between the two outer vertical right ribs. The left front detail panel is centered between the two outer vertical left ribs. Weathering details, Gold and gray adorntments etc to be added. OPTIONAL Level three certification (if applicable): The abdomen armor has two horizontal recessed rectangles centered above the center front detail panel and on each side of the center rib. All 8 Button details are recessed and bordered with a thin edge, only the recessed portion is painted. The center front panel column of raised gear teeth has only 9 teeth. There is a recessed edge (approximately ⅛" 3mm wide) along all four sides around the face of the center front panel The right front detail panel is centered between the two outer vertical right ribs. The left front detail panel is centered between the two outer vertical left ribs. There is a recessed edge (approximately ⅛" 3mm wide) along the sides and top around the face of the left front detail pane The abdominal armor back cover plate has two protruding tabs along the bottom that rest inside the back hard belt. Weathering details, Gold and gray adorntments etc to be added. Cod Armor The cod armor consists of a body shape formed triangular plate with a raised center rib and raised lower portion and is accurate in detail and proportion to official references. Light to medium weathering as per references Cracks may be painted on surface in metalic gold paint. Weathering details, Gold and gray adorntments etc to be added. OPTIONAL Level two certification (if applicable): The cod shall be a separate piece from the abdominal plate. Weathering details, Gold and gray adorntments etc to be added. OPTIONAL Level three certification (if applicable): Kidney Armor The kidney armor is separated in the back and covered by a rectangular plate. The rectangular plate is separate from the posterior armor. Light to medium weathering as per references Cracks may be painted on surface in metalic gold paint. Weathering details, Gold and gray adorntments etc to be added. OPTIONAL Level two certification (if applicable): OPTIONAL Level three certification (if applicable): Posterior Armor The posterior armor shall be a separate piece from the abdominal armor Light to medium weathering as per references Cracks may be painted on surface in metalic gold paint. Weathering details, Gold and gray adorntments etc to be added. OPTIONAL Level two certification (if applicable): OPTIONAL Level three certification (if applicable): Belt The Ammunition belt consists of a hard belt made of the same or similar material as the armor in two separate parts front and back (with overlap). The back belt overlaps the front belt on the sides. There are 6 ammunition boxes mounted to the belt. There are 2 (one left and one right) drop boxes suspended by black webbing approximately 2" (50mm) wide. Drop boxes must be accurate in detail and proportion to official references. The ammunition belt is accurate in detail and proportion to official references. Light to medium weathering as per references Cracks may be painted on surface in metalic gold paint. Weathering details, Gold and gray adorntments etc to be added. OPTIONAL Level two certification (if applicable): The only detail visible on the front belt is the mounted ammunition boxes unlike the squares present on ANH belts. The top edge of the front belt has protruding teeth that nest inside gaps between the ribs and detail panels of the abdominal armor. The two center ammunition boxes are thinner than the other mounted ammunition boxes. The second and fifth mounted ammunition boxes are slightly wider than the two center ammunition boxes. The two outermost ammunition boxes are almost square. The two drop boxes are rectangular and as wide as the mounted square boxes. Weathering details, Gold and gray adorntments etc to be added. OPTIONAL Level three certification (if applicable): The ammo boxes across the front are all made separately from the main belt and are secured to it The two drop boxes hang no more than 1" 25mm below the front belt and the black strap is visible. The second and fifth mounted ammunition boxes have trapezoid detail on the top of each ammunition box. The front belt protrudes past all mounted ammunition boxes above and below by approximately ⅛"–¼" 3–6mm. All ammunition boxes have slightly beveled edges on the face of each box. Weathering details, Gold and gray adorntments etc to be added. Thermal Detonator The thermal detonator consists of a grey tube approximately 3" 76mm in diameter and 8" 203mm long approximately. There are two white endcaps and a white control panel. The white control panel has a horizontal row of white rectangles along the bottom of the control panel and a grey “D” shaped recessed on the left side of the horizontal row. There is an oval greeble that protrudes from the control near the top right side. The thermal detonator is mounted to the rear hard belt and there are no visible screws or clips and is accurate in detail and proportion to official references. Light to medium weathering as per references Cracks may be painted on surface in metalic gold paint. Weathering details, Gold and gray adorntments etc to be added. OPTIONAL Level two certification (if applicable): The thermal detonator mount should be fully enclosed with solid walls on all four sides. The center of both end caps is gray. Weathering details, Gold and gray adorntments etc to be added. OPTIONAL Level three certification (if applicable): The control panel bottom detail is a raised panel with 7 raised rectangles, all are evenly spaced except the right most rectangle. There is a panel line approximately ¼" 6mm from the edge around the control panel. There is a panel line approximately ⅛" 3mm from the edge of each endcap. The inside edge of both endcaps is beveled. The oval greeble consists of an oval tube protrusion with the top edge slightly extending past the tube wall thickness and is visually similar to the Deathtrooper chin greeble. Weathering details, Gold and gray adorntments etc to be added. Thigh Armor The thigh armor is mirrored for each leg and not interchangeable. The cover strips are beveled and approximately ⅛" thick that does not extend beyond the thigh and has a smaller cover strip layered thereon. The top edge of the thigh armor is unadorned, and the bottom edge has a raised detail that fallows the bottom edge contour. The small ammo belt consists of 5 evenly spaced rectangle ammunition boxes and is installed on the bottom of the right thigh, there are no visible screws or rivets. Light to medium weathering as per references Cracks may be painted on surface in metalic gold paint. Weathering details, Gold and gray adorntments etc to be added. OPTIONAL Level two certification (if applicable): Thighs are loosely held closed in the back with elastic, shock cord (bungee cord) or white Velcro and are designed to remain flexible. Cover strips will cover both the front and rear joints. Weathering details, Gold and gray adorntments etc to be added. OPTIONAL Level three certification (if applicable): The bottom outside edges of the small ammunition belt are angled at approximately 45 degrees. Thigh armor is suspended by a black strap approximately 1" 25mm in width with a plastic side release buckle that is covered by black webbing or elastic that runs down the side seam of the leg. Weathering details, Gold and gray adorntments etc to be added. Lower Leg Armor The greaves are mirrored for each leg and are not interchangeable. The top edge of the greaves has a raised detail that fallows the top edge contour. The bottom edge of the greaves flairs out to cover the top of the ankle and boots. The cover strips are beveled and approximately ⅛" thick that does not extend beyond the greave and has a smaller cover strip layered thereon. Greaves are loosely held closed in the back with elastic, shock cord (bungee cord) or white Velcro and are designed to remain flexible. Cover strips will cover both the front and rear joints. The trapezoid knee plate (sniper knee plate) is affixed to the top of the left greave and there are no visible screws or rivets. Sniper knee plate must be aligned with the vertical cover strip and the top raised edge detail on the greave and is accurate in detail and proportion to official reference. Light to medium weathering as per references Cracks may be painted on surface in metalic gold paint. Weathering details, Gold and gray adorntments etc to be added. OPTIONAL Level two certification (if applicable): The sniper knee plate has raised detail that fallows the top edge contour. The sniper knee plate has 3 trapezoidal lugs on each side and 2 on the center bottom edge (totalling 8) of the knee plate. Weathering details, Gold and gray adorntments etc to be added. OPTIONAL Level three certification (if applicable): Boots Boots are above ankle height and the same style as the First Order TK. Chelsea type boots in the style of OT TK are not acceptable. Boots are all white and made of leather or leather-like material Flat black soles without a heel. Patent leather or high gloss is not permitted. Light to medium weathering as per references Cracks may be painted on surface in metalic gold paint. Weathering details, Gold and gray adorntments etc to be added. OPTIONAL Level two certification (if applicable): There is no seam present on the front of the boot. The wearer's inner side of the boots have zippers and no side elastic. Weathering details, Gold and gray adorntments etc to be added. OPTIONAL Level three certification (if applicable): Optional Accessories Items below are optional costume accessories. These items are not required for approval, but if present appear as described below. If adding in an accessory after initial approval, the item still needs to be submitted to local GML for approval before use. E-11 Blaster Manufactured by BlasTech Industries, the E-11 is standard-issue for many Imperial troops. Light, compact yet powerful, the E-11 blaster is always in high demand throughout the galaxy. "Note, the E-11 holster as seen in the Original Trilogy movies is not an authorized accessory for rogue One armor". Based on a real or replica Sterling Airsoft Gun, Sterling Sub-Machine Gun, scratch-built, or a modified commercial toy Stormtrooper blaster. A small flashlight can be mounted on the right side of the blaster centred over the T-Tracks. OPTIONAL Level two certification (if applicable): Blaster shall be based on a real or replica S&T Sterling L2A1 AEG Airsoft Gun. (Folding Stock does not need to function) D-Ring shall be present on the rear end cap. Scope shall be a real or replica M.H.R. (Minneapolis Honeywell Regulator Co.) M38 Telescope. 1943 model is preferred. Counter shall be a real or replica Hengstler 400 Series counter. Eagle logo is preferred. Power Cylinders shall be mounted on top of the magazine well. R1 style power cylinders are preferred over ANH style. 6 rows of T-Tracks cover the Sterling receiver holes except for the lower left row with the bayonet lug. Flashlight if fitted shall be a real or replica Element M300A Mini Scout Light. 3D printed blasters can not contain visible print lines and must be sanded smooth for a more realistic appearance. OPTIONAL Level three certification (if applicable): Scope shall be a real or replica 1943 M.H.R. Co. M38 Telescope, 1942 model is not allowed. Counter shall be a real or replica Hengstler 400 Series counter with Small eagle logo. Large eagle logo is not allowed. Power Cylinders shall be R1 style, ANH style is not allowed.