-
Posts
857 -
Joined
-
Last visited
-
Days Won
1
Content Type
Profiles
Forums
Gallery
Articles
Media Demo
Everything posted by ABS80
-

Help with assembling ATA Helmet
ABS80 replied to roony2311's topic in Hard Armor (General Discussion)
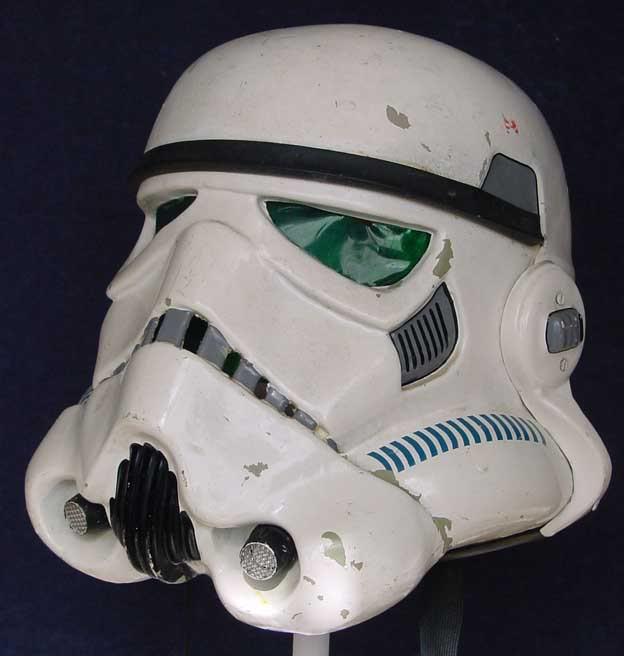
Thats why my AP helmet kits come with premarked holes, this simplifies the assembly quite a bit, people can still drill new holes to position ears and face plates to there prefference, but having premarked holes they have a good base to work with, my ear pieces also come with marked lines and with just a bit of sanding here they fit pretty good. Mark -
AP offers ready to wear armor and does custom assembly to fit your size and also offer many new upgrades. email authenticprops@hotmail.com for more info Mark (AP)
-

what is your opinion on AP armor?
ABS80 replied to dubVADER's topic in Hard Armor (General Discussion)
Check the build process of the new SiMan armor which was casted directly from ANH suit and a exact replica. ----------- Surprise!!! parts don't align perfectly either, that's the way the original were, the original molds were hand sculpted and rushed for production, parts were far from perfect, Mark (AP) -

TK-9496 Requesting [ANH] EIB Status[187][AP]
ABS80 replied to jnnfr72's topic in Request Expert Infantry Status
Jenny, first time I see photos of you wearing AP armor, you look great!!! fantastic job putting it togheter. Again thank you! Mark (AP) -
If the helmet has lineage from a real movie helmet it's impossible to see size difference from maker to maker, the FX now called AM are fan sculpts and way oversized. Yes assembly can make a helmet look bigger or smaller, all depend the angle of face plate, low or high brow also creates illusion of overall size, Hero or Stunt though the parts are the same exact size the hero always looked smaller to me. Your best bet is to get helmet that has lineage from a movie helmet. Mark
-
Huuumm really! I would like to see a side to side comparisation with measurments, I don't see how ATA could be that bigger then AP which has lineage from a real screen helmet, the only thing that could make ATA look bigger is the assembly, it's usually the angle of which the face and cap are connected togheter. all the parts should be the same size. Mark (AP)
-
Fiberglass reinforced cutting discs, set dremel at full speed it will cut like in butter. For the straight cuts, use the score and snap technique, just score with exacto knife, I use Olaf brand the ones that you snap off the blades, just score using a ruler, no need to go deep just put a bit of pressure then bend plastic along the scoring line and the plastic will just snap off nice and clean, I actually trimmed a full armor this way in only a few hours no mess but take your time. Mark
-

painting your armor ---tips, thoughts, my experience
ABS80 replied to gazmosis's topic in Assembly, Mods, and Painting
Or save yourself all this trouble and get a nice white gloss ABS kit Mark -
Yes definetely the solvent is attacking your vinyl stencil. Mark
-
I used vinyl stencil from Mike and not a single bleed, it's ideal to use a a airbrush or a spraycan, I only use spray method with stencil never a brush, you need to apply light coats and remove masking before paint cures. Here's what I did using Mikes vinyl stencils he custom made for me, it worked like a charm, it was time consuming and tricky to conform to the complex helmet shape, not for the beginner. Mark
-
Ok I see what you mean, If you look carefully thats a bad pull he did right there, you can actually see a webbing forming on the forehead which runs from bottom to top front, the plastic was too soft or had too much sag creating webbings (wrinkles) Mark
-
I didn't see the video but I assume this is to help release parts from molds but has nothing to do with eliminating stretch marks, my helmets are made on a 50,000+ machine but you still need the proper setting for ABS, it doesn't mean using a top notch machine the results are going to be automatically good, these big machines are made for mass production forming less complexe parts, a trooper helmet is formed one at a time, then manually remove each formed part from mold then reset machine for the next drop, I could easily pull 5+ AFX helmets in the same time frame it takes to make 1 ANH, AFX have no undercuts and can be self released by machine. Mark
-
because the top/cap is a tall mold it's difficult to completely eliminate stretch marks, with ABS the heating temp and timing has to be perfect to achieve a consistent stretch over the mold otherwsie the plastic chills as soon it touches the top of mold and thins out stretching down, ABS has to be heated longer and sometimes you need a plug assist, meaning you need to manually help the plastic stretch over the mold as soon as platic touches top of mold to avoid the chill factor, the top will always be thicker then the sides and forehead, no matter how good the pull you will always see some kind of stretch marks, in my case when the stretch marks are not accepatble I just sell them as B grades. Mark
-
Outer parts overlap inner parts for all legs and arms, but if you use the ANH strip method there's no overlapping you need to trim the parts so they butt each other and cover seems with abs strips, you can do overlapping only on the rear for the legs, but for all the arm parts the strips method is ANH accurate for both sides. Mark
-

AP armor.. are most parts mirrored?
ABS80 replied to sixxgunn13's topic in Hard Armor (General Discussion)
Not the thighs, for the inner left shin I would prefer to get a hold of a original inner shin. Mark -
Perfect!!!! Mark
-
I use Testors Grey #1138 close match to the decals and use Semi Gloss Black for the chin Mark
-

AP armor.. are most parts mirrored?
ABS80 replied to sixxgunn13's topic in Hard Armor (General Discussion)
Thas exactly why I never changed mine, the added part are completely different in shape and stand out, I rather have original parts that match, BTW many armors used in the movie also used same parts for left and right, there's many promo photos showing same arm parts for left and right, one which is very noticeable is the bicep parts. Mark -
If you can change them I would, if I was able to notice them from the photos it's even more noticeable in person, my kit comes with same size screw as original, remember it's the small details that make the big difference! Mark
-
They just seemed too small, I guess it's just a illusion since they are not painted white yet. I would use a larger drill so they sit a little more flush, then use a exacto around edge of hole to create counter sink so screw sits nice and flush. Mark
-
Did you use the screws that came with kit for the ear pieces? Mark
-
Rob, using my premarked holes will get you a helmet that looks exactly like the photos I sent you. As you can see there's 3 premarked holes on each side, the middle hole is to attach the face plate, the other 2 are for the ear pieces, you can just drill the middle hole and swivel face plate to desired angle to make desired brow trim sapcing, then drill proper new holes for the ear parts which will hold everything togheter. Mark
-
Oh I forgot, As you all can see from UPS tracking# his armor is shipping from USA address, like I said all orders are now shipped from USA. Cornelus you always made it sound that I was trying to rip you off after knowing my reputation, if I wanted to steal from you I would have just ignored all your emails, you need to chill out, patience goes a long way. Mark (AP)

