
.png.c79477c1740a05d2252e896e392c2c0e.png)
Ensi
-
Posts
226 -
Joined
-
Last visited
Content Type
Profiles
Forums
Gallery
Articles
Everything posted by Ensi
-

Ensi's F-11D Standard Build (The5thHorseman 3D-Print)
Ensi replied to Ensi's topic in Weapons of the First Order
Hey, first of all sorry for the late reply LOL! Secondly thanks! I do not feel confident enough to "teach" electronics, as I do not fully understand what I have created, safety and all that. Although the voltage regulator is there because the voltage in the chain, before the flashlight is higher than what the flashlight wants. If that makes sense? It takes the incoming voltage and converts it down to a lower voltage (which the flashlight wants.) So it doesn't go kaboom and I have the ability to have it all on the same power source. It is based on the MP1584, so if you just google for that you'll find it easily. I got mine at a local store. It can take input voltage from 4.5-28v on paper, even though the voltage from my battery is 3.7-4.2v depending on charge.. Works fine... so far Unless I find a more suited regulator this is mostly why I don't wanna make a guide. The chrome is not durable, I have scuffs and some of it have rubbed off already. Next time i'll try to do the same, but add the Alclad clear-coat to it. Seen some people have good results with it Still the best chrome-at-home option i've seen. -
Praetorian not delivering or communicating
Ensi replied to Glorificus's topic in General Weapons Discussion
I am that garrison mate. Got told mine was stopped (but didn't tell where) and on a return path to him. Asked for a tracking number but he apparently didn't have that on hand Yesterday he promised me a new shipment and tracking in a few days time so i'm staying hopeful It does look the best out of all the rubber E-11's i've seen. This is like a mini-ANOVOS FOTK situation -
ANOVOS (DENUO NOVO) FOTK Armor Delivery Possibility
Ensi replied to JonnieBear's topic in TFA Stormtrooper
I have one (with ANOVOS bucket). Jim is lightning fast, uses PayPal, and always responds if you ask him questions. His kit is not the most accurate in proportions/shape (forearms, thighs, chest, helmet to name a few) compared to ANOVOS which I think looks the absolute best. From what I've seen KB looks better on some parts, and worse on others, pick your poison. Jims kit also requires basically zero assembly compared to ABS kits, if you fit it out of the box you can almost go straight to strapping and paint. Details are sharp as it's fibreglass and not vac-formed ABS. My main gripes with the kit is that it can have a tendency to form cracks on weak/stressed points (easy to remedy), and it is a bit heavy. Still love the armor though -
Hyperfirm not delivering or communicating
Ensi replied to RubberSlug's topic in General Weapons Discussion
I'd be a little wary of them too. Sorry for the thread-highjacking but i've ordered an E-11 from them in the middle of July (supposed to ship 1 month later), have received exactly squat since (not even a tracking #). A fellow TK in my garrison ordered a few weeks before, and has gotten hers now, but it took daily pestering. Subpar communication. Only thing holding me back from applying to lvl2/3 right now -
Welcome to the TK life You can notch out the back of thighs and shins, but I would (and probably others) recommend you to get everything assembled and tested before you do that.
-
Depending on the condition, you could either just polish it out, or maybe wetsand then polish. You can follow the tutorial I made here, it's meant for painted/clearcoated surfaces but should work fine for bare plastic as well. Do you have a high-res pic of the shoulder bell surface? One that we can see the surface scratches/imperfections in
-
That TD is looking fine! Before my ANH TK i'd never cut much plastic and can definitely relate, you'll get much more confident after a few parts
-
TK-11131 requesting ANH Stunt Centurion status [DA props] [415]
Ensi replied to Xinx's topic in Request Centurion Status
Hi Pawel, the vertical adjustment there looks fine, but they will ask you to move them to the edge of the plastic ammo belt as stated in the CRL Drop boxes are vertically aligned with the end of the ammo belt with minimal gap between belt and box. -
ANOVOS (DENUO NOVO) FOTK Armor Delivery Possibility
Ensi replied to JonnieBear's topic in TFA Stormtrooper
Why though? Is it vacuumforming limits? How were the alpha/beta suits made? -
Ensi's ANH Stunt Build [ATA] With Centurion in mind!
Ensi replied to Ensi's topic in ANH Build Threads
Still also waiting on Praetorian Blasters for the E-11 -
Ensi's ANH Stunt Build [ATA] With Centurion in mind!
Ensi replied to Ensi's topic in ANH Build Threads
Thanks all!! Next task is making the torso tab/lock system and also lengthen my TD strips a bit as the white panel isn't facing upwards enough it seems. Thoughts? Already have suitable material so can give it a go this sunday -
ANOVOS (DENUO NOVO) FOTK Armor Delivery Possibility
Ensi replied to JonnieBear's topic in TFA Stormtrooper
And probably thin as hell.. -
Ensi's ANH Stunt Build [ATA] With Centurion in mind!
Ensi replied to Ensi's topic in ANH Build Threads
Just got my approval I'm now TK-61514, wait.. TKTK-61514? -
Fixed for me now
-
I've used most of Plastic Paddings fillers and they will crack under flex I'd smear it on a scrap piece the next time you use it just to test out, maybe i'm completely wrong
-
Ensi's ANH Stunt Build [ATA] With Centurion in mind!
Ensi replied to Ensi's topic in ANH Build Threads
Thanks Tony. I'll have them in as soon as I get basic and my E-11 from Praetorian Thanks guys! Walking around with this ABS suit was SOOOO much different from walking around in my fibreglass Jimmiroquai TFA The forearms can be adjusted more downwards as I sewed velcro onto the bicep->forearm elastic And I agree with that, they could come down. I also sanded the branding off the gloves (barely visible in the photos). My ABS belt is just a smidge wider than my cloth belt luckily. I trimmed the ABS belt further when building as I saw from reference they were very close to the boxes. Not exactly the sizes I was hoping for but it works I think -
Hi mate and welcome! A picture says a thousand words and it'll be much easier for us to help you if you can display them properly here. I've made a tutorial you can follow here on how to post images: But to answer #3 about return edges. Return edges will give the illusion of thickness, but are really up to comfort. No return-edge on bottom of shins and wrist-side of forearms is both very comfortable mods and also good for higher levels If you are going for the bracket-strapping system you also need some for the torso sections.
-
Ensi's ANH Stunt Build [ATA] With Centurion in mind!
Ensi replied to Ensi's topic in ANH Build Threads
Approval photos sent in! Let me know if you notice anything that could hold me back from basic/EIB/Centurion I'll have to make the bracket/slot system for the kidney->ab sides to make them stay put. Also maybe lower forearms a bit I think. -
Ensi's ANH Stunt Build [ATA] With Centurion in mind!
Ensi replied to Ensi's topic in ANH Build Threads
Helmet finished (except the fancy internals) Belt assembly finished, had some trouble with a bad rivet gun but nothing a dremel can't fix. Rivet into snap and snaps on the holster for ease of transportation. (Note: this is a mirrored shot, my holster is on the left side as it should be ) Drop-box loops curing. I can do it in this order because my ABS belt is snapped to the cloth belt. TD panel curing until tomorrow Ab buttons. I originally bought a circle cutter for making my own masking templates but said oh heck it and went freehand. And the last little detail.. Which I saved for last.. The white elastic band for the shoulder bridges Next post will probably be approval pictures And then on to EIB and Centurion -
Ensi's ANH Stunt Build [ATA] With Centurion in mind!
Ensi replied to Ensi's topic in ANH Build Threads
Thank you! The trick I used was to lightly score the semi-hardened paint with a blade, then use the back of the blade to scrape away the outline. Scraped away everything else with a toothpick and cotton swabs You can do it! Thanks guys! Might have to bend my TD clips more because it's so big lol. And name buddies too! Are you me? -
Ensi's ANH Stunt Build [ATA] With Centurion in mind!
Ensi replied to Ensi's topic in ANH Build Threads
First time i've actually used masking tape for its intended purpose I love it! Got a lot of bleed when using the decals to paint the rear stripes and tube stripes. I wanted to do the "light layer of color underneath" to avoid bleed, but the decals didn't stick too well and left a much bigger gap. It would've bled anyway.. But I just touched it up after. And some glory shots of the helmet Also received my package from Burkbench and wow this belt is nice! Much thicker than most of the belts i've handled. According to him this was made the screen-accurate way with white denim front, duck cloth interior, and satin back. Also correct right down to the stitch length he says. I haven't researched it that much but it certainly feels 70's His holster is also really nice Gonna wing it now and hopefully have approval photos in on Sunday! Also seems like Praetorian Blasters will ship my E-11 soon -
Ensi's ANH Stunt Build [ATA] With Centurion in mind!
Ensi replied to Ensi's topic in ANH Build Threads
That's a great tip! Some places it is very tricky.. My trooperbay decals were way bigger too. I think i'm just gonna go the masking tape route. Mask up a bigger area, paint the black then let it cure and then mask off and tape the remaining gray Oh yeah I definitely see it. Will get right on it! Or else it's gonna bother me forever -
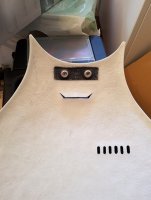
Ensi's ANH Stunt Build [ATA] With Centurion in mind!
Ensi replied to Ensi's topic in ANH Build Threads
Are my rear traps are too small? I just winged it freehand but it's so hard to tell with these pulls being so soft. Looking at other applications and reference it seems that they are. Advice on what to do needed -
If you're going for centurion (which I suspect you are) it is a requirement EDIT: They can also just be overlapped and glued without removing the seam. Maybe that was what you meant by gluing them shut?
-
Only the swede chamfers inner cover strips Are you doing the velcro overlap on biceps/thighs?
