
.png.c79477c1740a05d2252e896e392c2c0e.png)
Ensi
-
Posts
226 -
Joined
-
Last visited
Content Type
Profiles
Forums
Gallery
Articles
Everything posted by Ensi
-

Ensi's F-11D Standard Build (The5thHorseman 3D-Print)
Ensi replied to Ensi's topic in Weapons of the First Order
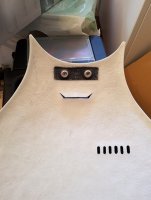
Seems like it! Can't wait to get this beast completed. I built a Jimmiroquai kit so this is no stranger to me Already had the spray filler on hand so I used that But that's an.. unorthodox way of doing it, hey, whatever works! THE SANDING BEGINS OH MY HOW I MISSED SANDING GEE WHIZ My arms are killing me Send help After I was done tormenting myself I had to rinse the dust off my parts and just did it in the sink. To dry them I used this beast usually used for drying your car/motorcycle after a wash. Man this thing blows. Parts all rinsed and dry! Glued the T-tracks Since it's literally freezing outside I had to make due with Jimmiroquai's shipping box which I got my armor in. Hooked up some steel wire and did the best I could, wear a respirator!! I managed to drop the barrel and it sent all the other parts flying but minimal damage was done and I am armed with sandpaper. -
FILES CAN BE FOUND HERE: Make sure to give Germain a huge thanks for being so generous to share these with us for free. TABLE OF CONTENTS Introduction, links. Initial sanding, T-Tracks, spray filler More spray filler, sanding, gluing small parts, threading/tapping holes for screws, V1 electronics test V2 electronics, cable routing, flashlight, grip, power cylinders, filling, sanding, test-fit Chroming parts using Alclad, magazine cover ball airsoft BB fix, failed thigh bracket install + fix, metal front-grip detail, flashlight switch install Assembly of everything, screw installation, wiring, electronics, scope-tint Finished pictures + video Electronics schematic (I am not an electrician, please know what you are doing before messing around with 18650 batteries) INFO Printed on a Prusa clone in PLA by a friend, not sure about layer thickness. What screws you need can be found in the instructions included in the print files. Screws bought from Asian sellers on eBay. Yes, the sanding and filling takes a LOT of time but it's so worth it! Structural bracket (optional) is metal and NOT white Holster bracket: Justin Lee Morrison Battery used: 18650 For Norwegians/Swedes: Battery Holder, Voltage regulator, Paint (Primer + Gloss White + Matte Black), Spray filler, 2-Part Filler, Flashlight, PLA Filament Everything else not mentioned most likely from Chinese eBay sellers. Wear a proper respirator when spraying anything or working with any chemicals please!! If you have any questions post them here and i'll do my best to help ------------- Welp... Had to start this sometime, here we go! This is my build thread of an F-11D Standard version, from Germain's @The5thHorseman awesome files. Files downloaded on 17.02.2017. Thank you so much for sharing these with us, it's really appreciated. Got a 3D-print nerd my dad knows to print this up for me in PLA. I already have an F-11D from Heston3DSolutions that I use, but I want to smooth it better and also have plans for the electronics First Order™ of business is lightly sanding all the parts. At the moment I have about 90% of all the parts, the rest is coming in the mail soon. I plan to sand all pieces lightly, prime them, then use a spray filler, sand again, prime, sand, paint, assemble. Wish me luck
-
TK61514 requesting TFA EIB status [Jimmiroquai] [784]
Ensi replied to Ensi's topic in Request Expert Infantry Status
No problem, brought out the drill and tap. Maybe add this to the future EIB posting guide? -
TK61514 requesting TFA EIB status [Jimmiroquai] [784]
Ensi replied to Ensi's topic in Request Expert Infantry Status
Thanks Here are some pictures of my blaster, also added it to the original post. -
TK61514 requesting TFA EIB status [Jimmiroquai] [784]
Ensi replied to Ensi's topic in Request Expert Infantry Status
Thanks Paul, built this kit with lvl2/3 in mind Sent from my SM-G950F using Tapatalk -
TK-61514 requesting TFA EIB status Name: Daniel Andersen Height: 177cm (5'10") Weight: 79kg (174lbs) TKID: 61514 Forum nickname: Ensi (FISD + 501st) 501st Profile: LINK Garrison: Nordic Garrison Helmet: ANOVOS Standard Line Armor: Jimmiroquai (V4) Gaskets: Jimmiroquai Belt: JAFO (Belts of the First Order) Holster: Jimmiroquai Neckseal: Stormtrooperundersuit.com (Extreme Racing) Undersuit: Stormtrooperundersuit.com (Extreme Racing) Boots: Imperial Boots Gloves: Imperial Boots Blaster: Hestonkent (Heston3DSolutions) Electronics: TRamp Pictures: Link to Imgur album if you prefer. Helmet Gaskets and neckseal Undersuit Yoke Chest Bells + Biceps Forearms Gloves + Knees Abdomen TD Belt Thighs Thigh function. I too have not installed screws into my blaster yet, but it is fully functional. Let me know if this will be a problem. Shins Boots + Spats Blaster
-
FirstOrders TLJ/Executioner Build - 9.23.2017
Ensi replied to First0rder's topic in TLJ Build Threads
Looks great!! The FOTK looks so darn intimidating, you feel like such a badass with it on Awaiting approved post -
MStalkid's TLJ FOTK/Executioner build (LARGE photos)
Ensi replied to MStalkid's topic in TFA Build Threads
Aww hell yeah!! Congrats man, great job -
I cut mine but decal is fine too. Also when gluing back together your forearms, make the non-greeblie side seamless if you can I just did a single snap to the shoulder-bell to keep them from falling down. EDIT: As in elastic glued to bicep with a snap on the other end that connects to the bell.
-
Voted!
-
Find a relative that has one and kidnap it for several weeks, that's what I did
-
Piece by piece! In the blink of an eye you'll be cursing spray cans instead of sandpaper! Been sick here as well, and in my first free weekend in a month.. I didn't spray the insides of my armor, I don't see the point really. No one's going to see it and it uses a lot of product, it can also compromise adhesion for snaps/straps etc. When bending my arms people can see the insides of the forearms, but I just lined that with some matte black gaffers tape. Definitely plastidip/spray rubber the inside of the helmet!
-
FirstOrders TLJ/Executioner Build - 9.23.2017
Ensi replied to First0rder's topic in TLJ Build Threads
Man those are some great painting results! Clear is looking shiny! Mine didn't turn out as good, have to try other paints next time.. Bicep details looks great. Also what is up with Finn's shoes in that picture? What are those lol? -
This is looking very promising! You can definitely do this before the premiere. I want to see many pictures!
-
320-400 is fine for the first step of sanding the outside, might take a bit longer but better safe than sorry. I used 320. For the inside of the armor i'd recommend 120 then 220 grit
-
Some sort of filler for the surface imperfections, paint, and more sandpaper! Great to see another Jim kit in the works
-
MStalkid's TLJ FOTK/Executioner build (LARGE photos)
Ensi replied to MStalkid's topic in TFA Build Threads
Why didn't I think of this?! Great advice! I just eyeballed it and I notice now I could've taken more off. One ony my spats just barely go onto the shin and is just pressure fitted on. The other one is too small so I have to sliiiightly overlap the shin and then secure the spat with small squares of velcro. You can either do velcro or if your spats are too roomy for that you might have to cut them up and trim. 2 strips of velcro, but I wish I did as Darren and went with magnets and some straps. This would also be the screen-accurate way! -
MStalkid's TLJ FOTK/Executioner build (LARGE photos)
Ensi replied to MStalkid's topic in TFA Build Threads
Back of the ab plate? Do you mean the opening of the ab-piece in the back? -
MStalkid's TLJ FOTK/Executioner build (LARGE photos)
Ensi replied to MStalkid's topic in TFA Build Threads
Awww yes! Exciting! Remember to give the insides of the armor a good sanding and a wash before you try it on This is going to be great -
Yeah same here. I'd recommend you go get a sheet of matte black vinyl wrap for cars or similar and cut out your own. And get more than you think you'll need
-
As hankey said: And I also read it helps focus your vision out of the bucket, can definitely see that one. Oh and the most important reason why is it looks cool as poodoo. If you want to go über accurate though leave it white. Good choice on Geeky Pinks! Can't go wrong with her. Awesome that you're gonna start a thread, takes a while to document everything but it is so worth it. Plus you dump a lot of knowledge and information out to those new builders and get the chance to get answers from the more experienced ones on that costume. The tent I used was a small 2-person "go to a festival and leave it there" type of tent, it's really cramped and not a lot of space so I could really just paint a big piece at once or both thighs/shins etc. Also if you don't have a proper respirator and you're going to do this, GET ONE. Painting inside such a confined space without a proper respirator with filters is just asking for trouble, also wear clothes you don't care about.
-
If you want it to be screen accurate a seam/overlap is the way to go: Also on the thighs: If you want to get it as accurate as you can i'd recommend talking to your GML about it as it is he/she that's going to be approving it. Would be a shame to not be able to make it accurate because of a CRL that is being worked on as we speak.
-
The third dot on the picatinny rail on the forearms on both the executioner and the TLJ TK seems to be black:
-
Blacked out the inside of my bucket today with some spray rubber. Didn't use PlastiDip because the place that sells it here is always out of stock. Some seams on the outside of my Anovos helmet were kind of big, so I made sure to put masking tape as well as I could in them to prevent the spray rubber from oozing out. And it worked! Masked off: A few coats: After: Looks like a proper helmet now! Going to let it cure for a few days before I add the velcro for the padding, fans, and the wireless mic. Went with 4 coats as per can instructions. Received my Stanley chest, 240 litres! Not sure if this will be too big for me or not, we'll see. Also pimped it out with some patches and reflective tape:
-
This armor looks really promising. Can't wait to see you build this and hear your thoughts
