
.png.c79477c1740a05d2252e896e392c2c0e.png)
Ensi
-
Posts
226 -
Joined
-
Last visited
Content Type
Profiles
Forums
Gallery
Articles
Everything posted by Ensi
-
Both the 5min and 4hour Loctite Epoxies i've used are rock solid, haven't had an issue with them but would recommend using the 4hour if you have the time. E6000 works really well with the fibreglass as Dustin said, and only way it is coming off is if you WANT it to. Clamp it down/use magnets if you can and leave it alone for 24 hours. When I removed my ab harness I really had to work to get it off haha. Snaps are not going anywhere. I've also used a lot of the Loctite 60sec Universal Glue (which is cyanoacrylate based) and with enough force you can get it off too. As with any glue, surface preparation is key. On the shin boxes/holster/greeblies/external parts I roughed up both surfaces with 60grit, etched some marks with a file/sharp object, and cleaned with IPA (as in rubbing alcohol and not the beer ). For the snaps I already sanded all of the insides when I got the kit so it's good.
-
I wouldn't use a brush as you leave brushmarks like that. I only used spray paint for the entire build. Sent from my SM-G950F using Tapatalk
-
Thanks, was really discouraging at the time but when life gives you thin fibreglass rip that #%&* out and fill it back up! I am noticing a spot in the same area with the same problem, i'm just not going to touch it
-
So turns out my "paint bubbling" wasn't bad paint, it was the flexible fibreglass layer that was super super thin in that spot and it cracked, so I ripped what I could out: Filled it: Sanded it back: After painting it I noticed paint failure just above the same spot, sigh Didn't even bother to prime this area, just did several light coats: All my parts are now cleared! Woo! About my wetsanding of the clear: The amount of orange peel I get from my spraycans, non-optimal conditions, and inexperience means that I have to sand back a LOT of material to get it flat. Tried it on some pieces and almost always hit through the color and into the primer, so i've decided to not wetsand the clear. Under better conditions and temps I could lay down heavier coats of clear and have more material to work with, but it's almost winter so that'll eventually come later. I really hope the clear will provide better protection for the paint during troops. Really a shame because the wetsanded parts looks sooooooo good Removed my ab straps because there was water trapped underneath the masking and it was left for several days, started to smell funky. Looking into a different way to do the harness right now, thinking about adding snaps for removability. Also made a shoulder support system without drilling holes in the yoke. I'm afraid it'll compromise the structural integrity. Heatbended some ABS plastic and E6K'd them into place. I will see how this will hold up, maybe make some metal ones as suggested by someone on the Jim FB build group. Before: After: Started adding the decals back, these i'm cutting out of vinyl car wrap I got from eBay. Blaster has yet to arrive..
-

MStalkid's TLJ FOTK/Executioner build (LARGE photos)
Ensi replied to MStalkid's topic in TFA Build Threads
I use Imgur, made a tutorial over in the HOWTO section: There are tons of hosting sites but it's all personal preference really. -
MStalkid's TLJ FOTK/Executioner build (LARGE photos)
Ensi replied to MStalkid's topic in TFA Build Threads
Looking forward to seeing your progress! The executioner seems to be very popular -
Thanks! I wanted this build thread to be as if I were to build an FOTK myself for the first time And shame about Anovos.. I think Jim is going to get a few more orders right about now haha.
-
Yeah it's not really a big problem, others have had WAY worse. The paint I used is an acrylic too but more "all purpose use". Been absolutely perfect no problems except this
-
Just when you think you're almost done... Paint failed on me on the ab-boxes. I think it was a combination of humidity, applying too thick of a coat, and not long enough flash time for the underlying coat. Paint has bubbled up and seems to have lifted the paint. It's super soft in these areas and would NOT hold up to the wetsanding (to remove orange peel) that i'm planning to do. Back to the sandpaper and rattle cans!
-
The top 2 layers flex a good bit but the inner polyester webbing layer is tough as nails and won't budge. I glued all of my layers together and when I glued the inner webbing I had to glue it in a "round" formation (not flat on table) if that makes sense, same goes for regular screw assembly I guess.
-
Just make sure to measure and mark it with the belt kit ON yourself and with all the armorparts (ab/cod/butt), or else you'll end up with wrinkles
-
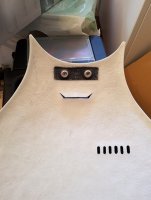
You know you are painting a TK when your shoes look like this! Been busy sanding, painting, lint-removing, clearcoating, and cursing the past few weeks. The tent really helps, but sadly there's been a lot of rain so it's made things challenging. I'm trucking on and the time of day doesn't stop me, so I am even painting at night. Must look really weird to my neighbors seeing me going out into my tent wearing this to paint.. Noticed some cracks starting to form in the ab: It's not really noticeable, but I wanted to prevent further cracking so I added some fibreglass mat and resin to the backside to kill some of the flex. I also plan to get into the ab section by lowering it down over my head instead of flexing it around my body. Also noticed some cracks on the yoke and codpiece, going to just apply some epoxy to the backside on these. Done with clearcoating most of the parts, i'm doing it as fast as I can as the temperature is starting to drop towards winter. What i've found to be really helpful is to have a spreadsheet of what parts you have done this and that to. Only some parts left now! Window/door seal strips have been purchased and is gonna go on the shoulder bells and other various areas on the armor where it rubs the most, tips on other places where to put it is appreciated! Other things: The maker of my 3D printed F-11D/SE-44C kit told me the shipment had been lost and he is printing a new one, just hope it is soon. Also ordered a Heston blaster and pistol on the sick sale he had, had to get a US friend to order it as he doesn't ship internationally. 240l Stanley chest has been purchased and is on its way from the UK! TRamp has been ordered and i've also received my wireless mic kit from eBay.
-
Ahhh!!! Painting mishaps! You just gotta truck through it, think of the end result Looking good!
-
I used the snap setting pliers, made everything sooooo easy! Good idea to vary everything up so you don't lose your mind.
-
So basically the strips of stuff you can use to seal up windows/doors/whatever? That's genius!!
-
Right now I have velcro on the knee plates too, but added the string for extra security. Where did you add the foam? I'm thinking of adding it around the entire upper torso (chest + yoke) as the ab seems to get a lot of beating from it. Also maybe under the shoulder bells.
-
So one mod I knew I needed to do was the kneeplates, pretty common and pretty easy to do. Elastic string around it to keep the kneeplates in place and keep them from falling off. These are just hairbands stapled to a piece of nylon webbing, which is glued to the kneeplates with 60sec. Also smothered some glue on the band/staple itself. One thing I experienced from my first troop was that single-stage paint (= no clearcoat) is NOT durable. At least not the one I used: During a break I noticed it and it kept me from trooping more on my first troop.. Poodoo happens but hey there's always another troop! My solution for this is to clearcoat the entire armor for durability and add a buttload of padding... And I thought I was done with spray paint and sandpaper... Current method goes like this: Wetsand with 800 grit to promote paint adhesion on the cured paint. Put on 2 color coats to make up for the paint removed during sanding, and also to provide a chemical bond for the clearcoat to adhere to. As in I wait 30 mins-2hours before I put the clear on. Before it completely cures. Put on 4 layers of clearcoat, making sure to cover every area and also inspecting for dust/lint/hairs before each coat. A tack cloth is really nice for this (for my Scandinavian people, here is where I got mine). It is a tacky cloth designed exactly for this purpose, which picks up dust/lint/whatever. Let the clearcoat cure for 24-48hours. You should end up with something like this: See that it looks like the skin of an orange? That's orange peel. Caused by using rattlecans, bad technique, used under non-optimal conditions, etc. Many variables. As I do some car detailing in my spare time I already had the tools to "fix" this. The goal being flattening the clearcoat as much as I can for better shine. This is what I did: Wetsand the paint with 1000-1500 grit, not yet exactly established the perfect grit here for my paintjob. This is to level out the texture, you should end up with a dull finish like this, make sure everything looks uniformly dull, this is the most important step. It is also the most dangerous step as you can sand through the clear and into the color coat which i've done a few times already.. Then wetsand with 2500-3000 grit to level out the 1000-1500 scratches. And finally, knock down the 2500-3000 scratches with polishing compound and a polishing pad. This is my first result: Still a lot of sanding marks but soooo much better, just need to experiment on this a bit. If you're interested in how paint and clearcoat go together to create gloss, watch this video from the 06:10 to 07:02 mark, it's for cars but it applies to armor as well. The orange peel is not a flat surface, so I flattened it to get more shine, makes sense? Just remember that all these steps are abrasive and will remove clearcoat (this is how polishing works), be careful And I still haven't gotten my blaster... Sigh Also did the elastic string mod to my big belt box.
-
That does NOT look right Is this from the same can? Maybe you got a lemon?
-
That's awesome dude, are you gonna start a build thread? My snaps are from a store in Oslo that sells fabric, sewing machine supplies and the likes (Sømsenteret). I used Prym brand snaps, model "Sport & Camping": Also used the snap setting pliers they have, makes the entire process a breeze: Maybe you can get them in Ireland too? Doesn't really matter which types you use as long as they are high quality "heavy duty" ones.
-
Good luck! It might seem daunting at first but you just gotta work at it, hope my build thread is of help Thanks mate! Thanks! Ok so i've participated in my first troop and the single-stage paint just got absolutely wrecked in some places. Since the paint has cured I need to sand the paint lightly, apply some more color coats, then clear coat everything... Guess i'm not done yet..
-
Get used to sandpaper
-
TK-61514 reporting for duty! This has definitely been a journey, I went from not having any experience in costume making to assembling and getting a TFA Stormtrooper 501st approved! I must say this is a big dream come true for me as i've wanted to join for the longest time. I want to thank the great people in my garrison and the people here on FISD, you know who you are! Even though I am approved this thread is not finished, I will update it later with mods done to the armor after I get to use it a bit. Already done some slight modifications to it. Thanks man! Was just finishing work for the day when I got the message about the fixes, drove home and jumped straight into the armor haha.
-
TK-61514 requesting higher access. http://www.501st.com/members/displaymember.php?userID=25720&costumeID=326
-
Thanks! This was my first ever costume too and I had no experience in prop making, so I can't compare it to anything. Personal rating from 1-10 would be maybe 5 or 6. It just takes a lot of research and time (also a bit of money..). Jim's kit is really easy to work with as you don't have to glue and trim 500000000000 parts like on the ABS kits. I had to do quite a bit of trimming because I wanted the armor to fit me well, and i'm kinda skinny. Jim's armor is a bit more "heavy friendly". Don't get me wrong, it is challenging, but there are so many great resources and build threads here so if you are a bit handy it should be no problem. As it wasn't for me!
-
And i'm approved!!! Wooo! Big dream come true, just waiting for my TKID now! Had to fix poking yoke and askew cod, no biggie!
