
.png.c79477c1740a05d2252e896e392c2c0e.png)
Ensi
-
Posts
226 -
Joined
-
Last visited
Content Type
Profiles
Forums
Gallery
Articles
Everything posted by Ensi
-

Ensi's ANH Stunt Build [ATA] With Centurion in mind!
Ensi replied to Ensi's topic in ANH Build Threads
This is easily the most nerve-racking part of the build for me Laid on the gray today. To me it looks ok, a bit wonky which gives it that charm. If there are any concerns please let me know Gonna let it rest for a couple of days then clean it up with a toothpick and lay on the final black stripes. -
Ensi's ANH Stunt Build [ATA] With Centurion in mind!
Ensi replied to Ensi's topic in ANH Build Threads
Awesome! I'll see when I put the gray on tomorrow Was a bit hard to determine where to paint as the details are a bit soft. -
Ensi's ANH Stunt Build [ATA] With Centurion in mind!
Ensi replied to Ensi's topic in ANH Build Threads
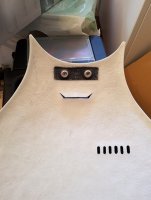
Opened up the helmet a bit more and cut down the screws you see there. Also opened up the teeth a bit more, from this: To this: And then I decided to just dive head first into painting. My hands seem to shake and i'm not that good with handpainting, but it turned out ok I guess? I may have to do some adjusting, but i'm not sure. Seems like I need to widen the temple trap, and also maybe increase the size of the left rear trap bottom side. Hopefully i'll have my Burkbench package sometime this week -
Ensi's ANH Stunt Build [ATA] With Centurion in mind!
Ensi replied to Ensi's topic in ANH Build Threads
You must be some kind of good luck fairy or something because right after I read that I found this: Snagged it up (last one!) Always wanted Husky bins as they look so darn cool, but shipping out of the US was always insane ($170'ish). So thank you! And yeah looked at the stunt build -
Ensi's ANH Stunt Build [ATA] With Centurion in mind!
Ensi replied to Ensi's topic in ANH Build Threads
Kung! Also checked your thread, nicely done!! Will have a crack at it after opening/cleaning up the teeth some more. Btw, where did you get your low-profile transport case? What brand is it and does it work well? -
Ensi's ANH Stunt Build [ATA] With Centurion in mind!
Ensi replied to Ensi's topic in ANH Build Threads
TK-Caveman Speaking of cavemen, my head is pretty huge so squeezing into an OTTK helmet can be challenging for me. With the trim in place I can barely get my noggin in so i'm considering removing what seems to be leftover flashing. Thoughts? Just wished the helmet wasn't assembled when I got the kit but you can't have everything -
Ensi's ANH Stunt Build [ATA] With Centurion in mind!
Ensi replied to Ensi's topic in ANH Build Threads
Thanks man! Hopefully the momentum will pick back up soon [emoji4] Oh man can't I just get approved like this?? Dreading the hand painting [emoji51] Sent from my SM-G950F using Tapatalk -
Ensi's ANH Stunt Build [ATA] With Centurion in mind!
Ensi replied to Ensi's topic in ANH Build Threads
Build has kinda stalled, part motivation and part waiting for parts. Contacted Burkbench and he made a mistake in my order, crossing the wrong Daniel off the list apparently. Oh well, human mistake. Said he would get right on it. Coming up on 3 weeks since that message, gonna send him another one soon. Gave the mic tips a coat of white and scuffed them up a bit Added the last ear screws and countersunk them. Do this with a drill bit about the size of the screw head BY HAND. DO NOT USE A DRILL. Before/after I've also been polishing up the helmet and various parts to give them that Death Star shine. Using the drill backing plate for a car headlight restoration kit, I cut up one of my polishing pads and used Menzerna SF-3500 to get rid of 6 years of wear and tear and just laying in a box. Here's a video showing a 50/50. Man does it make a difference.. Also managed to do another test-fit of my armor. Please tell me if you see something The belt will close up the side gaps and also hopefully fix the buttplate trying to sneak under the kidney. Click the images for higher res. Also ordered a new undersuit from stormtrooperundersuit EDIT: Might have to pad the shins or add elastic to prevent rotation. -
Ensi's F-11D Standard Build (The5thHorseman 3D-Print)
Ensi replied to Ensi's topic in Weapons of the First Order
Thanks man, I appreciate it! The sanding sucks but the results speak for themselves 1. I'd struggle with explaining it in text so here are some pictures: Blaster-side is just one magnet attached with 5-min epoxy glue. I tried CA at first but it didn't hold. (Also if you do epoxy use a clear one ) When the handle is closed the magnets do not sit flush up against eachother, there's a slight gap. I like this as it doesn't slam on the magnets (potentially making them break/crack) when closing the handle 2. I painted the muzzle black, let it cure properly, then masked and painted the white. I do have some bleed myself, but it is not noticeable at all, use high quality tape. What you could try though, is paint the muzzle black, let cure, mask off, then spray a light layer of black first, let dry, then spray the white. This supposedly fills in the void of the part->tape and makes sure you end up with a nice, crisp line when you put on the white Just recently found this tip so I haven't tested it but it makes perfect sense. -
Ensi's F-11D Standard Build (The5thHorseman 3D-Print)
Ensi replied to Ensi's topic in Weapons of the First Order
Updated thread with table of contents for an easier read and added misc info on first post. -
Tee-Bowls' First Order Trooper TFA/TLJE Build (KB Props)
Ensi replied to Tee-Bowls's topic in TFA Build Threads
Screen used forearms seems to not be glued all the way on one side, probably for easier kitting up. Also the ab boxes don't have to be seamless, see pic: Looks like they are just attached. Maybe @ukswrath can chime in on both points? Great work btw -
Ensi's ANH Stunt Build [ATA] With Centurion in mind!
Ensi replied to Ensi's topic in ANH Build Threads
Installed ab left-side rivets into snaps (keep in mind the rivets here were trimmed down prior to installation) Installed the thigh ammo pack Glued thigh elastic (measured a bit much the first time as you can see here..) Current fitment of lower body Got the rest of the strapping done Velcro on bicep-forearm connection Nylon straps on left ab connection All that is left now is the helmet, ab-buttons, shoulder bridges, handguards, painting, and belt+TD assembly, but i'm still waiting for my order from Burkbench before that can be started. Also PS if you're taking pictures in a mirror... IT'S MIRRORED It was my left shin showing a gap, not the right one. Glued the upper elastic a little bit more and it solved the issue After test fitting a bit I am considering switching out the shoulder bridge elastic with white nylon. The elastic is not strong enough and the bells pull the elastic out a lot. Just moving slightly misaligns them. -
Looks great! What did you use for the chrome/metal paint?
-
Ensi's ANH Stunt Build [ATA] With Centurion in mind!
Ensi replied to Ensi's topic in ANH Build Threads
Not being satisfied with the ABS paste, and also considering the paint seeming (hehe) to match.. I went ahead and used body filler and paint. I REALLY lucked out on the paint match here, it is DEAD ON Up close in the correct lighting you'll see the body filler. Not that good with fillers yet, but it's not noticeable at all from a small distance. For any Norwegian, Swedish, or Finnish folks here that have a 2012 ATA kit, this is the paint I used (gloss white): https://www.clasohlson.com/no/CRC-Pro-Paint-spraylakk/Pr346047001 -
Ensi's ANH Stunt Build [ATA] With Centurion in mind!
Ensi replied to Ensi's topic in ANH Build Threads
Thanks all! Build is slowly moving along while waiting for various shipments. I attacked the shim today, first time with ABS paste. And I do NOT like it lol, stringy and awkward to apply. Just like E6000 But i'm having some problems, after applying and sanding it down, I noticed it's kind of translucent? There's a dark line running down the area of the seam. The photos do NOT show how it really is, it's more noticeable in real life. It's either the paste or the slight height difference of the shim->kidney that's creating a shadow. I've done 2 rounds of paste->sanding and now on the third application after noticing some air bubbles. If the third round doesn't fix the black line i'll just fill the remaining holes and dust it with white spray paint. The paint I used for my TFA actually matches the ABS of this kit perfectly, I can't even see the difference (hint: i've sprayed half of it, also note the scratches in the upper left). -
Ensi's ANH Stunt Build [ATA] With Centurion in mind!
Ensi replied to Ensi's topic in ANH Build Threads
Great! I've seen different angles as well and had to ask. Thanks man Awesome! I can feel the end of this build Also Tony, wanted to ask. I want to do the left side ab-rivets like I have done my cod rivet. Smack them into a snap to have that functionality and ease of transport. Would this be ok for L3? -
Ensi's ANH Stunt Build [ATA] With Centurion in mind!
Ensi replied to Ensi's topic in ANH Build Threads
So got quite a bit done lately Installed most of the snaps and strapping on the armor. Elastic everywhere except butt-kidney where i've used nylon. Note, you can see the butt going inwards a lot and this is intentional. By simulating the belt with my hands the butt flared out way too much. I put a pan on the stove, boiled some water, and submerged the point of bend on the butt while holding it in the shape I wanted. Keep it there until you feel it "give", then take it out immediately and shower it under cold water. Worked great! Double butt snaps and right side upper ab snap Cod brass split rivet (wow this was a pain, had to trim down a longer split rivet to be able to even bend it!) Shoulder bridge elastic Glued sniper knee Han Hooks Also, am I correct in that the yellow line here would be the correct angle for ANH Stunt? I seem to have gotten a spare brow trim with the kit which is great! -
Ensi's ANH Stunt Build [ATA] With Centurion in mind!
Ensi replied to Ensi's topic in ANH Build Threads
Awesome! Regluing the pesky middle hook closed them up better -
Ensi's ANH Stunt Build [ATA] With Centurion in mind!
Ensi replied to Ensi's topic in ANH Build Threads
Ok nice, thanks They are pretty tight on there as is, so might have to do some heatshaping to close it up a bit more. For now i'll consider them ok and move on -
Ensi's ANH Stunt Build [ATA] With Centurion in mind!
Ensi replied to Ensi's topic in ANH Build Threads
So the e6000 got done curing and I tried on my shins. I'm not entirely sure if this is good enough or if I should try to adjust or just rip it off and do velcro. Middle hook of my right shin slid during curing so it's not connected in these pics. What do you think? -
Based on the upgraded yoke-piece, that's a V5 Jim kit which is the newest. The gaskets are also from him. There are many ways of fastening stuff and no real "this is the best way", magnets, velcro, snaps, it all works. Also people are getting new pieces for the executioner so they can switch out pieces and have an Executioner and a regular TLJ TK (think ANH Hero and ANH Stunt). Chest to yoke can be tricky, I opted for nylon webbing running across the 2 "wings", with additional snaps in the middle to secure the chest (see my profile pic lol). Along with elastic+velcro closure on sides (although screen accurate would be to overlap both pieces and use just velcro). Yoke is screen-accurate, as you can see here (albeit a screen-used TFA kit, I see no reason why TLJ should be different): But should be no problem to cut it like you outlined if you so wish, would lose a bit of accuracy but gain easier access when kitting up. I'd recommend reading up on Jim TFA TK threads as there's a lot of them and the parts are 95% the same
-
FN1313's Jimmiroqaui FOTK Armor Build
Ensi replied to FN1313's topic in Build Threads Requireing Maintenance
Looking good! Nice and clean -
Ensi's ANH Stunt Build [ATA] With Centurion in mind!
Ensi replied to Ensi's topic in ANH Build Threads
Great Got everything then. Also, question: Does how I do my interior strapping matter at all as long as it looks good from the outside? I want to make most of the pieces separable for easier transport. For example, put snaps on the other side of the left ab/cod rivets, velcro fastening on biceps to forearms elastic, etc. -
Ensi's ANH Stunt Build [ATA] With Centurion in mind!
Ensi replied to Ensi's topic in ANH Build Threads
Assembled some more limbs! I am starting to see a hint of a stormtrooper.. Also made the elastic shin-closure hook thingymajigs: Hit the hooks with some white spraypaint Also went out and got the last part that I need, gloves! Would the knurling on the topside (on fingers) of the gloves be a problem? -
FN1313's Jimmiroqaui FOTK Armor Build
Ensi replied to FN1313's topic in Build Threads Requireing Maintenance
Wetsanding is the best
