
.png.c79477c1740a05d2252e896e392c2c0e.png)
Ensi
-
Posts
226 -
Joined
-
Last visited
Content Type
Profiles
Forums
Gallery
Articles
Everything posted by Ensi
-
Yessss, more FOTK's! Any update?
-

Ensi's F-11D Standard Build (The5thHorseman 3D-Print)
Ensi replied to Ensi's topic in Weapons of the First Order
You can do it!! It just takes a bit of time I never did. It wasn't my strongest area either so I spent like 3 weeks reading about electronics trying to wrap my head around it You can do it in several ways, I opted to use an 18650 for the UNLIMITED POWER it has. Here's my wiring schematic if it helps: I've cropped out the technical stuff as it will vary. Keep in mind I am no electrician and toying around with 18650 cells is no joke. You could easily do it with a 9V battery for the LED's and just use a mini torch like everyone else did in the front Thanks! The brand of paint I used is CRC Pro Paint. It's this cheapo all-round acrylic paint we sell at work. Same stuff I used on my suit! I smoothed/primed/sanded the silver parts exactly the same, but in the end I hit it with gloss black and then clear. Polished it a bit at the end but it didn't help much. Then alclad chrome if i'm not mistaken was airbrushed on -
Haven't had any catastrophic failures yet. Several small cracks though, which i've reinforced with fibreglass mats and resin from behind. This armor requires upkeep and is a bit of work sometimes. But I guess you have that with every armor? Still think it is the best looking kit right after ANOVOS, if you can get your hands on that
- 1 reply
-
- 2
-

-
Bend/shape a piece of metal or plastic around the lip Not as screen accurate but looks way better with those supports.
-
Ensi's F-11D Standard Build (The5thHorseman 3D-Print)
Ensi replied to Ensi's topic in Weapons of the First Order
Thanks! Yes I wanted it practical, didn't want to mess around with several batteries -
Ensi's F-11D Standard Build (The5thHorseman 3D-Print)
Ensi replied to Ensi's topic in Weapons of the First Order
Already have someone that's gonna print it up for me, I guess this madness never ends hahah -
Ensi's F-11D Standard Build (The5thHorseman 3D-Print)
Ensi replied to Ensi's topic in Weapons of the First Order
Done!! I could of course have done more smoothing, and there are some cracks and some blemishes that I didn't fix. But as with my kit, nothing is perfect, just move on before you go nuts! (Yes I am missing a screw under the forward grip, which I fixed right now ) -
Ensi's F-11D Standard Build (The5thHorseman 3D-Print)
Ensi replied to Ensi's topic in Weapons of the First Order
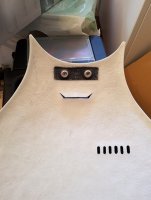
THIS POST IS GOING TO BE HUGE DO NOT QUOTE THE ENTIRE THING LOL. Finished pictures is in the next post. So I used the weekened effectively and finished my blaster!! It's amazing that I spent all these weeks doing the surface prep, and it's only when you start assembling that you get your reward. Assembled it in 2 days with electronics and everything, surface prep took forever. Masked off the scope bracket, wow this was a pain to do, so many small pieces of masking tape. Did not come out perfect but I think that's the best I could do with such a small piece Now let the fun begin! I assembled everything according to the guide Germain provides, all with screws and some glue reinforcement where I think it could help. Having all the screws organized makes everything so much easier. Assembled the grip, glued the grip inlay with CA, put a spring and some E6000 on the "second trigger", installed decorative screws. Glued on the thigh bracket, installed screws, attached frame to grip. Installed muzzle and sight. 6mm Airsoft BB painted black and glued into place Started pulling electronics and installing the switches Painted the screws to make it blend in a bit better. This switch turns everything on/off. Assembled the scope and some other various parts Actual glass lenses was used in the scope, the tint is some kind of film a co-worker had laying around. Cool hexagon pattern, almost looks like a killflash, which I think fits the FOTK's modern style. Hot glued the voltage regulator for the flashlight down, also hot glued the light-plates (?????) down. Ran more wires Above both lights is a sheet of clear plexiglass CA'ed in place, with 2 layers of that film you put on your bathroom window so people can't see you poop. The lights are angled because of the cables underneath, I should've done it a better way but it doesn't look that bad Notice how the wires are not going up the hole I made for those wires? Easy to make mistakes when you are this hyped! Wired up the flashlight. Note that both cables are black and labelled, this is because I didn't want a red wire going up the barrel and potentially showing. Before I glued on the ring, I sanded off the black finish on the flashlight. This switch turns the flashlight on or off. Also note, the structural bracket should NOT be white. I was so certain it was and painted it. Then I realized i'm a dumbass. Gonna go without it until I can get it machined out of aluminium at a local makerspace in the future Phew... Next post will be finished pictures.. -
Recommendations for where to purchase F-11D kit?
Ensi replied to BGeek's topic in Weapons of the First Order
Nope, out of the box ready to use! -
Recommendations for where to purchase F-11D kit?
Ensi replied to BGeek's topic in Weapons of the First Order
No, they are straight from printer to assembly. He just prints them in black/white material, silver parts are painted though! -
Recommendations for where to purchase F-11D kit?
Ensi replied to BGeek's topic in Weapons of the First Order
It is able to, but you have to add the screws yourself as it only comes with 3D-printed "screws". Quality is good, there is no surface finishing done, it's straight from printer to assembly. It is super light so great for trooping. -
FN1313 Anovos FOTK Build Thread
Ensi replied to FN1313's topic in Build Threads Requireing Maintenance
That's from Heston and it is indeed a nice blaster for the price, you get lights and it's fully finished. I have one that I troop with now, and it is SUPER light, very good for trooping. Although it has a fair bit of print lines, but the price and weight make up for it. I also have boots and gloves from IB, they are great! And also have the undersuit and neckseal from stormtrooperundersuit. The shiny area cracks/frays along the seam right down your crotch area, so it is hidden by cod and buttpiece. It is the undersuit you want for screen accuracy, but do note they are very small in size. I wear a medium everything, ordered a large, but it's super tight, wish i'd ordered an XL. If you haven't found a vendor for gaskets yet, go with Geeky Pinks and get neckseal and gaskets at the same time. -
Looking forward to this! Really hope ANOVOS actually delivers. So jealous of that ATI stock I'm guessing you printed the heavy version blaster? Toying around with the idea of getting a stock like that but would maybe look weird on standard since the heavy version is bigger.
-
Ensi's F-11D Standard Build (The5thHorseman 3D-Print)
Ensi replied to Ensi's topic in Weapons of the First Order
So as I am mostly done with the boring sanding and filling (still some left tho) I moved on to the fun stuff! As I said before I was gonna outsource the chroming work to a garrison friend who has an airbrush and alclad. Before I could do that I needed to give the parts a glossy black finish Drove over to him and hung out, saw all his AMAZING props. Including an E-11 he'd built using only real parts. Decomissioned Sterling, real tank scope, real hengstler, the works! So sick! Commence the alclad: The results were awesome Compared to my old blaster The magazine cover did a print boo-boo and because of that I was missing the ball in the print. Drilled a small hole and countersunk a 6mm airsoft BB into the hole. Installed the bracket scews. I did this before gluing the bracket on to the piece (which i'd recommend you to do instead). As I was drilling freehand one of the screws ended up not going in completely straight which also meant the bracket was not straight. It bothered me so much so I tried to fill the hole/mistake i've made and re-do it. First I filled it with some epoxy putty, that didn't work. Was way too soft, probably because it was old. So I wrestled that out of the hole, and filled it with 5min epoxy glue. Nope, soft that as well, probably because there was such large amounts of it. Or maybe it was old too? Who knows. Cursed a bit and removed that too. Then I tried with the polyester resin I had laying around from my boat repair kit. Those of you who have seen my FOTK build thread know that I have used this kit extensively to prevent cracks. And it worked wonderfully!! Just taped the hole from behind, mixed up the resin and dumped it in there. It's not 100% lined up super straight, but I think i've come to the same realization as with my FOTK. "Nothing will ever be perfect and you'll lose your sanity if you dwell too long on one step". The screws I use are button head anti-tamper torx M5 screws. Guide says M6 but M6 doesn't fit into my Jimmiroquai supplied holster. I even had to sand some in my armor build to make the M5 fit. I also had to remove my ball bearing on my holster to make the holster usable. This will probably not be an issue if you have a holster from another maker. Wetsanded and polished up the metal holster bracket (supplied by Justin Lee Morrison). Inspired by the KCP blaster thread and pictures, I decided I didn't want a sticker in the pillhole on the left side. I dug out a sheet of aluminium i've gotten from a friend at work and fabricated my own using drill bits and files. Also polished that up a bit! Both the pillhole part and the holster bracket got a few thin coats of clear coat to minimize corrosion/oxidation. Then I tackled the flashlight switch. I thought long and hard about this one, and ultimately decided to sacrifice some screen accuracy for practicality. By adding a switch to the empty pillhole on the left. Added some M3 anti-tamper torx to it to make it as First Order™ as possible as well as making it removable for future repairs. Haven't decided if I should paint this assembly white or just leave it like it is. Drill bits, files, and lots of patience Next up? I'm gonna sit down and relax before the final round of sanding -
Do you know how to use filler, spray cans, and sandpaper? Then you can do a Jimmi kit. It's probably the easiest available FOTK kit out there right now. Only minor modifications necessary, maybe some down/up-sizing of parts depending on your body type. You have all the info and help you will ever need and more here on these forums And yeah it's expensive, the things that make it expensive is all the other stuff: gaskets, boots, gloves, belt, pouches, blaster, neckseal, undersuit, nylon webbing, elastic, velcro, magnets, glues, tools etc etc etc.
-
Ensi's F-11D Standard Build (The5thHorseman 3D-Print)
Ensi replied to Ensi's topic in Weapons of the First Order
Oh and I forgot to say, Germain your attention to detail is amazing. I just LOVE how idiot-proof these parts are, where it's possible, he has made the parts in such a way that you can't orient them wrong. There are notches and spaces made out so everything lines up nicely. Thanks! -
Ensi's F-11D Standard Build (The5thHorseman 3D-Print)
Ensi replied to Ensi's topic in Weapons of the First Order
Been busy doing a clothing run for the 2 Norwegian Squads, with custom text and everything, wow what a time sink. Finally got the rest of my parts! I am thinking about changing my middle name to Sandpaper First up, I re-did my electronics. Instead of running off a 9V battery, I instead opted to use an 18650 cell. I also researched and learned a lot during this time. Threw a variable voltage regulator into the mix and now everything runs off 1 battery! Yes! Drilled holes for the cabling Sanded/dremel'd the flashlight ring to accomodate my flashlight which was larger Joined the grip parts together as many have done, with reinforcement. Pro-tip: If your power cylinders come out awful (like mine did), slice it in half and print them vertically, looks much better. Just glue and fill the seam later. More filling and sanding Tapped the rest of the holes and assembled some of the pieces together, couldn't help myself. It's starting to look like a proper blaster!! Next up? More sanding and sanding and sanding, you get the deal -
Ensi's F-11D Standard Build (The5thHorseman 3D-Print)
Ensi replied to Ensi's topic in Weapons of the First Order
It sure is a beauty! And it's so easy to put together Thanks! If anyone reading this is interested I can post up a tutorial or something on how to make it, maybe start a run or something if people are interested? I dunno, could be cool And yes, it sucks! You want to go straight to paint but doing this stuff the surface prep is everything. Hehe, when I first started out trooping, people didn't say "oh that's a cool blaster", they said "omg lights!!!11!1" The balloon lights in Heston's blaster (current one I use now) isn't very good after 30 minutes or so, mostly because of the cheap china AG3 watch batteries I put it in. A full change of quality silver oxide ones will cost me like $25. -
Ensi's F-11D Standard Build (The5thHorseman 3D-Print)
Ensi replied to Ensi's topic in Weapons of the First Order
Build hasn't moved as fast as I wanted. Mostly because it's winter and spraying inside stinks up everything. Sanding of spray filler Glued some various part on to minimize part count and also sanding Tapped all the holes I could This one was a royal pain in my behind to tap, had to use some pliers Feels really secure with the screws in place, but i'm going to add a little bit of glue to some of the parts for extra stability As I hadn't gotten every part and didn't want to stink up the house, I decided to take a look at the electronics. And the best solution for me right now was this: Got a bit of ABS plastic which I drilled 1mm holes in and fed the LED's through. These will be run off a 9V battery hidden inside the buffer tube. Still not sure where to put the switch (which will turn both on or off). My phone's camera struggles with such contrasting brightness, but it is really bright! Right now I have a piece of what would be similar to wax paper on the inside of the pill holes, which disperses the light really well. LED's like these are so directional.. Looking for a better way to disperse the light but so far this is the best one. Next up more sanding and filling until I get my other parts -
TK61514 requesting TFA EIB status [Jimmiroquai] [784]
Ensi replied to Ensi's topic in Request Expert Infantry Status
Thank you! Feels great to get EIB For centurion i'll need to cut up thighs and biceps, and also get rubber gaskets. About the shoulders supports, i'm sorry but that photo is an old one before I added them. See the trooping photo above and this, looks 100 times better! Blaster screws got installed before the premiere troop Thanks Sent from my SM-G950F using Tapatalk -
TK61514 requesting TFA EIB status [Jimmiroquai] [784]
Ensi replied to Ensi's topic in Request Expert Infantry Status
Alright I get ya Thanks for explaining! -
FirstOrders TLJ/Executioner Build - 9.23.2017
Ensi replied to First0rder's topic in TLJ Build Threads
Congratulations! The feeling is GREAT, isn't it?? Superb job and awesome of you to make a build thread to help the newer FOJE's -
This is the Stormtrooper forum, i'd try Blizzardforce (Snowtroopers) instead http://www.blizzardforce.com/forum/
-
TK61514 requesting TFA EIB status [Jimmiroquai] [784]
Ensi replied to Ensi's topic in Request Expert Infantry Status
No problem, Tony But can I ask why? It should have no effect on this current level of EIB and others have been approved without it. Chest to yoke connection top Yoke/back Chest Shoulders/biceps Ab Thigh Cod/butt Everything else is velcro. -
Ensi's F-11D Standard Build (The5thHorseman 3D-Print)
Ensi replied to Ensi's topic in Weapons of the First Order
I did my best to not get water into the open holes and such, but made sure to dry them really well with the car-dryer. In hindsight just blowing the dust off and a damp cloth would be better. You are too kind! I'm really excited about this build, it will look 10000 times better than my current blaster, and i'll have better electronics! I have a friend in the garrison with an airbrush and some alclad that i'm going to "outsource" the chroming work to. Question is, i've read that acrylic black undercoats is a no-no for alclad? And some say it's ok? Going with the same paint as my kit for color-matching