

Madmartigan
-
Posts
492 -
Joined
-
Last visited
Content Type
Profiles
Forums
Gallery
Articles
Everything posted by Madmartigan
-
Reasons that trooping as a Stormtrooper is the best!
Madmartigan replied to bluehickey's topic in Off Topic
And then there's that. lol -
Reasons that trooping as a Stormtrooper is the best!
Madmartigan replied to bluehickey's topic in Off Topic
As someone who has trooped as a hero character (Boba Fett) and a TK, I'd say it's a bit of a toss up for me. On the one hand, I loved just being able to chat with the crowds as a TK. Hard to do that as Fett and maintain the gravitas I insist on maintaining when I don that dented helmet. The TK armor is much lighter than wearing the full flightsuit, vest, armor pieces and jetpack. I can suit up by myself or close to it (Where the Fett demands a handler to get everything on right), and I worry a lot less about something breaking, getting swiped, bumping into stuff, etc. The Fett has its own charms, though. Ironically, it seems cooler temperature wise (that might have to do mostly with the open dome of the helmet versus the undercut TK), and aside from the jetpack getting heavy, it's a bit more comfortable overall. And I don't fear stairs! Plus you draw quite a crowd. That being said, having the TK now allows me to be more picky about when I want to Fett it up. And I like that I have a choice. My first troop as a TK last week was a blast and I can see myself actually being more active now, since I don't have to worry about damaging my Fett as often. -
Welcome to the EIB!
-
Flexible TM armour
Madmartigan replied to troopermaster's topic in Build Threads Requireing Maintenance
A correction/retraction -- apparently the cap and back are not vulnerable, necessarily, when demolding. It's more about technique or the moulds, I guess. What I should have added earlier, and why I personally love my suit, is that the glossy HIPS -- while not unbreakable -- is, indeed, much more flexible as compared to regular HIPS or ABS. It will be very interesting to see how Paul's suit compares. -
Flexible TM armour
Madmartigan replied to troopermaster's topic in Build Threads Requireing Maintenance
No, it's not. I have the same glossy HIPS type suit (a CAP suit), and the knee plate did crack during assembly (really my own fault, not the part). The face plates and cap n back are also vulnerable and can crack when demolding. I've put less stress on the other parts. Not that it is not highly durable stuff, but I would not classify as unbreakable. -
Luke's Hero helmet
Madmartigan replied to Darth_Finger's topic in Build Threads Requireing Maintenance
I think he's talking about up by the shoulder. Looks like a crack to me, too. -
HOWTO: Create a Clover template
Madmartigan replied to Sonnenschein's topic in Tutorials, Tips and HOWTOs
Walmart typically carries white cushion foam in the sewing section. Will be in a white plastic package with about 3-4 sheets, 24x24x1 or so. -
TK-9135 V2.0 Full ESB
Madmartigan replied to Runnriottt's topic in Build Threads Requireing Maintenance
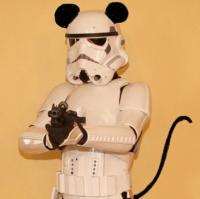
This really saddens me....when a trooper's plastic addiction becomes so consuming that they seem to forego the basic necessities such as food in order to instead feed their armor habit. I mean, look at this picture of Nathan! Even his scrawny little arms and bony fingers seem to implore "Can someone spare a sandwich??" I therefore urge that you to donate to the Feed a Trooper (FAT) Fund today. Because an emaciated TK is a terrible waste. -
Honestly, it kinda depends. Some people make the front only as wide as the finishing strip (and the strip should be about 19-20mm). I made mine a little wider to accomodate my larger calves -- about 25mm at the bottom and 30mm at the top. The front of the calf join does a sort of an hourglass thing and tapers in the middle. But it means there's about 3-4mm of the raised section showing underneath the strip on each side. The great thing is that eventhough there is some of that raised section showing beneath the strip, in pictures you can hardly see it.
-
Yup. Put the shin together so it fits and then put the knee on. Worked that way for me on both sets I've put together so far.
-
You do realize you are missing the finishing strip, right? That strip will eventually go between the knee plate and the main part of the shin and push everything out a good 2-3mm.
-
TM AnH Helmet in screen used look
Madmartigan replied to Turrican's topic in Hard Armor (General Discussion)
Wow...beautiful! *envy on* -
PM sent. Hope you make it back soon!
-
Just gotta cover my junk in the trunk.
-
Really? I never thought those were painted. I know my butt plate is riding a little high in that picture, so when I adjust it, the snaps will be more "tucked in". But I've never seen a reference photo with them painted, and I've seen them unpainted in other builds. Pretty sure unpainted is accurate. Anyone want to chime in? TM? Stuka? -Chris
-
Thanks, Eric!
-
First pose it is! Thanks, Ryan!
-
Thanks! Yeah...I'm thinking I'm going to go with the outer snap on the chest to back connection -- that'll allow me to drop the ab and butt a tad. Terrell -- I'm kinda torn between the first photo and the last. I'll leave it to you.
-
Thanks! I really owe all that to the great tutorials and parts from FBJ, Stormtrooper John, TM, Stuka, Billhaq, and many others. I've already got some accurate paint cracking on the handplates and scuffs on the jodhpurs! lol And what you can't see from the pics is that I've replicated almost every strap that Stukatrooper had in his TM build, so I feel almost as accurate on the inside as the outside. Must say, I love this place! Gonna be some tough choices for me and my garrison now between my shiny and my Fett.
-
Last night I put the finishing touches on my CAP glossy HIPS armor, duct taped up the backdrop, fired up the self-timer on the camera, and now I think I'm ready to go! I just got approval from my GML to add the TK-8990 designation and it's live on the 501st site, so I humbly submit myself for your review: Front: Back: Sides -- no gaps!: Bucket off: Ab details (opted for the Humbrol French Blue): Side rivets and holster attached in Stunt 2-rivet config: Helmet details: Modified MR E-11 (until my trooping blaster is complete...). Real M38 scope and Eagle Hengstler, homemade power cylinders, functional folding stock (no pics) and replacement barrel, bolt, cocking lever, spring: Few additional poses: Looking forward to your feedback. Thanks again to everyone whose tutorials, advice, and shared experiences have been invaluable. And thanks to CAP for making one last set of armor before hanging it up. I owe you one. And if I can bribe anyone to Photoshop some of the poses on to a nice DeathStar or other background, I can supply the original high-res photos. I'd be indebted. Cheers! Chris
-
i use imageshack -- http://imageshack.us/
-
I would certainly concur with an inaugural "class" of awards going to Mike A., Pete/Stukatrooper, Nathan, and Smitty. I have relied heavily on all of them in putting together my first couple of helmets, my blasters, and my EIB ANH suit -- which I finished last night and will be posting photos of for clearance as soon as the TK number comes through! The content and tutorials from all of them were invaluable. Pete's Photostreams became my bible of assembly -- almost every strap or rivet I've placed in my suit can be traced back to either him or firebladejedi. Hey....there's another one: Mark! If there isn't a initial class of four or five during the inception, I think we have our first five or six months booked at the very least. Throw in Stomper and then I guess we're lucky Detachment Officers like Paul/Daetrin, Terrell, Guns, and Billhaq aren't eligible or you'd basically have the first year booked! My sincere gratitude to you all. I think this is a fantastic idea! -Chris
-
Mounting a Holster on a canvas belt
Madmartigan replied to INDY's topic in Boots, Soft Parts, and other Accessories
I used the "hidden snap" method that Billhaq suggested, Dave. If I make it up to Connecticon, I can show you. You can search his threads, too (since my camera isn't playing nice), but it basically involves riveting the male snap to the canvas belt so rivets show on the outside and the male snap faces inside for the accurate look. But then a female snap is on the holster strips facing the belt, so the whole thing is easily removable. I love it. -
Ear Screws
Madmartigan replied to MooCizzle's topic in FISD Expert Infantry Badge (EIB) Requirements
Nope...raised is fine. -
Ear Screws
Madmartigan replied to MooCizzle's topic in FISD Expert Infantry Badge (EIB) Requirements
Length of the screws is less important -- though I doubt you'd need them to be 4cm wide. The screw heads on both my TE2 and CAP are about 6mm wide/in diameter. Not sure which # screw that corresponds to, but that's the reason your holes are too big. They look like they are a good 5-6mm wide, when they should only be wide enough to accomodate the screw thread. PM sent re: replacements. -C