Parquette
-
Posts
560 -
Joined
-
Last visited
-
Days Won
1
Content Type
Profiles
Forums
Gallery
Articles
Everything posted by Parquette
-
Thanks for pointing that out! I opted to go with backing it with the original piece so that I had something to keep it in place, and not be see through (though because it's black I'm not sure how much you could see in). Just personal preference, though a person can do otherwise
-

Who watched Rogue One? Review/ *SPOILERS?*
Parquette replied to GandalfTheImperial's topic in Off Topic
I think it had to do with the fact that it was the first tests they ever did, and if anything, it may not have been at full power. After all, Tarkin said when they were given orders to blow Jeddha, "No, I think the Holy City will be enough for today," giving the indication that they were only destroying a region of the planet. -
Mainly I was regarding the normal TK's, but yeah! That's the sandtrooper of today
-
whoa!
-
Par_'s Rogue One TK research and Build (WIP)
Parquette replied to Parquette's topic in Build Threads Requireing Maintenance
Everything I have done to my Black Series Stormtrooper helmet I am now posting in the pinned post "HOWTO: Make your Black Series more accurate." I will update this thread once I have progress more on the rest of the costume. -
I would suggest looking into armor articulation and how it works, before starting this build. Not that much articulation is needed, but it would help the armoured tunic skirt, along with maybe improving any stiffness of the shoulder armor. Good luck with your build!
-
Sorry I haven't posted anything on the Black Series mods lately. Added grill to the mouth, as seen on the screen used R1 helmet. Got some cheap screen wire from Ace Hardware in their screen section. They have little screen repair kits in small packets. I bought the black one because on the screen used helmer it isn't too visible, but I may go back just to highlight them a bit more (possibly repaint with aluminum spray paint or stee...l wool). In the BS there is already a black piece behind the teeth screwed in. In order to keep it in place I unseeded it, stuck the grill sections over the pegs so that they poke through, then re-skrewed the black piece over it. Make sure it's tight so that it keeps the grill from moving around too much. I will advise putting something along the edges of the loose wire sticking out on the inside, cause this stuff does fray and even touch you when you slide the helmet on. Maybe glue the ends into place on the actual helmet itself. Also, based off of this reference image provided above, the blue doesn't look like it's plastic at all. In an article recently they talked about how they designed the stripes to be vents, but the blue looked real close up to the underside of the white plastic, thus restricting the amount of air circulation passing through (unless on the side facing us where we can't see the stripes there is a gap that isn't visible from the front or sides). It looks very much like it's thin blue tape of sorts. Does anyone else see the diagonal little lines in the blue? It looks like pieces of tape overlapping each other. If anything, it might allow for easier air circulation to get in. For now I need to figure out how I am going to even cut out those stripes before planning any further down the road. Plugged up the speaker on the Black Series, along with the battery compartment seam. There are better ways to plug them up, but here is what I did. For the battery compartment I used e6000 glue to seal the seam, with a littke plumbers epoxy putty for the indentation at the bottom. Then, with more epoxy putty (this stuff is reccomended by Adam Savage and Cosplay Chris on youtube. I know his stuff is more cheap, but even Adam Savage on Tested reccomended this stuff), I plugged it into the speaker best I could, then with a bondo knife (tan flat scoop things by bondo), I scraped off the excess. It took away a few spots inside the speaker, but it's not bad. Sanded a little bit to make it flush, and I have 1 more thing to do to both the putty and the e6000: superglue. What's that? Superglue won't do it? Well I've found that the loctite gel superglue makes an excellent filler, if there isnt too much to fill and you have enough of the glue. I'll put it on the holes and cracks in the putty, smear with my finger, and repeat the process until there are no holes. Now I need to do this to the e6000 area because e6000 is more latex like than hard, so if you sand it it'll fray at the edges. I'll go over the general edges/area with the superglue to ensure it is generically hard and doesn't fray. Then sanding! I will warn those who wish to use the putty tgat, it stinks. Even after drying after 20 minutes, it stinks. Smells like a bad stew really. And if you breath in enough of it you could get a headache.
-
Yup! All of that on the tube stripes is on my mind already! The tube stripes present a problem for me, mainly because without cutting areas of the ear inserts inside the faceplate it won't be possible.My main plan was to cut them out, put a blue painted strip of plastic in there, and depending on how snug the fit is, may not even need to glue it in, seeing as how in a recent interview they said it was an actual vent.<br><br> In regards to the grey cheek panels, I would say it could pass a basic approval when a CRL comes out. I wouldn't fret too much about it, seeing as how you don't notice a difference until you really get up close to it.
-
This clip from Jimmy Kimmel Live has an exclusive scene, and it shows that normal TK's can be weathered. I think we should have an option in this CRL where the builder can either slightly weather some small areas on the armor, or heavily weather it.
-
Awesome. Thanks man!
-
The only problem with the ab plate is that it has many differences. For instance the center raise line that goes into the box, it is ramped up to the box where it is perfectly flush with it. That and heavily modding an ab to look like this and have carved out sections next to the center raise line would cost a lot. But it's worth a shot!
-
Yup! I had plans to go the FX route and mod it a little bit to R1. The fron chest and back look fine and match a little bit, just need to add some things and connect them under the arm through a gloss black piece of plastic. I thinkt that could be connexted through snaps on each armor, that snaps the black plastic piece to each side, so that you have a choice on which side you want snapped already.
-
What light did you use? I know you said it was scratch built, but that casing is from a real flashlight right? Could you post your full process?
-
Looking good Dynamic! Where do you get your snaps from? Would a place like Joans or Michaels have some?
-
Someone posted a video today of the screen used Stormtrooper from premiere night last night. I will be using that and other pics of the same suit for my reference material. Something I noticed is that there is a key detail. On the back armor, there is a noticeable hole below the right strap's slot. It may be on the other side, only further reference material will tell. However, one can assume this may be a screw hole for the strap for better security. I also noted the little tabs sticking out of the belt that slot into all the recessed areas of the abdomen. Before making the belt I'd reccomend making the abdomen first, mainly so you can model the belt's tabs off of it. Here are some good pics. None of them are mine. ------------ Take note of that grill I was referring to in the above post. ----------- Keep in mind that the more fine details will be reserved for the Lvl 2 and 3, but for now concentrating on the very basic details would be the best thing.
-
I am totally with Daetrin on Level 1: keep it basic and generic, like basic is supposed to be. I for one am going to modify some other armor pieces, while making some of my own from scratch Might I suggest that for the mouth, that a wire mesh of sorts be put back there behind the teeth? Here is a screen used piece, and is seen in between the individual teeth, next to a close enough wire. Courtesy of a R1 Trooper Armoury member. ---------- Also the brow on the black series is a fraction over the 1/4th mark, do you think it'll be ok? Seeing as generically in the film the brows varied in height?
-
So I was encouraged to post an updated CRL draft of the current info we have so far. Here is what I have pieced together regarding some of the main parts. Helmet: -Is generically symmetrical (there is the iconic bump on the bottom of the left eye (viewer's view). -Lenses are green or dark green, but are made to conceal the wearer's eyes. -Tube stripes are recessed, and painted dark blue. -The brow can vary in height, but is reccomended to stay close to the eyes. -The neck hole has black trim running along the edge. Whatever method of going about this is up to the builder, however plastidipping the edge or merely painting the edge black will not pass approval. -Matches same white as rest of armor. Chest armor: -Is symmetrical. -Is slightly long, but wide at the bottom. -Shoulder straps are inserted into some slanted slots at the shoulder area. Same goes for the back armor. The straps have etched or carved sideways lines running along them. -Is fit to the size of the wearer. Back Armor: -Is symmetrical. -Is fitting to the body type of the wearer. -The bottom sides start to curve around the wearer until they are cut off. A black plastic piece will be placed behind the end and connected to the bottom sides of the chest armor. Can be connected through snaps. -The back will have a slanted box in the middle of the back armor. The sides with the deepest slants are the top and bottom of the box. In the box will be a recessed area with some thick walled greeblies shaped like O II. On the bottom of the I I's are some sideways line indentations. Over the top of the sides where it is has a flat edge before being recessed, there is a separate flat piece of trim over that. It is has a visible seam on it's sides (found by the recent video taken by a 501st member at the World Premier night, where they had a screen used costume. I'll provide the video below) -Is approximately same height as chest armor. -The straps in the slots from the chest armor will go over the wearer's shoulder, and into slots located at the shoulder area of the back armor. Abdomen Armor: -Is symmetrical and fitted to the wearer. -Has exactly 5 raised lines in the front, with a center box over the bottom of the middle line. The box has a grill on the bottom right, 4 buttons on the left (the top 3 buttons are dark grey, and the bottom button is dark blue), and above the grill at the top is a mini recessed square with a mini screen of some sorts. Above the box and almost directly below the chest armor, next to the 2 middles lines are 2 rectangular sections that have been carved out. See reference photo for details (for whenever we have one) -The ends underneath the arms have a raised end, and the ends are slanted forward towards the front of the abdomen, like so, \ -On the left of the abdomen (viewers view), in between 2 of the 5 raise lines is a sideways rectangle. -Armor extends into upper torso armor. Ammo belt: -Is entirely made of plastic, made up of 2 pieces, with the halves joining directly in the middle of the wearer's side waist. The rear half overlaps the front half's ends and attach with whatever method deemed suitable by the builder. -Has ammo boxes across the front, all of them made separately from the main belt and are secured to it. -The ammo boxes on the very left and right of the belt are more square instead of rectangular like the center ammo boxes, and the 2nd to last ammo box is a more fat rectangular shape versus the regular rectangular shape of the center boxes. -Above the thighs of the wearer are located 2 hanging ammo boxes from the ammo belt. -Is made to fit the wearer. Cod and butt armor: _ -Cod is slanted in shape, with a bump at the middle/bottom that is located in the area of the wearer's cod. The bump's top is shaped like so, / \ -From the top of the cod armor to the top of the bump is 1 raised, straight line. It is located directly in the middle of the armor. -Butt armor is made to fit the wearer, and curves around the sides of the butt, and the bottom middle has a slanted in section that extends a little bit in between the back legs. That section looks like so, \_/ -Cod and Butt armor are connected through a strap system in between the thighs of the wearer.
-
Will do sir!
-
Thanks gmrhodes13. I haven't done any mods lately (mainly because I havent made any trips to the hardware store), but my next move is to get some wire screen material to screen doors, and insert some behind the mouth. In movie close ups you can see a grill in between the teeth of the helmet, and on the black series is a black piece they put behind it. I'm going to take that out, and put the wire in, then screw the black piece back in. Hopefully it should work fine! After that, I think it'll be on to putting padding in, then maybe, just maybe, get around to filling in those infernal cracks. Btw, pro-tip: Make sure after screwing in the helmet frame after putting the lenses in that it is not warped in any areas, due to improperly being screwed in. There was a mini gap at the ear section with the brow, and I found it that some extremely small pegs were not inserted into their appropriate slots at the ears, so I reseperated it and pulled it back towards that peg slot. Also, make sure your holes in your home made lens are big enough to be put over the screw slots, because it will make a big difference as to how your helmet frame sits. It caused a gap in between the skull cap and brow on mine, until I found out my center hole in my lens wasn't big enough and pushed in.
-
Lol! We'll see what happens Dark! For all I know, you won't like how I look in your hall of fame xD
-
Just made a HOWTO thread Hopefully my mods will be enough for 501st basic standards in any future CRL. Anyone wondering what to do and hoping to achieve the same goal, hopefully it will help. Here's the link: http://www.whitearmor.net/forum/topic/39843-black-series-r1-tk-bucket-howto/ Also GandalfTheImperial, as of now there's not really much of a way to remove the brow of the BS, because it's been molded into the plastic (as mentioned by their ad announcing the product), unless your want to try prying it off with a knife. However, it will be difficult. As much as I'd like to remove the brow, I won't be struggling to get it off unless a better method comes up. Along with that the sculpt itself is fine for basic. If you put it side by side with some of the ref images above or in the other threads, it's pretty good (and may very well derive from the files used for it with a few little changes) and looks the part. However for Centurion and so on the sculpt as you mentioned may have to be improved. Really the main problem with the sides is that the cheeks/tubes are a little wider compared to the original, which may be causing the ears problem. I'd also say that for basic the lenses can be either bubble of flat, because they aren't as bubbled as the ROTJ Trooper, and it's more subtle.
-
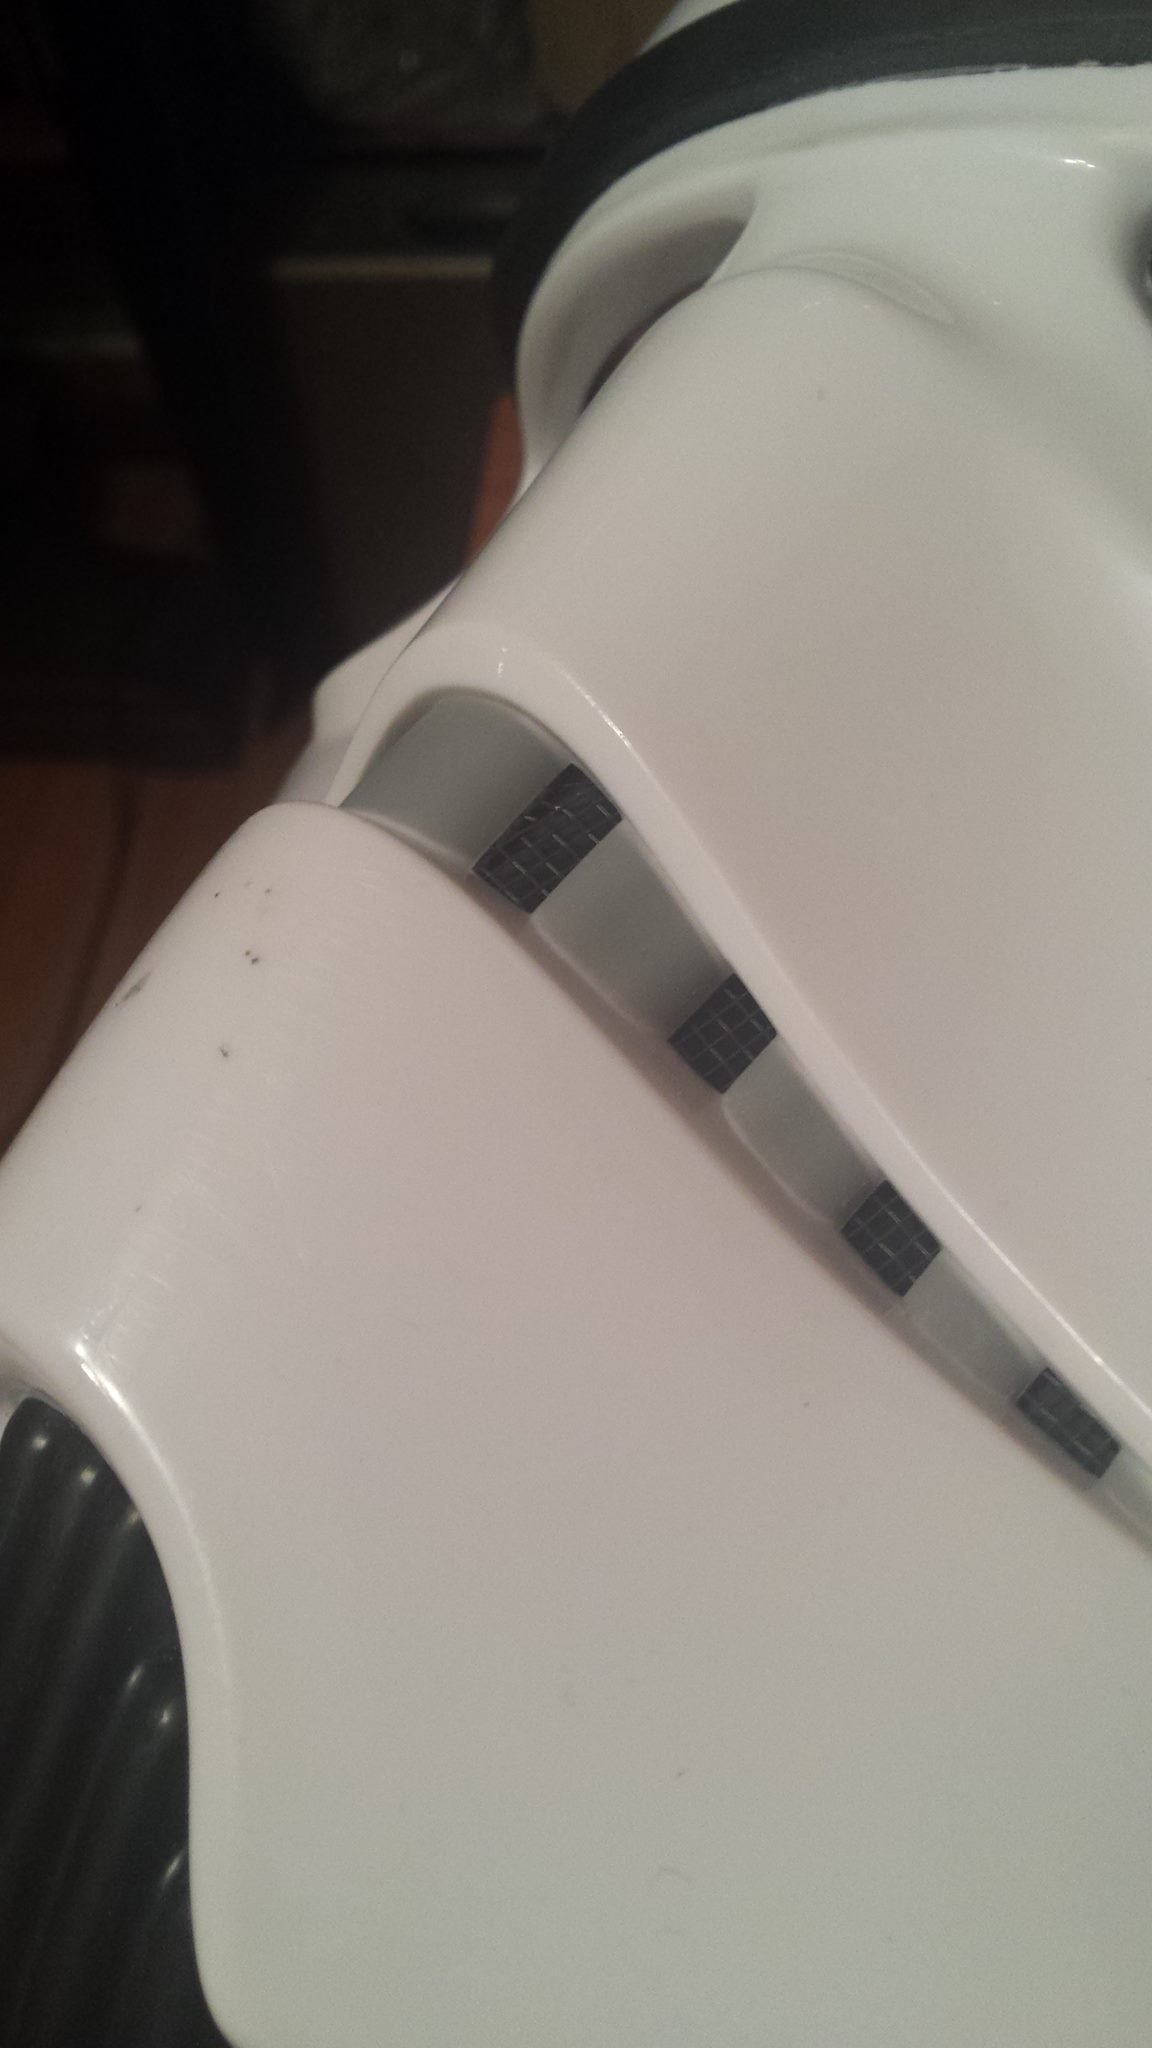
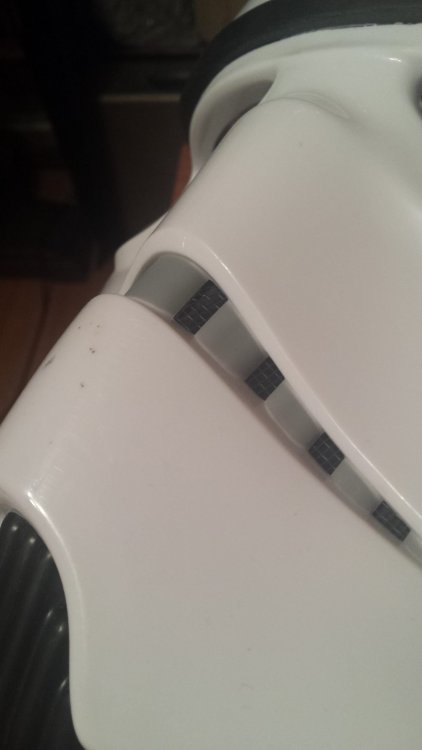
****UPDATE! 12/08/2020**** Note: This Update is the full tutorial on the major things that need to be done so that it can truly become an approvable R1TK Bucket. Alright to start off, the bucket is sculpted really well and once held up to a screen grab, is nearly identical. However, obviously Hasbro took some liberties/changed some things around that will be modded/or will have to be left alone. One of the most noticeable things is that the cheeks of the faceplate are a little wider, thus resulting in the rest of the sides of the helmet being wider. However, this can't be helped much without taking extensive measures. DISCLAIMER: While this mod is mine, some images of my PROCESS have been lost to the sands of time (or data in this case). So I'll be utilizing some pictures of the original BS helmet, with crappy circles and arrows I drew to highlight the parts I'm talking about. So let's get started. List of materials needed for the following mods: -Bondo Filler. -Vacuum Line from the Auto Store. -E6000. -Loctite Superglue: Gel, and Liquid versions (optional) -2 Part Epoxy -Trooperbay Brow and Neck-hole Trim -Screen Door Plastic Mesh Patch -Your choice of polishing compound (optional) -Dremel Tool with assorted grinding bits. -Sanding paper: Grits 120, 150, 220, 1000, 15000. (last 2 grits are for polishing. Optional) -Styrene Plastic (For Sale Signs, Parking Signs, etc...) -Rustoleum Ultra 2x White Gloss, Rustoleum 2x Blue spray paints. -Patience... Highly Reccomended items: -Respirator (for breathing when using Bondo) -Pocket Knife (for prying) -Latex Gloves (for superglue contact on your finger) *****Black Series R1TK Helmet modifications***** 1. Gutting of the interior. Gut out the interior in the back half of the helmet. This restricts head room (or is unwearable for us big headed folk), and looks bad from the bottom. For any remaining plugs or screw posts for this section, completely grind down. This one is pretty self explanatory: Just use your DREMEL cutting and sanding wheels and grind down until flush, then sand smooth. Side note: I highly recommend taking the back half of the helmet out to gut before putting the helmet together, because once it's in the helmet, it's not that easy to cut, and the helmet is a little difficult to separate. 2. Trim removal. The next step was taking out the neck trim on the BACK HALF of the helmet. It just didn't line up with the trim in the front, so toss that. You just use a pocket-knife or something to pry it into the underside, then tear it off. It shouldn't rip, and should peel nicely. Luckily, this isn't molded into the plastic like the front neck hole section is, so it's easier to do. 3. Filling in the speaker and battery compartment. The best way (and the way I recommend) would be to use Bondo, Milliput, or Plumbers Putty. Either way, you take your paste of choice and push it hard into the speaker. Then take a flat, flexible object (like a squeegee) and scrape the excess off. Let it sit... Finally you'll whip up some 2 part Epoxy to glaze over it, then once it cures, sand until smooth (or flush). 4. Bonding. Time to bond the ALL 3 SECTIONS of the helmet together. Use either your 2 part Epoxy or E6000 to place in all the seams. DO NOT allow any squeeze out. Press the parts all together, and let it cure with tape or a brace around it to keep constant pressure. 5. Vocoder, brow and neck trim STRIP. Now it's time to replicate one of the most noticeable features on this TK helmet: The vocoder tubes. Begin by prying the layer of rubber off of the vocoder section, which I pried off with a sharp pocket knife. Treat the knife as if it was a crowbar: Once it's under the surface, rock it back and forth, gradually pushing the knife in further, and LIFT. Any chips or notches your knife may make can easily be filled in with Bondo. Just take your time: with patience you will be greatly rewarded. Be sure to check your health condition at this point, because your vocoder will look as hideous as in the picture below, and you could have a heart attack. While your at it, tear off the rubber for the front half of the helmet too. Should look like below once sanded. The brow is the same story. Speaking of which... 6. Bondo filler between skull cap and face. Alright, so this one's a doozie, so just bare with me... The brow of the helmet must be LOWERED DOWN, as you can see it's way too high to be SA. Compared to OS... But you tore off the OLD ONE... What do you do? Well as you can see, there's a noticeable gap between your CAP and FACE sections. Now, assuming you did your bonding job right, it won't be too big a gap. So you're going to need to fill that part in with Bondo first, then 2 part Epoxy to top it off. Take your time, sanding in-between layers. Build up until the cap edge is perfectly flush. Below is from when the helmet is already painted, but it shows what it SHOULD look like. 7. Sanding time. Go ahead and sand all of the surfaces where the rubber was. Use low grit 120 and work up to 220. 8. More work on the Vocoder. In order to create that gap on the bottom between the 3 middle tubes and the 2 tubes on the edges, grab your Dremel tool with the cutting bit and chop off the bottom section of the plastic vocoder. Then, apply some STYRENE plastic in place with some SUPER-GLUE, then Epoxy all around the edges. Then you'll apply Epoxy on the OUTSIDE as well to get rid of any gaps. Sand smooth. 9. Vocoder tubes. Originally I went to the Auto store and bought a vacuum line hose, but it turned out too shiny, stiff, and formed kinks at the sharp angles. I went into my garage and found an older one, that was more dull and flexible, thus resulting in little to no kinks and the proper matte look of the screen used bucket. Drill out the holes the tubes will go in. Put each one of these holes at the top and bottom of the vocoder ridges. NOT ABOVE OR BELOW. Directly on the ends... I took the hosing and wrapped it in and out of the holes, to see how it'll go. Once you have a feel for it, take out the tubes. THIS IS ONLY FOR A TEST FIT! DO NOT GLUE THE TUBES IN PLACE! 10. Jaw Extension Take some styrene plastic scraps, and glue it to the interior of the helmet's neck hole. Do this all along the inside, have half of the pieces stick out. Make sure they are wide pieces too. Sometimes you'll need to glue another piece on top of some to make it stronger. Use superglue for this, then fill in with Epoxy or Bondo. Sand smooth. 11. Assymetry to the left eye. In the screen used Rogue One helmets, a subtle yet key feature leftover from the OT helmet is visible: the bump on the left eye. Look closely You can see how the right eye in the below pic is animated to show how the left isn't the same. Here you can just build it up with bondo. Make sure it protrudes forward, and raises subtley (if that's even a word). 12. Hollow out the slots. I don't have pics for this, but drill out holes in each slot. Then, cut out the slots with the Dremel, using an etching bit. After this, file the stripes smooth with various files (or if you don't have these, use folded sandpaper to get right-angle grinds). 13. Time for paint. PAINT THE HELMET! Mask off the grey sections carefully, and paint the entire helmet with Rustoleum 2X Ultra Coat Gloss white paint. Make sure they're even coats, and make sure they're not too thick. Or you can have a local auto-body shop do it, like I did. 14. Reweave the vocoder tubes. Like the title says, reweave the vocoder through the holes. Once this is done, cut each of the extra tubing on the inside, leaving the vocoder tubes on the outside. Then E6000 them in place from the inside, so they'll stay there forever. 15. Neck hole rubber trim. Use a PRESSURE COOKER rubber edge seal you can find from Ace Hardware. Slip this onto the edge of the neck hole, and glue it in place. 16: Blue backing for tube stripes. Paint some blue styrene plastic a nice blue color. Put this underneath the hollowed out tube stripes and glue it with e6000. Be very light, you don't want any of the glue visible in the exterior of the tube stripes, nor the e6000 actually melting the thin styrene. Believe me, I've run into this problem from going heavy on it. Just make sure you glue in areas that won't be seen. I'd recommend doing it at the top, bottom, and very edges of the strip. Now, what I did was looked back at the infamous interview with the costume designer Glyn Dillon. He said (and I paraphrase a little), "we actually designed those [tube stripes] to be working vents." But for the life of me, couldn't find any gaps to confirm there's room for air to get in. But nothing stopped me from improvising. Those 2 steps you'll find are on the BOTTOM side of the tube stripes. Those will act as "shims" to create a non-visible gap, thereby allowing the most MINUTE of air space. It barely does anything, just figured I'd say "yeah, it's a vent" and let it sit at that. I painted them an ocean blue (which I think may have been a smidge too dark), and proceeded to use E6000 to glue them to the underside, using painters tap to keep constant pressure. In the above pic you can see the piece is actually pretty close to the surface. However, in the below pic you'll find that on the BOTTOM SIDE of the blue piece that there's a visible gap. To the naked eye, this isn't apparent, but it fulfills the necessity for some gap in there to technically make it a vent... 17: Rubber brow replication. Grab your brow you ordered from 'trooperbay.com' and carefully glue it in place. I would recommend you do this with frog-masking tape and e6000. Squirt glue first (not in globs) on the base, spread it thinly/evenly, then slowly and methodically tape your brow to the glued region. There are a few different levels of brow in the film: Angry frown, neutral frown, there are tons of ref images of how the screen used helmets looked. Trim to the desired length. Place the brow much lower than the original, almost at it's edge. But towards each end it should slowly meet the original brow base again. 18. New Mic tips! Thanks UKSWrath for my new Mic Tips! Have them painted black on the inside (like the screen used ones), and they'll be perfect. That's what I requested from Tony, and he delivered. Just drill a hole in the center of the appropriate sections and screw the new ones in. 19. Teeth Mesh The original helmets contained a criss-cross BLACK SCREEN Material that is seen between the individual teeth. So we're going to utilize some good old fashioned PLASTIC SCREEN PATCHES from the hardware store. These are typically used for repair work on screen doors. There are tons of builds on here that show various ways to do this, so it's pretty self-explanatory: Cut to shape, find best way to place it, then glue. 20: Polishing. Wetsand with 1000 - 15000 sandpaper, anywhere it's white. Then grab your polishing compound (mine is Mcguires) and apply it in small sections all over the white parts of the helmet, one section at a time. Then with a rough towel, rub it really hard into the surface. Wait a few seconds, then grab a smooth cloth and polish away. Put a lot of elbow grease into it! The more pressure, the more reflection. 21: FINISHED!!! And there you have it! My Black Series mod. I'm still finishing mine, so the below pictures will not be complete. But I hope this helps! A last and final note is that this is how to make your BS Bucket APPROVABLE, not be 100% screen accurate. For instance more work is required for the gray rear trapezoids and cheek details to make them perfect, and currently I don't have a proper write up for that. However if I find the time I will be sure to update if that's the case!
-
Good News for Hasbro collectors (Or others)
Parquette replied to GandalfTheImperial's topic in Off Topic
When you say, role playing helmets, you mean like, HELMETS??? Well in regards to the helmet, the main priority is accuracy. Don't shift the lenses on the FOTK, because they are beg enough, and definitely perfect sized. Don't alter them too much. But mainly But please please please do Darth Vader's twisted helmet :D -
Par_'s Rogue One TK research and Build (WIP)
Parquette replied to Parquette's topic in Build Threads Requireing Maintenance
Here's a side by side of my mod-in-progress Black Series R1 Trooper, next to a screen grab from a Behind the Scenes reel. As long as the underside of the brow is plastidipped, it should be fine. Height wise for Basic Approval it should pass. -
Here's a side by side of my mod-in-progress Black Series R1 Trooper, next to a screen grab from a Behind the Scenes reel. As long as the underside of the brow is plastidipped, it should be fine. Height wise for Basic Approval it should pass. ------------ I've also discovered that even back armor from the FX armor can work for Basic approval as long as it's modded (for instance, the notches at the bottom of the I I's in the O I I , and the strap inserts and such). Here it is next to the Hot Toys trooper, which has proven very accurate (though maybe a few inaccuracies), along with 1 screen cap that shows the back armor. Also a mod that should be noted is the lack of a seam along the inside walls of the back box. This can be modded with a Dremel or rotary tool with a saw blade. Then the Hot Toys back. However with the bottom sides widened it would be a whole lot more accurate and better looking. So the FX upper Torso with mods will look the part and hopefully pass basic.