

Haso
-
Posts
303 -
Joined
-
Last visited
-
Days Won
1
Content Type
Profiles
Forums
Gallery
Articles
Everything posted by Haso
-
Alright I'll play...i reckon that's you with the DLT and hubby is on the right. Great job on the builds btw. Sent from my SM-J100Y using Tapatalk
-
Jyanixqel's AP Build and Road to 501st
Haso replied to Jyanixqel's topic in Build Threads Requireing Maintenance
Great! For belt storage i remove the ammo belt from the canvas belt (snap connections), place the ammo belt in the holster then just coil up the canvas belt with holster still attached. Then just store alongside the bigger pieces. Sent from my SM-J100Y using Tapatalk -
Jyanixqel's AP Build and Road to 501st
Haso replied to Jyanixqel's topic in Build Threads Requireing Maintenance
Are you going for a hero TK based on the holster screws? I'd be incluned to stick with chicago screws with the holster unless there's a compelling reason otherwise. The snaps for the ammo belt to canvas belt connection are good, thats how i have mine. Did you get any advice on the shins? Sent from my SM-J100Y using Tapatalk -
TK-21874 Requesting ANH Stunt Centurion Status (AP) [291]
Haso replied to spyder918's topic in Request Centurion Status
Well done Centurion! Sent from my SM-J100Y using Tapatalk -
TK-21874 Requesting ANH Stunt Centurion Status (AP) [291]
Haso replied to spyder918's topic in Request Centurion Status
Looks great! Every time I see an AP up for Centurion it reminds me to get off my butt plate and get my submission in. Sent from my SM-J100Y using Tapatalk -
I just say that armour was built at factories throughout the expanse of the galaxy and your look depended to some degree on the locale of where it was made. You can justify inconsistencies that way. Sent from my SM-J100Y using Tapatalk
-
Coming along well! Sent from my SM-J100Y using Tapatalk
-
Quick0817 AP TK Stunt armor build thread
Haso replied to quick0817's topic in Build Threads Requireing Maintenance
Looking good. Your thighs look fine the way you've done them. Good removal of return edge on forearms. Sent from my SM-J100Y using Tapatalk -
Awesome work. Well done troopers. Sent from my SM-J100Y using Tapatalk
-
ROTJ reinforcement for Austria & the Empire
Haso replied to Maxl's topic in Build Threads Requireing Maintenance
Congratulations trooper. Sent from my SM-J100Y using Tapatalk -
...Ha! And i did the same thing you did with that very same pumpkin head; cut a hole in the bottom for my son's Halloween costume. Sent from my SM-J100Y using Tapatalk
-
Jyanixqel's AP Build and Road to 501st
Haso replied to Jyanixqel's topic in Build Threads Requireing Maintenance
Hey mate. Good progress so far. I have an AP kit and love it. Also check with your GML about the rear shin cover strip and what they'd suggest to get you over the approval line. I didnt have that same issue so can't offer practical advice on that one. Sent from my SM-J100Y using Tapatalk -
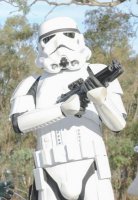
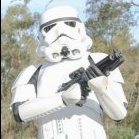
Haso's ANH Stunt TK Build - AP Armour
Haso replied to Haso's topic in Build Threads Requireing Maintenance
...so this seems to be the best way I can fix my Aker mic to stay right on my mouth when I put my bucket on. Neck strap with some 25mm elastic velcro'd at the back, then another strap that loops over the top of the head and attaches in front of ears on the neck strap. I've then fixed the mic to the neck strap. This keeps the mic right up to my mouth especially after putting on the bucket which is a very tight squeeze. I tried this arrangement at AMCE last weekend - it worked sometime; without the strap across the top of my head, it often shifted the mic as I put on the bucket or the neck strap dropped. The top strap seems to rectify both. -
Looking great! For forearm placement, it also looks like you could drop your right side bicep slightly, to match your left and help close that elbow/wrist gap. Sent from my SM-J100Y using Tapatalk
-
Looks fantastic Mark. Well done and thanks for posting this up. Sent from my SM-J100Y using Tapatalk
-
Awesome work guys, thanks. Bring out more. Sent from my SM-J100Y using Tapatalk
-
Great stuff. I just used modelling clay and filled in the existing slots in the screw heads, then used a flat head screwdriver to make a new slot. Then just painted. Sent from my SM-J100Y using Tapatalk
-
TK-31026 requesting ANH Stunt Centurion status [Anovos][274]
Haso replied to ScaryGuy's topic in Request Centurion Status
Great work! This is a top build. Good luck. -
Haso's ANH Stunt TK Build - AP Armour
Haso replied to Haso's topic in Build Threads Requireing Maintenance
Thanks. Yeah I have the white line facing mouth. I'm going to test feasibility of this at a troop this weekend, but not with the Aker running. I'll report back how well this goes. -
Haso's ANH Stunt TK Build - AP Armour
Haso replied to Haso's topic in Build Threads Requireing Maintenance
Fitting a head, fans and microphone into an AP bucket... Not sure about everyone else with an AP bucket, but if you're big-brained like myself and find it a tight squeeze to fit your head in the bucket with a fan and an Aker mic, here's what I'm just done and I'll test it at a troop next Saturday night... I removed the metal headband from the microphone, attached some velcro to the inside of the neckseal, and have just positioned the mic inside the neckseal with velcro to hold it in place... -
I see you guys were referring to the Doopy Doos conversion of the Hasbro which is not Centurion approvable. I was referring to the full resin DD kit which shouldn't be a problem. Sent from my SM-J100Y using Tapatalk
-
Im not sure the Doopy Doos kit is unapproveable for Centurion. Pretty certain ive seen them in Centurion submission threads. Sent from my SM-J100Y using Tapatalk
-
...you know there's a guy from my squad heading your way in October I think. He's going to try to hook up with you guys while he's there. Sent from my SM-J100Y using Tapatalk
-
Great to see you back in action! Sent from my SM-J100Y using Tapatalk
-
Haso's ANH Stunt TK Build - AP Armour
Haso replied to Haso's topic in Build Threads Requireing Maintenance
Modding the AP supplied Thermal Det screws for Centurion accuracy... After I got EIB approval, the feedback I got for Centurion submission was a suggestion to swap out the black thermal detonator screws for more accurate ones. The accurate ones are rounded pan-head screws with just the straight slot (not sure how to describe it). I started having a look around some hardware stores for these screws which from what my research shows are brass screws, but couldn't find any. I then had an idea to mod the screws I already have by using some 2-part modelling clay, or green stuff, to fill in the screws and then create the right kind of screw slot, then repaint it. Pictures are probably clearer to explain... Below are the screws BEFORE I modded them...note the rounded centres... Filling the screws with modelling putty - some water on fingers helps to smooth the putty out: Then, after about an hour I used a flat-head screwdriver to carve the slot in the screws. Again, water the screwdriver tip to help get a smooth result. Carefully pick off pieces of the displaced clay... Once cleaned up... and finally, after painting... also, I e6000'd some scrap elastic to the backs of the TD clips to reduce scratching my armour when it's attached...just pick off any excess glue once cured for a neat, clean look... Centurion pics still to be taken, I'll post them up once submitted.
