

Haso
-
Posts
303 -
Joined
-
Last visited
-
Days Won
1
Content Type
Profiles
Forums
Gallery
Articles
Everything posted by Haso
-
Brattie's AP Build and Journey to The 501st
Haso replied to Brattie's topic in Build Threads Requireing Maintenance
Congrats on your BBB. will be watching your build. Sent from my SM-J100Y using Tapatalk -
Very nice indeed. I like the smoke effect from the eyes, lol. I also found blu tac handy for plugging the teeth gaps to prevent overspray. Sent from my SM-J100Y using Tapatalk
-
*scuffing Sent from my SM-J100Y using Tapatalk
-
Think stuffing to the degree seen on Tantive IV boarding party. Also check out the pics in thefifthhorseman's Centurion application thread, his has some interesting TK weathering done on it. Sent from my SM-J100Y using Tapatalk
-
Yeah one of you need to bring it home. Medal tally currently shows AUS = 1, CAN = 0. [emoji12] [emoji106] Sent from my SM-J100Y using Tapatalk
-
Are they the screws you got with the AP kit? I just got EIB with those but they suggest they be replaced for Centurion. Close, but not perfect. Sent from my SM-J100Y using Tapatalk
-
Nice one. Keep that momentum going hey! Sent from my SM-J100Y using Tapatalk
-
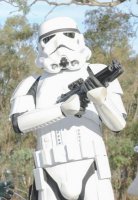
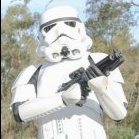
TK-29175 Requesting ANH Stunt EIB Status [AP] [611]
Haso replied to Haso's topic in Request Expert Infantry Status
Awesome! Thanks Sly for the feedback. It sure is my goal to get Centurion and has been from the very first cut I made for this build. Your suggestion on the T-det screws is noted and I'll source some more accurate ones prior to submitting. I am proud to be on my way to becoming another Centurion for Knightfall Squad. ...and as always, thanks again Q for your encouragement. -
Anyone know a good way to install a lens?
Haso replied to The Anonymous Egyptian's topic in Assembly, Mods, and Painting
Look up the TK 1636 YouTube channel then follow the tute in the 'helmet lenses' episode. Works great1 Sent from my SM-J100Y using Tapatalk -
TK-29464 Requesting ANH Stunt Centurion Status (Anovos) [255]
Haso replied to KingYeti's topic in Request Centurion Status
A really nice build. Well done! Sent from my SM-J100Y using Tapatalk -
Nukems ANH Stunt Build thread! (AP)
Haso replied to nukem25rs's topic in Build Threads Requireing Maintenance
The bucket looks great. Nice job! Sent from my SM-J100Y using Tapatalk -
TK 22788 Reporting for Duty!
Haso replied to ComradeDave's topic in Newly Approved Members - Sound Off!
Thanks for the shout out mate. It's been a pleasure following your build and seeing you get your TK number. Sent from my SM-J100Y using Tapatalk -
I think of it more this way. With a vast galaxy there must have been local suppliers/foundries for the armour and so appearances may be different/localised from one part of the galaxy to the next. Sent from my SM-J100Y using Tapatalk
-
Name= Kris Hase Legion ID=TK-29175 Forum Name= Haso Knightfall Squad Terror Australis Garrison Armor= AP Helmet= AP Blaster= PVC Pipe Build, Doopy Doos parts, 3D printed power cylinders & T-Tracks from sources on FISD Height = 180cm (5'11) Weight = 80kg (176 lb) Boots = TK Boots Canvas belt = Trooperbay Hand Plates = Trooperbay (handpainted version) Electronics= fans only for now, voice equipment to come Neck Seal = Darman Holster = AP Hovi Tips = AP Thanking you for your consideration...
-
Am quietly following this build and so far it's looking great. You're braver than me, I used the AP painted-look decals. There's some great reference pics of frowns on screen used buckets in the photo gallery on FISD. Looking at those they weren't perfectly crisp straight lines; you could just do them free hand...like your traps and tears. Sent from my SM-J100Y using Tapatalk
-
Congrats trooper, great to see you finally brought it home. Its been a long journey but you did a great job. Sorry to hear about your sister. Sent from my SM-J100Y using Tapatalk
-
Awesome news, good luck! Sent from my SM-J100Y using Tapatalk
-
Great work on that notch! Sent from my SM-J100Y using Tapatalk
-
Cut 'em off. Cut! Cut! Cut!.... Sent from my SM-J100Y using Tapatalk
-
I used E6000 and although only early days with two troops, it's holding up just fine. To separate the shins I tend to run my hand up in between the velcro strips to reduce the direct pulling apart force needed. Sent from my SM-J100Y using Tapatalk
-
Nice work. The gaps look fine. Sent from my SM-J100Y using Tapatalk
-
Great to hear you're almost there. Sent from my SM-J100Y using Tapatalk
-
Great stuff mate. Looking forward to seeing more of this build. Sent from my SM-J100Y using Tapatalk
-
Where can I find an E-11 blaster?
Haso replied to Shinyarmour1's topic in General Weapons Discussion
Mark at AP is a vetted supplier for TK suits, is in Canada and offers fully built E11 blasters. Sent from my SM-J100Y using Tapatalk -
So the notch needs to align with the forward edge of your butt plate. Thanks, I caught wind of a change happening, didn't know what it was till now though. Sent from my SM-J100Y using Tapatalk
