


justjoseph63
-
Posts
12,745 -
Joined
-
Last visited
-
Days Won
326
Content Type
Profiles
Forums
Gallery
Articles
Everything posted by justjoseph63
-
 Way to go, Mike! Welcome to the rank of EIB, Trooper... Just a few fixes... then onto Centurion!
 -
Compression suit
justjoseph63 replied to RLH2515's topic in Boots, Soft Parts, and other Accessories
Unless you are looking for a small or XXL, Amazon carries them here: https://www.amazon.com/JOGAL-Compression-Baselayer-Sleeve-Elastic/dp/B01EN1MDSI/ref=sr_1_7?ie=UTF8&qid=1474296249&sr=8-7&keywords=mens+black+compression+suit+long+sleeve -
fragarock's RS Stunt build - Not to scale
justjoseph63 replied to fragarock's topic in ANH Build Threads
Like I mentioned, I have not done it on a Hyperfirm E-11, only on a Doopydoos resin build. On that, I did go all the way through following Tim's (Dark CMF) build, but I wouldn't recommend doing that on a HF one. You should probably drill out just enough (or maybe a little deeper) to fit them in. -
fragarock's RS Stunt build - Not to scale
justjoseph63 replied to fragarock's topic in ANH Build Threads
You can certainly use a drill on this type of material, Frank, but you need to be really careful so as not to destroy the scope in the process. I have done several mods to my Hyperfirm T-21, including drilling out the end of the barrel and inserting a 2 inch long piece of 1 1/2 inch wide PVC pipe for realism. (I didn't like the fact that it was flat). As for the lenses, this is what I used for my resin build E-11: http://www.ebay.com/itm/15-32X21-Mini-Monocular-Scope-Telescope-Adjustable-Hunting-Camping-Silver-EM-01-/310982110832?hash=item4867fa6e70:g:MUcAAOSwXj5XFuJL You will have to disassemble it, but the lenses themselves fit perfectly. The following is how I would do it, but there may be someone out there who has better info. A few pointers, though... When drilling them out, always start with a bit that is about half the size of the hole diameter you need, and work your way up to the correct one. Make sure it is centered perfectly. You will have to use a "spade" bit for the larger hole. Start with a regular bit first, and work your way up. Take your time on this... When attaching the lenses, you may have to use the material's natural texture to hold them in place... sort of a "compression" fitting. Do NOT use super glue. The reason being is that if any of the glue gets inside behind the lens, the chemicals it contains will fog the lens permanently. Trust me on this one. If you decide to go this route, you should definitely post photos of the process. -
The best thing(s) to clean up those teeth are a set of these, Justin : http://www.lowes.com/pd/Project-Source-6-Piece-Needle-File-Set/4777067
-
The second option will be just fine... Like you said, it will be hidden anyway. GREAT to hear that you are going for EIB, (and hopefully Centurion after that)!
-
Looking fantastic, Jim.. great progress!!!!
-
Protecting boots from the elements?
justjoseph63 replied to pewpewpew's topic in Boots, Soft Parts, and other Accessories
Or just make the switch to HWT... Scratches and scuffs are not just accepted, but encouraged! -
Supply list for your OT TK build....
justjoseph63 replied to justjoseph63's topic in Getting Started - Read this First!
Don't let it be overwhelming, Michael. Many of the things on the list you can actually borrow from friends of relatives, or you can go to places such as Harbor Freight or Northern Tool and pick them up for way less that you can at the big box home improvement stores. Unfortunately, the Neon City Garrison has no website at the moment, but you can get in touch with them here: facebook.com/NeonCityGarrison to find out if there are any "armor parties" planned. These are designed to help new folks with their builds, and often have many of the tools you will need. -
Some great advice fro Christian and Kalani there, Paul. Most vendors can manufacture spare parts with no problems. My advice would to be start really researching the build threads, especially those concerning those for smaller frames. I would also highly recommend starting your own individual build threads once you get your kits. It seems like a pain, I know, but that way you can post your photos (we LOVE photos), ask questions, and show off your build(s) in one place. Just remember, it's not a "sprint" to build your armor, it's more of a marathon. Take your time, study the build threads, measure twice, cut once, and ask questions. We are here to help! Also, get all your necessary building supplies ready while you wait for BBB (Big Brown Box) day to arrive. Nothing worse than needing something and not having it on-hand. As the Boy Scouts say... "Be Prepared". Speaking of waiting... while you have the extra time, take a few minutes to check out the "Advanced Tactics" area. This will give you the lowdown on how you can both take your armor to higher levels of screen accuracy. Best of luck to you both on your TK journey!
-
I am having trouble viewing any posts, and was wondering if I was the only one. I can (obviously) log in, and am able to see/read pm's, but when I attempt to read a post, I get this message: www.whitearmor.net Driver Error There appears to be an error with the database. If you are seeing this page, it means there was a problem communicating with our database. Sometimes this error is temporary and will go away when you refresh the page. Sometimes the error will need to be fixed by an administrator before the site will become accessible again. You can try to refresh the page by clicking here ← Return to the index Just curious. Thanks!
-
Looking GREAT so far, Scott! Awesome job on those return edges, and I'm glad to see that you removed all of them from the upper thighs. I noticed that you are using Zap-A-Gap CA glue. Be REALLLY careful with this. I would recommend using that tube of E-6000 wherever you can. Yeah... it takes longer, but this is a marathon, not a sprint! If the CA drips onto your armor, getting it off and back to the original finish is not a lot of fun. Trust me on that one, LOL. Looking forward to seeing this build progress!
-
TK-23812 requesting ANH centurion status (TM) [269]
justjoseph63 replied to Dale3van5's topic in Request Centurion Status
Looking GREAT, Dale! I see that your calf armor (especially the left side) seems to shift out of alignment a bit. I had this same exact issue, and it was easily fixed by adding a strip of 1 inch (25mm) thick foam padding in the inside of the fronts. I cut a strip 1 1/2 inches (4 cm) wide and 10 inches (25cm) long and used Velcro to hold it in place... worked like a charm! These 2 things will not affect your application, but you may want to address them at some point: 1. The nick on the right of your cod can be sanded out to prevent it from snagging on your undersuit. 2. It may just be the photo, (and my poor eyesight), but it looks as if you may have the beginnings of stress cracks on the cod as well. I have seen this same issue 3 times in the last month at our armor parties. If this is indeed the case, you can reinforce that area with some ABS. Awesome job on this build, Trooper, and I look forward to welcoming you to the rank of Centurion!! -
This is what I would do at this point, Christian... Try one side with the French blue, and see if it works. If not, you will need to remove the paint and start again, unfortunately. A couple of things, though... Many paint removers/thinners are made with Acetone. Be SURE you get one without Acetone, as it will melt the ABS. Whatever product you choose, try a small amount on the inside of your bucket or a scrap piece of ABS first to see if it damages the surface. Another hint: After applying the template next time, press the edges down really well and hit it with a light coat of gloss white paint, and let that dry for about 5 minutes or so. The reason for doing this is that it will seal the edges so that the blue doesn't bleed out, and it will give you clean, crisp lines. Remove the template as soon as the blue paint is fairly dry. Do not leave it on for too long, or the paint can make it stick to the bucket.
-
I would like to see this listing as well. There is a seller on there right now who is offering the Anovos ANH bucket (only)for $500.00. Seriously?
-
Helmet pads or hard hat insert
justjoseph63 replied to RLH2515's topic in Assembly, Mods, and Painting
An alternative to the pads is a one inch thick piece of "chair cushion" foam from Wal-Mart, (about $6.00) I cut a piece about 3 inches wide, long enough to stretch from ear to ear, glued a piece of a black T-shirt around it, and used Velcro to hold it in place inside my bucket. Dozens of troops later, it is holding up great. Another thing to think about is adding any sort of cushioning to the inside of the top of the helmet. At first, I had padding there (using the same 1 inch foam), but I found that I was constantly tilting my bucket forward to be able to see. I took it out, and viola! No more tilting! Plus, it eliminated the "bobble-head" look from my helmet riding too high up on my head. -
Chapaaz's RWA-ANH Stunt WIP
justjoseph63 replied to Chapaaz's topic in Build Threads Requireing Maintenance
Gotta love those big boxes full of Stormtroopery goodness!! -
Anovos ANH Stunt - Looking for critiques
justjoseph63 replied to R5-D4's topic in ANH (Stunt and Hero)
Looks like you've done a darned good job, Nick! I would suggest posting up a few detailed, close up photos of the areas you are thinking about trimming before taking off any material. It may affect your application if too severe, and there may be alternatives if you are having a problem in those areas. Also, do you find that the tops of the thigh pieces chafe in the rear because of the return edges? Those can be completely removed if uncomfortable, and are not needed for any level. Some closer shots of your armor in general will help as well, but it looks great overall! Perfect alignment on your back.kidney connection. -
Like Tom mentioned, you will need to reinforce the ends of the elastic, and a soldering iron will make it WAY easier to put the holes in not just the elastic, but the nylon strapping as well. Some troopers use small strips of ABS to attach the male/female snap sections to the armor, but I prefer to use the heavy duty nylon for this. The reason being is that I feel it adheres better to the curved areas of the armor. (see photo). In the photo, it shows 2 inch nylon webbing using the "double snap" method, which is what I used on many of my connections. It doesn't stretch, but it will keep certain areas from separating, like the kidney/ab and the kidney/back, which are prone to gaps. Some areas, of course, will require elastic, like the shoulder bridges. I double over the ends for strength, glued them together, and then put the snaps in. (photo 2)
-
Forgot to add... You may want to think about getting a secondary canvas belt. The HWT one will get dirty... this way you have a clean one for regular shiny white troops. And don't forget, no drop boxes for level 2.
-
Great to hear that you are going for EIB and Centurion, Tom! As for "battle damage", sometimes less is more. Here is a link to my HWT Centurion thread, which will give you a general idea: http://www.whitearmor.net/forum/topic/32195-tk-10963-requesting-hwt-centurion-status-am-20ata3/ It may sound strange, but the product I ended up using to do the "damage" with I found at the Dollar store. It was a small ladie's compact of black powder makeup. I also bought something called a blush brush there to apply it with. It holds up surprisingly well, and is removable with some de-greasing cleaner if needed. It will rub off to a degree, though, so if you use a helmet bag, put your bucket in a plastic bag before putting it in. Also, PLEASE don't forget the battle damage on the pack!!! I personally think it looks crazy to see a dirty HWT with a shiny clean pack.
-
Welcome to the boards, Scott! Sorry glad to hear that Anovos shipped you the wrong armor, LOL. At this point, I hope you have looked up the end-all-be-all (in my humble opinion) of Anovos build threads, made by Tony, (ukswrath), located here: http://www.whitearmor.net/forum/topic/35086-ukswraths-anovos-tk-build/. He built it to Centurion specs, which I hope you are aiming for. If we can be of any help, just ask, and have a blast on your build!
-
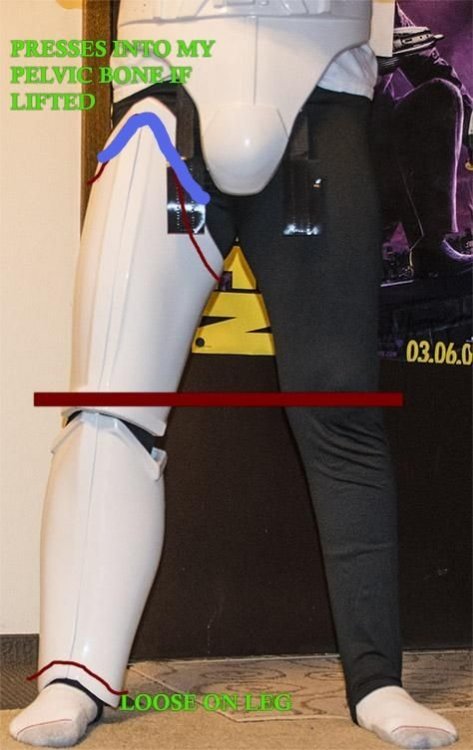
Hopefully you haven't attached the back cover strips, Chris. I would trim the tops of the thighs first.. this will give you a better idea of the fit. It may seem like a pain, but I would do it in increments... you can always take more off if needed. I suggest doing the tops and back, but leaving the inside for now, otherwise you may have too much of a gap, (see below). I would also hold off on trimming the bottoms of the calves for now. You may end up cutting them too short, and they will ride over your boots. You might want to actually have the boots on when fitting to give you a better idea of the final look. I used a blue line, (it's a bit wide), but the area I mean is the top of the line, not the bottom, if that makes sense.
-
Shin enclosures with rubber and magnets
justjoseph63 replied to Sam Crow's topic in Build Threads Requireing Maintenance
It always amazes me just how creative people can get with their armor. Great idea!!! -
Great looking build, Sean, and glad to see you went with the double-snap system! (You won't regret that extra work, I promise). If you find that the tops of the thigh armor are too high and rub on the cod piece (or tend to chafe), you can remove all the return edges (front and back) and lower the front. This will make things a bit more comfortable. Also, fantastic work on that blaster!

