


ukswrath
-
Posts
14,622 -
Joined
-
Last visited
-
Days Won
180
Content Type
Profiles
Forums
Gallery
Articles
Everything posted by ukswrath
-
6. Strapping (I'll be addressing this section later) 7a. Thighs Trimming to be cont...
-
5a. Posterior Trimming to be cont...
-
4a. Ab Trimming to be cont....
-
3a. Shins Trimming to be cont...
-
2b. Biceps cont.... Trimming Left bicep This indent kind of concerns me but I'll deal with it later. Anyone else have the same issue? To be cont...
-
Pyrates AP Build and Journey to The 501st
ukswrath replied to Pyrates's topic in Build Threads Requireing Maintenance
Yea now quit talking and start cutting lol -
Pyrates AP Build and Journey to The 501st
ukswrath replied to Pyrates's topic in Build Threads Requireing Maintenance
, looking forward to it. -
Pyrates AP Build and Journey to The 501st
ukswrath replied to Pyrates's topic in Build Threads Requireing Maintenance
This thread is by far the busiest build without a build lol -
Thanks my friend
-
Haha thanks boss
-
Thanks a bunch Hugh
-
TK 73427 Requesting ANH Stunt Centurion Status [211]
ukswrath replied to Coastertk's topic in Request Centurion Status
Hi Jay, thank you for your Centurion application, and we appreciate the accuracy upgrades you've made, so lets have a look. CRL Requirements: All submission photos have been posted, plus a few extra, however there are still a few things that we require for you to change before we can grant you the badge we will discuss them here. The screw below rank bar on you left ear, it looks to be of a different or smaller type than the others. We're asking that you correct this, thanks Cod rivet should be of the same type as your 6 Ab to kidney rivets. Its not quite clear what type yours is but it looks more like a pop rivet. Should look more like this Take care of these two areas and we'll be happy to pin that badge on your chest. -
Hey Walter, thanks brother
-
In this thread I'll be assembling the Trooperbay FO TK pauldron. I'll be installing a magnetic base, multi color magnetic vinyl sheets to represent the three colors used in the movie, foam to protect the armor from scratching and elastic to secure it to the armor. Tools: Pencil Exacto knife Scissors Steel straight ruler 400 grit wet & dry sand paper or 3M scotchbrite painters scouring pad Material: Pauldron - http://www.whitearmor.net/forum/topic/34314-tfa-shoulder-pauldrons/ Vinyl Magnetic Sheet (1' x 2') - http://www.amazon.com/gp/product/B000PSL68C?psc=1&redirect=true&ref_=oh_aui_detailpage_o03_s00 Earth magnets 1/2" x 1/16" - http://www.ebay.com/itm/291593103868?_trksid=p2057872.m2749.l2649&var=590635446239&ssPageName=STRK%3AMEBIDX%3AIT Elastic - black, 1/16" x 2', rope style - http://www.amazon.com/Dritz-9342B-Round-Elastic-16-Inch/dp/B002XNQOV6/ref=sr_1_1?ie=UTF8&qid=1453692574&sr=8-1&keywords=Dritz+9342B+Round+Cord+Elastic%2C+Black%2C+1%2F16-Inch Neoprene foam pading 1/4" with adhesive - http://www.ebay.com/itm/CLOSED-CELL-SPONGE-RUBBER-NEOPRENE-EPDM-BLEND1-4THKX53-WIDEX12-ADHESIVE-1-SIDE-/262245444526?hash=item3d0f0bebae:g:vH4AAOSw9N1VnnGA Industrial Strength velcro, black 1" square Painters tape E6000 Paint: Red spray paint - Rust-Oleum #249082 - http://www.homedepot.com/p/Rust-Oleum-Painter-s-Touch-2X-12-oz-Satin-Colonial-Red-General-Purpose-Spray-Paint-249082/100670410 Satin Black spray paint - Rust-Oleum #265545 - http://www.homedepot...65545/203188794 Grey Primer spray paint - Rust-Oleum #2081830 - http://www.homedepot...81830/100169179 PPE (Personal Protective Equipment): I can't stress enough how important it is to wear PPE, especially when working with some of the tools listed above. Wear it! Safety glasses - Hardware store Cut resistant gloves - Hardware store 1/2 Respirator. Sanding releases small carcinogens into the air. Protect your lungs. - Hardware store or http://www.amazon.co...ailpage_o05_s00 Trooperbay FO TK Paudron 1. Using 400 grit wet or dry sand paper remove the gloss from the plastic and prepare for primer, top portion only. After.. 2. Primer spray paint top portion only. 2 to 3 coats. 3. Sand primer with 400 grit. Be careful not to sand through primer. 4. Paint pauldron black. If all you want is a black pauldron skip to the "lower assembly" section. If you want the ability to use multiple colors continue on. When I first painted my pauldron I wanted a red one representing the FO Squad Leader. Afterwards I decided I wanted other color options. Here it is panted red. Process: Tape off 1/4" around the edge and paint. 5. Installing magnets to secure magnetic vinyl sheet. Note: The magnets will secure the vinyl sheet firmly against the plastic however, if bumped hard enough it may shift. Evenly space and glue magnets to underside of pauldron like so. Use painters tape to prevent the magnets from sliding towards each other during the drying process. I used a sharpie to first determine the location of each magnet to be glued. Lower assembly 6. Installing foam and elastic (upper and lower mounting) to secure it to your armor. Trace out and cut a foam section. Test fit 6. Install lower mounting elastic rope as illustrated. Punch two holes in the foam in the following locations. Feed elastic through and tie together at the back (sticky) side of the foam. 7. Install main foam section with lower elastic mounting strap. 8. Install the upper mounting elastic as follows. I used separate pieces of foam in the next couple sections to secure the upper mounting elastic. Easier to access in case of repair. Feed elastic through the thinner of the two sections. This one resides at the back of the armor. Tie a knot in one end of the elastic and apply E6000 to help secure it. 9. On the opposite side install a 1" square section of hook sided velcro in the middle of the exposed area. 10. Place foam around the remaining portion leaving the velcro exposed. 11. Feed the opposite end of the elastic through the loop side of velcro. Test fit. Foam and mounting finished 12. Draw out and cut two sections from the vinyl magnet sheet to cover upper section of pauldron leaving 1/4" of pauldron exposed. Cut two sections. The material already comes white which leaves me one to color black. 13. Using 400grit wet or dry sand paper scuff up the white surface and prepare for paint. I will not be priming but instead I'll be using paint with primer. Before, glossy After sanding After painting Finished!
-
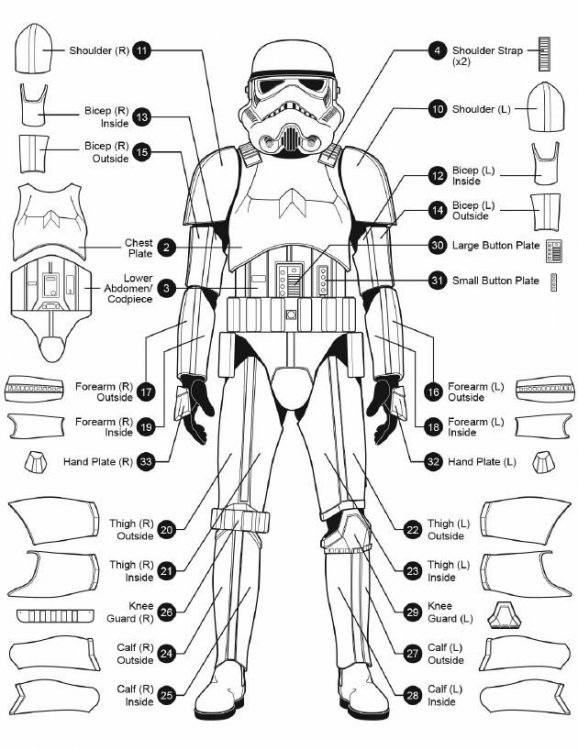
Trimming cont... 2a. Biceps Trimming the biceps appear to be simple. Following the line will allow for a pretty large bicep. I may find myself trimming it down even more after some trial fitting. Note: I believe there's a limb armor number pattern here. The odd numbers appear to be right side, even numbers are left. Not that his matters but maybe worth mentioning none the less. #13 & #15 right side Cut along the line... After.. to be cont...
-
Let's begin by trimming. Note: There's a thin protective coating on the outside of the armor. I suggest leaving it on as you build. This will help prevent unwanted stains and scratches to your armor from glues or other HOWEVER, once you begin building (installing cover strips) remove or at least peel back and tape exposing the armor areas you'll glue to. Gluing directly to the protective coating will lead to joint failure. 1a. Forearms Armor sections should have built in cut lines or indentations. Some areas like the forearms may have two cut lines, this is most likely for different sized troopers. Perform a fitment test measuring your arms to know which area to cut at. When in doubt cut the area that will give you the most room, you can always trim more later if needed. 1. Using an Exacto knife or scissors cut along the indent lines. Note: If using a Exacto knife you'll be using a score and snap technique. This is where you cut the material without slicing all the way through. Afterwards snap off the trimmed section. You may encounter areas where the score and snap technique will NOT work due to the lack of material thickness. In this case you may find it easier to just cut completely through. Either way be careful to not tear the material. NOTE: The inner forearm section appears to have two separate cut lines on one side I believe giving the builder the opportunity for two forearm sizes. It's the only reason I can explain for having two lines. Continuing... Pieces #17 & #19 are the right forearm #16 & #18 are the left forearm To be cont...
-
Karpouzian's (50677) Anovos TK build
ukswrath replied to Karpouzian's topic in Build Threads Requireing Maintenance
Any Hero build tutorial should suffice. -
In this tutorial I'll be building the ANOVOS TK armor as ANH Stunt. Though the kit appears to have all the necessary components for 501st basic approval I'll be changing a few things in hopes of making it Centurion (L3) level acceptable. Materials, Strapping & Other used in this build will be highlighted in BLUE Areas that will be changed: NOTE: These changes are NOT required for 501st basic approval A. The kit includes velcro and snaps for the internal strapping which I'll be switching out for brackets and straps provided by Mr. No Stripes. My choice to use brackets is just a matter of preference. Note: The included velcro and snaps appear to be Centurion acceptable except for the chest to back connections which are required to be white. B. The kit includes black elastic for the chest to back connection which I'll be switching out for white, a Centurion requirement. C. The kit includes velcro to connect the shoulder bell strap to the chest to back strap. I'll be using a Dritz #10 sew in snap. Accuracy update but NOT a Centurion requirement D. The kit includes philips head screws for the TD brackets which I'll be replacing with slotted pan head screws, Accuracy update but NOT a Centurion requirement but recommended E. The kit includes velcro for the rear calf connection which I'll be replacing with the elastic and bra hooks set up, Accuracy update but NOT a Centurion requirement F. The kit includes ABS hand guards which will be switched out for Latex style, a Centurion requirement G. Waist belt accuracy modifications - Remove upper holster mounting screws, Repair holes to fabric, Replace line 24 snaps with "Popper" snaps, Correct elastic to drop box connection, Glue drop box elastic to belt. I'm sure this list will build, stay tuned Tools: Pencil Exacto knives, large & small Scissors Steel straight ruler (metric) Dremel with sanding wheel or sand paper. Small carbide bit for helmet teeth or small file. 3M scotch brite pad (any color, gradient) Drill 5/32" & 1/8" drill bits Hammer Screwdriver (blade) Spring clamps (set or 12 or more in various sizes) Earth magnets 1/2" x 1/8" (12.7mm x 3.1mm), 20 to 40 magnets Painters tape PPE (Personal Protective Equipment): I can't stress enough how important it is to wear PPE, especially when working with some of the tools listed above. Wear it! Safety glasses - Hardware store Cut resistant gloves - Hardware store 1/2 Respirator. Sanding releases small carcinogens into the air. Protect your lungs. - Hardware store or http://www.amazon.co...ailpage_o05_s00 Materials: E6000 - two to three+ 2oz tubes, or two+ 3oz tubes Zap-A-Gap & Zip Kicker Elastic (Chest to Back plate) - White 2" x 2' in length recommended) Elastic (Drop Boxes) - White 3/4" x 20" Elastic (Bells to Shoulder Strapping) - Black 1" x 12", ANOVOS supplied Elastic (Bicep to Bicep around arm) - Black 1" x 20" Elastic (Bicep to Forearm) - Black, 2" x 6", ANOVOS supplied Elastic (Thigh to waist belt) - Black, 3" x 24" Elastic (Kidney to Ab right side) - Black, 1" x 8" Elastic (Posterior to Cod) - Black, 1" x 12" Nylon Webbing (Kidney to Ab, left side 6 rivets) - 1" x 6", ANOVOS supplied Single cap rivets (Waist belt drop boxes and thigh ammo belt) 7.4mm or 5/16" Paint: Gloss White: Testers Gloss black: Humbrol #21 Testors # 1747 Gray (Ab plate), Humbrol #5 Testors # 1138 -http://www.humbrol.com/us-en/shop/paints/enamel-paints/5-dark-admiralty-grey-gloss-14ml-enamel-paint.html French Blue (Ab plate & Tube stripes), Humbrol #14 Testors # 2715 - http://www.humbrol.com/us-en/shop/paints/enamel-paints/14-french-blue-gloss-14ml-enamel-paint.html Gunship Grey (TD tube), Testor #1923 (spray paint) NOTE: Painting the TD tube is NOT required for any level of approval Internal Strapping: A. ANOVOS supplied B. Internal Strapping Brackets - http://www.whitearmor.net/forum/topic/20859-accurate-anh-stormtrooper-strapping-brackets-v-20-now-available/. Alternative lock nuts to replace the nuts that come with the bracket kit - http://www.amazon.com/gp/product/B000NBKLOQ C. Snaps: 1) Ab - "S" snaps "poppers" (Used on the following locations: Ab to belt, Ab to Kidney right side, Cod to Posterior, Shoulder to Back plate strapping right/front) 15mm, (bag of 15 is the smallest)- http://www.ebay.com/...=STRK:MEBIDX:IT 2) Ab - "S" Snap die punch and set tool 15-17mm, (1x) - http://www.ebay.com/...=item5413a405e2 NOTE: For the "S" snaps and set tool kit you may need to contact the seller who is in the UK and have him set up a auction with US shipping. The original sales did not have a ship to US option at the time I purchased the items. 3) Thigh Ammo Belt - Single Cap Rivets - 7.4mm or 5/16", Ebay - https://www.ebay.com/itm/Solid-brass-nickel-plated-single-cap-rapid-rivets-7-mm-cap-100-pair/222251554883?hash=item33bf399843:g:zTsAAOSwLnBX2zzO:sc:USPSPriorityFlatRateEnvelope!94513!US!-1 4) Thigh Ammo Belt - Double Cap rivet tool (1x) - http://www.ebay.com/...=item463922315d, or Hobby/Craft store 5) Ab/Kidney - Split rivets (bag) - ANOVOS supplied 7) Inner strapping - Line 24 snaps, nickle, 100ct (recommended), Tandy - https://www.tandylea...ts/1263-12.aspx. Fasnap - http://fasteners.fas...nap-fasteners? 7a) Inner strapping (canon brackets) Not illustrated in this build. For informational purposes only - http://www.whitearmo...-now-available/ 8) Shoulder to Bicep - Dritz Sew in Snaps, Nickle, Size #10 -http://www.amazon.co...YH1DNAAPPP1R3H1 9) COD split rivet - ANOVOS supplied D. Calf closure 1) Elastic - http://www.amazon.com/Dritz-9506W-Non-Roll-Elastic-4-Inch/dp/B004ALO9CK/ref=sr_1_2?ie=UTF8&qid=1454439839&sr=8-2&keywords=3%2F4%22+white+elastic 2) Bra hooks - http://www.amazon.com/Dritz-Hooks-Eyes-Nickel-Size/dp/B005S7FA28/ref=sr_1_10?ie=UTF8&qid=1454440102&sr=8-10&keywords=dritz+bra+hooks 3) Velcro - ANOVOS supplied Other: Thigh Garter belt - http://www.whitearmor.net/forum/topic/29991-thigh-garter-system/ Gloves (ANOVOS supplied) or - https://trooperbay.com/flexible-hand-guards-in-white-black-or-plain.html Rubber hand guards (Joseph) - http://www.whitearmor.net/forum/topic/35702-latex-hand-guards-for-centurion-level-anh/ Boots - Totally killer Boots - http://www.tkboots.com/, Imperial Boots - http://www.imperialboots.com/ Undersuit (ANOVOS supplied) or - Shirt, Pant Waist Belt - ANOVOS modified Waist Belt other - Kittle's belts) - http://www.whitearmor.net/forum/topic/19803-fs-white-canvas-belts/ ANOVOS assembly instructions (if anyone wants them) - https://cdn.shopify.com/s/files/1/0346/5761/files/SWTROOPER001-KIT_V1.pdf?18334450603693831912 UKS Assembly instructions - PDF - https://drive.google.com/file/d/0B-d8yBFyd0CgWGtmSWx6ZHRjbFE/view Sections, Navigation & Check List: 1. Forearms: 1a. Forearm trimming 1b. Forearms Pre- assembly 1c. Assembly (front) 1d. Assembly cont (rear) 2. Biceps: 2a. Bicep trimming right 2b. Bicep trimming left 2c. Bicep Pre-assembly 2d. Assembly 3. Calves/Shins (lower leg): 3a. Shins trimming left & right 3b. Shin Sniper Knee trimming 3c. Shin Pre-assembly 3d. Assembly (front) 3e. Sniper knee Pre-assembly 3f. Rear Closure (Straps and Bra hooks) 3g. Sniper knee, rear cover strip and calf closure elastic system installation 4. Ab: 4a Ab trimming 4b. Ab Button Panel trimming 4c. Ab Button Pre-assembly 4d. Ab & Kidney Split Rivet Pre-assembly 4e. Ab Waist Belt Mount assembly 4f. Ab Right side rivet assembly 4g. Ab Cod Rivet Pre-assembly 4h. Ab Button plates - Painting and Installation 5. Posterior: 5a. Posterior trimming 5b. Posterior rivet assembly 5b. Posterior to Cod connecting strap assembly - Under "Strapping" section 5c. Assembly - Under "Strapping" section 6. Strapping: 6a. Bracket System Pre-assembly 6b. Bicep to Forearm strapping 6c. Chest to Back strapping assembly 6d. Ab to Kidney left side strapping 6e. Ab to kidney Right side strapping 6f. Posterior to Cod 6g. Bracket System final assembly 6h. Bracket system support pads 7g. Thigh Support System (part 1) 7h. Thigh Support System (part 2) 7. Thighs: 7a. Thighs trimming left & right 7b. Thigh Ammo Pack trimming 7c. Thigh Pre-assembly 7d. Assembly (front) 7e. Assembly (rear) 7f. Thigh Ammo Pack installation 7g. Thigh Support System (part 1) 7h. Thigh Support System (part 2) 8. Chest and Shoulders: 8a. Chest trimming 8b. Chest Shoulder Covers trimming 8c. Chest strap to Shoulder Bell connection (Shoulder side) 8d. (6c) Chest to Back strapping assembly 8e. Shoulder Cover assembly 8f. Shoulder Cover Retaining Strap 9. Shoulder Bells: 9a. Shoulder Bell trimming 9b. Chest strap to Shoulder Bell connection (Bell side). 9c. Shoulder Bell strap installation cont. 10. Thermal Detonator: 10a. Pre-assembly 10b. Paint (not required) 10c. Assembly Final 11. Waist Belt: 3/3/16 NOTE: New information regarding the Anovos waist belt, PLEASE READ. The official word is the waist belt is accepted at the EIB (L2) with the previously mention belt modifications however, it is NOT acceptable at Centurion (L3) regardless of the modifications. The cloth portion of the belt assembly will need to be replaced for Centurion approval. You can either skip the following belt modification tutorial and replace the cloth portion of the belt all together, or continue on if EIB is as far as you plan on going. A tutorial on how to change out the cloth portion of the belt is in the works. 11a. Waist belt EIB (ONLY) Accuracy update 11b. Waist belt Centurion Update 12. Back Plate: 12a. Back plate trimming 12b. Assembly - Refer to "Bracket system final assembly" 12c. Upper connection point modification 13. Kidney: 13a. Kidney trimming 13b. Kidney to Ab right side connecting strap - Refer to "Strapping" "Ab to kidney strapping right side" 13c. Kidney to Ab left side connection strapping - Refer to "Strapping" Ab to kidney strapping left side" 13d. Assembly - Refer to Bracket System Final Assembly" 14. Hand Guards: 14a Hand Guard trimming 14b. Hand Guard, Centurion Update 15. Helmet Accuracy modifications: 15a. Helmet Modifications for Centurion and accuracy (Part 1) 15b. Helmet Modifications for Centurion and Accuracy (part 2) 15c. Hovi Tip Mod 16. Fitment Alterations (if any): N/A 17. Final Pictures: 17a. 501st Submission and completed armor pictures 18. Additional information: 18a. Making and install support pads for Mr. NoStripes bracket system (Not a requirement) 19. Helmet Electronics: 19a. Installation of Ukswrath's Hovi Audio system, SHA (hearing assist) and Cooling system Out of the Box
-
Though I haven't tried it yet it shouldn't be too difficult being the helmet is held together via the ear screws and an additional screw which are removable.
-
TK 73427 Requesting ANH Stunt Centurion Status [211]
ukswrath replied to Coastertk's topic in Request Centurion Status
Hey Jay we'll be with you shortly brother. Could you do us a favor and provide your EIB application link please. Post it at the beginning of this thread -
TK-21122 Requesting ANH Stunt EIB Status (ATA)[536]
ukswrath replied to Gloves's topic in Request Expert Infantry Status
Hey Karl soon as you install a D ring we can proceed with your application. You can do it brother. -
It has arrived! Let the games begin ANOVOS left ATA right. ANOVOS is definitely chiseled in comparison Build thread coming soon
-
Congrats Aaron, excellent job trooper.
-
Congrats Michael excellent job!
-
HOWTO: ukswrath's FO TK Battle/Riot Shield assembly
ukswrath replied to ukswrath's topic in TFA Stormtrooper
Thanks Paul

