


ukswrath
-
Posts
14,622 -
Joined
-
Last visited
-
Days Won
180
Content Type
Profiles
Forums
Gallery
Articles
Everything posted by ukswrath
-
Awesome story Frank. Other than a few minor issues it sounds like you had a stellar event
-
FN1313 Anovos FOTK Build Thread
ukswrath replied to FN1313's topic in Build Threads Requireing Maintenance
Very cool -
These are awesome
-
Looks great. Yes how the two sides come together directly effects how it looks.
-
As much as you want, it's not required. That said if you plan on using brackets then you want to leave roughly 1/4"
-
Thigh A. Confirm both sides will align correctly once clued B. Using a scotch brie pad or similar scuff up the full surface of the cover strip and 1/4" surface on each thigh side. C. Install cover strip on one side. Let dry for 48 hrs. Afterwards remove any excess glue from the gluing surface D. Prep. Have several 10" strips of painters tape cut and waiting. Have any clamps and magnets separated and waiting. Have a block of wood roughly the width of the cover strip at least 3/4" thick x 10"L. E. Apply glue to 2nd half of thigh. F. Bring sides together and install clamps at the ends. G. Grab a strip of painters tape and strap the two sides together so they are flush. H. Add as many magnets as you can to the cover strip. I. Add block of wood on top of magnets. J. Add remaining strips of painters tape over the top of the wood at the same time forcing wood downward until the two sides are parallel with each other. K. Double check everything. If it looks good, let dry for minimum 48 hrs.
-
TK-60812 Requesting ANH Stunt EIB Status (SDS) [817]
ukswrath replied to Adrián's topic in Request Expert Infantry Status
Thank you -
Yep, working on it, almost done.
-
TK-60812 Requesting ANH Stunt EIB Status (SDS) [817]
ukswrath replied to Adrián's topic in Request Expert Infantry Status
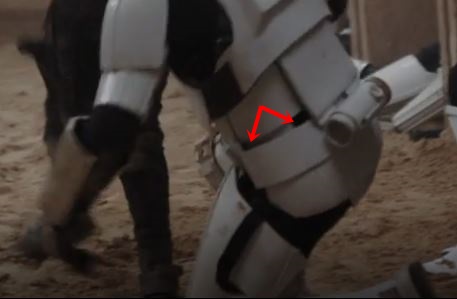
Adrian before we get started you need you to make a correction. It appears the calf cover strips are too long. They should stop just below the upper molded edge as illustrated in the photos we've provided. Please trim this and submit a new photo. Thank you Reference photo -
TK-60812 Requesting ANH Stunt EIB Status (SDS) [817]
ukswrath replied to Adrián's topic in Request Expert Infantry Status
Hey Adrian Andrew or myself will be with you shortly. While you'r waiting please provide the following photos. Waist belt connections (inside view) Thigh or shin interior Thanks -
TK92527 requesting ANH Stunt Centurion status (TM) [389]
ukswrath replied to Dainbrandr's topic in Request Centurion Status
Our pleasure, excellent work. Where it with pride. -
TK92527 requesting ANH Stunt Centurion status (TM) [389]
ukswrath replied to Dainbrandr's topic in Request Centurion Status
Alright Martin let's do this. Thank you for your Centurion application. CRL and Centurion Application Requirements: All required submission photos are present. Thank you for making the suggested updates mentioned on your EIB application. Your armor looks much cleaner and uniform. Beautiful job on your TM build. That said Andrew and I would like to welcome you to Centurion. Great job! Other-Armor Fit/Assembly: If we had anything to add here would be to bring the waist belt up even higher. It should sit at the lowest Ab buttons. Vader is awaiting your arrival on the Death Star. -
Create an interest check in the sales section and see what kind of interest you receive. that will answer your question.
-
If it's typically unseen we usually wouldn't mention it. If we did then everyone would be required to show it.
-
TK92527 requesting ANH Stunt Centurion status (TM) [389]
ukswrath replied to Dainbrandr's topic in Request Centurion Status
Awesome! Fantastic job. Well be with you shortly. -
-
Well we've seen some interesting ideas come across these boards.
-
Are we talking about these?
-
No worries
-
Hey Jeff you installed the hooks incorrectly. They are supposed to face towards your leg. This makes it easier to disassemble the armor. How you installed them will not effect any level of approval but may make it more difficult to remove once installed.
-
Lol
-
Rubies E-11 Conversion for EIB?
ukswrath replied to kawnr's topic in FISD Expert Infantry Badge (EIB) Requirements
You need to check with your garrison GML. -
Nice work. Interested to see how the foam work out
-
TK92527 requesting ANH Stunt Centurion status (TM) [389]
ukswrath replied to Dainbrandr's topic in Request Centurion Status
No worries. We'll be here when your ready. -
April 2018 Request for CRL Updates thread
ukswrath replied to Daetrin's topic in Hard Armor (General Discussion)
That's what I was thinking
