
Artshot
-
Posts
584 -
Joined
-
Last visited
Content Type
Profiles
Forums
Gallery
Articles
Everything posted by Artshot
-
I have had the same problem with my build with the bottom corners sticking out and affecting the movement of the back plate at the butt plate, I trimmed it back quite a bit and did a little bending via the hot water method, oh and I also levelled out the bottom edge where it joins the edge of the butt plate. Trying to reduce the curve of the armor where it attaches to the shoulder straps has been my next challenge, been trying to keep the length while fitting it closer to my body, more hot bath time.
-

KaiserW AM 2.0 build (ANH Stunt)
Artshot replied to KaiserW's topic in Build Threads Requireing Maintenance
I got to this stage before I took a break, looking forward to seeing how you approach it, the excess width on the armor pieces looks larger than other armors I have seen. -
Nice baton build As somebody still trying to figure out the internals and spring loading the deflector arms on my 3d build, it's always nice to see a baton going together. Just wish I could figure out how to get the deflectors to pop out and spin.....at the same time
-
KCP First Order F-11D Studio Replica Blaster
Artshot replied to kcpstudio's topic in Weapons of the First Order
Why of why is my wallet not bigger.....definitely interested though -
Still Here!! After a much needed vacation (Tokyo.....loved it) I am back and trying to get this thing finished, just got a little work backlog to clear, although I did have a few thoughts about the spinning/extending deflectors. 1) I have created the sockets on the "Shaft" to attach the deflectors to, currently I have created a hole all the way through for a dowel, this way both deflectors will be fixed together and rotate the same amount, I also created a plug to keep the pieces spaced, this plug will fit into corresponding sockets in the deflectors. 2) I am going to try and build a locking mechanism that will fit in the socket around the dowel so that the deflectors will only spin 180 degrees, hopefully if I can figure it out I will create a slight ramp or raised area inside so that as the deflectors spin, they go up and out.....wish me luck with that. 3) After looking at the link "mo3dprinting" supplied and studying how the spin of the deflectors was created, I may be able to fashion something similar, my only concern is that space is limited. 4) To create the lightning effect on the deflectors I was thinking that the deflectors could be channelled for fitting fibre optics, with a light coat of paint from the distance they would look like part of the main body, once lit, they would hopefully be bright enough to be seen through the paint. 5) As I run the pieces through Shapeways to check for errors, it's becoming increasingly obvious that this thing would be expensive to produce through them (more than a set of armor), so therefore when I finish I will put each piece in it's own file, that way you can print only what you need, also if somebody is going to try and print this at home with a smaller print base, I will chop the main shaft into sections, probably at each link on the length, to try to avoid any obvious seams. Okay, so if your still with me, here's some pictures As always, any and all advice is welcome, especially if you have any idea's on the release and spin function. Cheers Art
-
July 2016 Newsletter - FISD's 10th Anniversary
Artshot replied to Holnave (evan_loh)'s topic in The Newsletter Archive
As somebody who only received his box of Stormtroopery goodness this year and is still putting things together, I truly appreciate those that have gone before, fine tuned, improved and generally made this place the font of all knowledge. Long may it last! -
Jimmiroquai Rogue One Builds
Artshot replied to jimmiroquai's topic in Build Threads Requireing Maintenance
I have a feeling I am going to be giving you a lot of my money. -
Welcome to the AM 2.0 club
-
Just a few observations from the attached photos of the new "Hawaii" Trooper.....sorry, it has that look to me Looks to be some sort of grey or black connection between chest and back pieces. More of a pronounced raised area on the hand guards, near the wrist end. Thigh/Knee ammo pack looks to be in a different fixed position. The belt now looks to be attached or fixed along the break line between chest and cod piece. Of course all of these observations could be wrong, one cleaner photos arrive.
-
Death Trooper WIP (Lots of pictures)
Artshot replied to PhoenixTrooper's topic in Build Threads Requireing Maintenance
I like the way you have continued the damage into the TD bracket, it's little details like that which make a great build, exceptional -
Sketchup is pretty good for modelling, and free
-
Update Coming Soon.......ish. Stupid work getting in the way again.
-
Doh!
-
Ah, I thought somewhere there may be something similar, not being in the 501st yet meant I could not check.
-
Just had a random thought (it happens a lot at work), is there any feasibility in having a map function with members locations on it ? (just for states or counties etc) I have seen a few sites that have a similar function, just thought it would be handy if somebody was planning a get together or armor party. Random thought over.
-
Morning All As I continue to build my AM 2.0 armor I have come across a little problem that I thought I would seek some advice on. I would normally just add this post to my build, but it might get lost amongst everything else in there. Anyway, as a diversion from trying to sort out my upper torso and shoulder connections, I thought I would trim up my thighs, and noticed this. As you can see, the return is a slightly irregular, easily sorted by trimming it back to my regular width of about 5mm which I have used on most of my armor returns, however I was confronted with this. As I hope you can see, as the armor was formed it looks like the return has started to change from the regular 90 degree angle to almost lying flat with the outer edge, it would not normally bother me, but the area is at the front and not at the rear, where I expect to trim some out for better mobility. My question is, should I try to form a correct 90 degree angle with my sealing iron, or am I just being picky, I am thinking it will look more pleasing if the angle is 90 degrees..... I tend to overthink the small details, which explains how after many many months, I have still not finished my build. Oh, and while I am at it, I have trimmed the front raised area to 20mm on each side, when applying the cover strip is it preferred to get it to follow the actual edge of the raised area as much as possible ? That's about it, as always any and all feedback is appreciated.
-
Artshot's ANH Stunt Build (AM 2.0)
Artshot replied to Artshot's topic in Build Threads Requireing Maintenance
Well, time for another update, which has been long coming as I keep getting distracted by bright & shiny things. After putting the six holes in the Ab and Kidney pieces I joined them together using the traditional method of webbing and rivets, I tried to get the two pieces as tight together as I could as I know they will begin to stretch at some point, typically I forgot to take a photo of the interior. However, here's the exterior. And to complete the two pieces, here's the right side. While I was at it, and borrowing from other builds, I created a tongue & groove fitting on the interior of the right side, luckily using black plasticard that I had handy, I will still have to fashion an interior Velcro strap to keep everything together, but now when the side is closed, it will not slip up or down and ruin the straight join. So, now that the Ab and Kidney pieces are joined, I decided to return to my troublesome back plate, from previous instalments of my build you may have noticed it was giving me trouble, mainly because it has two spur like edges that protrude around the top of the kidney piece and the upper strap to shoulder edges were turned in a bit too much, making the piece stand a bit out from my back. So, with elastic in hand I made the two outer straps (the inner are regular webbing), I figured that the inner would keep the back and kidney close together whilst the outer would allow some stretch when I have to bend, otherwise I think the stress would pop the snaps and I may leave a trail of armour behind me....literally. The second photo is just to show how I fixed each snap to the elastic strapping, I doubled it over and tidied up the edge with E6000 Fray Lock (just happened to have a tube), this stuff is great, not only will it seal the ends but I also used it to glue the loose edge of the strap down, I also put a dab of it on each point where a snap goes through the webbing or elastic. And here's what it looks like on the outside. After doing all the gluing I decided to give the back plate a hot bath to try and make it fit a bit better, I think I have managed it, despite the slightly boiled hands.......hope it was worth it. Just to finish, and because I wanted to do something easier, I glued on my button plates, it annoys me that the four button plate is not in line with the ridge on the armour, but its in line with the raised area. And, that's that, for the moment. Enjoy. -
Great read as always.
-
Drilling into helmet
Artshot replied to The Anonymous Egyptian's topic in Hard Armor (General Discussion)
For small holes like the ones for attaching the cod snaps and ab/kidney rivets, I used a piece of tape over where I wanted the hole, marked the centre with a pencil, then used the tip of a scalpel to make a tiny pilot type indentation, then used a small screwdriver (I have a set of small jewellers type screwdrivers, which were really cheap) to slowly bore a hole through manually by using slight pressure as it goes, never force it. I tidied up the hole with a small round file, which can also be picked up cheap, I know it's a slow way of doing it, but I have had runaway drills before and don't want to risk screwing up. Incidentally the Jewellers Screwdrivers & Files come in very handy when assembling your blaster. -
Congrats, very nice clean build.
-
SlyFox's ANH Airsoft Conversion w/ Real Parts
Artshot replied to SlyFox740's topic in ANH BlasTech E11
Looking forward to seeing how this comes out -
How to glue on latex hand guards
Artshot replied to Nosey10's topic in Boots, Soft Parts, and other Accessories
I used the following on mine (Loctite All Plastics Glue), basically because your using a chemical on chemical gloves your going to struggle a bit, the pen in this set strips away some of the protection and it worked great, I did it slowly by gluing the centre then working my way around each hand guard a little bit at a time, careful with the glue though as once it's on the glove it's there forever, I was trying for a nice clean join line with mine. https://www.amazon.co.uk/gp/product/B002SPBX9W/ref=oh_aui_search_detailpage?ie=UTF8&psc=1 Sent from my iPad using Tapatalk -
Mine is derived from being lazy, when I created a new email address years ago, it was suggested by Yahoo, luckily for me that not only at the time was I representing a friend in selling his original artwork (comics artwork), but I also collected original comic artwork myself, still do And keeping with being lazy, I just added 1968 to it for PS4, where I can be seen crashing, getting shot and generally falling off things on a regular basis.
-
I noticed that to, but not being an expert on variants I figured it might be normal, I also noticed the pins where the stock joins the main body are different, along with the sight bracket/runner having more of a downwards angle to where it joins the main body along with what looks to me to be a domed hex or + screw fixing the sight bracket/runner to the rear sights. But like I said, these could just be normal variations.
-
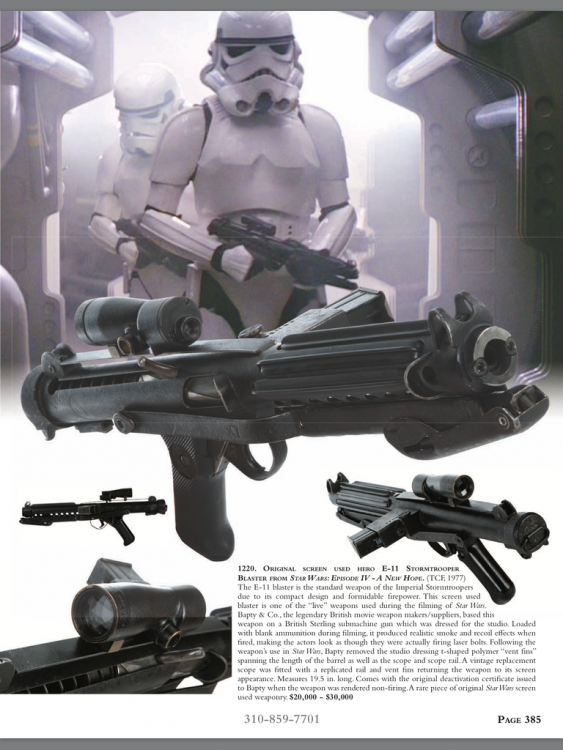
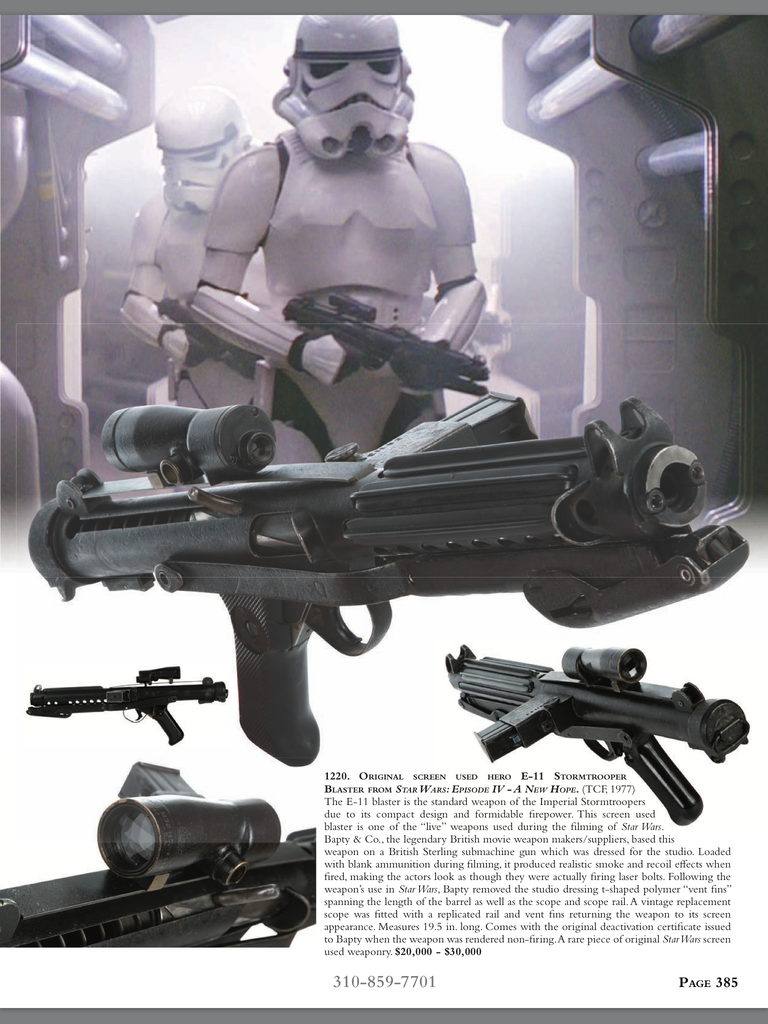
Firstly, not sure if this is the right section to post into, please feel free to move if required. So, I was looking through the latest Profiles in History auction catalogue and came across this little gem, then I saw the estimated price $20,000 to $30,000 Back to my Doopy build I think, still it's a nice reference photo