

illusionz_09
-
Posts
998 -
Joined
-
Last visited
-
Days Won
1
Content Type
Profiles
Forums
Gallery
Articles
Everything posted by illusionz_09
-
 yea i keep looking at it and i am tempted to weather mine as well. Any suggestions? do you think i should?
 -
you will definitely enjoy the process. One advice i give you if you are going to change the barrel and want the full light to shine through is make sure you trim the ends of the T-Tracks that go inside the barrel to fall fairly flush with the inside of the barrel. That way the LED will not hindered by any tracks covering its shine.
-
Looks great!
-
Fuumantroop's AM armor build
illusionz_09 replied to fuumantroop's topic in Build Threads Requireing Maintenance
looking good so far!!! looks like your getting good movement on your arms so far. -
The resin is actually really sturdy. You should be able to hollow out a considerable amount. I agree that the magazine is a good/easy place to hide it. You can definitely get creative with your build, everyone does it a little bit differently. Just make sure you shave off little by little to not unnecessarily remove excess. good luck.
-
Complete novice builds not bad Doopys E-11
illusionz_09 replied to Scotty71's topic in ANH BlasTech E11
Lmfao. Little details no one notices or highlights on builds so it's hard to know. Don't stress it. Looks great -
Complete novice builds not bad Doopys E-11
illusionz_09 replied to Scotty71's topic in ANH BlasTech E11
Looking good. I think u may have glued the bayonet lug upside down though. I would check. But looks great! Nice job. Love the power cylinder. -
I've been debating that. I think I like newly issued and let it "weather" naturally on its own. I really love the new issue look. It really looks realistic in person
-
Looks amazing. Good job!
-
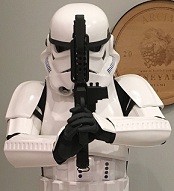
thanks Andrew! I think for now im just leaving it without a clear coat lol. well see what happens. in any case i finished the scope. I dremeled/filed a piece of magnifying glass to fit into the "tape" back of scope created a plastic piece for the front of the scope as well with dremel. glued on and project is now completed. Here is a before and after pic... and now for the classic pics of all angles... and then i took some "action" shots of shooting the blaster to show the lights. Looks better in person but you catch the drift lmao. and here is how it fits in my holster... Let me know if have any quesions.
-
the ejection port is already done and good to go. All i have left is to finish the end cap of the scope and attach; and i'll post official finalized pics of the blaster. All angles and the lights as well.
-
Doopy build...real Sterling folding stock
illusionz_09 replied to gazmosis's topic in Build Threads Requireing Maintenance
yes, great build. Really does look real. I can only imagine how much better it looks in person. -
the hardest part is starting lol. Good Luck on your build. Enjoy it!!! I just finished my Hasbro, and I already want to do a full resin kit lmfao. But i'll wait for now and live vicariously through you haha. Anyway, can't wait for the thread. Ask if you have any questions.
-
I agree. A nice oak finish and shine would look great in contrast. love it
-
DO NO BUY RUSTOLEUM clear coat. Horrible!!! lol it left the gun milky, so i had to restart the painting process for the gun. I didn't take pics of the redo, but basically i did a coat of aluminum again then instead of flat black i used satin black. Unfortunately the satin left too much of a shine of the gun (I didn't like it, looked fake) so i went back to Flat Black. I just left a touch of the satin black on the handle of the blaster. not sure if you can see the bit of shine on the handle and the trigger. To me it looks more realistic this way instead of shining up the gun. Due to the clear coat fiasco before, i'm leaving the blaster like this. The color looks great and authentic to me. Then i painted the ejection port aluminum for the final touch. Covered everything except that spot. I also painted the back of the scope, all i have to do is attach the glass to it and then i'll take final pictures of my E-11 blaster. Keep an eye out. If anyone has any critique that you see that i need to fix/update please let me know.
-
So there are 2 steps in between that you don't see. I painted the folding stock aluminum with a couple coats and also did a light coat of black on the actual gun where the stock is going to cover so that the aluminum won't be as pronounced. Then i glued the folding stock to the blaster. Once the glue was officially set, then i began the flat black painting process. It was night time so i gave it a rough paint job of black. Once it dries i will do the next full coat of black during the day so i can see all spots lol. (Left is before black and Right is after the first coat) Not great pics since it was dark outside... Like i said i need another coat of the flat black and then finish it off with the clear coat; then add on the back of the scope. I should have this finished soon and will post the full finished product once complete.
-
Complete novice builds not bad Doopys E-11
illusionz_09 replied to Scotty71's topic in ANH BlasTech E11
yes, came out great. Nice job. -
any strap works. the only requirement is that the holster itself is black and the strap system is the correct style of single button with two straps.
-
Sanded & Drilled the base of the folding stock. btw...i didnt take a picture of me glueing the base and the front of the stock together. While I was waiting for the glue to set, i began working on the T-Tracks for the barrel. First get the water in a pan boiling hot (i.e. bubbling) and then you stick the tip you are going to bend; one by one, side by side I bent it with some pliers measuring and checking everytime. sorry guys, no pics of me actually bending the pieces but i'm sure you get the point lol. ask me if you have any questions. (they are very forgiving so if you mess up aligning the bend, just put that spot back in there and it should go back to its original shape) Then i glued them onto the barrel and taped it to leave overnight to make sure it holds. then painted the base coat of the Gray Granite to the folding stock. next step is to paint the stock aluminum and then glue it on to the gun to prep for black paint.
-
i personally like the wood look with this build. But maybe it you create like a granite look then thats another option to do.
-
yes, everything came out amazing. Great job...
-
so as i mentioned before the first thing i did was create the Bayonet Lug by cutting and shaping a scrap piece of delrin i had. and i also cleaned up the front sight. (pic of both the sight and the lug completed on right) right when i started to paint outside i realized i forgot to seal the screws and lines on the gun...lol. So using the epoxy i sealed the screws and the key lines/spots on the gun. then i sanded them down to get them as even as i could lol... so this is the paints i will be using for the color of the gun... First a granite base, then aluminum, and the finish off with flat black. (i will do a clear coat when i finish the whole project) Satin Granite color went on first. then the aluminum metallic look. I'm painting here both the gun and the back of the scope which you see on the left of the tree. (SIDE NOTE: if you want to go more accurate, the full scope should be painted copper color instead of aluminum. Problem is i couldn't find any color i liked at the store. So I just stuck with aluminum for the scope as well. yes, it gets covered in black, but just details) At this point i decided to tackle my folding stock. Since i changed the barrel of the hasbro, the folding stock was too short so i have to extend it. I'm sure there are other ways of extending it, but i used a piece of baseboard i got at Home Depot. the gap i needed is about 0.8 inch. once glued on. Now just waiting for the E6000 to completely harden. tonight i will sand it down flush and then put some epoxy for the edges. Then i can paint the stock and add to the gun. Also i have to bend the t tracks and glue to the barrel.
-
I feel you... it trying to make time to finish the build lol. I got more done this weekend. I'll post now.
-
Broken Hasbro E-11 LED
illusionz_09 replied to charlesnarles's topic in Electronics for Helmets / Blasters
Yes as long as you connect the wires properly to the new power source. Just make sure you follow the current. -
front sight looks great. However, once you put on the doopydoo scope you wont really be able to use the scope, unless you drill through it. Up to you. as for the pics, instead of putting the link up, click the image button and paste the url there so that the picture appears on the forum instead of the website. Good luck with the build. enjoy it.