

illusionz_09
-
Posts
998 -
Joined
-
Last visited
-
Days Won
1
Content Type
Profiles
Forums
Gallery
Articles
Everything posted by illusionz_09
-
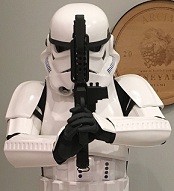
 I made a couple bits for the gun. First thing i made was the Muzzle Flash Guard. Here is a tip for anyone trying to make this: i used an end cap for a PVC pipe, cut a section at the end. it gives a similar size/shape. Using a dremel i was shaping and bending to the size i needed. I kept checking with the barrel to see how it would look and shape as needed... Once i made the guard, i went to create the actual sights for the front sight. I don't have pictures of the process, but this is what the pieces looked like when i was ready to apply. Then i applied the pieces to the gun using E6000. the front sight (vertical bar) seems a bit wonky to me lol. Once it hardens completely in place, i will use an x-acto knife to clean it up and make it look more symmetrical. Once i create the bayonet lug and epoxy key spots on the gun, then we are ready for paint...can't wait.
 -
Haven't really done much. I used a broken LED i had to create the dot bump on the magazine. I first drilled a hole the size of the light, then used lots of E6000 to fill hole and hold the LED. then taped it up overnight (you see it taped up on the last picture) ^ this is how it came out after i cleaned off some excess glue. Just need to finish creating a couple bits, then its ready for paint.
-
Using the template for the front sight, i had an operator at work create a couple in the machine shop. Made it thin enough to bend at home alone lol. Used some pliers and a little bit of elbow grease, but i was able to get the shape i wanted (for the most part lol). finished adding the end cap extra view of all the key doopydoo kit added and the tape covering the magazine where i put the curve dot. just waiting until its glued flush. I can see the light at the end of the tunnel lol...
-
Yea you are right. I have to work with it to see what looks best. Ur probably right with just attach completely. Thanks.
-
Now that the electronics are done i prepped the inside fittings. Then used painters tape to cover the LED inside the barrel so that after i paint i can easily remove with tweezers (sorry no pics of this, i just closed the gun) Gun officially closed lol! started to finish adding the doopydoo additions i have left. folding stock glued together to attach later. Front scope glued. Back of scope placed, but not glued. and back end cap. (i have seen the doopydoo added different ways for the end cap, apparently everyone glues it differently) its taped right now so you cant see it. Also i marked on the magazine where i want to put a piece of broken LED to give the round dot look. I am also debating on it i want to leave a gap between the gun and the folding stock to look more realistic. any suggestions?
-
Follow this thread http://www.whitearmor.net/forum/topic/25919-dianas-rs-props-build-anh-stunt/ she had the exact same issue as you. Made proper modification for her height and one of the best finished trooper armor i have seen. She used Luke Skywalker as the trooper look since he was depicted as a "short trooper" in the films as well. hope this helps.
-
Received my AP armor yesterday
illusionz_09 replied to dkmwong's topic in Build Threads Requireing Maintenance
Good Luck! -
Broken Hasbro E-11 LED
illusionz_09 replied to charlesnarles's topic in Electronics for Helmets / Blasters
so the resisitor bypass can be easily seen on my thread on page 2. (Im sure there are other pics out there but i can reference mine quickest lol) http://www.whitearmor.net/forum/topic/27767-hasbro-e-11-blaster-conversion-from-miami/ the reason you want to bypass the resistor is to use the full voltage from the batteries. that way the LED shines to its full potental. as far as connection points, you have the right idea. Just make sure you solder on side of the LED to the + and the other to the -. Since you are only doing one LED on the nozzle it should be very straight forward. Just use the two wires that are currently connected to the light it came with. Don't overthink it. Good Luck! -
Broken Hasbro E-11 LED
illusionz_09 replied to charlesnarles's topic in Electronics for Helmets / Blasters
oh and a new LED light is like 3 bucks -
Broken Hasbro E-11 LED
illusionz_09 replied to charlesnarles's topic in Electronics for Helmets / Blasters
oh wow, yea you need to buy a new light. Good news is that you didnt mess with the internal electronics. Just buy a new LED at Radioshack or whereever, then remove part of that green tape on both wires and solder the new light there. Tim's advice is right with his thread on top. Click on fuumantroops' build and you can see the LED he used. The wires shown in the pic are red and black, but they are the exact same wires under the green tape. Now, here is a tip: if you are not going to modify the gun and if you do not have a soldering iron and any accessories to solder, then (if you do live close to disneyland and can just go in and buy a gun) i suggest you just go buy a new gun. completely up to you. personally i opened the gun and updated the electronics and made modifications, but its up to you how much you want to put into it. if time is not an issue for you, then i suggest trying to fix it yourself, that way you also make it better with a brighter and better LED light. Basic soldering kits can be bought for less than 15 bucks, solder for like 7 bucks. hope this helps. -
Broken Hasbro E-11 LED
illusionz_09 replied to charlesnarles's topic in Electronics for Helmets / Blasters
are you sure you messed up the electronics? take a picture of it and post it and we will let you know what may be wrong and what to do. -
I cut off the head cap of a 1/4-20 Socket Head Screw with my dremel to put on the Nozzle. I finished the electronics in the gun as well. As previously mentioned, the Jumbo LED I put at the base of the barrel and the smaller LED light inside the front nozzle. A few tips to those that will be updating their electronics: use silver solder!!!! the solder with Lead is a poor conductor and a hastle, just buy a small silver solder and use that. Once i got the silver solder, it will made life much easier. I had to go very non traditional in hooking up my electronics to the power source, but i made it happen. (barrel light to the old wire source and the nozzle light directly to the circuit board, not sure if you can tell what i did in the picture. I also glued on the nozzle and taped it to leave overnight. Some action shots in the dark of the electronics of both the chamber and the tip ( the tip still has tape so it looks awkward) Poor quality pics, i will take better ones once i complete the gun. BTW, i cant stress this enough...buy new really good batteries! I used the Lithium batteries, they are great. Now that the electronics are complete i just have to fully secure them down and then seal the gun, add a couple bits and its ready for paint. Will keep everyone posted.
-
The main electronics have been soldered and updated. I first updated the circuit board to be able to bypass the full voltage of the batteries to the lights. Before & After: Then I soldered the new wires that will lead to the LED lights. The green wire will be for the LED inside the barrel and the red wire is for the LED on the nozzle (tip) of the blaster. Just need to wrap solder points with electrical tape and then install the lights. The 2 LEDs i am using are the Jumbo Super-Bright Red LED for Inside the barrel and smaller Red LED for the nozzle. Then I glued the Power Cell on top of the magazine for the night. slowly but surely its coming along...
-
Thanks guys! Can't wait to see it finished either lol
-
btw, andrew i have an issue i keep going back and forth in my mind. Is it practical to drill the front of the doopydoo front end scope to create an actual viewing area to make the scope "useful." that way there is no decal but you can actually see through the sites and be able to use the scope... Is that practical, have you heard anyone do that, or it just makes no sense?
-
I have been traveling a lot so I have been out of it for a couple of weeks. I got back into it last night and made a little progress. First I wanted to create my updated trigger to look more realistic. I printed and cut out the template trigger. Then i traced it on top of a piece of delrin "5mm thick chip" and cut out the shape accordingly. Then cut out the area in the Hasbro trigger so i can then glue my new trigger. Then on the nozzle i glued it to a piece of 1.5" diameter x 4mm delrin. I also drilled out where the socket head cap screws will go (i have them i just need to dremel the head and glue em on). Also i drilled a small whole in the center where the LED will sit. BTW...my T-Tracks came in. They are on my side pile for after my base coat is on the gun i will bend them and add to the barrel. Then to "end" the night i glued the magazine and the counter on the hasbro to leave overnight to fully glue together. Tomorrow i will glue the power-cell fuse on top of the magazine. Next on my list are the electronics. I will solder the new LEDs to the base of the barrel and the nozzle tip.
-
DLDigital's Hasbro E11 Doopy Mod
illusionz_09 replied to dldigital's topic in Build Threads Requireing Maintenance
Realistically internally thats pretty much it. Unless you want to change the trigger guard and/or the barrel as well. It's completely up to you how much mod's you want to add to it to make it more realistic. But as far as opening up the gun, the trigger and the LED are the main things to modify. -
DLDigital's Hasbro E11 Doopy Mod
illusionz_09 replied to dldigital's topic in Build Threads Requireing Maintenance
great start so far...good luck -
really great tips! thanks!
-
Great Job on the blaster Glen!!! Looks amazing as usual. I have a question that has been perplexing me, its about the painting/LED situation. How did you avoid painting the LEDs inside the barrel when you were spraying? Is it that with their positions within the barrel that they pretty much avoid any spray contact? i just want to make sure because after i fix the electronics i want to make sure i don't kill my job by painting the lights lol. thanks.
-
yea, i like the barrel look. the T-tracks should be in any day. as far as the tape method, yea definitely like that route lol. But i think im going to leave it see-through or maybe just put like crosshairs. I want to make it realistically "functional" lmao. well see what i do.
-
Now that the old barrel is out, i attached the new barrel. I used both E6000 and Krazy Glue. I had to use both because the Krazy glue is a little more fast acting until the E6000 really catches. With the small angles of the blaster it makes attaching pieces much easier lol. I also found the right black chord to create the back of the scope. I also put a little dab of E6000 where it meets to make sure it doesn't go anywhere. Next i wanted to focus on changing the trigger guard to look more "movie accurate." if you look at the movies, there is a forward curve look to the trigger guard. so i found a handle on a toy lantern and used that as the basis for the guard itself. after grinded the inside of the "guard" to be even, i dremeled out the current stock blaster guards. Once the guard was out and i cleaned it up with an x-acto knife, I used reference pictures to see where i want the new trigger guard placed. So i dremeled some spots on the blaster in the positions i want to insert the guard and then using the same E6000/Krazy Glue technique i glued the new guard onto the blaster. Once the guard was securely glued, i dremeled off the excess loop of the blue guard so that it doesn't restrict the inside of the handle area where the electronics overlap. After i get it painted i think it should look fairly accurate. Also, my doopydoo kit arrived! Progress lol. more coming soon lol...
-
so i got a little more done. I dremeled out big chunks of the rail scope and the used an X-acto knife to clean it up. I was going to remove them and put a new metal rail, but i figured once cleaned it looks pretty accurate. I also sanded the back of the scope to remove the excess epoxy. I was happy with the rail, i decided to leave as is. Then, since i made a new barrel for the gun, i removed the current barrel from the gun. Just as the rail, first i dremeled a rough part of the barrel, then used an X-acto knife to clean up the area. next on my list is to glue the barrel on and epoxy around it to make it perfectly flush with the gun. I'll be able to do that within the next couple of days. My doopydoo kit is also due to arrive any day now...
-
looks great
-
Glen, what did you use on the tip of the barrel to fill the gap between the doopydoo front nozzle and the actual barrel? also, what did you use to create the trigger guard? thanks!