

SorenM
-
Posts
1,134 -
Joined
-
Last visited
Content Type
Profiles
Forums
Gallery
Articles
Everything posted by SorenM
-
Doopydoos E-11 build, Total amount of expences.
SorenM replied to SorenM's topic in ANH BlasTech E11
Grazie mille... -
That is a great looking blaster!...👠..I used the start of your thread as a great inspiration. 😊 Funny thing is that our paintjob look very much alike, and I honestly did not look at your paintjob before now.... Funny old thing is that I also paint(ed) Citadel miniatures....it shows😉....
-
Tusind tack, many thanks!
-
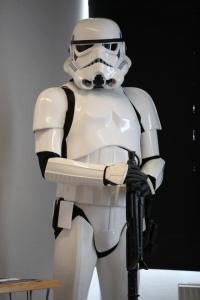
My son (7 yo) and I went to CE II, he is a SW geek just like me ( I am certain that it isn't the result of me influencing him, beginning when he was 6 months old).. We talked about what it would be like and what to expect. I told him that there would be a costume competition, and he immediately wanted to participate as a Jawa. His mother and I started working on a costume (cheap was paramount...but ended up not that cheap actually). He finished 3rd in the childrens category. This is the blaster I made This is his costume Messing with troopers from the French Garrison ( I think it was) It always ends up badly...
-
Doopydoos E-11 build, Total amount of expences.
SorenM replied to SorenM's topic in ANH BlasTech E11
Thnx:-) -
This is an estimate of how much it cost me to transform a Doopydoos blaster from this to this. The prices are Danish. Naturally these prices differ across the globe, and maybe the parts could have been found cheaper here as well. Times are estimated. Time used on Research: 12+ hours Time used on rinsing/sanding/grinding etc.: 9 hours Time used on building/glueing: 16 hours Time used on painting, weathering: 5 hours Petrol for going to the hardware store: 21$ Kit incl. Shipping: 80$ Glue: 30$ Aluminium bar for Hengstler bracket: 25$ Aluminium bar for scope rail: 8 Brass screws for Hengstler: 5$ Brass screws for scope, powercylinders and fire selection lever: 5$ M6 screws for muzzle and pistolgrip: 5$ Front sight pin: 3$ Primer: 20$ Paint: 14$ Total amount: 216$ The wood for the bolt, the plexiglass for the counter window, the screws for attaching this and that, the paint for weathering and the coathanger for the spring was something I had lying around.
-
Thanks:-)
-
Cheers mate!.., I reckon it is good enough for an eventual CEN certification?
-
Yes finally..., but I need to find another project soon, to keep me preoccupied until my armour gets here
-
End result ( except the target/aim thingy for the scope).... All feedback is appreciated
-
E-11 ANH Doopydoo kit - work in progress
SorenM replied to Ossus501ch's topic in Build Threads Requireing Maintenance
I must say that it looks quite battered, and thus fits a Sandtrooper well, again it all comes down to preference. It is a nice build indeed. If you have not seen my build, you could check it out, to see a more subtle weathering.... But again, nice blaster! -
Arrrgh misunderstood you Mathias, the front ofcourse means where the counter is....doh!!...have just blackened the front again, and will start weathering the real rear end
-
Weathered the Hengstler, and I also blackened the rear end of the scope, that foil looked ridiculus....will find those aiming/target thingies.
-
Cheers again Mathias...very helpful...will do some very subtle weathering then, on the rear of the Hengstler...
-
E-11 ANH Doopydoo kit - work in progress
SorenM replied to Ossus501ch's topic in Build Threads Requireing Maintenance
Nice weathering, a little more than I personally like, but taste cannot be discussed☺ Just a few minor points. The scope is made of brass, and the screws as well, so the weathering should be brass.... -
Finished the Hengstler.....it's not good, but it's ok...thanx to Simpixel for the numbers (which will be changed when I get my TK number). The scope ends will be changed eventually..that CD foil is quite hard to work with.....😤😠Is the Hengstler weathered in any way?...cannot seem to find a definite answer..... Scope front end Scope rear end and Hengstler I know that the glass in the counter window is supposed to be rounded, but I've tried without luck...and truth be told, that Hengstler really annoys me right now, so another future upgrade.....
-
Tack så mycket Mathias, thanx so much coming from a "details man" like you, it means a lot
-
Well I managed to 'save' my mistake, and while it is drying I had time to finish the weathering, glossing the handle, filling the folding stock screws, and picking out details on the scope...I think the paint job went quite well😊 Here are some photos in a higher resolution than normal: Scope details and weathering Blaster weathered and detailed Handle glossed Front details Bolt, spring and cockinghandle details ( I know that the number of coils are incorrect, but that will do for now) Magazine details
-
Here's a link to the stand...It fits this blaster perfectly:-) ..http://www.doopydoos.com/stormtrooper-hasbro-conversion-blaster-stand-kit-2647-p.asp
-
Arrrrgh I fu.... Up my Hengstler counter for the second time now!...I put the display and reset button upside down...again..(you nitwit Soren...grrrrr)... Will need to fill and grind again tomorrow.......for crying out loud!.
-
Thanks...but I must admit that I was not perfectly clear when I said I "made" the stand. I only assembled, and painted it.........you can buy it at doopydoos.....
-
Painting my black Chelsea boots white
SorenM replied to SorenM's topic in Boots, Soft Parts, and other Accessories
Thanks so much -
Thanx a lot!.☺...yes the Devil is in the detail......I love details.....
-
Painting my black Chelsea boots white
SorenM replied to SorenM's topic in Boots, Soft Parts, and other Accessories
Looking good...:-)... We'll see how good mine will hold up... -
Finished the baselayer of paint. Fixed the bolt, attached the fire selection lever, spring and cocking handle. Started the weathering, which will be slight. I have used four differnt shades of metallic/silver, and primarily used drybrushing, and highlighting techniques. The paint used is the same as I use when I paint Warhammer miniatures. To do list includes continued weathering, filling the screws that attach the folding stock, glossing the handle and T-bars, fixing the scope ends, and making the front on the Hengstler counter.....looks like I will finish before the weekend...fingers crossed
