gmrhodes13
-
Posts
31,206 -
Joined
-
Last visited
-
Days Won
1,069
Content Type
Profiles
Forums
Gallery
Articles
Everything posted by gmrhodes13
-
Unfortunately not at 15, you have to be 18 to join. There is a group for those under 18 called Galactic Academy http://www.galactic-academy.net/
-

TK-32128 Requesting [ANH Stunt] EIB Status (TM)
gmrhodes13 replied to King's topic in Request Expert Infantry Status
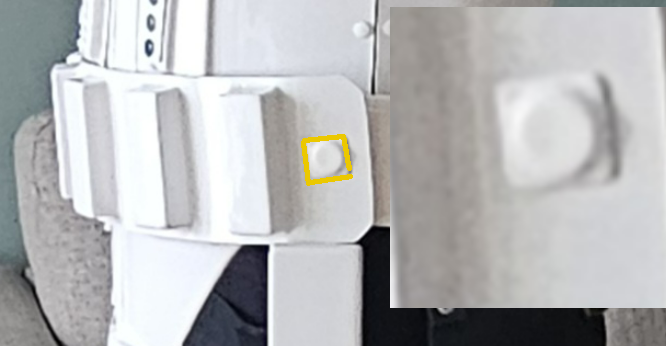
You may want to add some white paint to the rims of the Hovi's Correct Aerators/Hovi-MIX tips are present. Screens used shall be of a wide type mesh, with the rim of the mic and the inside white or painted white. Also remove any paint on the gums Frown is painted gray and does not leave the teeth area. A total of 8 cut outs in the teeth area of the frown are present. Looking forward to seeing your other images Good luck trooper -
Congratulations trooper and welcome to Expert Infantry and the EI Honor Gallery
-
Work on the helmet, which turned into the creation of armor.
gmrhodes13 replied to Uhbif's topic in CPT Enoch Build Threads
Welcome aboard, looking forward to seeing the progress, good luck with the build -
Can take a few days, A.C. @NoVATie is not on the forum everyday, please standby
-
Hello and welcome aboard trooper
-
New member to do capitán enoch
gmrhodes13 replied to Jedioscuro1987's topic in New Member Introductions
All the images need to be posted in the CRL thread (or sent to our DL @themaninthesuitcase), backgrounds are edited and there needs to be a last look over the text. Once that is complete it is sent to the Legion Membership Officer team to decide if the CRL is complete and meets their requirements and ready for inclusion into the legion. More info on the process https://databank.501st.com/databank/Costuming:CRLGuide Notes to Keep in Mind Typically as much time will be spent researching and looking at reference sources as it will take to make / assemble the costume. Ideally, there are clear full body pictures of the front, side, and back. When in doubt, email and ask [email protected], providing all reference for the character in question. Understand that a CRL undergoes many revisions by many people before publishing and that it is possible that there are multiple people working on the same costume at the same time. There are no guidelines on creating a new costume aside from reference material, and a costumer may be asked to change things multiple times. Understand that a CRL is not intended to be a detailed how-to on costume construction; rather it is a visual guide to be used for 501st costume approval. Detailed instructions, designs, and specific measurements are to be recorded within the detachment forum’s WIP documentation. The costume will not be approved in the Membership Database until all of the steps to create the CRL are completed. The wait period from completion of costume to approval can be lengthy. Pictures of the costume being worn, as well as costume parts requested. The first completed costume is not always the CRL model. Sometimes multiple applicants images are used to complete a CRL. Images should be captured against a simple, contrasting background, at high resolution, with good lighting. The Detachment and/or LMO may ask for assistance in writing the text of the CRL, but this is not always the case. Before any CRL goes live, it will be reviewed, edited, and approved by the LMO Team. Once approved, the new costume will be added to the membership database, and the CRL published on the wiki (Databank). -
TK ANH Stunt by CloseTheBlastDoor
gmrhodes13 replied to CloseTheBlastDoor's topic in ANH Build Threads
I have not been successful with PETG as yet, a lot of stringing, they say it takes practice to dial it in but it does my head in constantly testing, will get back to trying again when I have nothing on. -
A lot of WTF builds on the forum which have gone through similar matching issues, here's a few for reference. You will find most use abbreviated armor makers names in the title of the build threads Having a build thread is a great way of showing your progress, asking questions and getting feedback https://www.whitearmor.net/forum/forum/80-anh-build-threads/ Grear thread on return edges/trimming Good luck with the build
-
TK-30874 Requesting [ANH Stunt] EIB Status (AP) 1086
gmrhodes13 replied to 0megaRed's topic in Request Expert Infantry Status
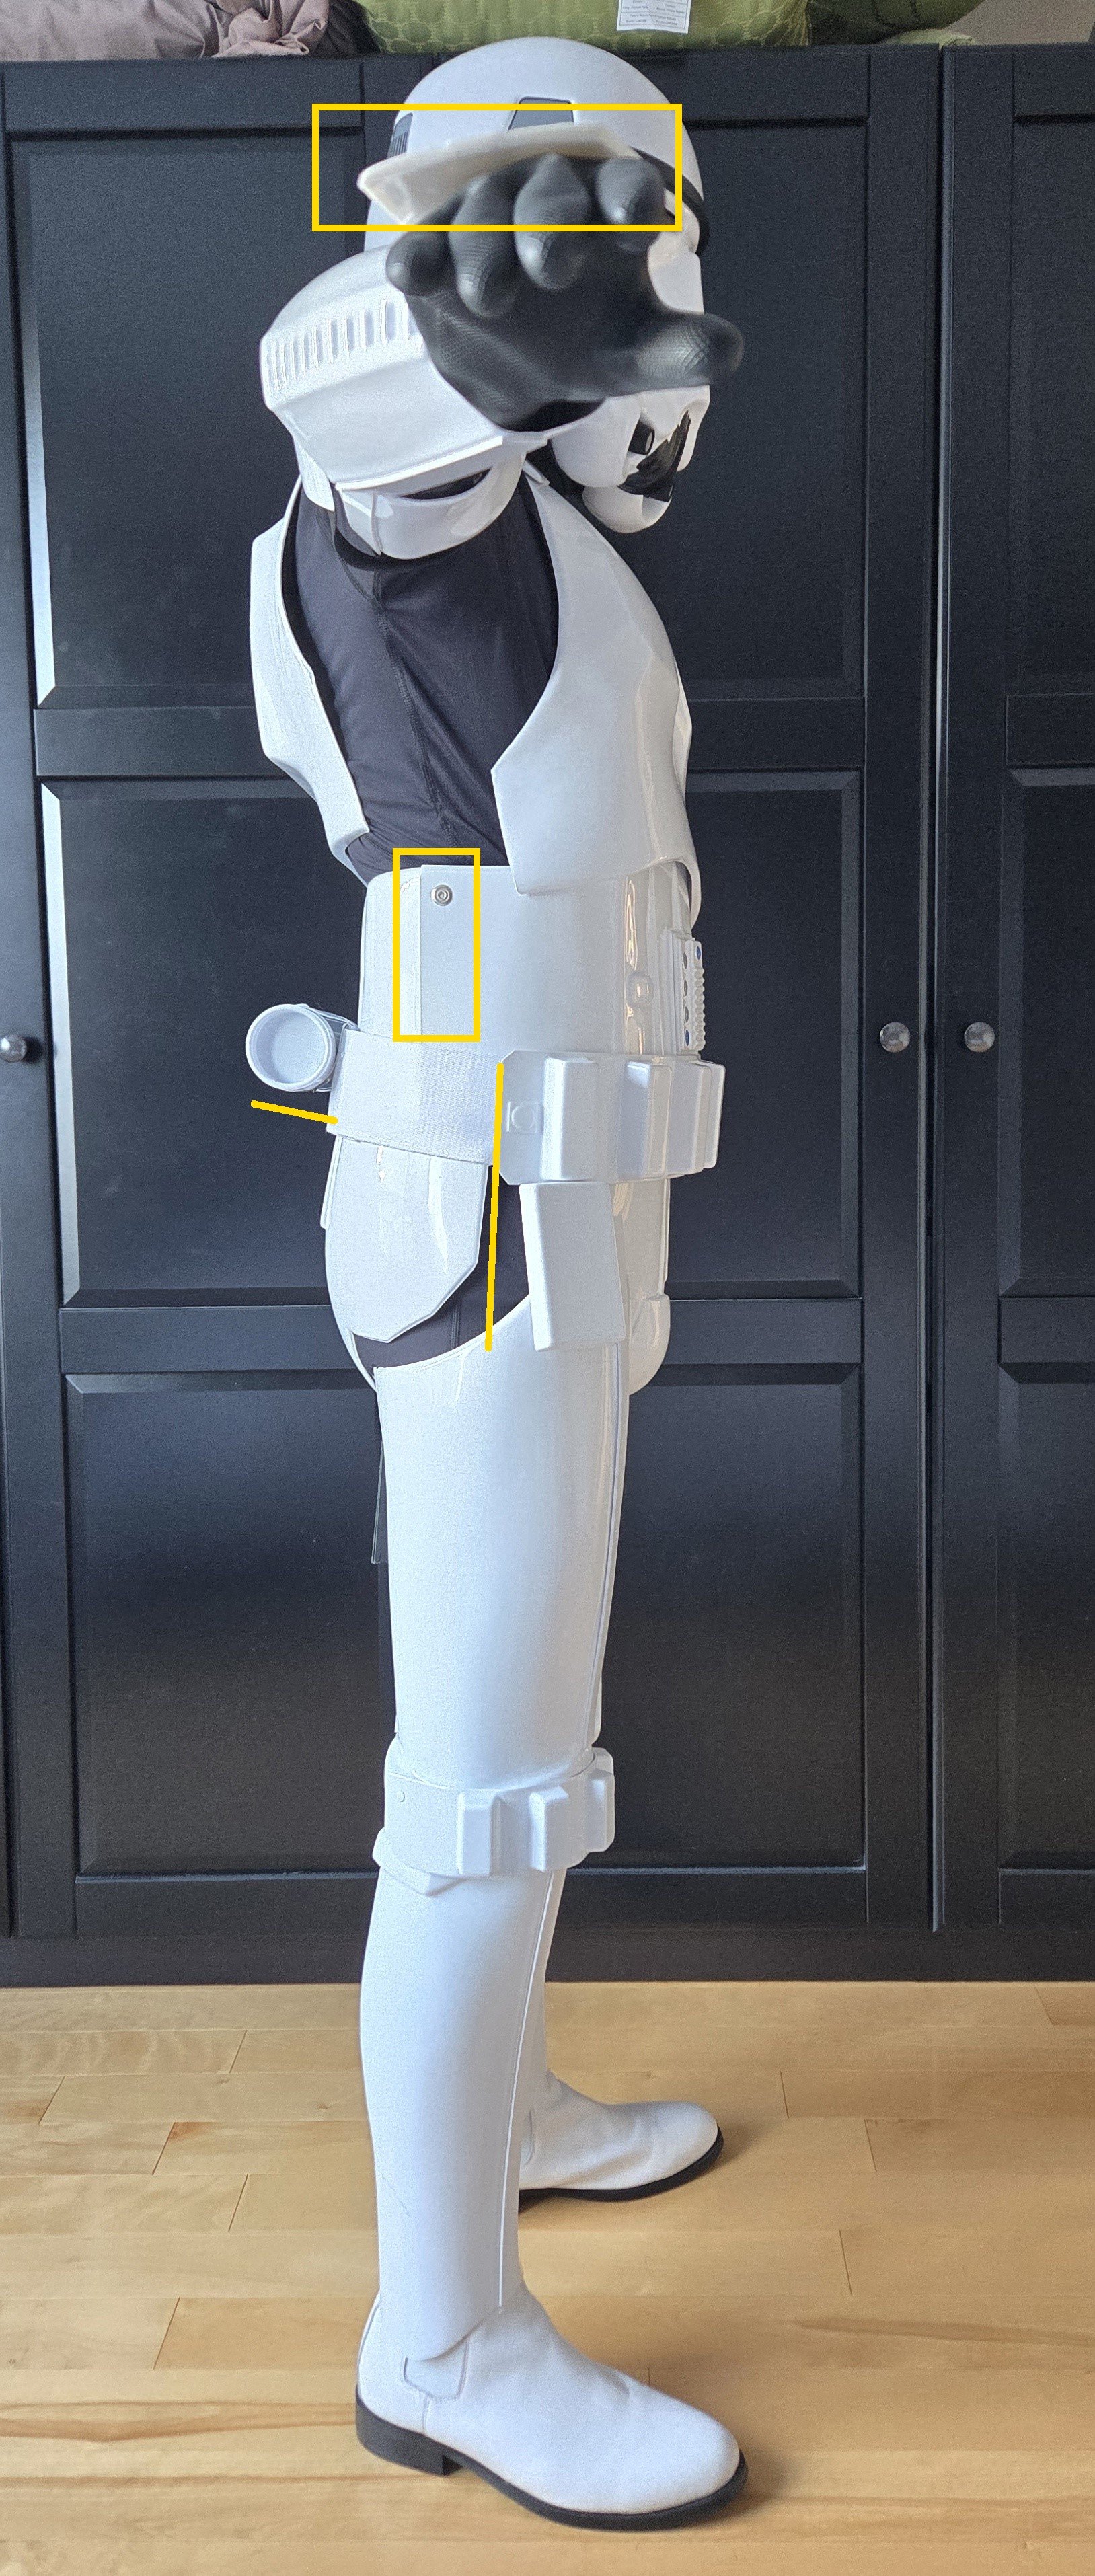
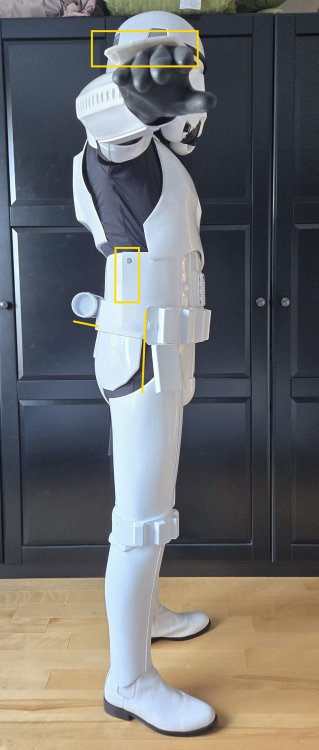
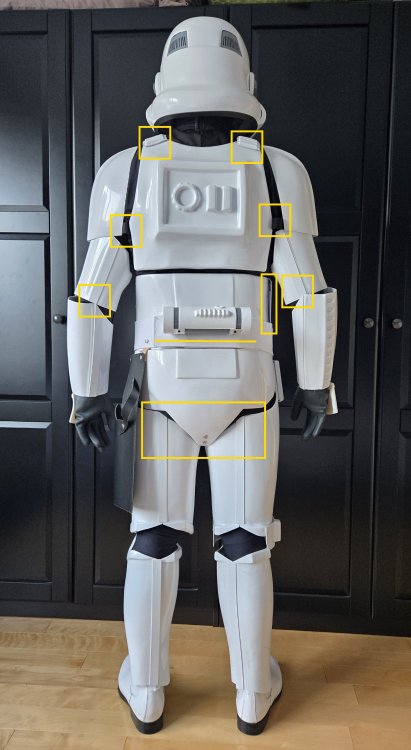
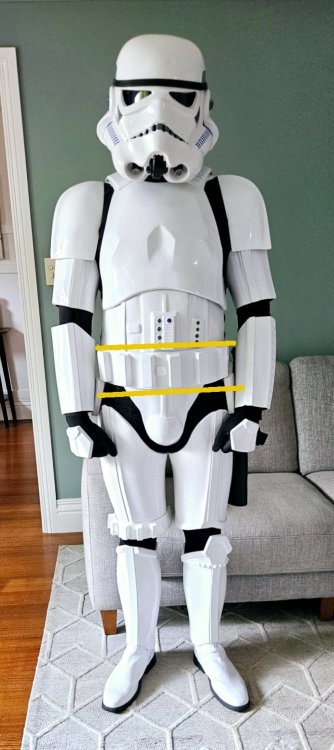
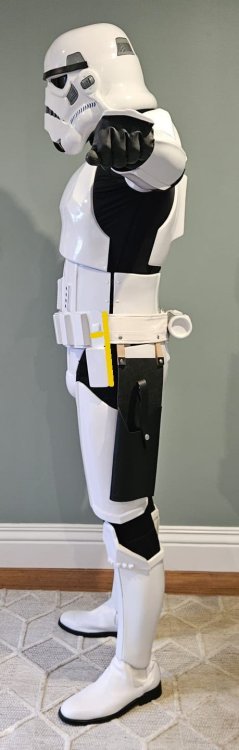
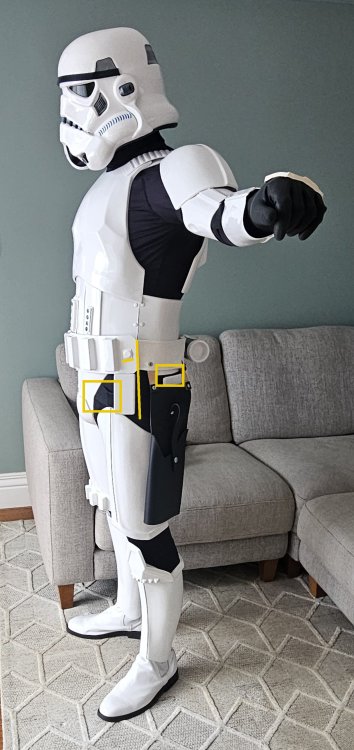
There are a couple of other things you may want to address, note these are suggestions and you are welcome to disregard and wait for the DO's review, but if you have time wouldn't hurt to address some. Your arms are touching in several places, I would try to bring your biceps up (they are quite low), giving you more room at the elbows. Shoulder elastic around bicep looks loose (rear photo) Your shins at not at the same height on the boots, adding some velcro or elastic inside can help keep them down. Belt could come up a bit: The top of the ABS ammo belt should sit at or just above the bottom of the central and vertical abdomen button panels. Your belt is slightly on an angle Trim the sharp corners off the tops of the thigh coverstrips or they will dig in you when moving If your stickers aren't too old you could add some tape, pry them off carefully and replace a pencil width from the cheek Ideally, the tube stripes are positioned approximately a pencil width from the side of the cheek. Ab and kidney look to be overlapping Drop boxes should align with the end of the plastic belt For Level 3, Drop boxes are vertically aligned with the end of the ammo belt with minimal gap between belt and box. Detonator could come down a little Hand plates do not look like they are affixed to the gloves, could be in wrong position Looks like you have velcro under your rear shoulder straps, these should free float. Arms touching Overlap side AB/Kidney Posterior touching thighs Loose shoulder bell elastic Using a contrasting background is best when taking your photos, especially for those like your GWL (garrison web liaison) or FISD honor gallery editor Once again these are suggestions, you are welcome to wait until you hear from the Deployment Team Good luck with your application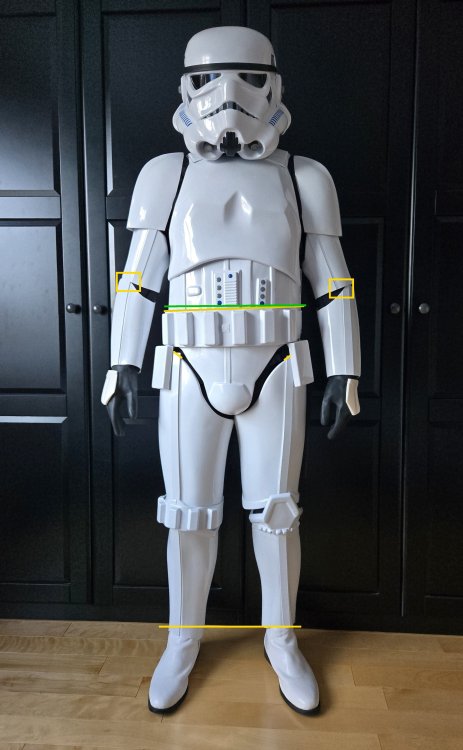
-
TK-30874 Requesting [ANH Stunt] EIB Status (AP) 1086
gmrhodes13 replied to 0megaRed's topic in Request Expert Infantry Status
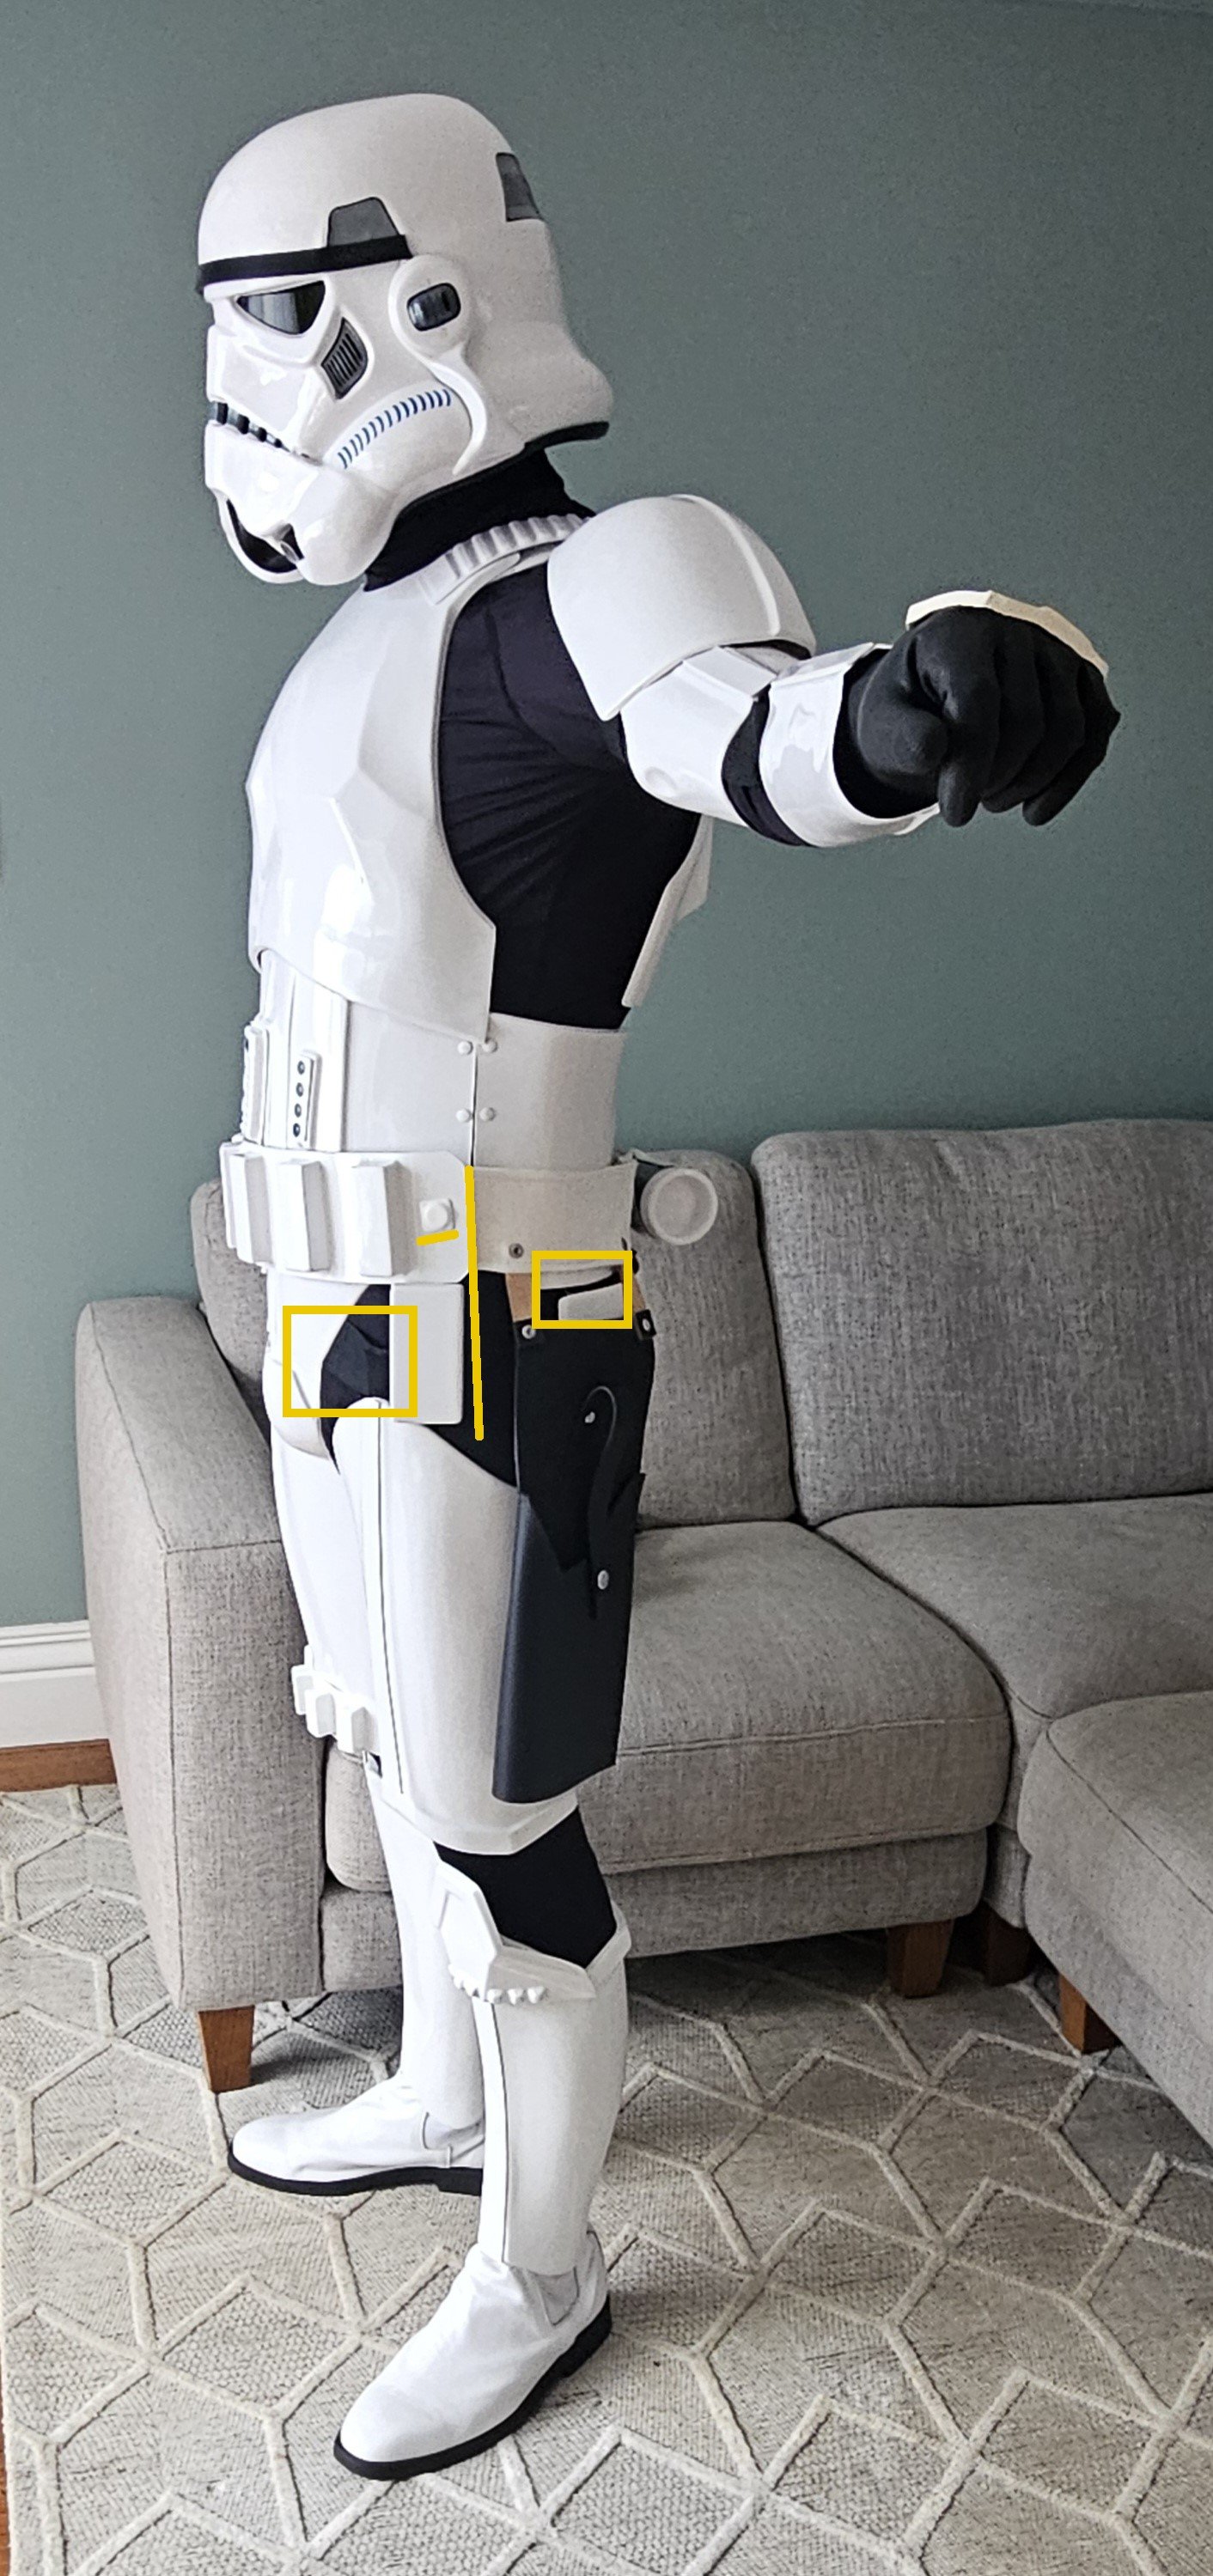
If you have a look at other EIB applications you may notice it has been asked as a L3 Centurion requirement Here's just one Centurion Requirements: A bit of filler in the gaps on the bottom of the thigh joint in the back will need to be applied. This can be done with ABS paste or Sugru. CRL L3: Lower thigh ridge joins (front and rear) shall butt-up flush against each other. Any gaps must be backed with ABS or filled as not to be noticeable. References You should be fine for EIB You may want to just take out the extra material in the corners of your forearms Also add a little white paint to the rim of your hovi's Correct Aerators/Hovi-MIX tips are present. Screens used shall be of a wide type mesh, with the rim of the mic and the inside white or painted white.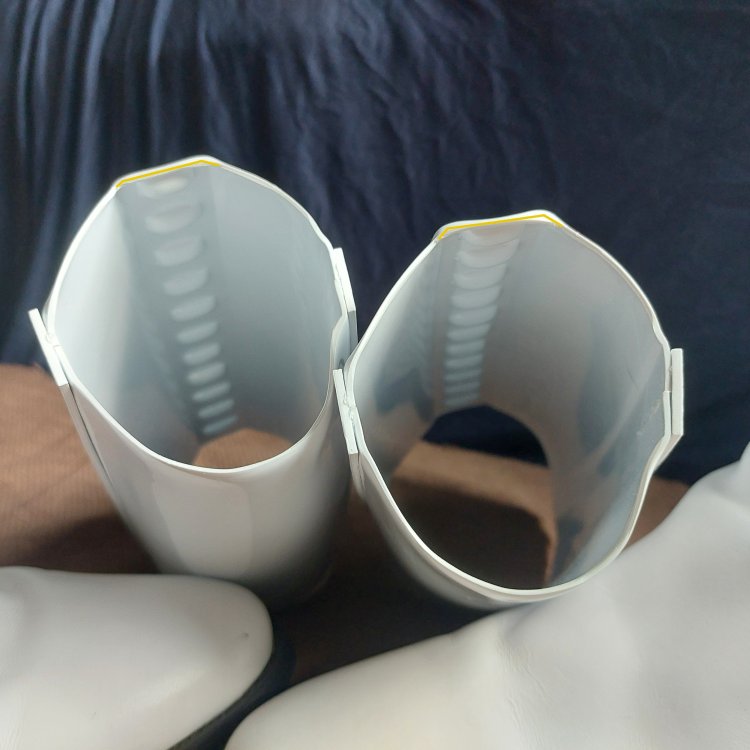
-
New member to do capitán enoch
gmrhodes13 replied to Jedioscuro1987's topic in New Member Introductions
Hello and welcome, if already a 501st member you can request higher access here Draft of the CRL is here The CRL has not been published yet, needs a final go over with the text and waiting on a model and all the photos required for the CRL. You will know when it is published as the detachment and legion post it on facebook, it will also be posted here on the forum in announcements and in the monthly newsletter. -
TK-70384 Requesting ANH STUNT Centurion Status (WTF) 536
gmrhodes13 replied to Slouch's topic in Request Centurion Status
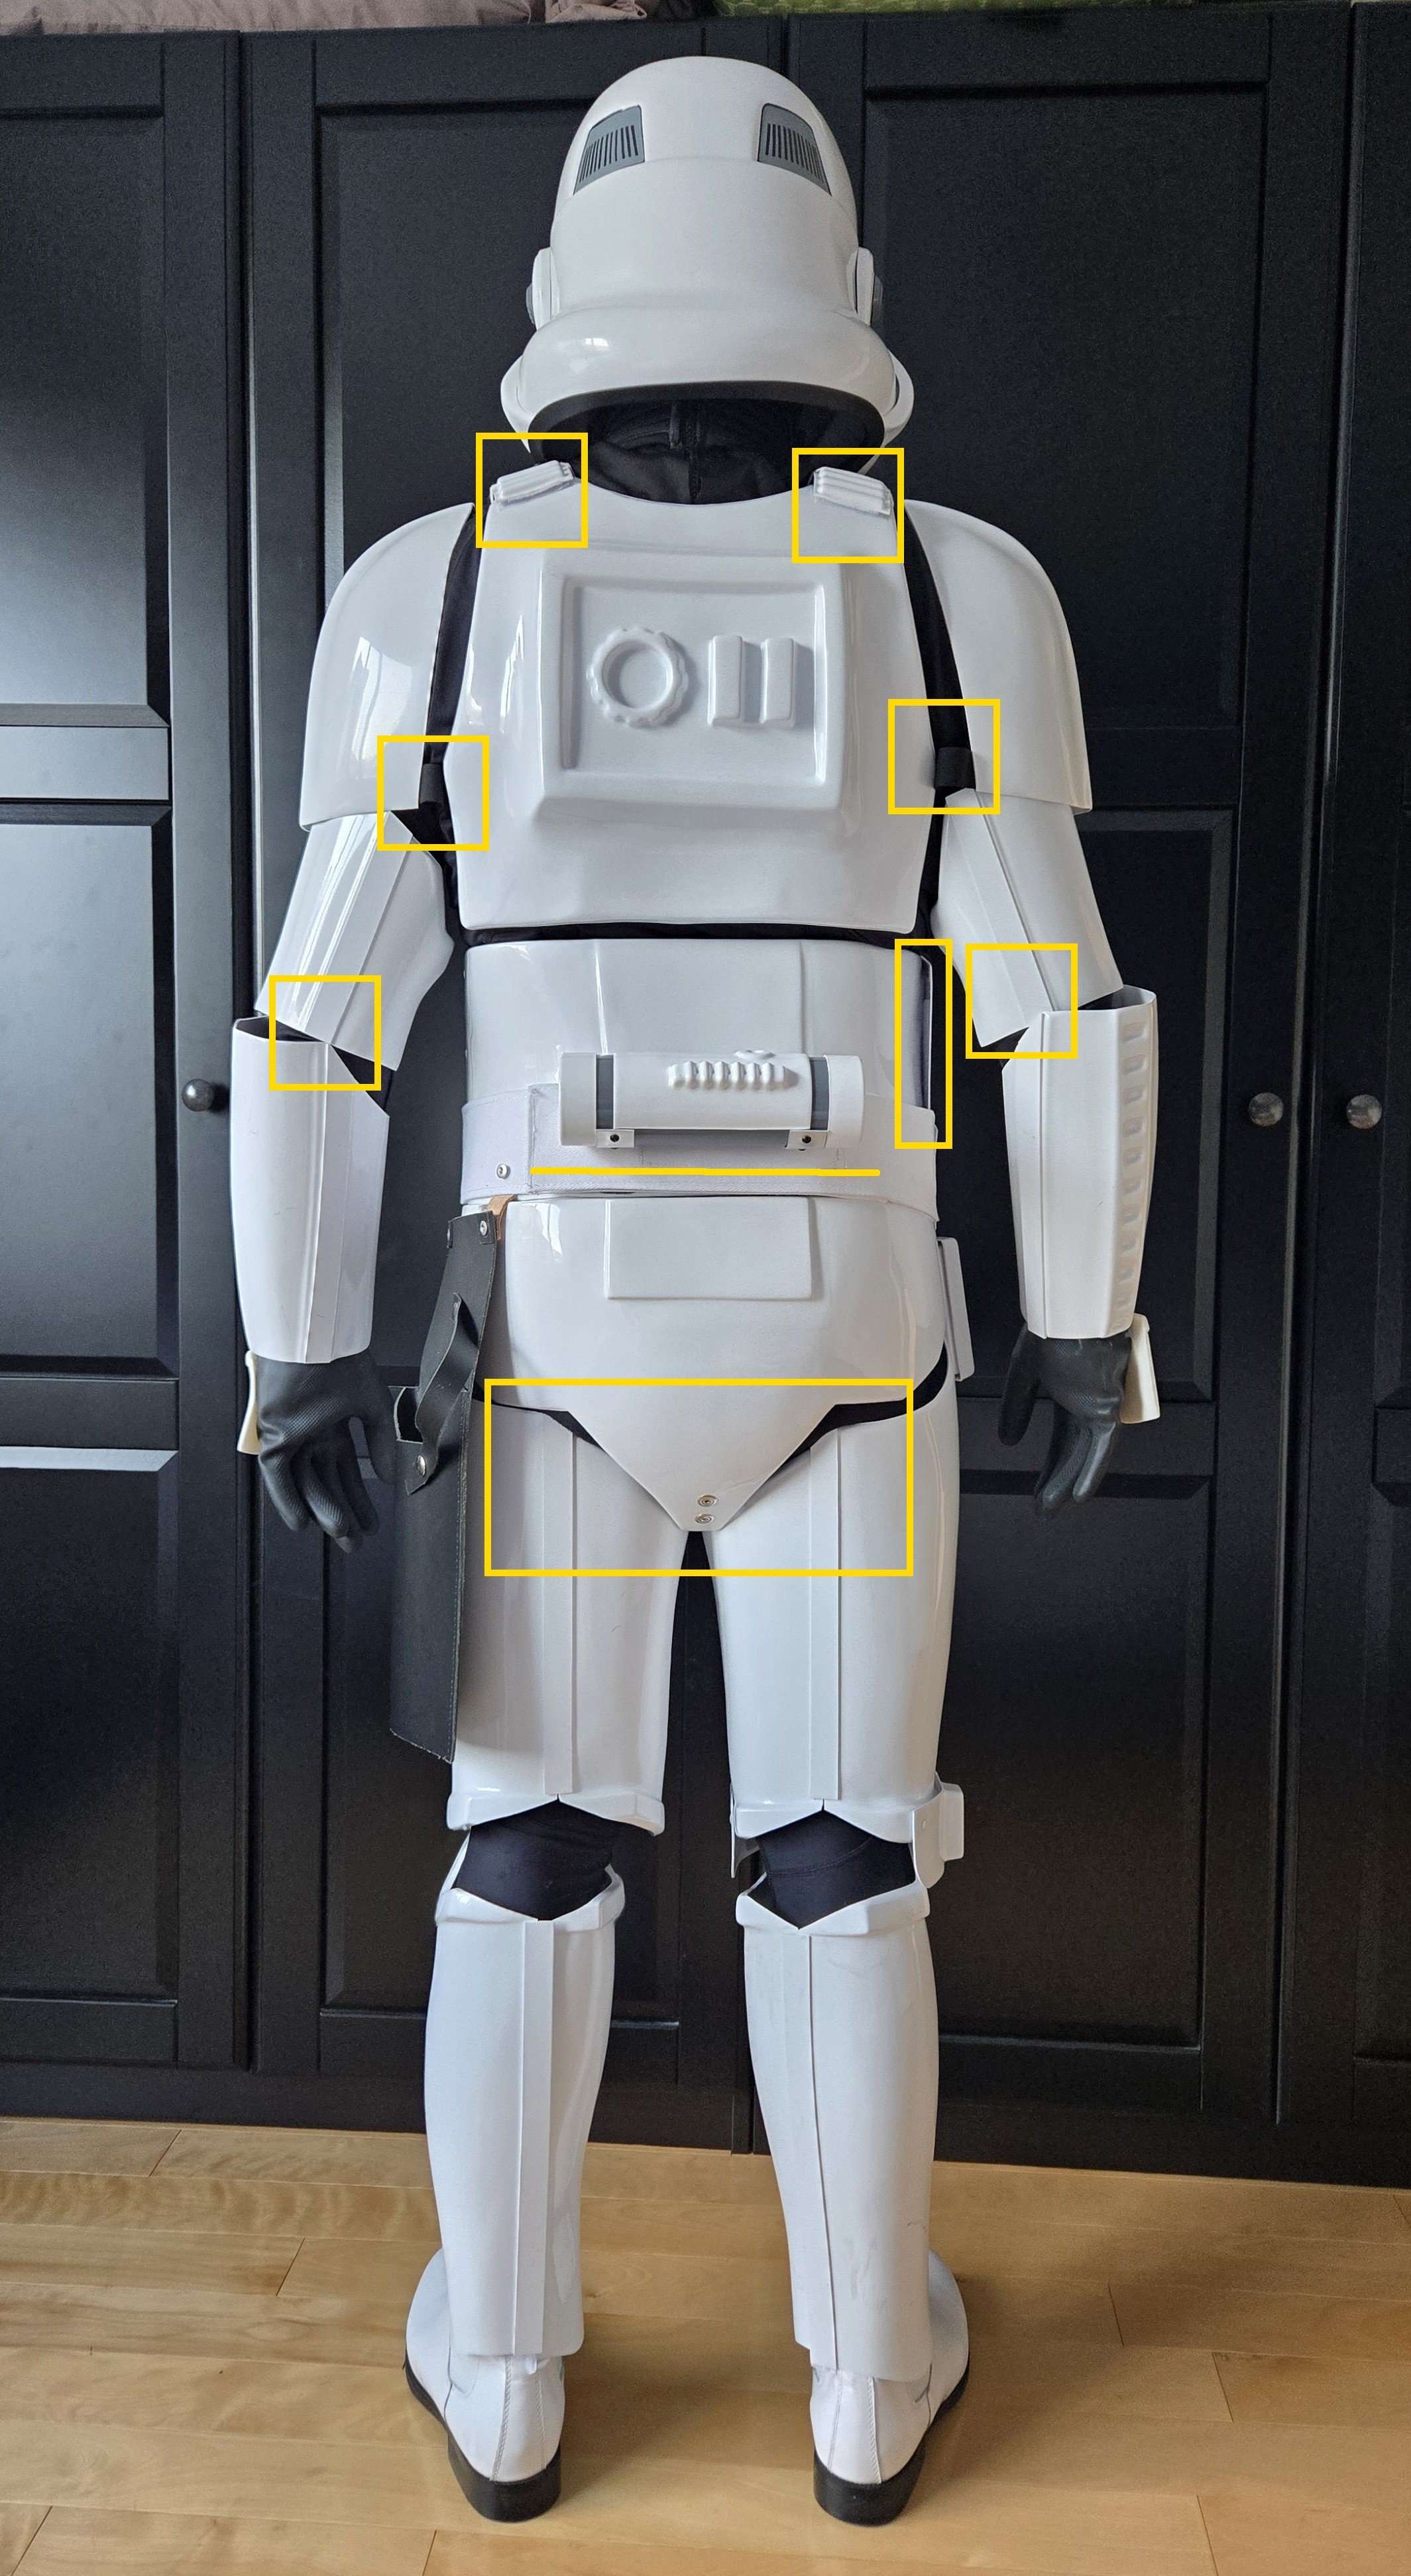
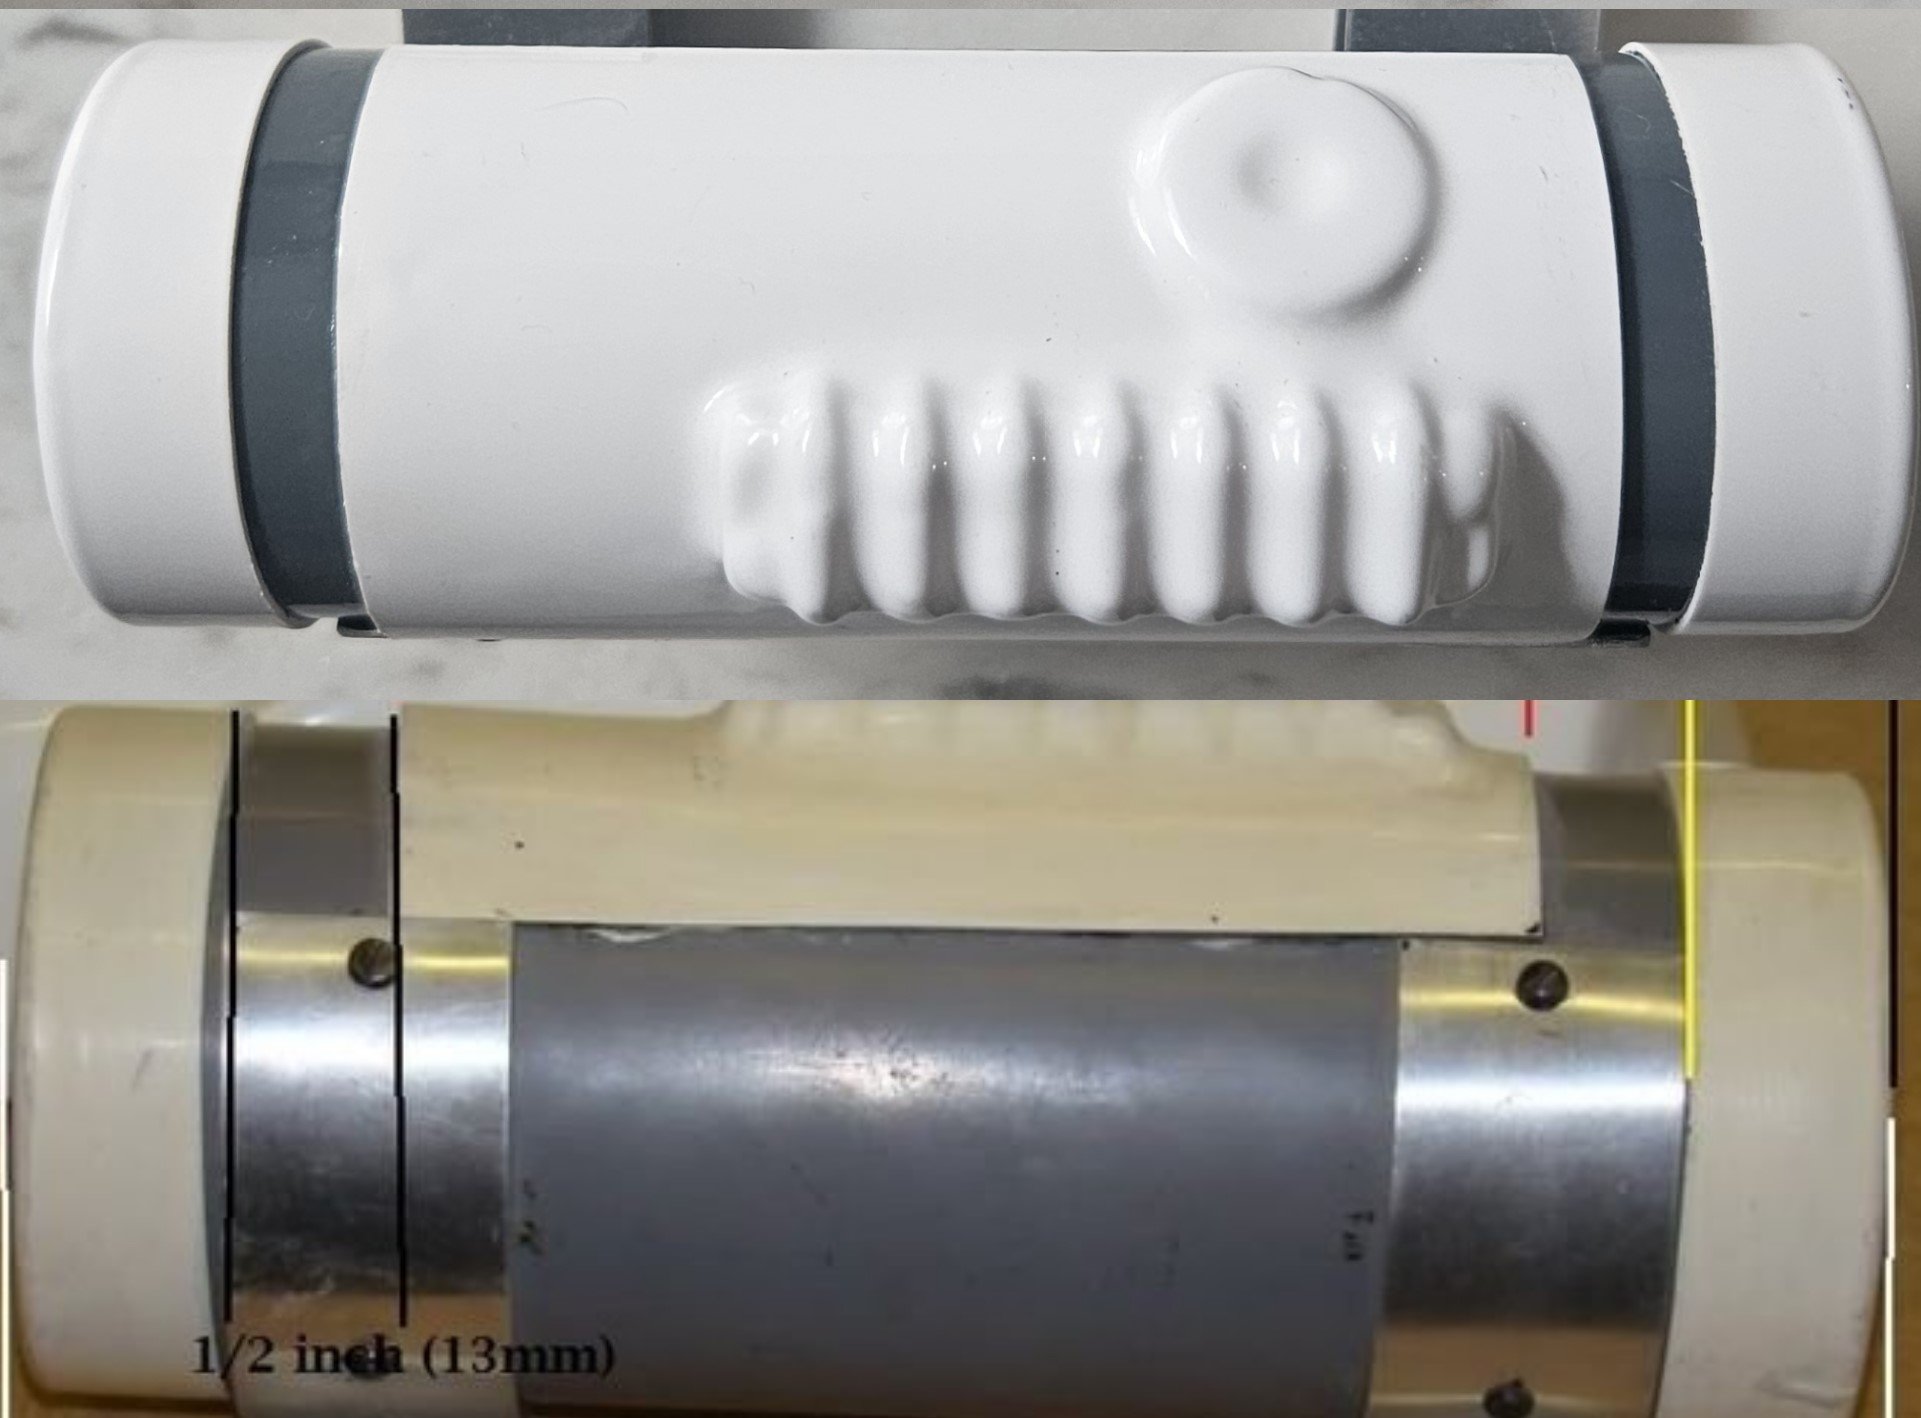
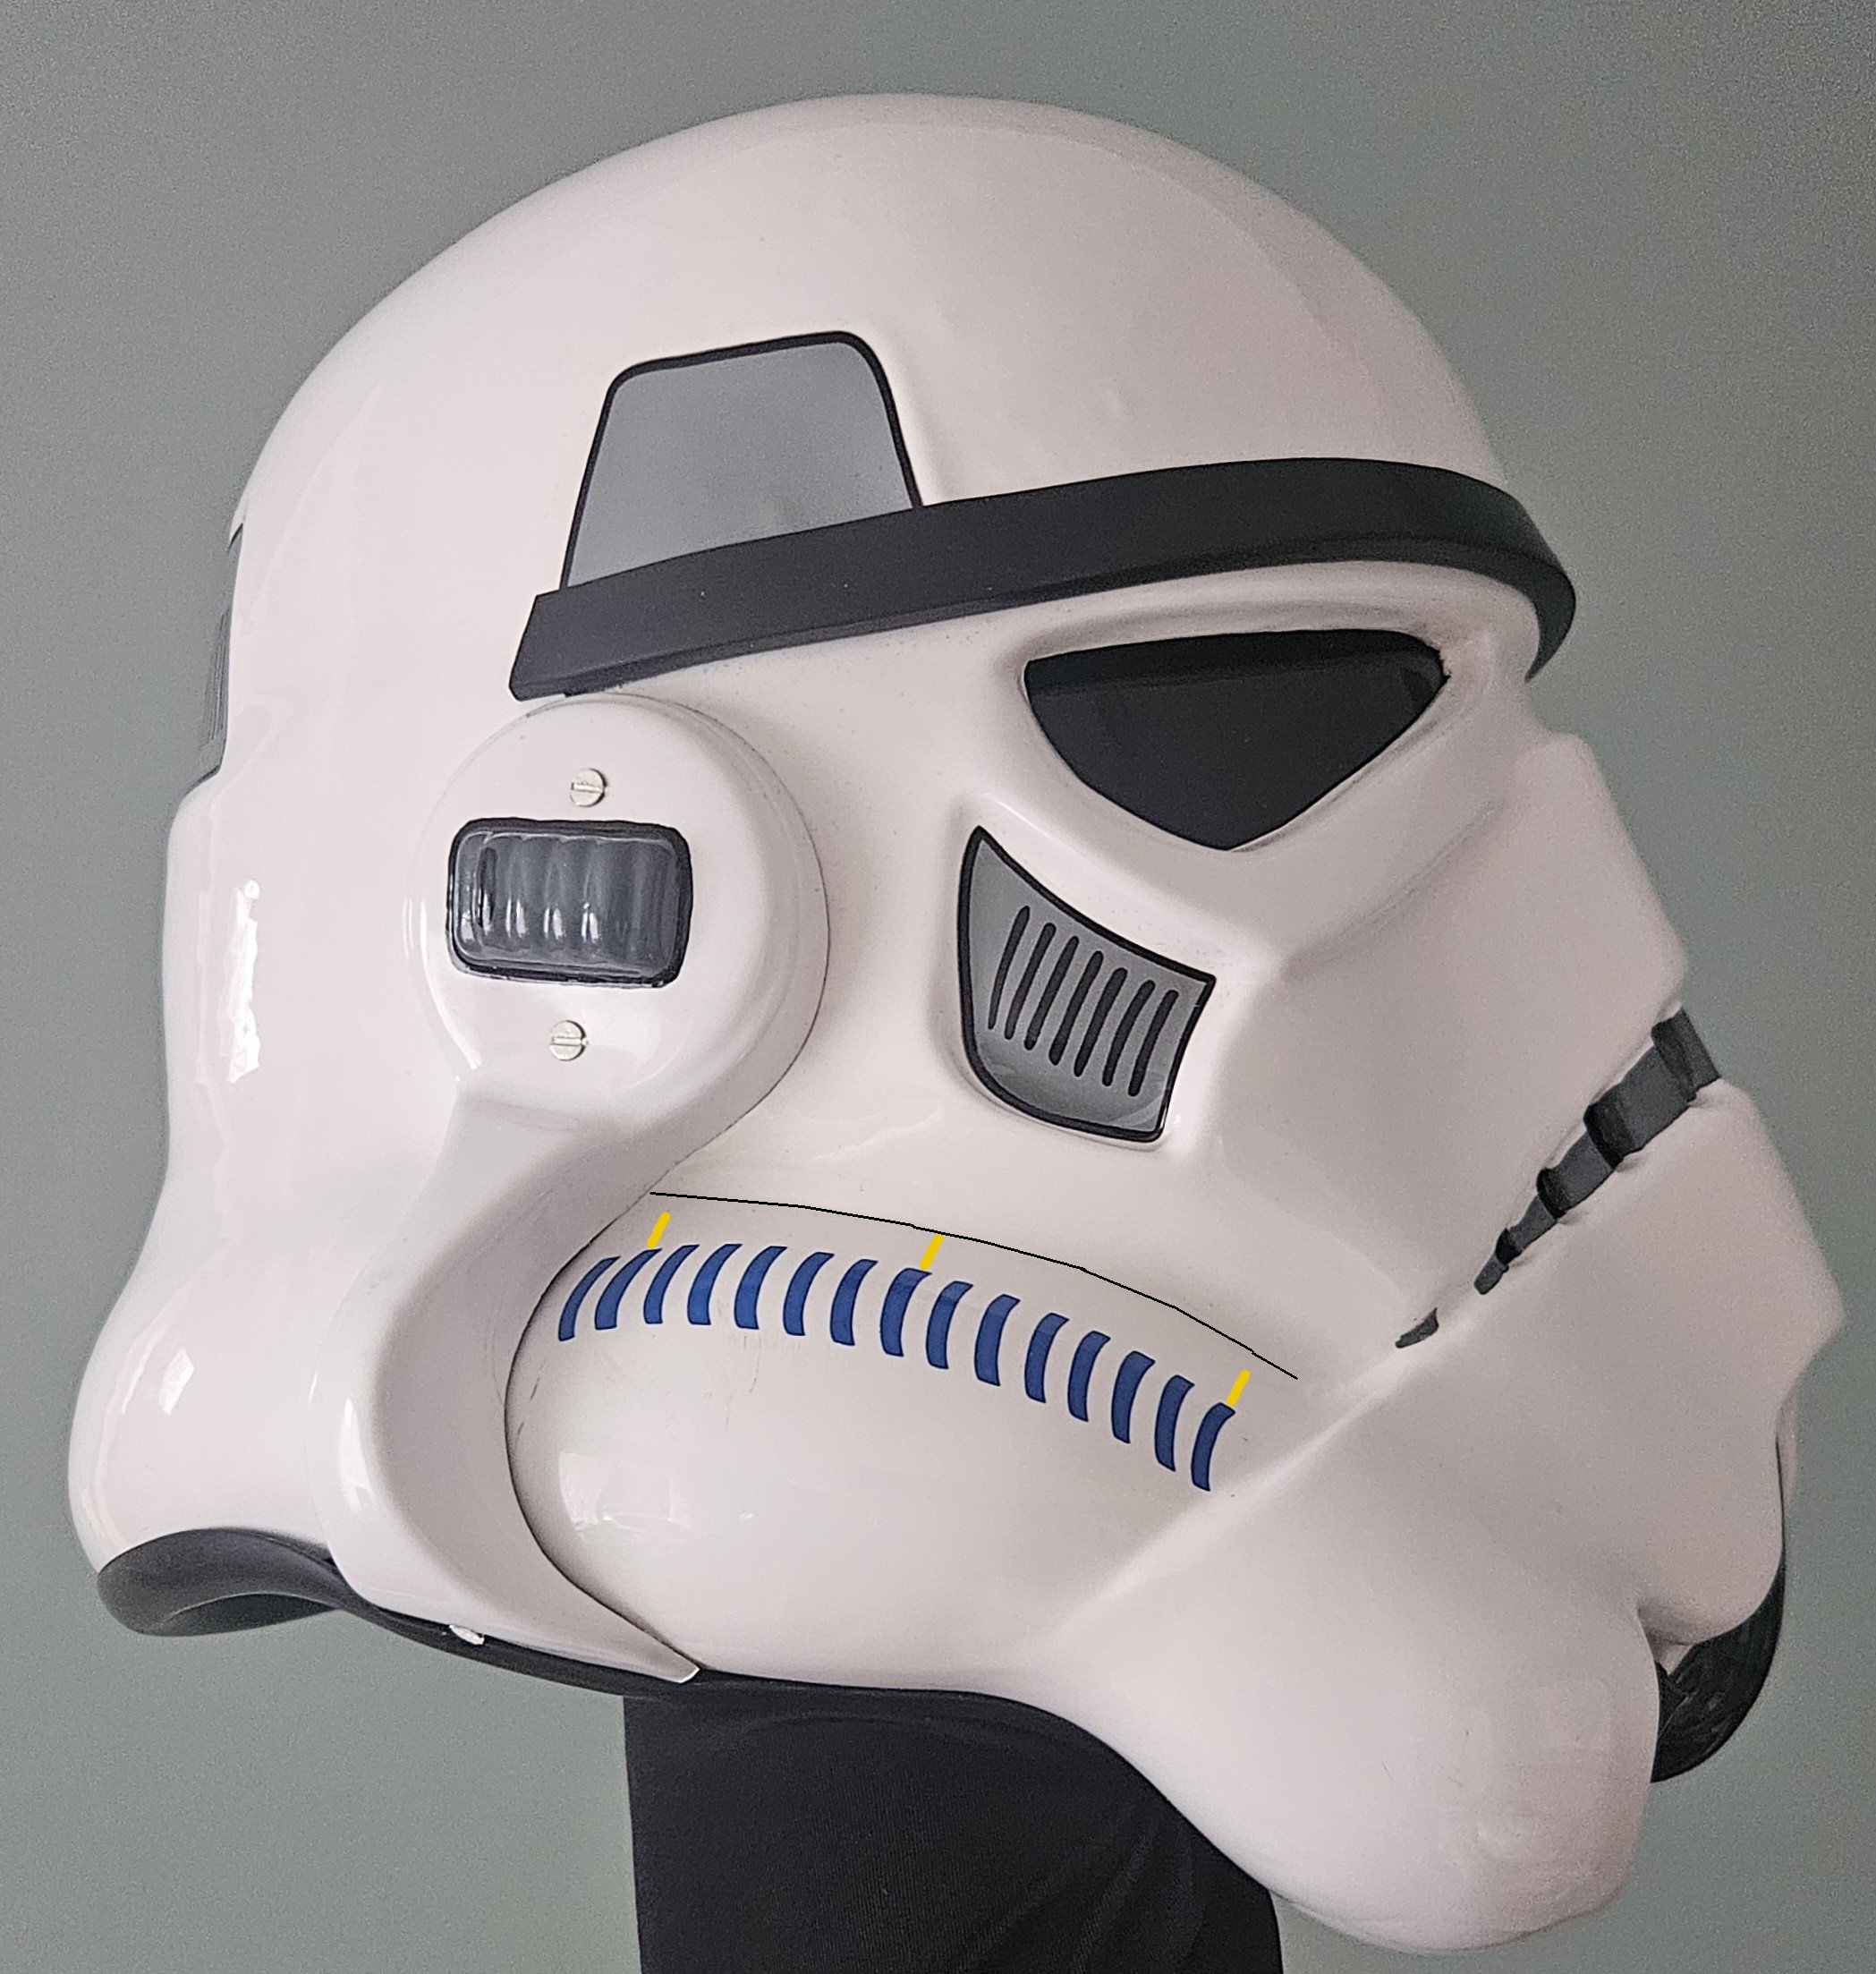
Some nice fixes there, just before the DO's come along there are a couple of things you could address to really make your application stand out, please note these are just suggestions and the DO's may or may not require any of them Belt is sitting on and angle, looks like it was missed in your EIB application, you may need an to straighten Centurion EIB Drop box not quite aligned with the end of the plastic belt, it was actually better in your EIB application. Left side button cover is on an angle. You may also want to add some tighter strapping or some V tabs behind your posterior to kidney, notice it is sticking out on the side. V There is also some belt/elastic showing between the cod and thigh on your left side. Centurion EIB With a heat gun or oven you bend strips of ABS plastic into the shape of a V, only glue one side and the other remains free to allow movement when you bend. Just helps stop the butt plate from pushing back from the back plate. Although size is not mentioned in the CRL your drop box elastic is a little wide Although your TD is a better length the gaps are still a little small between your endcaps and control panel, should be @ 1/2" (13mm) Looks like it's the curve of your tube stripes which doesn't follow the cheek giving the uneven appearance, nice gap in the middle but further on the ends. But by the CRL these are: Ideally, the tube stripes are positioned approximately a pencil width from the side of the cheek not must be You could remove the bump int he brow trim Could be lighting or a different angle but some 3D print lines can be seen, Hengstler stand out the most Once again these are just suggestions, the DO's may or may not require any of these changes. Good luck with approval


.jpg.dc525fd0e8b7192699b2c8cf6c1aadff.jpg)

-
TK ANH Stunt by CloseTheBlastDoor
gmrhodes13 replied to CloseTheBlastDoor's topic in ANH Build Threads
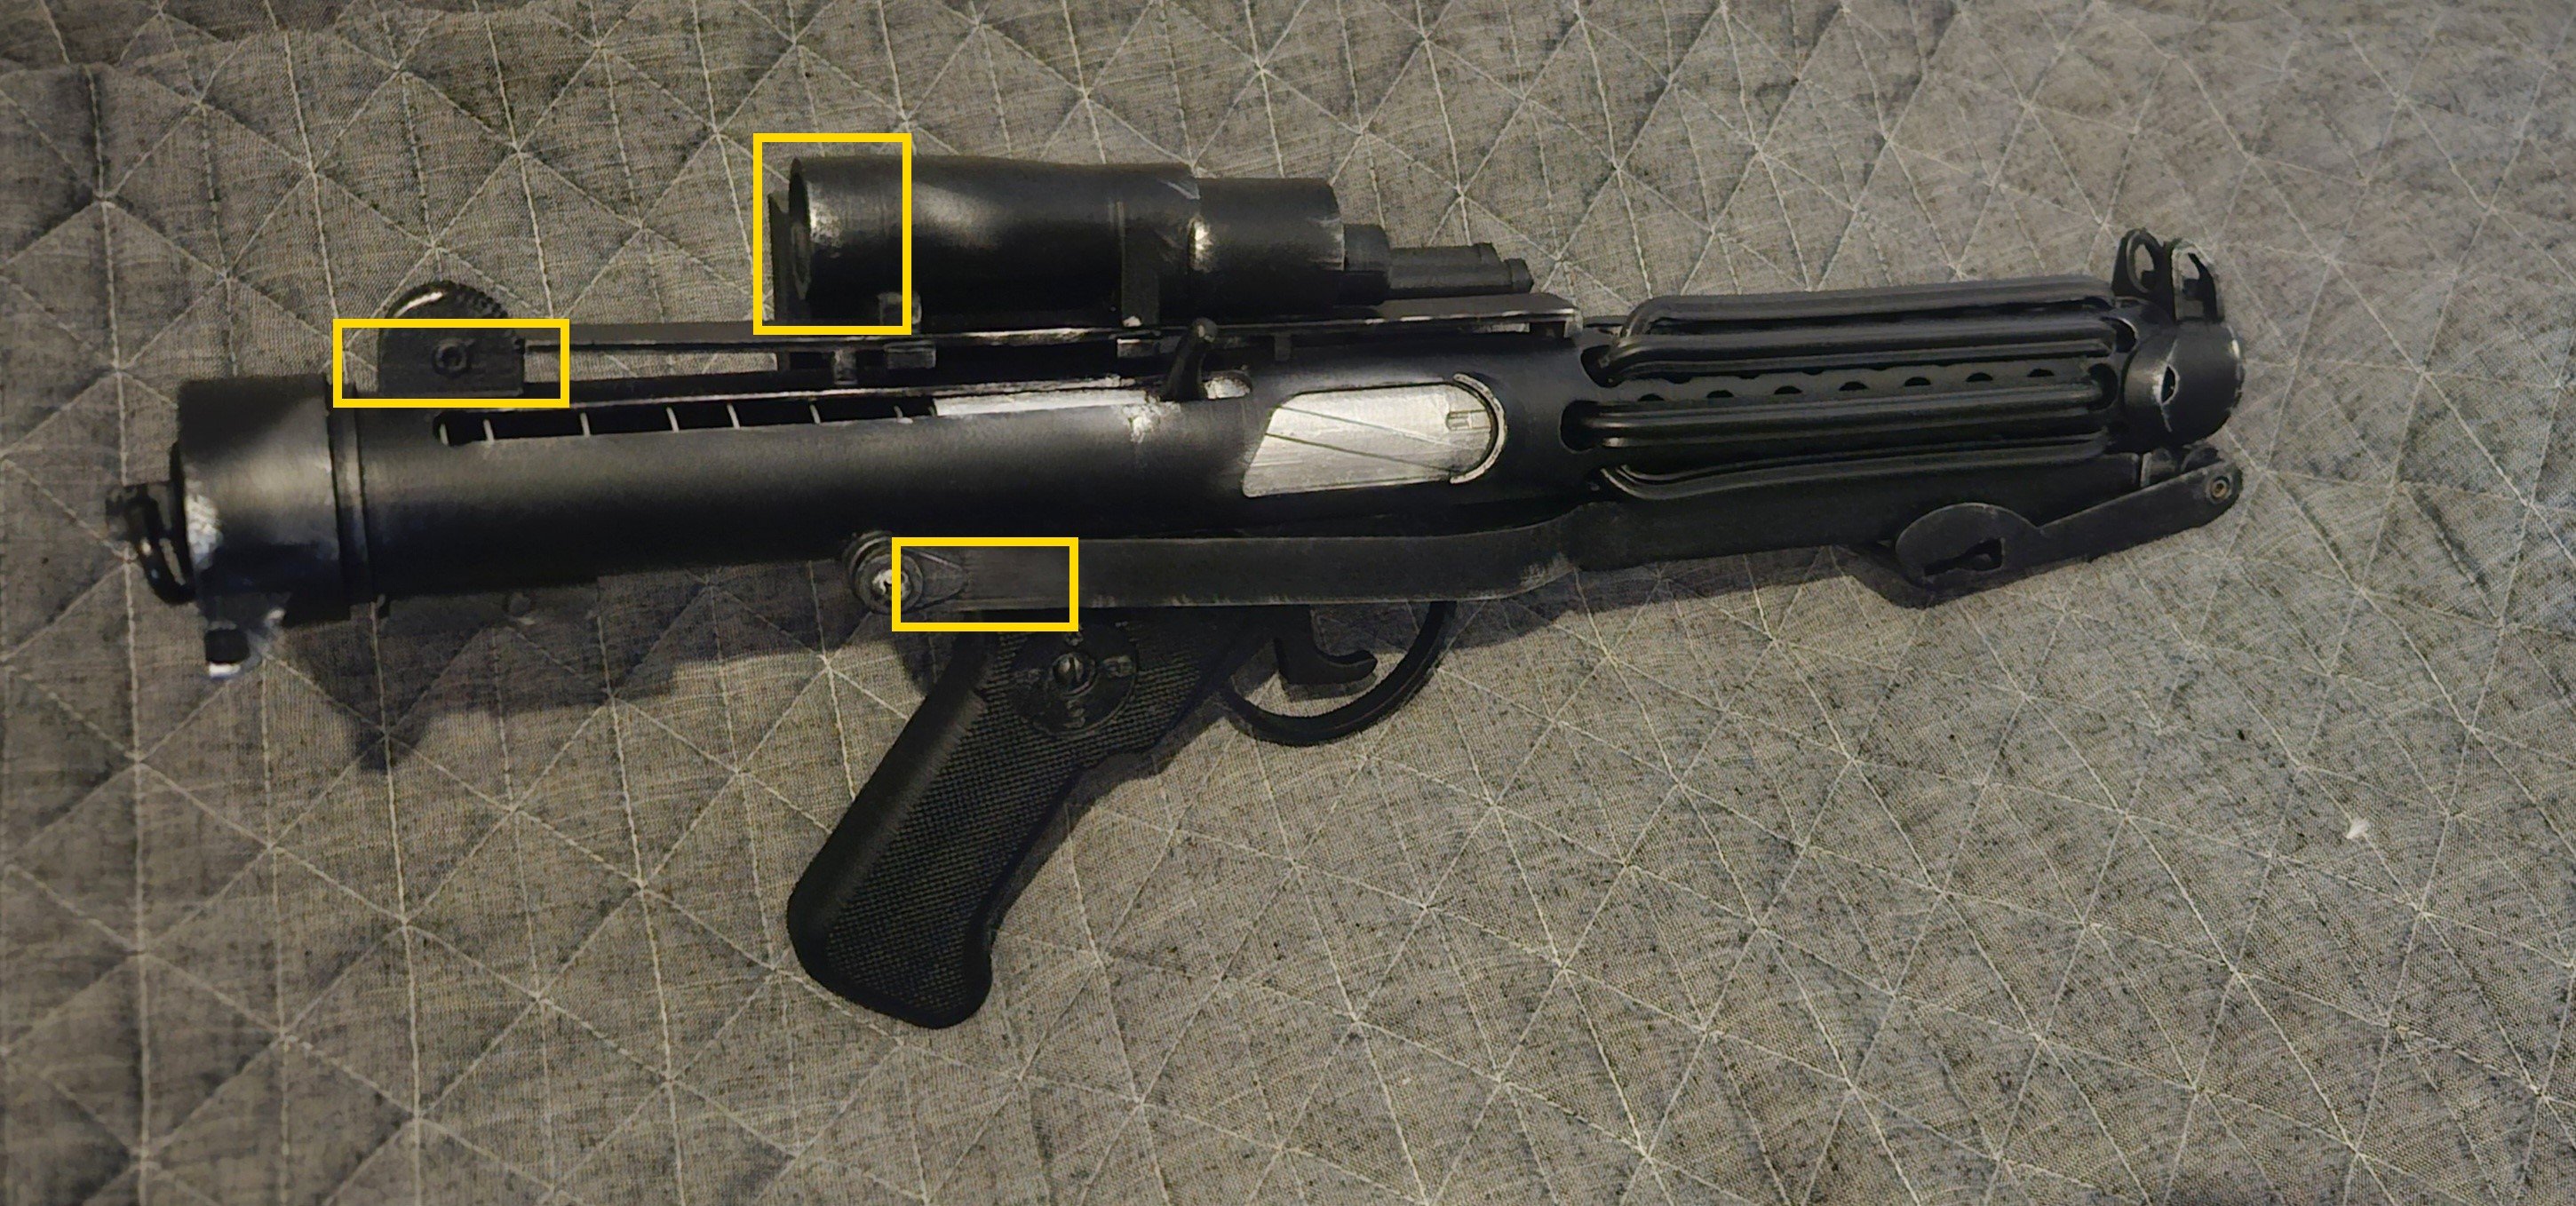
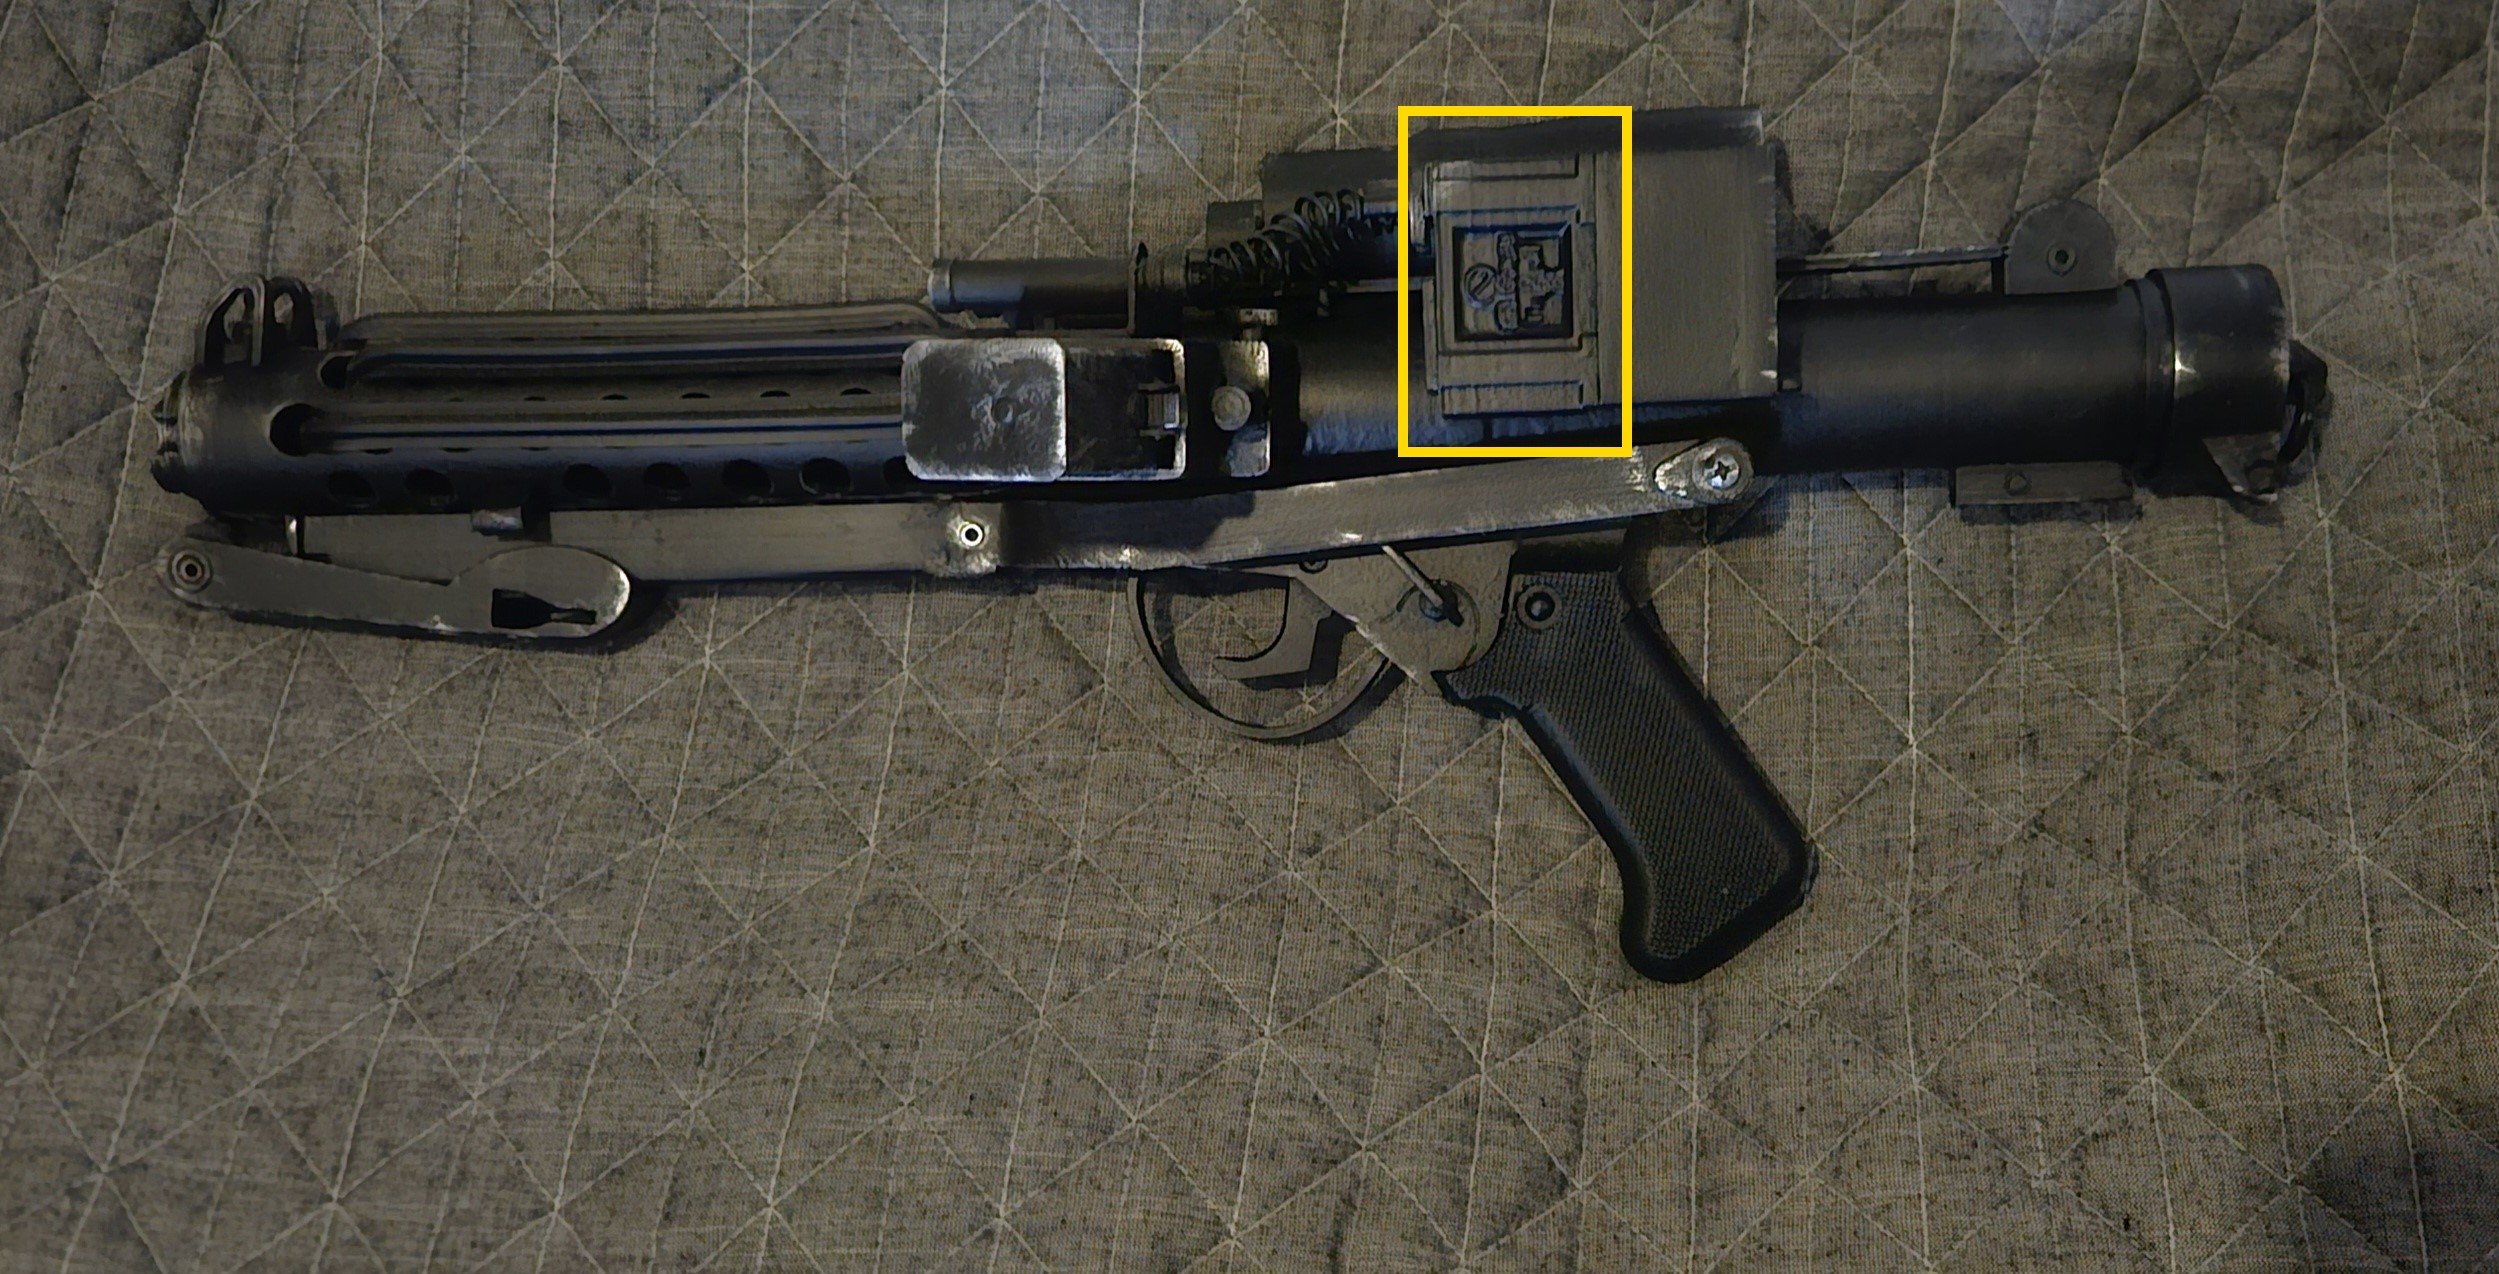
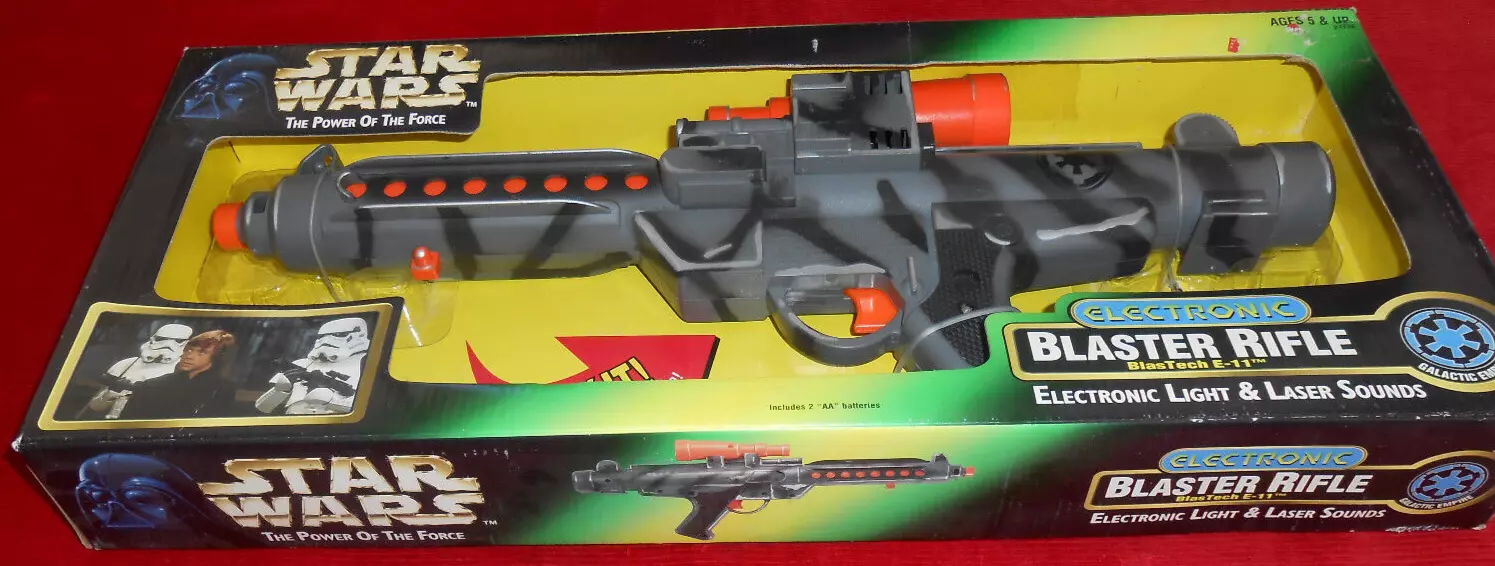
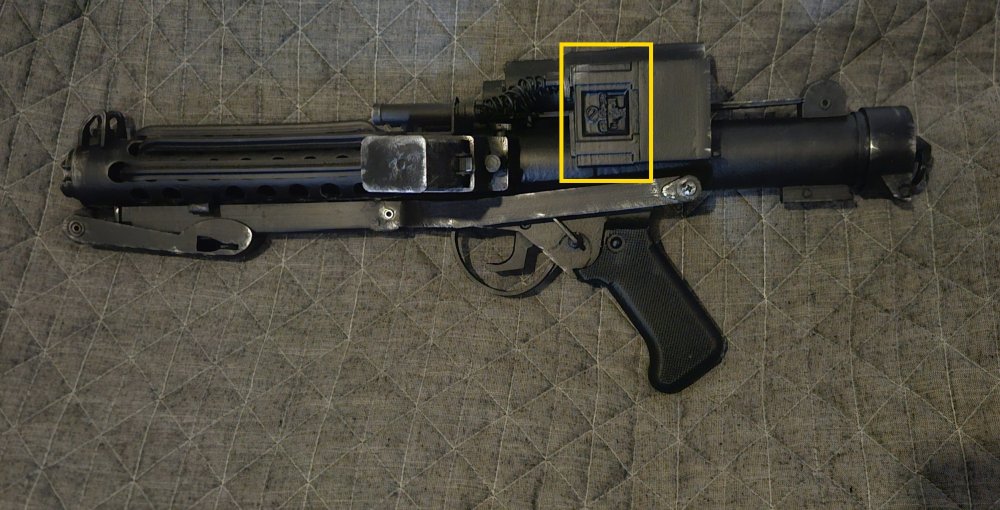
What you have now is a base model Hasbro/Kenner E-11, should meet base approval (depending on your GML). Doopy Doo's used to make an add on kit to make it a little more accurate BUT would only clear for base and EIB levels (depending on your GML of course). Lots of different color/versions, the last of the Disney Parks E-11's had a selector switch to go from kill to stun (different lights and sounds). Majority of E-11 builds back then (13 years ago) were Hasbro or pipe builds, no 3D printers back then (ok there were but around @$2,500 and upwards There also used to be a few others supplying resin kits back around then but unfortunately all gone now. I used to cut off the front of the barrel, fabricate an accurate one with T-tracks so it was at least the right size and LED's could be seen through it. My build thread is here (pre 3D file era) And then I had to build another E-11 for centurion standards, this was a pipe build with Doopy Doo's add on's (they also did a full resin kit) and some hand made pieces. Build here I did find some 3D files to add a little more detail to the blaster which I posted here: There are some really great Hasbro upgrade/conversion build threads on the forum and worth having a dig through some of them, was always amazing to see how so many builds were a little different from others and quirky additions some people added You will have no issues using Bryan's files for EIB or Centurion, he put countless hours into those files and a lot of detail work, even a working trigger for electronics. Biggest thing is not to leave any print lines, prep work is definitely the key to any printed prop, hurts my brain every time I see printed props with no sanding or filling, hey but that's just me. Bryan has some images in this thread Zeroroom (who I never got to meet as he retired) came up with some great templates for a scratch build E-11, I'll have to remember to upgrade his watermarked images, stupid Photobucket
.jpg.ae52cd4fed6d0ff677ff7b99f9f9534f.jpg)
-
Hi there, we don't have armorer's as such, we have attaché's, as well as experienced troopers who frequent the forums who will chime in on your build, you are welcome to post a build thread (in the appropriate build area) or if finished post in our pre approval area. Costume approval is carried out by GML's (garrison membership liaisons) the detachment only looks after level 2 and level 3 applications. Look forward to seeing your build
-
Good luck with the build
-
Top right corner of this forum, click the message tab, then left side compose new, in the TO line enter sskunky, it will then show his profile link and click and enter.
-
Where, What and Whom To Avoid When Buying
gmrhodes13 replied to RogueTrooper's topic in Getting Started - Read this First!
Firstly FX is no longer approvable, we have come a long way with costumes over the last 15 years as far as screen accuracy, Jedi Robe is very inaccurate compared to other makers on our vetted sellers list, Jedi Robe is also a known recaster. Yes people can make up their own minds, if you are happy with what you purchased great, we just supply information for people to read and decide, we do not promote. -
TK ANH Stunt by CloseTheBlastDoor
gmrhodes13 replied to CloseTheBlastDoor's topic in ANH Build Threads
Most go for Keep Trooping these days, we used to have several suppliers some years ago but allas no longer. Note those boots you have will pass for ROTK and FOTK You could even place a wanted or swap sales post, may be worth a try https://www.whitearmor.net/forum/forum/11-for-saletrade-personal-items-only/ Issue with these boots are the height and elastic shown on the sides, you may be able to find some Chelsea boots similar but normally they are black or brown and needed to be stripped, then coated in vinyl paint. Unfortunately shipping is how it is these days, think of us Downunder, we get hit every which way (well when the postie's aren't off playing and get back to delivering)
-
TK ANH Stunt by CloseTheBlastDoor
gmrhodes13 replied to CloseTheBlastDoor's topic in ANH Build Threads
References: -
TK ANH Stunt by CloseTheBlastDoor
gmrhodes13 replied to CloseTheBlastDoor's topic in ANH Build Threads
Should be fine, try to make sure the rear sits down on your backplate and you will be ok -
TK ANH Stunt by CloseTheBlastDoor
gmrhodes13 replied to CloseTheBlastDoor's topic in ANH Build Threads
Dependant on the make or armor and length of the shoulder straps, ideally there should be 1 large tab and 4 to 41/2 small tabs on the front of the chest to match screen references, it's not a requirement and won't stop higher level approvals though And no large tab on the back, some trim the large tab in half "NOTE: As seen in the photos below, there are no large tabs on the rear of the shoulder bridges. This is not specifically mentioned in the CRL, but removing them is highly recommended if possible." -
Specs on the costume here: https://databank.501st.com/databank/Costuming:TK_shocktrooper Gallery here: https://www.whitearmor.net/forum/gallery/album/101-shocktrooper/ Build area here: https://www.whitearmor.net/forum/forum/184-battlefront-dice-shocktrooper/ Hot Toys Shock Trooper images here: https://www.sideshow.com/collectibles/star-wars-shock-trooper-hot-toys-902649
-
Looking forward to seeing your progress, good luck with the build
-
Your left shoulder looks a little wider than the right. Personally I would trim the left first then compare again, you don't want too much of a gap between the shoulders and the chest/back. References Note very little black showing between