pandatrooper
-
Posts
2,730 -
Joined
-
Last visited
-
Days Won
1
Content Type
Profiles
Forums
Gallery
Articles
Everything posted by pandatrooper
-

Coming Soon: Another ATA build[*ATA]
pandatrooper replied to Darksaber's topic in Build Threads Requireing Maintenance
Here's a how I reinforced my aerator sockets http://forum.whitearmor.net/index.php?showtopic=8686 -
Something I usually do is just bring a plastic shopping bag along, and when you're done stuff your undersuit into the bag for washing, and seal it shut for the ride home, etc.. That way, your armor doesn't get smelly and you can wash the undersuit when you get home. And I don't want to see pics. Bleh!
-
Where to get a E-11 conversion kit?
pandatrooper replied to TomBangkok's topic in General Weapons Discussion
I purchased some parts from them off Ebay and they didn't ship them until 10 days later. It will probably be another 2-3 weeks before I see the parts. Decent accessories, just rather slow on processing orders and shipping. -
The link is here. http://forum.whitearmor.net/index.php?showtopic=8783 For the D ring, I simply took some aluminum wire and bent it to shape. It's just a simple oval, so you can pretty much use any thick wire to mimic the look. It's not like you're going to hang a sling on it anyways.
-
Yikes. I'd suggest washing that underarmor in hot water, to try an kill off any bacteria. Not sure if your armor is painted or not, but using a disinfectant would help. Hose off any mildew first, then if you don't want to use chemicals (bleach, cleaners, even shower / bathroom cleaner comes to mind, etc..) use a mixture of 50% vinegar and 50% water. Scrub the armor with the mixture with a sponge, then rinse thoroughly and dry it. I know this might sound weird but vinegar is a natural disinfectant / bacteria killer. You can use it in smelly shoes, etc and it will kill the bacteria. If you rinse it thoroughly, the vinegar smell will dissipate after a while. Sounds like you'll need to repaint that blaster.
-
He's doing a run as we speak: -----------
-
Decals: How do they did?
pandatrooper replied to Verne's topic in Build Threads Requireing Maintenance
Not sure if you're asking for confirmation that they're decals? If so, I believe the original ROTJ helmets were decals http://www.starwarshelmets.com/Original-RO...mor-helmets.htm TK-4510 makes replacement decals that match the original screen look if you're looking to buy some http://members.cox.net/appstronaut/ROTJ_helmet_decals.html -
There's other complete helmets (like SDS) http://www.sdsprops.com/s001-intro.html But of course they come with a high cost. The MRCE is probably the most reasonable in terms of price, but requires mods for 501st use, but you probably already know that. AP helmets do not come assembled, they're kits. Sure, you could pay someone to assemble it, but there's also a lot you'd learn if you assembled it yourself. Even if you get an armor kit, you're going to have to build it and rig it up anyways, so there's always something to build by hand. I would suggest starting small. If you do intend to build armor, start with trimming and Dremeling everything to get used to what you need to do. Then when it's time for assembling something, start with a bicep. It's the easiest piece and really simple. Start there and then move onto other pieces. Before long, you'll have your own setup and be proud to know you "did it yourself".
-
Pauldrons for $25 - and they look great!
pandatrooper replied to Daetrin's topic in Boots, Soft Parts, and other Accessories
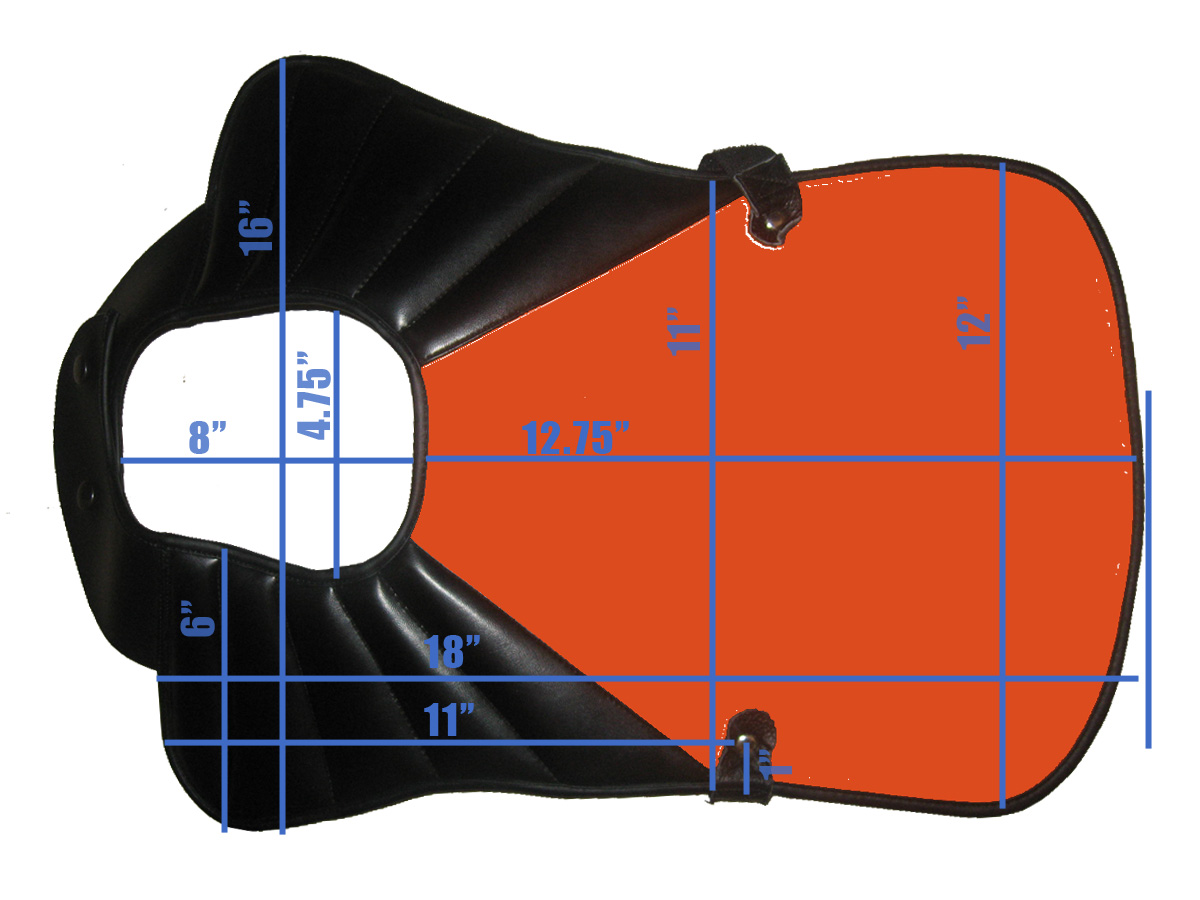
Here's the dimensions. I used Midri's image above and added the specs.
-
The SR props one is rather nice too. --------------
-
Make sure to get a variable speed one. It will save you a lot of headaches. Use slower speeds if you find that the plastic is soft. A single speed Dremel will eat plastic, so use slower speeds and just take off a little at a time (this is from someone that owns 3 different Dremels)
-
Thermal Detonator Build - Help Needed
pandatrooper replied to Debater2nd's topic in Assembly, Mods, and Painting
So, you don't have the control panel thing or the ends? Did you get an armor kit that did not include these parts? I guess if you're stuck you could either buy a TD kit from a seller, or scratch build something that would pass / be screen accurate (if that's what you're shooting for. I don't think regular PVC cap ends will do, but you might get by via getting PVC pipe cap ends, cutting the flat ends off, routing the edges of the cap so it's round, and plugging the inner pipe with a flat piece of styrene and glue it in place. Then use bondo to round off any joins to give it a smoother look. For the control panel, you could cut a flat piece of styrene to size, heat it until it contours the PVC pipe, then glue on some small blocks of wood for the buttons and a couple stacked washers or a very short section of thin piping for the round button, then bondo everything to smooth it out. It's a lot of work, but it could be done. I don't think it's that hard to scratch build. But if would easier to just buy a TD kit or even a premade one. Once in a while there's a FS thread in the buy and sell section for TD's. Good luck. -
Helmet Advice - size questions
pandatrooper replied to Agent RayBans's topic in Hard Armor (General Discussion)
Right here in my EIB thread ----- on the screen used Luke hero helmet, the face was tucked under even more. Check out the last few helmets on this page on Starwars helmets.com ------- -
Helmet Advice - size questions
pandatrooper replied to Agent RayBans's topic in Hard Armor (General Discussion)
The bigger the helmet, the more it would interfere with turning your head because it would be larger in all proportions. When the chin of the helmet bumps against the chest armor or shoulder straps, I call it "chin banging". One thing I discovered was that you need to be able to see, and turn your head (sounds obvious). That means even though you think you might want your eyes centered in the lenses and eye openings, the bottom / chin area might bump into your chest. one thing you can do is raise the helmet up with some padding up top, so that you look through the lowest part of the lenses, not the middle or top. I noticed that on stunt helmets, especially if people want the "high brow" look without cutting too much of the brow, the face ends up slightly longer because it's rotated downwards from the cap / back. If you push this up hero style, this will reduce the height of the face region by a good inch, depending on the look you want. One thing I did when I built my hero lid, was I tucked in the "face" portion more under the brow. This resulted in the overall height of the lid being slightly shorter, and smaller overall. Being only 5 foot 8 inches, and not having a long neck, i need as much help as I can get. So tucked in the face, and when wearing the helmet I try to have the helmet sit slightly higher so that I'm looking through the lowest part of the lenses. This reduces vision slightly, but works better for movement. So I would say stick with the smaller helmets rather than going larger, and use fans to help reduce fogging, consider leaving a gap between the eye openings and the lenses to allow some air to circulate, and consider going Hero style if you want to reduce "chin banging". Good luck! -
Whoa, that's very cool new Jim! Looking forward to it! I had actually contacted them inquiring about blaster and saber parts. Jim finally did get back to me and I got what I needed, and he's been very helpful with support after the purchases.
-
Voice amp from E-bay
pandatrooper replied to Amptrooper's topic in Electronics for Helmets / Blasters
I bought the Small Talk a few months ago for really cheap on Ebay. Got it fast, good service. I popped some batteries in. It wasn't "horrible", I would give it a "C" rating. But I had some issues: - the mic wasn't that good at picking up your voice (it needs to touch your lips to register sound sometimes) - you have to either mount the whole mouth piece in your lid, or take it apart and just use the corded mic (its designed for respirator work masks) - lots of feedback on the speaker - "OK" volume but not great - great value for $10 if you can't afford something better About 6 weeks later, I bought TK6294 / Jim's amp, and I was was blown away. Literally... - rechargeable, lasts much longer (I used it for 8 hours at work and it didn't even come close to wearing out) - comes with a higher quality boom mic - 2 ports, one for the mic and another as an additional input - MUCH louder - MUCH clearer - feedback? Well there's feedback on most systems, but it was really easy to tune out on Jim's amp. Obviously, to avoid feedback - don't face the mike towards the speaker (the mike "opening" is indicated with a white mark on the boom mike, make sure this faces you), and adjust the volume as high as you want. If you max it out too much, you will get feedback, but you get feedback on any system. When I first got it, I put the headset mic on my head as it come in the box. The volume was about 25% louder right off the bat than the Small talk but much clearer, I though "This is OK". But when i took the foam tip off, I noticed the orientation of the mic opening marked with a white paint dot. the mic was actually pointed down, resulting less audio pickup and more feedback. I put the foam tip back on, and rotated the actual mic tip towards my mouth, and I felt the volume increased by another 40%. This thing was much louder and clearer than the Small talk. I can't recommend Jim's amp enough. It simply kicks an impolite person and is worth more than what he charges in terms of simplicity, functionality, and on top of that - Jim provides great service. I'd give it an "A" rating. Did I mention my Small talk has been sitting on my work bench under a pile of junk since I got Jims amp? -
Thanks for the tip. I finally managed to get in touch with them a few weeks ago, I tried a few different e-mail addresses and got to them. Thanks for the link tho!
-
Voice amp from E-bay
pandatrooper replied to Amptrooper's topic in Electronics for Helmets / Blasters
Might be helpful if you attached a link? -
Which is better? AP Armor or FX Armor?
pandatrooper replied to Dearmeat's topic in Getting Started - Read this First!
Hello, and welcome to the FISD. Not sure if you have already, but you might want to introduce yourself on the new members section - so that people here can understand your goals and help you with them. You might want to read up on all the threads on here or try doing a search, as these questions get asked all the time. "Better" is a relative term, it depends on your needs. Both are troopable, represent the Stormtrooper, have almost all the pieces you need armor / helmet wise, and both are acceptable in the 501st. In a nutshell (and I'm really just skimming the surface here) The FX is: - more affordable - more readily available, lots of sources and plenty out there for sale - more adaptable to sizes (fits slightly larger) - was fan sculpted - not 100% screen accurate in terms of detail but acceptable - fairly easy to assemble The AP is: - more screen accurate - originates from molds that had a screen lineage - more costly - slimmer fitting - much more complex to assemble if you want it to be accurate - can be purchased from fewer sources than FX I would suggest reading the getting started / tutorial sections, you'll find tons of info there on both armors -
Pandatrooper's Hasbro build
pandatrooper replied to pandatrooper's topic in Build Threads Requireing Maintenance
You should be able to find a small section of pipe to replace it. Really, it's not that big of a deal. For like $10 - $15, you can get a resin cast of a real M38 scope, which is way more accurate anyways. You could just cut the Hasbro scope off and mount the resin scope on a rail. http://www.doopydoos.com/stormtrooper-e-11...lica-1475-p.asp -
Pandatrooper's Hasbro build
pandatrooper replied to pandatrooper's topic in Build Threads Requireing Maintenance
You have to pull these parts straight off, they can't be twisted off because they have slots that stick out on the outside of the scope, and the rings have slots they fit into. On top of that, they are glued on. I jammed a very small flat screwdriver into the gap between the outer ring and the scope and worked it all the way around the perimeter until the glue seal was broken. Do this to the front and back ring. I then used some narrow pliers on the front ring, and grabbed the cross hairs and pulled straight out. Don't worry if they snap, you're not going to want to put them back on with cross hairs anyways. Just keep prying at it. The back cover ring has a hole in it. I jammed needle nose pliers into the little sight hole and pulled the ring straight off. Just used the whole cap end as leverage. Don't worry about damaging the flat part, as you can simply stick on a sticker or cardboard picture of a cross hair on top. You can also cut away the flat part, and leave a small lip, so that you can glue on some transparent red plastic to make new cross hairs, etc.. -
That's so cool! It's funny, I was on the 501st main page a while back and say his name listed. And I was like "I thought he was an honorary member?". I dug a little deeper and found out the Dented Helmet guys constructed a costume for him. Great to see the original Fett back in armor!
-
If you're referring to the shoulder straps (underneath the bumpy plastic ones) they can be black or white as far as I know.
-
Doughboy's ATA Build[*ATA]
pandatrooper replied to Rebel Doughboy's topic in Build Threads Requireing Maintenance
If you want to have the holster permanently attached to the belt, you can use rivets. I used 3/8" rivets on mine with the rivet facing outwards (rivet gun on the outside of the belt). If you want to make it removable, use snaps. You can have one side of the snap on the underside of the belt, and the other on the straps. You could also use Chicago screws, which are like a short bolt, and a T nut on the the other side. Also removable if you want. Personally, I plan on trooping with my suit, so I riveted the holster in place. I don't want it to fall off if some kid pulls on it. But the choice is up to you. -
That's not white elastic at the bicep, it's black elastic which is the screen accurate way to secure it. Also, the drop boxes are correctly attached with white elastic. You might want to research the numerous ATA topic threads and builds on here. There's lots of info on ATA available and it's fine for trooping.