Leaderboard


Popular Content
Showing content with the highest reputation on 06/02/2026 in all areas
-
Welcome Yonatan, This hobby is expensive when you get it right, even worse if you get it wrong so the advice above is very important. This group is founded on research and 1000's of members putting in time searching, questioning and learning from each other. Take that experience and leverage it as much as possible. We are here to help in every way we can and get you to the finish line.2 points
-
I was thinking I was pretty close to the painting stage, so I went ahead and sanded all the ABS parts to get rid of the gloss and get a nice consistent surface. I did a pass with 120 grit, then 220 grit, then washed them. However, after trying on upper body again, I really think I will need to shorten the biceps because I feel like the kid from The Christmas Story who can't put his arms down: I am thinking that if I were to shorten the biceps from the top, they'll still hit the chest but not as badly. The thickness of the 3D print vs a vacuumformed chest is a big disadvantage here. In order to test out my theory, I made a bicep piece out of paper and trimmed it shorter: Taking a look at other builds, it doesn't seem to look ridiculous. When I was looking at my bicep pieces, I also saw the clip sits high compared to other people's builds, so I think I should be able to trim from the bottom as well, which should allow me to drop the entire bicep lower, and make it so I don't have to trim as much from the top. I like having the biceps high because it gives me a lot more arm mobility but this might be an area I'll just need to compromise. I've marked in tape where I think I'll trim. (The upper trim is at the top of the tape): As is the way of things, when I was pulling the back armor off, it split at the middle seam: I realized I'd only glued that seam, though, so I went ahead and 'welded' the entire seam together with a soldering iron, as well as backed it with a thick piece of ABS. I welded from both the inside and outside so that will make finishing a bit of a pain, but probably good that I reinforced the seam as the back armor gets a ton of flex when I put it on and take it off. Edited to add a photo of the welded back piece. Obviously it will take a lot more work to hide the seam:2 points
-
Welcome to the FISD, start by reading and asking questions. Mistakes can be expensive and are usually easily avoided with a couple of question.2 points
-
Hello and welcome, I would stay off Etsy. Finding a costume comes with a lot of research, these threads will help you on your way You can also take a look at others builds, great to see how things are put together https://www.whitearmor.net/forum/forum/31-costuming-and-builds-original-trilogy-and-anthology501st-approved/2 points
-
This is my biggest concern, if I'm going to have the patience to finish mine.1 point
-
You're quite welcome, and well deserved. JB or Devcon (what I used). Most are quite similar and will definately help with the support. In some areas (with the highest amount of stress) an inner coverstrip with plastic welder might also be a good idea.1 point
-
In this photo the biceps aren't strapped at all so they're sitting pretty low. And actually last night I went ahead and trimmed one of the biceps 😅. It was slightly impulsive so hopefully they're not too short haha1 point
-
I can attest. This looks amazing in person. A fine job! You are way more patient than I am!1 point
-
Welcome back Kevin1 point
-
Wow, outstanding work with the mods Sha Sha. Ingenuity at its finest. A little helpful hint. Every seam, including those you had to create to accommodate for sizing, will stress and flex, especially when installing and removing the armor. Naturally this will have an adverse effect on your paint job. Cracking seams/paint is a very big issue with this armor. May I suggest you follow up the non factory seams with plastic welder, at least on the inside of the armor. Its strong, somewhat flexible and it's sandable. I love seeing all your hard work and dedication. It reminds me of Diana's TK. Keep up the great work.1 point
-
This is an awesome photo, great work. Regardless of lore or not, that prod looks very cool too.1 point
-
You may not get a response as James has not been on the forum since January 2025. You can find the template and references here A very nice build here And here Lots of files out there, try a Google search https://www.google.com/search?q=t-21+blaster+stl&sca_esv=91d57c56ebe7dce1&sxsrf=ANbL-n6us9THuVJUBmu4po3_x9upnLST1Q%3A1780264719479&source=hp&ei=D68catSNG4_bseMPyZjvwQE&iflsig=AFdpzrgAAAAAahy9H_I3WYg7j2QzdUDqRVAOo2Lq5cy5&ved=0ahUKEwiU0dXxwuSUAxWPbWwGHUnMOxgQ4dUDCCc&uact=5&oq=t-21+blaster+stl&gs_lp=Egdnd3Mtd2l6IhB0LTIxIGJsYXN0ZXIgc3RsMgYQABgWGB4yBRAAGO8FMggQABiABBiiBDIIEAAYgAQYogRIwiBQAFikHXAAeACQAQCYAdMBoAHYF6oBBjAuMTQuMrgBA8gBAPgBAZgCEKACjxjCAgQQIxgnwgILEAAYgAQYkQIYigXCAgoQABiABBhDGIoFwgILEAAYgAQYsQMYgwHCAhEQLhiABBixAxjRAxiDARjHAcICCxAuGIAEGNEDGMcBwgIQEC4YgAQY0QMYQxjHARiKBcICChAuGIAEGEMYigXCAgoQABiABBgUGIcCwgIFEAAYgATCAggQABgWGAoYHpgDAJIHBjAuMTMuM6AH33GyBwYwLjEzLjO4B48YwgcGMC4xMy4zyAclgAgA&sclient=gws-wiz https://www.printables.com/model/23594-sw-blastech-t211 point
-
I decided to add a few more pictures so you can see the size difference between the 102% and 107%. 102% is about 5mm bigger than 100% would have been, so hardly noticeable. Please forgive the pictures. Its hard to do with the helmet in pieces and with only one functioning arm.1 point
-
Thanks to some help from @Sayless I can now post pictures. As mentioned before, I started with 102% on @TKModder421's modified Niko files. After trying a few test cuts I thought that would work but I learned my mistake was not taking into account the flange where the dome and the back meet. With my head pressed up against that flange my glasses still rub the lenses and would have put holes in them. I looked into options to help me put the helmet on better because I couldn't even get it on without my glasses off. I'm blind as a bat without them so I needed to change things. I reprinted at 107% which may have been a little more than I needed but at only about 15 millimeters taller, wider, and longer than 102% it was hardly noticeable visually. And now I have room for padding in the back and my glasses clear when I put the helmet on and wear it. Below are some pictures I've taken of my progress so far. My printer is 256 by 256 and I'm new to it so in my first attempt at printing the helmet I cut the back right down the middle. This made the most sense to me but I learned that ABS warps when there's not a lot of structure so after 4 attempts I gave up and changed my plan. The first photo shows where I cut it the next time and how I used a piece of one of the failed prints as a backer for strength (picture 2). This worked pretty well because the majority of the seam would be hidden by the ear. Because I'm using ABS and I'm bonding things together with acetone I think the joint would have been pretty strong without the backer but I used it for Peace of Mind. That worked out well other than being too small. I resized the files and used the measuring tool in my slicer to figure out which percentage would work well with what I had learned and the 107% looked like it would so I did a test cut. That fit pretty well so I went ahead and printed the bulk of the helmet. I haven't printed the chin yet but I think I'll be able to get this one on even with my glasses on. But if I run in to the same issue I had with the 102% I'll go back to my original idea of using magnets to hold the chin on. Putting the face and back together I can set this on now and not have my head touching the back and still have room for my glasses. I think I'm happy with it. You can see the 102% and the 107% side by side in picture 3. Because the back wouldn't fit still I knew I needed to cut it. I rotated it and decided that cutting off multiple small pieces to bond back on would be better than trying to line up two larger pieces. I also ended up needing to cut a little bit off of the face. Pictures 4&5 show the small pieces I clipped off. By cliping small pieces the larger pieces kept their shape and didn't warp so the small ones fit up perfectly. The acetone bonding should be simple and the majority of these seams will be hidden behind the ears too. The last picture shows some damage to the vent on one side of the face. I had a layer shift that was in the worst possible spot. I'm going to try and fix it with the file but I might end up reprinting this piece. I have to do some maintenance on my printer first. As mentioned above, I'm new to 3D printing, this printer is new and has 400 hours on it now, and is due for some maintenance. So far I'm happy with the progress. I was afraid the 107% helmet would look clownishly large but side by side to the smaller one and looking at myself in the mirror I think it will be just fine. Once its all bonded together I will post a picture for your opinions.1 point
-
With more items ticked off, I decided to do another suit up today. These are stills from a video so the image quality isn't amazing, and I dressed myself so there are a number of dressing issues, but I'm happy with how everything is coming together. Still TODO from from the fitting/assembly/strapping point of view: - I still need a way to keep the biceps up. I've been considering various methods such as strapping them to the shoulder bells (the same thing I did with my OTTK), or possibly adding some kind of strap with a snap or buckle to attach them to the shoulder gaskets. - There is also nothing keeping the spats in place on the shin, so I'll add some Velcro. - I have an idea to attach elastic to ankle sleeves, and attach them to the bottom of the knee gaskets in order to keep them from riding/bunching up. This is particularly necessary since my shin armor is fixed and I have to slip my legs/feet in vs closing the armor around my shins. - The inside point of the shin armor really digs into the inside of my knee (the top of my tibia) so I am planning on cutting them down some. Looking at the Anovos/Denuo Novo armor, the inside point is quite a bit shorter than the outside so I'm assuming this is fine. - Finally, one danger of taking 8 years to build a set of hard armor is accounting for body size changes. I have been lifting weights consistently for the last 6 years, so my arms and legs are bigger than they were when I first started this project. I already made the biceps slightly bigger, and I am considering doing the same for the thighs. After all the strapping and fitting it will be endless sanding and painting, but I do feel like the end is in sight!1 point
-
I connected mine to my inner suspension harness. Very similar to how the movie armor was done. Though this option is obviously not required.
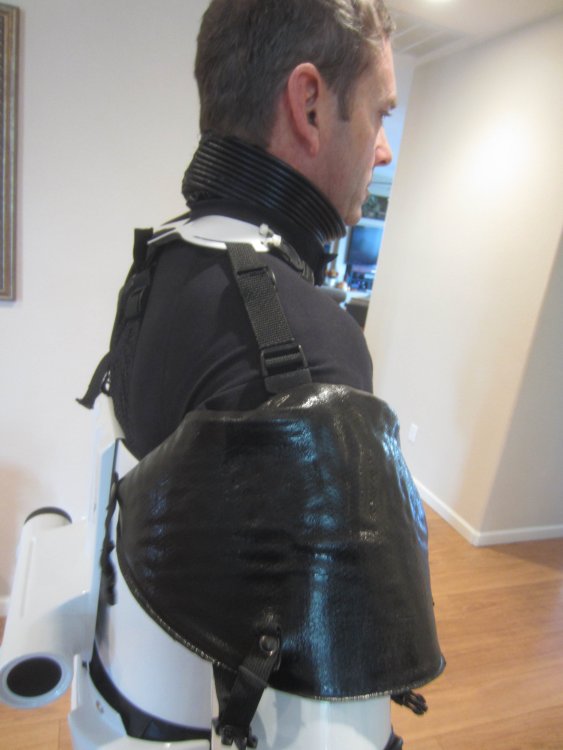
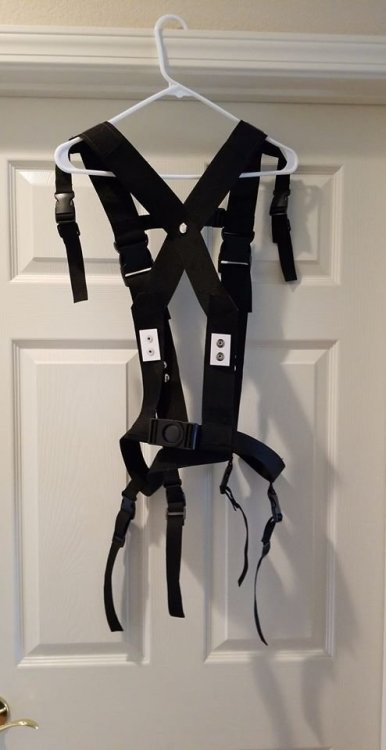 1 point
 -
Hey there. This ended up going no where as the files were hard to work with due to needed modifications. Even more so now that we have seen more of them in the Maul show. Also now with WTF offering an ABS kit, I placed an order, though for helmet I'm going with the file from FolkyPatrol via Esty as it seems more accurate. Now it really just waiting for WTF on the kit.0 points