
Leaderboard


Popular Content
Showing content with the highest reputation on 03/11/2026 in all areas
-
This is why I hate painting, I do something like this more or less every single time. Builds coming on well but I also wouldn't want to clear coat it, it won't look right. I'm not doing a Non saga build but for things for my TLJ I've just been leaving them in the bare white paint, which is an acrylic. This gives a pretty decent approximation of the bare castings used. It also doesn't really buff up properly if you do polish it. It also dings up and weathers in pretty well, which for something I've never trooped shows how clumsy I am. I am using Halfords paint in the UK so not how sure this compares to the Behr but I can't imaging they are a million miles apart if they are both acrylic auto style paints.2 points
-
Personally, I plan to just hit it with either the Spraymax automotive 2k gloss white, or just the Behr Premium No 52 Gloss White, and then not polish or clear it unless I get orange peel. Or if I do clear, 1k and/or semi-gloss or satin if I can find a product I like. 2k cans are expensive and can't be used for small touchups easily (once you crack one, you gotta use it). The suit is GOING to rub all over the place, especially at first, so you want it easy to repair, so I've just been leaning towards the cheaper Behr paint. It's gonna yellow over time either way, but I've been wiping my suits down with Aerospace303 and we'll see if that helps. I've got all of the MPSB parts printed (below, plus the shins and ab, and an S&T + all the parts for a proper E-11 build) and plan to use those to submit for Centurion, but may end up building the rest of the suit out of printed ABS (I have a K2+) from the Akira Yuming files in time. I have exactly one arm piece post-processed, three other suits I want to finish building first, and a second baby due in April lol So I've just been low-key advising some of the other guys that are printing and finishing these at a high level until I get around to redoing mine. I'm happy to help and learn from you guys too.2 points
-
Yea the movie armor wasn't even painted. It was simplly the color of the material. Almost a satin, or semi-gloss look. That said, my entire armor was automotive painted with a semi-gloss clear. I just like things new looking forever I guess. But like others have mentioned, not too shiny. I think no matter what you do it will look awesome.2 points
-
Just a couple of things you could address. Helmet appears to be sitting high, you may want to see if you can adjust the padding, or tilt the helmet back so there is not as much black showing. Looks like your shoulder straps are not under your elastic straps in the rear photo, they should also be centered to teh backplate. Also shins are not quite closed Brow trim is on an angle You may notice your posterior is sticking out, I came up with a V tab system which reduces this, may be worth a try. With a heat gun or oven you bend strips of ABS plastic into the shape of a V, only glue one side and the other remains free to allow movement when you bend. Just helps stop the butt plate from pushing back from the back plate.1 point
-
Thanks Glen! It's been so long since I've posted here that I forgot how to post links lol I will definitely do that once approved, thanks!1 point
-
Good luck with approval, hope to see you approved very soon. Once you receive approval you can request higher TK access here Also with adding photos you need to use the link with the file extension ie: .jpp, .gif, .png, how to thread here Good luck1 point
-
Hello! It has been just over 6 years since I last posted. I started this build when I was too young to join the Legion, and I ended up being happy just wearing this armor (amongst other costumes) just for myself, and didn't feel the need to join a group. Now in my early twenties, I feel the need for that community and to do more good with this armor than ever I did before. I have since moved back to Canada where I'm from, and I'll be joining up with the Badlands Garrison, I am just awaiting approval. I started to feel the unfinished business of not accomplishing my goal of joining the 501st, and I'm really glad to be remedying that. Here are a few of my approval photos.1 point
-
Chris, I appreciate the insight. I’m slowly starting to rethink clear coating the armor itself. The more I read and hear from others, the more it seems like leaving it closer to the raw paint finish might actually be the better route for accuracy and long-term maintenance. So I’m definitely going to keep digging into that before I commit to anything on the armor (thankfully, I've got some time!). That said, I do still think I’m going to proceed with clearing the helmet regardless, simply because of the amount of work that’s gone into it at this point. I’d hate to damage the finish after finally getting the paint where I want it. With the little bit of research I’ve done this afternoon, I’ve seen some recommendations to clear coat and then wet sand with something like 1500–2000 grit to knock down the shine. My only hesitation there is that I assume that would start pushing things toward more of a matte finish rather than the satin/semi-gloss look the armor seems to have. And circling back to the dropping-parts discussion… this definitely isn’t the first casualty. Helmet #2 cracked after a drop, and I also managed to drop one half of a calf during the primer stage. At this point it almost feels like a rite of passage to drop at least one piece per phase of the build. I’m definitely curious to see how the Rustoleum acrylic ends up holding up long-term compared to something like the Behr paint you mentioned—or even some of the higher-end finishes others are spraying through proper paint guns.1 point
-
You learn something new every day—I had no idea the original armor was simply the raw material, but that actually makes a lot of sense. If I’m putting in all this work, I’d definitely like it to stay looking new for as long as possible. Sounds like I’ve got a bit more research (and probably some trial and error) ahead of me to land on the right finish. Appreciate the info! Whoa, build spoilers! Kidding—but it sounds like you and Tony are in very similar boats when it comes to finishing. Honestly, I had no idea SprayMax offered 2K paints with color infused. I’d be tempted to borrow the idea, but I already have several cans of white that I’ll probably end up using. It definitely sounds like you’ve got your hands full—but congrats on the second baby! I’ll definitely be keeping an eye out for updates on your build as well. I love seeing other builders taking the 3D-printed approach. It might be unconventional, but the ability to resize everything so easily is a huge advantage. I’m also considering lining the inside of parts of the armor with white foam or felt (in places where it won’t be visible) to help reduce some of the wear that comes from armor rubbing together. Nothing in the CRL explicitly says not to, though I realize it probably moves things a little further away from screen accuracy.1 point
-
I've been loosely following along and boy howdy do I have a lot to say, but let's start with the important things: - Your head is in the right place and the research is coming together and looking great! I've been planning a revamp of my suit with printed parts for a while now and just haven't gotten through the sanding and prep. - I would absolutely not recommend 2K clear coating the suit. It makes it too glossy for accuracy, and you'll just need to sand through clear and white when you get cracks. Clearing my ROTK is one of my biggest regrets on the build. Good luck!1 point
-
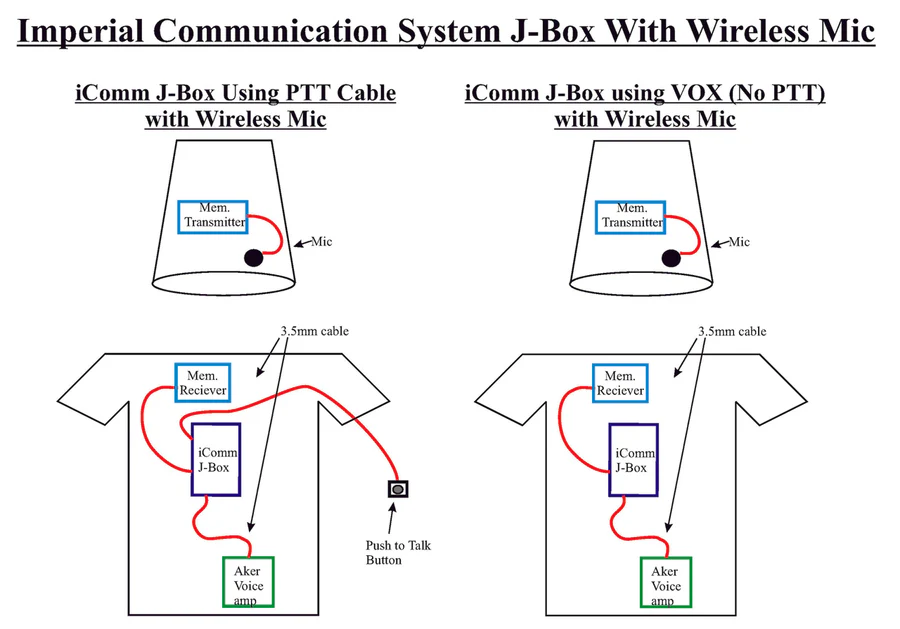
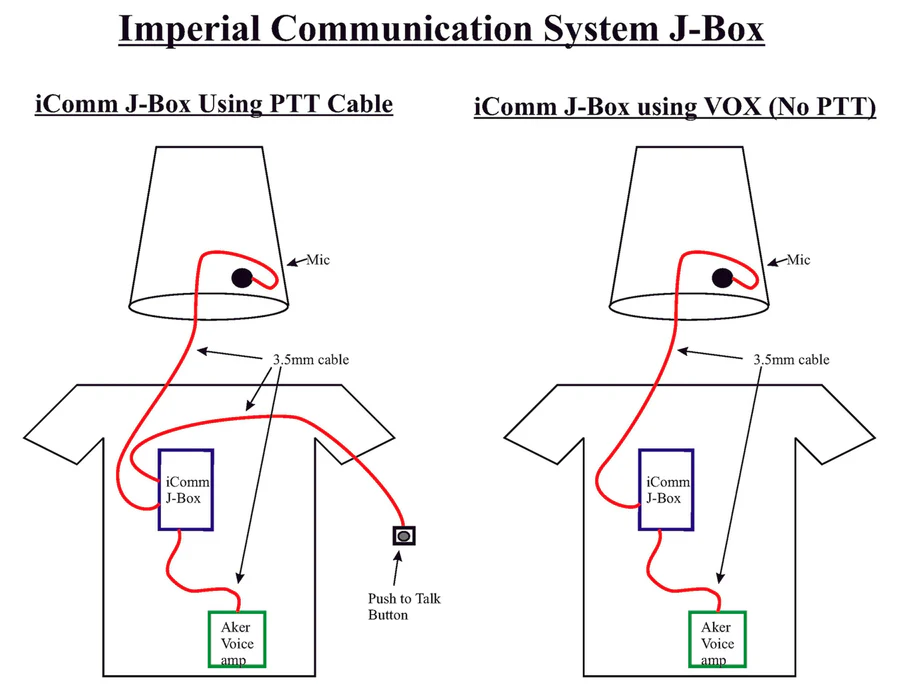
https://docs.google.com/document/d/1NkirM6MR5KRTWzG1dUNSEallxJMcER3NJbSPg9lLicQ/edit?usp=sharing Add your MP3 Player to auxiliary input of your amp img16_110x110_crop_center.avif img16_110x110_crop_center.avif
 1 point
 -
1 point
-
Since the WTF mic tip is so bad, I did a lot of research and found what I believe is the most accurate to the real part of there! https://cults3d.com/en/3d-model/art/accurate-prop-wars-star-stormtrooper-hovi-mix-pa2-aerators-stormtrooper-communic?srsltid=AfmBOop4lmJvgqg2KN03Ow5vMSVygrFl4nW-5ZhlsfIQ9mmZb0Rmj6EQ I printed the base without the barbs so it's flat and put a machine screw in to secure it to the helmet. In hindsight I should have just screwed the base to the helmet and spun on the tip, but I "overthunk" it and applied epoxy to attach the screw permanently to the base. I also bought UKswraith correct mesh screen and formed it by pushing it through a hole of the correct size with a socket. Sometimes the simplest way is the best way Sent from my moto g 5G - 2024 using Tapatalk1 point
-
Updated @TreeHuggerMatt1 point


