Leaderboard


Popular Content
Showing content with the highest reputation on 06/20/2024 in all areas
-
Thanks for the really helpful links / pics. I've now got the lid assembled with the ears and neck rubber on. I've being doing a bit of back-and-forwarding with my armourer on the UK Garrison forum to get my E11 right (replaced 3d printed scope rail with metal one) so progress has been slow.2 points
-
Hi John, great to see your Centurion application ! Added to the processing line sir.2 points
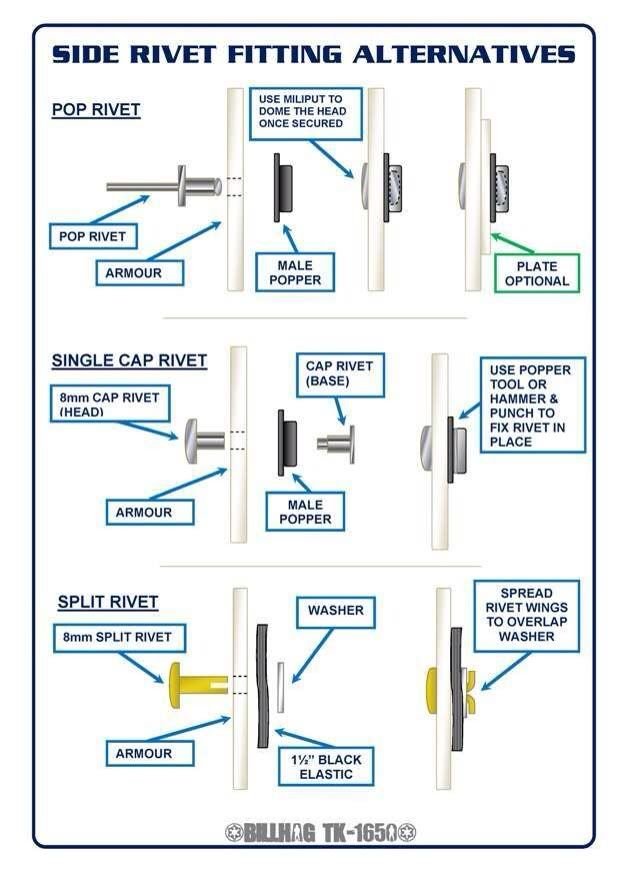
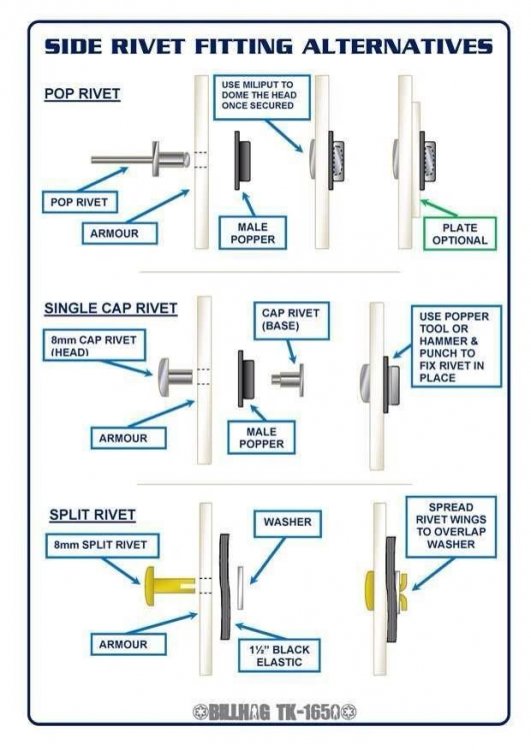
-
Get ready, info overload The rivets you have are fine to use on the holster, hopefully they are not the short post type. If the posts are long enough you could add male snap on the back of the belt and female on the holster, so you can remove between troops (note 4 rivet placement is only for HERO, don't make that mistake ) Different attachments There are variants on holster placement latest info in this thread Bending the belt helps it to stop springing off when knocked, snaps don't like to be on an angle Bending the ABS Belt by gazmosis, Boba_Skywalker3 Great how to by Tony Belt Assembly by ukswrath If you need to make a fabric belt https://www.whitearmor.net/forum/topic/665-howto-a-guide-to-making-a-canvas-belt/ I use regular snaps behind the button covers to fabric belt, and also from fabric belt to armor Don't take note of the center snap on the abdomen, I thought this would stop it slipping but really didn't need it, I was oh so young and dumb . You can add velcro here if you find it drops at the middle. The top of the ABS belt shall sit at or just above the bottom of the central and vertical ab button panels. A slight overlap is suggested, but not required. The bottom of the canvas belt should ideally sit above the bottom of the kidney plate and not overlap the kidney/posterior plate connection. Belt button cover reference For Level 3, the corners of the plastic ammo belt shall be trimmed at a 45 degree angle that meets the outer edge of the cloth belt. For Level 3, Drop boxes are vertically aligned with the end of the ammo belt with minimal gap between belt and box. For Level 3**, Drop boxes must have full inner drop boxes to close the back. I will highlight a few important details From the CRL: Belt Belt face is made of plastic (TK ammo belt). The soft belt proper is made of canvas, or material with a canvas covering. Size must be 2.75” (70 mm) to 3.25”(83 mm) wide and not wider than the plastic portion of the belt. The color is be white to off-white. The drop boxes dangle from the sides of the front plastic belt (ammo belt) via white straps and are aligned under the plastic tabs of the ammo belt. OPTIONAL Level two certification (if applicable): There shall be three square buttons, one centered in the middle and one on each end of the plastic ammo belt.. OPTIONAL Level three certification (if applicable): Drop boxes must have full inner drop boxes to close the back. Flat covers are not allowed. Drop boxes are vertically aligned with the end of the ammo belt with minimal gap between belt and box. The corners of the plastic ammo belt shall be trimmed at a 45 degree angle that that meets the outer edge of the cloth belt. The top of the ABS ammo belt should sit at or just above the bottom of the central and vertical abdomen button panels. Canvas belt can not contain patches of any sort. Canvas belt must be firm / sturdy in appearance. No creasing or sagging
 2 points
 -
Ok here it is! I made the changes recommended in my EIB post. This has been such a rewarding experience going for Centurion. As always happy to make necessary changes. I'll not my changes from my EIB submission within the post in red Mandatory Information: ___ Armor Maker: Walt's Trooper Factory (WTF) ___ Helmet Maker Walt's Trooper Factory (WTF) ___ Blaster Maker: RS Props ___ Link to your EI Approval thread: ___ Permission photos social media: Yes Optional information: ___ Full name: John Barlow ___ Height/weight: 5'7"/145lb ___ Boot maker: Keep Trooping (Imperial Boots) ___ Canvas belt supplier: Tye O'Dell (Custom) ___ Hand guard supplier: Trooper Bay ___ Holster maker: Tye O'Dell (Custom) Full Body 1. ___ Front (Arms flat by side, no weapon) - Removed helmet padding to drop the helmet down an inch so that it's touching my head - Shoulder gap reduced further - Extended the strap between my bicep and forearms to allow a larger gap to match the forearm and hand plates (more prominent with the side view) - Belt now sits just touching the bottom button 2. ___ Back (Arms flat by side) - Shoulder straps held down with white elastic band - Shoulder strap ends trimmed off - Hook and Loop "patches" removed from canvas belt - Lower thigh ridge joints backed with ABS and filled 3. ___ Left side (Arms raised) - Drop boxes secured with hook and loop and moved farther back - Kidney and abdomen armor align 4. ___ Right side (Arms raised) - Drop boxes secured with hook and loop and moved farther back - Kidney and abdomen armor align 5. ___ Left side detail (arms raised) 6. ___ Right side detail (arms raised) Armor Details 7. ___ Cod and posterior plate connections showing rivet/snaps (exterior) - Six white painted rivets added on the left side of armor - "Han" snap added on the left side of armor 8. ___ Shoulder bridges- Front/rear/sides -White elastic string added for shoulder strap connection 9. ___ Thigh ammo pack connections (interior and exterior, left and right sides) 10. ___ Sniper knee plate (left and right sides) 11. ___ Wrist openings - Forearm end return edges sanded flat 12. ___ Abdomen button plates (close-up) -Luckily E6000 was used and I removed both plates and trimmed down further 13. ___ Posterior plate/kidney connection (back and/or front) Helmet Details 14. ___ Front 15. ___ Left side 16. ___ Right side 17. ___ Rear 18. ___ Close-up of Hovi tips 19. ___ S-trim (side view) 20. ___ Ear screws (close up, left, right and bottom) Accessories 21. ___ TD (Thermal Detonator) front and rear showing screw type 22. ___ Hand guards bent showing flexibility - Flexible hand guards added 23. ___ Holster attachment 24. ___ ABS/canvas belt (rear, showing drop boxes) 25. ___ Boots (tops and sides) BLASTER 26. ___ Left side 27. ___ Right side 28. ___ Rear (showing D-ring) BLASTER Action Shot1 point
-
Great work.1 point
-
Thank you for the feedback on the pre-approval forum. I made adjustments to the back of the lower legs. I cut the raised detail as suggested. The cut revealed the glue and support pieces I had used and they were an off-color. I used ABS paste (with a bit more acetone this time) and covered the edges. I then sanded them smooth with 220, 400, 1500, and 2000 grit sandpaper.1 point
-
OMG I am indeed overloaded! I will have more questions! Thank you!1 point
-
Correct a few makers use smaller caps so pipe must be smaller too (WTF, ATA and I think AP), it does make them look a little off with length and gaps, but normally no issues having them approved1 point
-
Yes, I do hope that they stay in place. The CA glue seems pretty strong. E6000 would have been nice in case I had to adjust them. I think the left and right plates are pretty even, although the left glove itself is "rolled" to the right a bit more. Looks even when they're on, though, so hopefully it's all good.1 point
-
I started posting these on the FISD Discord server and thought I might share them here on the forum as well. Discord makes sharing images really easy since you don't need to host them, but I can just throw these on imgur about as easy. But I digress. Lesson 1: a phrase most are likely familiar with. L, O, and N are very easy in Aurebesh, since they're so similar to English. L and N are backwards and O is a round triangle. G is laying on it's side. V is a Y in Aurebesh.1 point
-
1 point
-
1 point
-
Another phrase that should be familiar, as we see it fairly often in Legion. We also see "FISD" in Aurebesh somewhat often. The bottom word is only one letter off. T is upside down in Aurebesh. It's a down arrow basically. I is a 1. S is used often. It's an arrow pointing down to the right. F is upside down and slightly stylized. --------- More tomorrow.1 point
-
1 point
-
I think I'm done with this unless something new comes out. I'm happy to work on the CRL and get something pushed through!1 point