


Vicky_Velocipanda
-
Posts
112 -
Joined
-
Last visited
-
Days Won
4
Content Type
Profiles
Forums
Gallery
Articles
Everything posted by Vicky_Velocipanda
-
I was summoned :D Hi Belinda! I own one of Kevin's kits and mine is approved with the Legion! I also haven't seen any 3D files for that set of armor and I think Kevin is the only maker selling kits. Have a look at the CRL and decide which version of the costume you want to make, there are two! Just reach out if you have more questions!
-

FISD Forum Fundraiser 2025 - Completed
Vicky_Velocipanda replied to themaninthesuitcase's topic in Announcements
And money sent! 10D99229SH1698726 -
Greeting from Scarif (San Diego)
Vicky_Velocipanda replied to dvanzandt's topic in New Member Introductions
Welcome! I hope reading through the forum makes you want to keep your TK though -
Welcome back, Jonathan!
-
Amazing work so far! We already talked about your idea on Insta and I love the enthusiasm for this costume! A silly idea maybe, but I do love my usable pouches on the belt. If I remember correctly, this was optional while building the costume (has been a whole, correct me if I’m wrong). That might be something to include for higher levels. Another thing are the shoes. I struggled with the CRL pictures and ended up heavily modifying a pair of boots to fit the requirements for my version. I‘d be happy to help here if I can! I have the Legacy armor and I love it!
-
Welcome to the FISD!!
-
My TK armor has a crack- what can I do now? Hello there! In this simple tutorial I will show you how to fix cracks in your beloved TK armor. Finding a crack for the first time is super scary, but don’t worry, they can easily be fixed! What you need: Leftover scraps of plastic from your armor build Aceton A jar (preferably made of glass and not plastic) with a lid Something to stir Sanding paper Cottons swabs Paper tissues/ wipes Reminder: Aceton is quite stinky and unhealthy so make sure to work in a well ventilated area! Starting off: Break your leftover scraps into many tiny scraps so they dissolve easier. Put them in your jar (I use a jam jar) and pour in some Aceton over them. Be careful to not pour too much as you don’t it to be too runny. Close the jar, wait and shake it around a bit. Take your tool ans stir the mix. You want the whole thing to be viscous and thick. Applying the goo: When you’re happy with your little mixture, take a look at the cracks. For huge cracks in places with lots of pressure on them, I strongly recommend adding a piece of plastic as support. I just glue a little strip of the leftover plastic on the backside of the crack using the Aceton paste and then cover the plastic strip in Aceton to get a smooth transition. As you can see in the picture, I used strong magnets to help the plastic strips stay in place while the Aceton paste is drying. Adding the plastic strip for support is really important because otherwise, the cracks will come back. It’s not pretty yet, but we’re getting there! On the front side use less Aceton paste but make sure you cover the whole crack! Sanding it down: When the Aceton paste is completely dry and hard, you can sand it down. Take some sanding paper and start sanding. Do that until you’re happy with the look aka welcome to sanding hell! Make sure you start with a coarser sanding paper and make your way down to a really fine one! You want to have a really smooth surface! In the picture, the crack is still visible, so I had to do more sanding. Finishing touches: When you’re happy with your surface, you might see that the shine of your armor is reduced in the areas where you worked with the Aceton paste. My armor is one of the really shiny ones so I wanted to bring back the shine. What you can do for that is to put some (really just a little) Aceton on a tissue or a cotton swap (depending on the size of the area) and give the area you want to make shiny a quick wipe. This has worked really well for me. I sadly don't have a picture of the finished repair because I wanted to get over with it after hours of sanding. But you'll get the idea! And voilà, your TK armor is fixed again! Keep trooping! The repaired parts will still not be as sturdy as they used to be, so watch out and don't do stuff like breakdancing or going down slides in armor (yes, I witness both of these)! Additional tip: Keep the jar and write the Trooper you used it for on the lid! In our household, we have armor kits from different makers so we label the jars to not confuse them. Also, you can just use the same glass jar over and over again! This tutorial was brought to you by TK-50893
-
Armor Maintenance & Upkeep
Vicky_Velocipanda replied to Armor9's topic in Hard Armor (General Discussion)
I use the sponges used for doing the dishes (the ones with a yellow and a black side, if that makes sense) and some water to remove the black scuff. For bigger repairs, it's always good to keep some leftover white plastic from building the armor. If you mix some little pieces of that with aceton, you get a paste that you can use to repair cracks in your armor. Put on the paste, let it dry, then sand it down. For the white screws, I just use a white paint pen (Google says the right translation ist touch-up pen?). Hope that helps -
Love the idea! The name sounds cool as well! I‘d love to support you in this! Oh the opportunities, just think about all the pretty merch we could have jokes aside (that wasn’t really a joke though, have you seen those beautiful „pin-up“ patches by the Scout Troopers), the issues with different body types really do come up and I‘d love to have a space where we can help each other out!
-
There was a bit of that oily stuff on some parts, but not too much actually. If I remember correctly, there was quite a bit of that greasy stuff on the breast and back plate, not much on other parts! And I participated in his free shipping promo because I‘m located in Germany and international shipping rates are crazy!
-
Congrats to Dave and thank you all for your kind words
-
Thanks! Well, I spent 1,5 hours painting myself which meant getting up really early But since I also have a Twi'Lek and several other "colorful" costumes, I got used to being the first person awake on the day of a con
-
Thank you
-
Hey guys, I'd like to show you my Jarael costume! Since I love making costumes that involve bodypaint, Jarael was a good choice! Making this costume involved sewing, working with foam and of course all the makeup stuff! I wore the costume for the first time at Comic Con Germany a few weeks ago. Still missing are some pouches on the belt and the shockstaff, but I'm not sure when I'll be able to build those... Overall, I'm quite happy with how this turned out. I will change some minor things, but I like the look so far! Anyway, I'm happy that I now have a comfortable costume since most of my other costumes are not comfortable AT ALL So here's a full shot of the (almost) finished costume: And here's a close-up: Both pictures were taken by Harry Grees. More pictures on my page: https://www.facebook.com/velocipandacosplay Hope you like it! Greets from Germany, Vicky
-
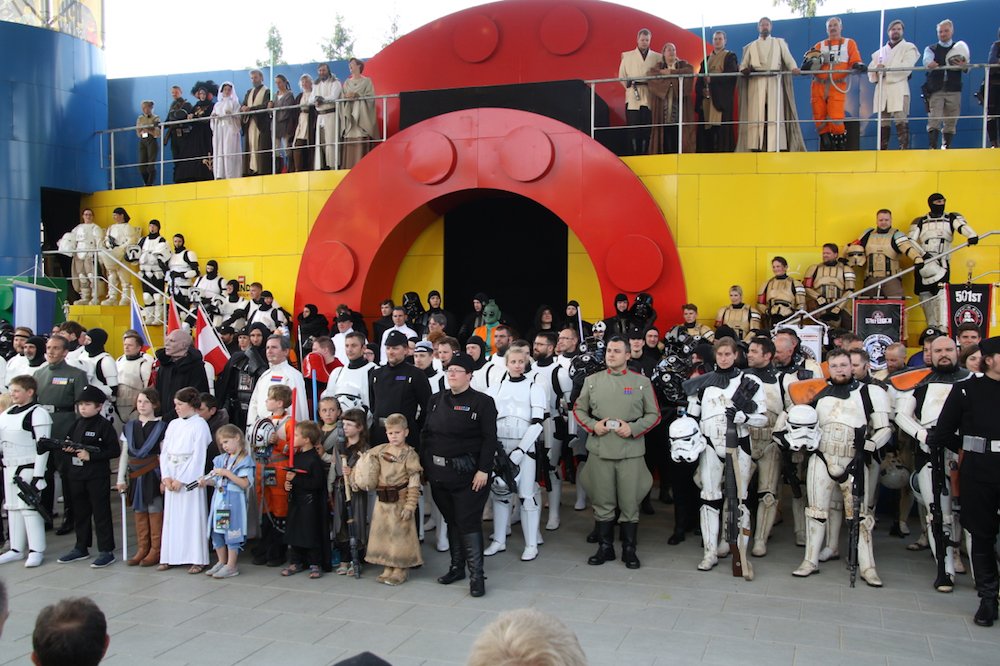
I'm probably too late, but I'll still try since that book looks awesome! I'm Vicky (TK-50893) from Germany! I joined the German Garrison in October after a long time of going to conventions and events and always being fascinated by the people in the 501st. My boyfriend (also a Trooper) convinced me to ignore my doubts and fears (I have some years of experience as a cosplayer, but I never built armor like this before) and to start building a TK armor (well I helped him build it as good as I could, but still, that counts!). And finally, at the end of May/ beginning of June, it was Legoland time again (it's our biggest event here in Germany with people from 13 different countries participating) and I could join my fellow Troopers for the first time at Legoland! And it was amazing, the kids and parents loved our costumes and everybody was so welcoming and friendly! It was not only a great opportunity to meet all my friends in and outside the Legion but also my first time on that huge stage in front of all these people. And I felt so proud, even more because I was allowed to stand in the first row that day. Nerdy little me standing there in that shiny (well not so shiny after the two days there but who cares ^^) armor and seeing the children staring at us with excitement. I could have been one of those kids a few years ago since Star Wars always was and will be a huge part of my life. When everybody started applauding, I felt so happy and when all the people on stage shouted the "who let the Troops out" I felt as a part of the huge family that is the 501st. On the picture, I'm the blonde Trooper girl far right in the first row of Stormtroopers, just behind the Officer lady with the glasses and all the little ones!
-
TK-50893 requesting 501st & detachment access. Please correct the detachment affiliation in the legion membership DB. https://www.501st.com/members/displaymember.php?userID=26004&costumeID=124

