Leaderboard


Popular Content
Showing content with the highest reputation on 07/02/2023 in Posts
-
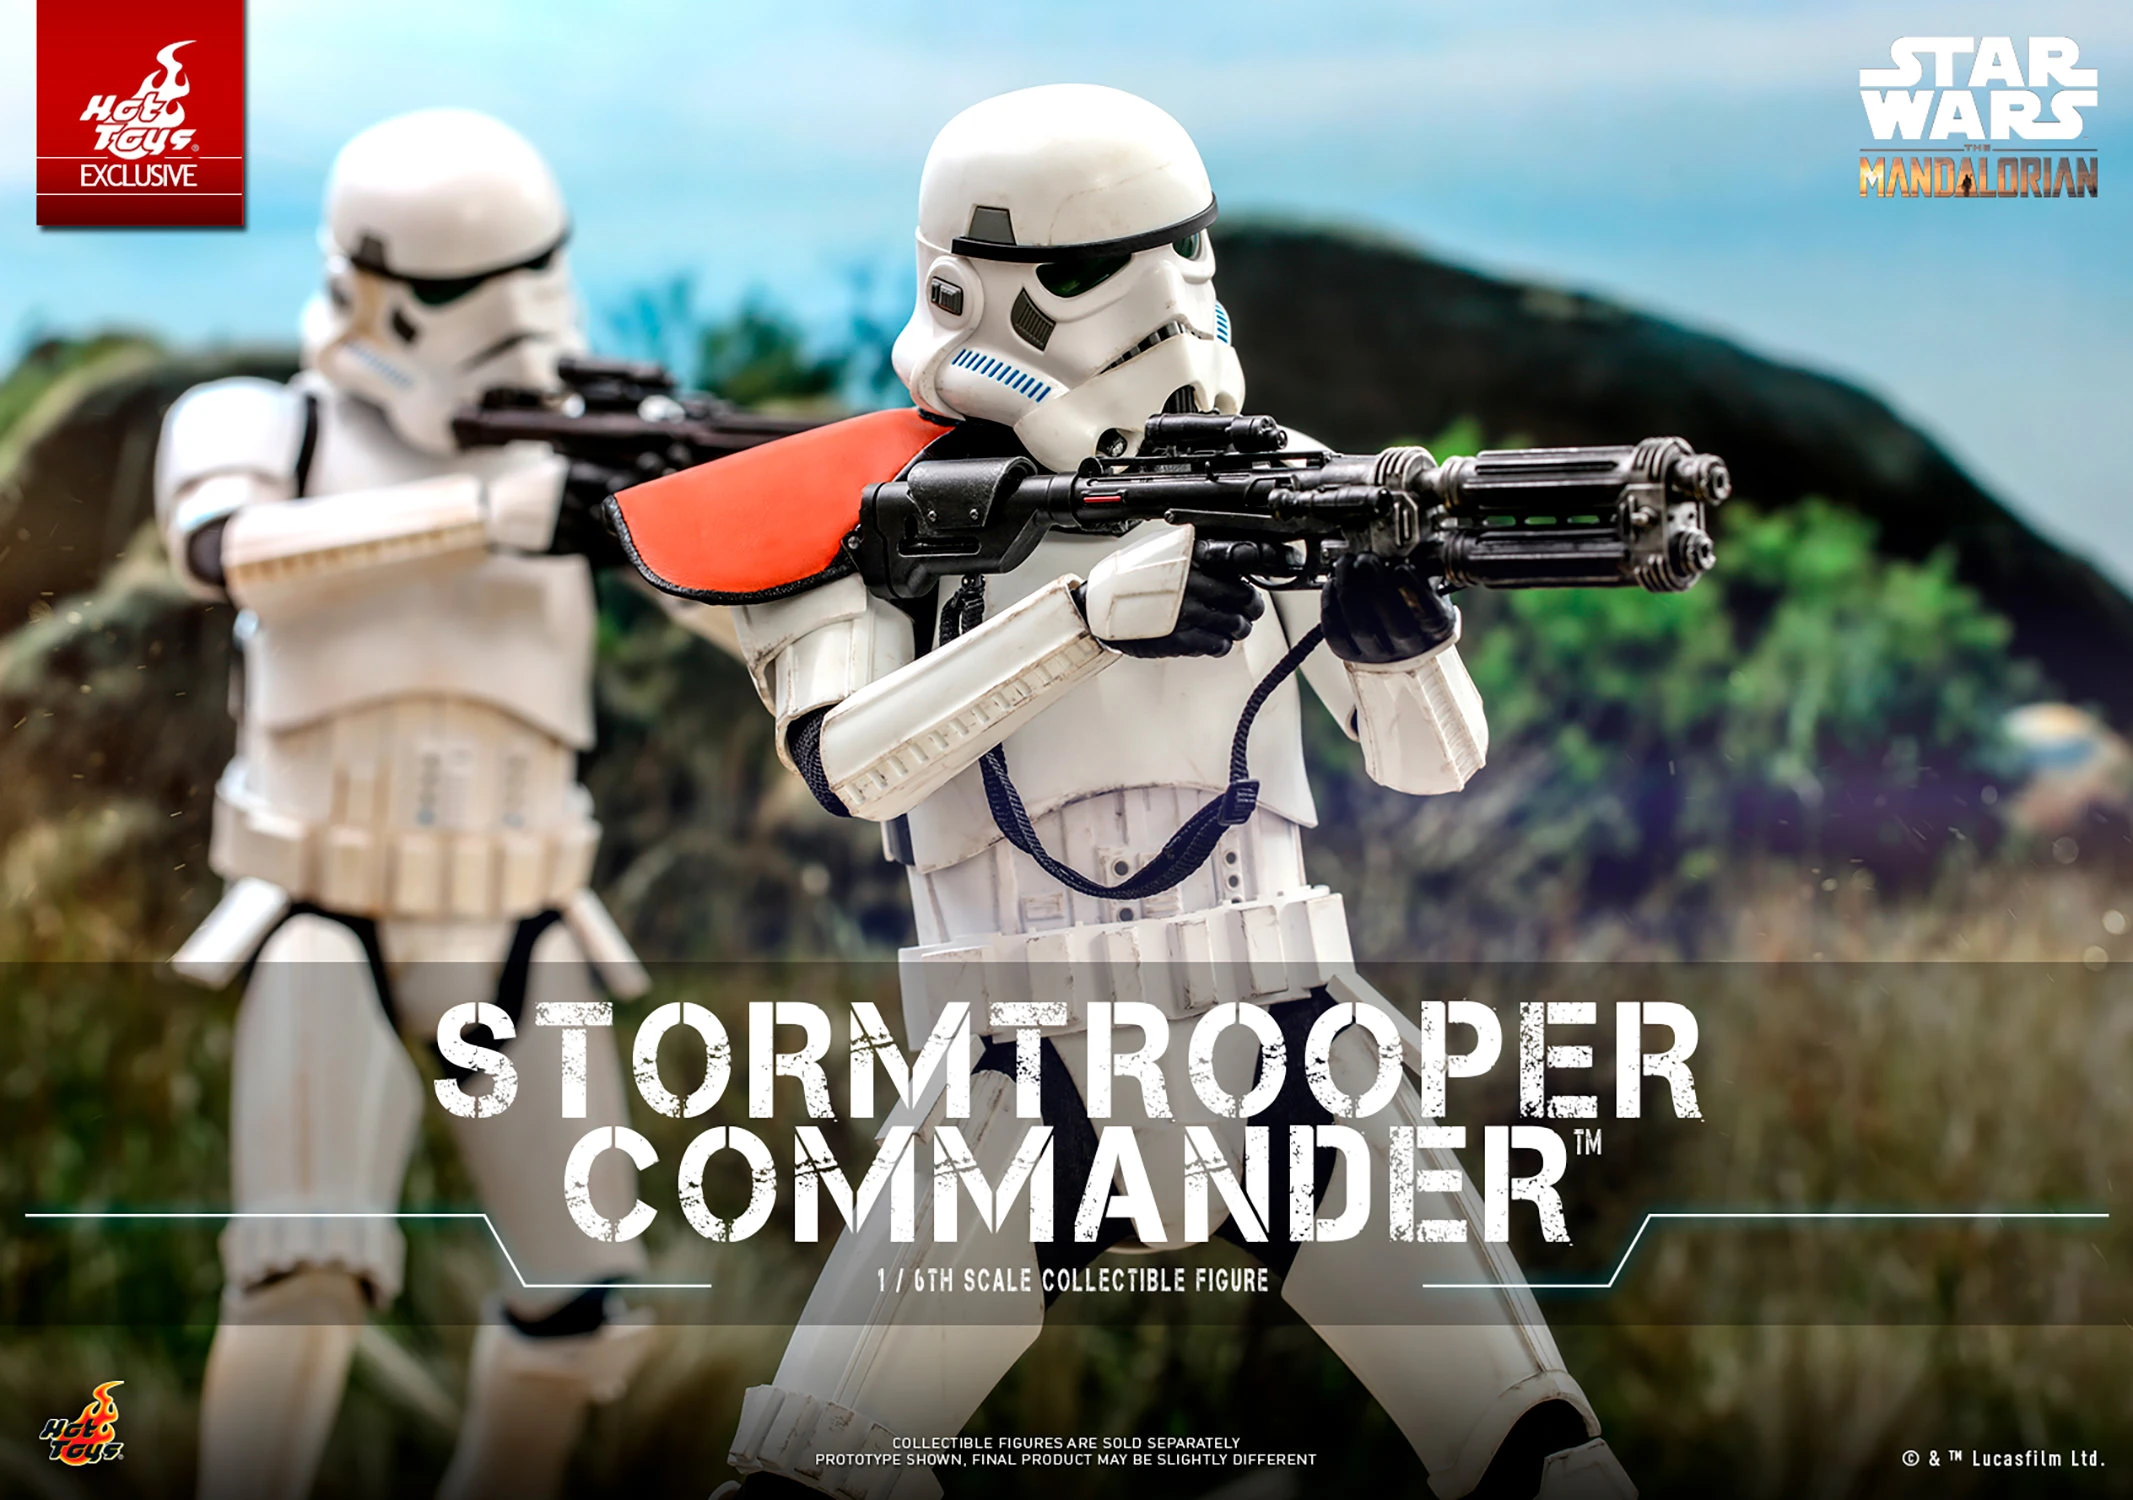
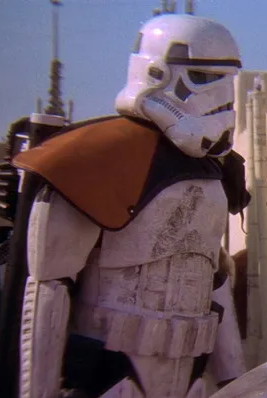
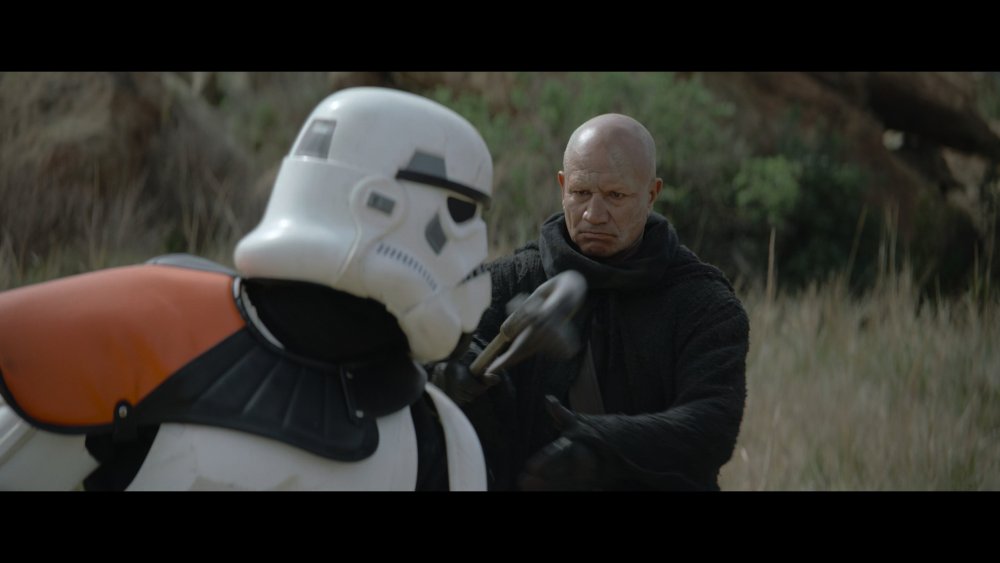
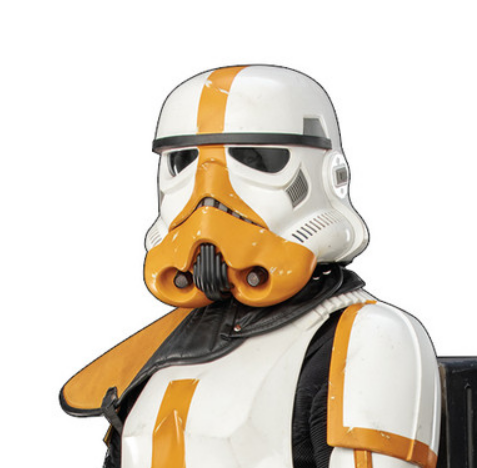
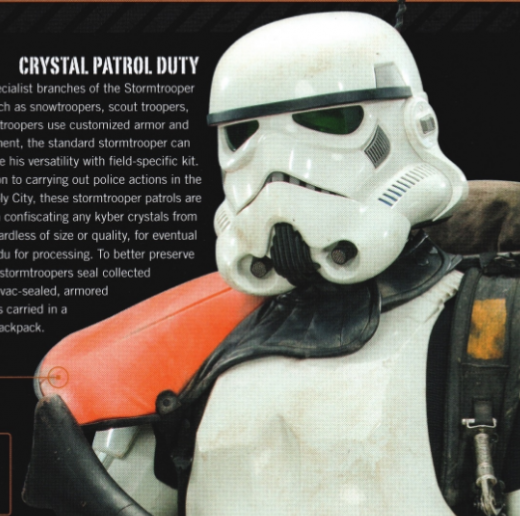
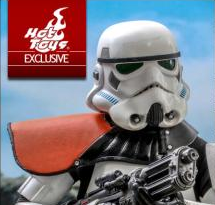
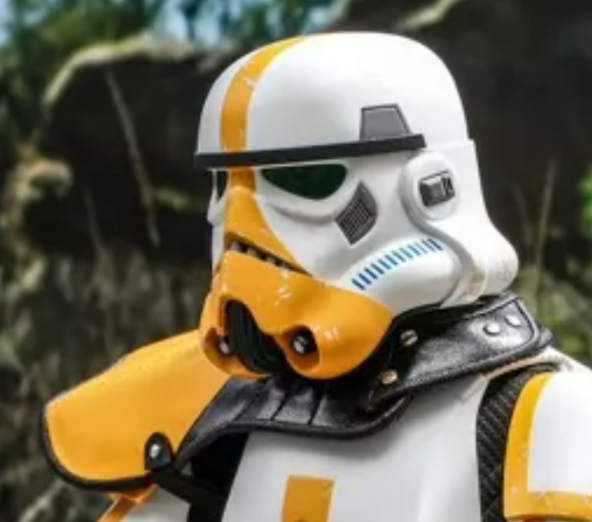
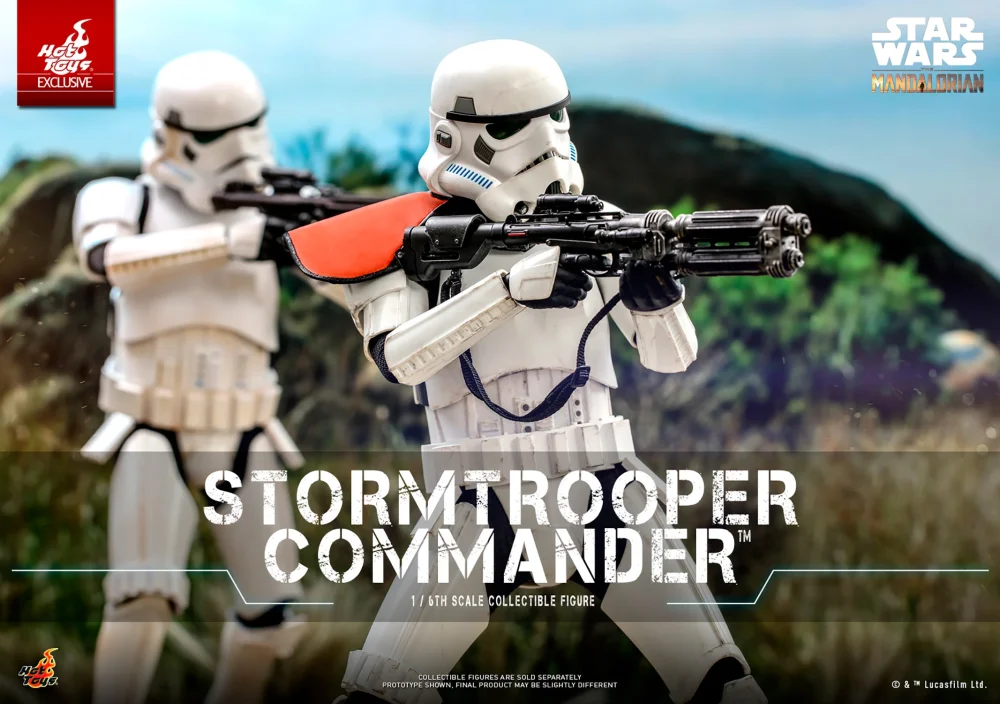
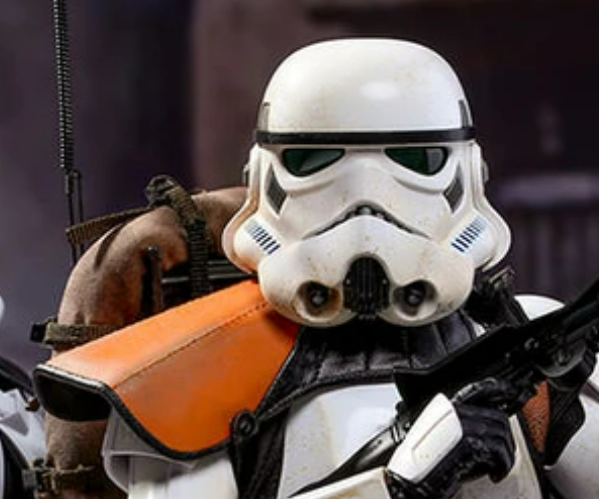
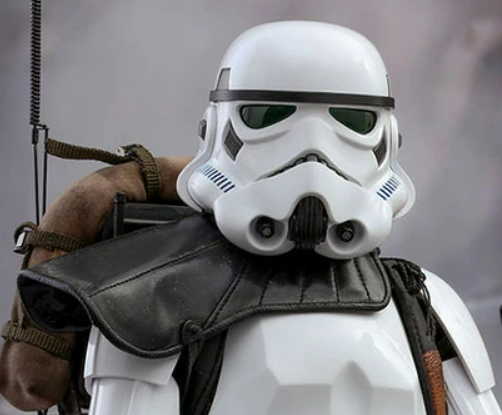
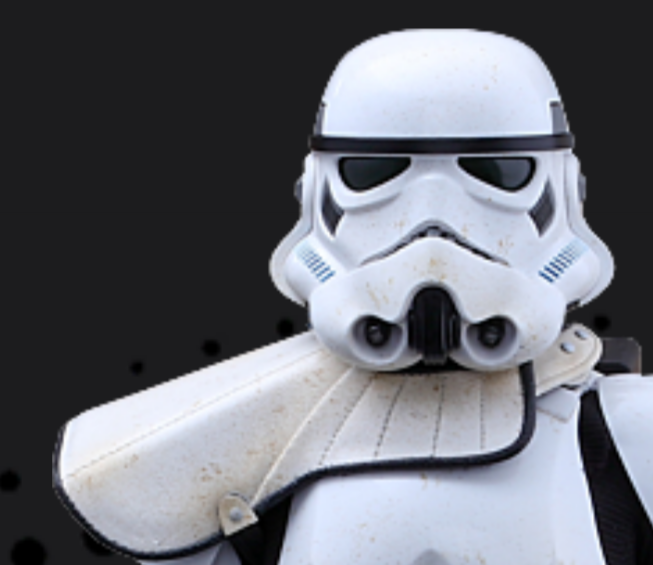
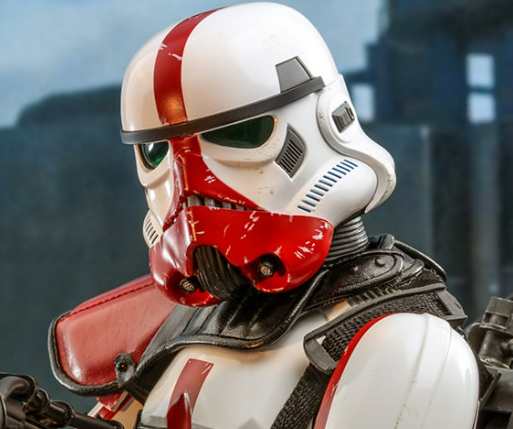
A little new era trooper pauldron research, mainly for the Mortar and Incinerator troopers, there always seems to be an exception though. So here we go, most of the new era pauldrons are a little different to what we have seen in the past, ANH and other original movies/series the colored sections have no lines (bare in mind these are for Sandtroopers) ANH Orange ANH Black With the exception of 1 white pauldron on a sandtrooper, it did indeed have sewn lines. New era pauldrons have 2 sewn lines/3 panels in the colored section just the same. ANH White NEW ERA 2 sewn lines / 3 panels Mortar - what is different to other new era pauldrons is a silver rivet is on the lower colored panel (arm strap) and also 2 rivets on the closure and the closure is on top of the pauldron not underneath like other new era, identical to the ANH white pauldron (the supplier confirmed it was created ANH style) hence the rivets. Hot toys same silver rivets, closure on top and silver snaps Incinerator - 2 sewn lines / 3 panels, no rivets, closure underneath pauldron, black rivet shoulder strap Black rivet shoulder stap. Can also make out 2 black snaps on closure NEW ERA Sandtroopers 2 lines / 3 panels. Note closures are affixed under the pauldron not on top and no rivets same as Incinerator. Also black rivet for shoulder strap Orange Note 2 black snaps on closure Hot toy black rivet/snaps Also note the white underside of pauldron Black Hot toy black rivet/snaps White (and an exception, some may note the CRL model is wrong for this pauldron, it is the only one that has a colored closure, being white, unless there are other references of course) It's closure is also attached underneath the pauldron and no rivets. White rivet shoulder strap Hot toys same, white rivet & snaps We come to another exception, someone has to be different, it has an ANH style with no lines in the colored panel which does not match other new era pauldrons, also showing 2 rivets on top of the closure and the closure is attached on top of the pauldron ANH style. Mandalorian Season 2 Hot toys same, no lines on color area, silver rivets, closure on top and silver snaps Hot Toys refer to this trooper as a Stormtrooper Commander What does this all mean, well research is the key, the more you research something the more you may learn and for those uber accurate ones make sure you research others research


 4 points
 -
I think so too. You can get helmets from others though and they look a bit different but similar to the different drewings made by Mcquarrie. So as long as the helmet looks like one of those it would be aporoved? Perhaps add those variants to the CRL? I’m going for this helmet.2 points
-
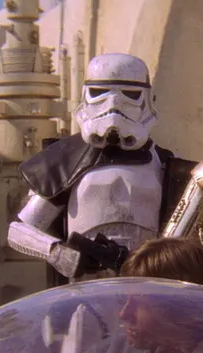
Hi all, My name is Ian from Melbourne, Australia & I've just joined the 501st Knightfall garrison there. I'd like to build up an ANH Stormtrooper costume - no experience whatsoever (but willing to learn ) so would appreciate any guidance on getting started. Especially if there are any reputable local Aussie vendors that I could support by buying from them. Cheers, Ian1 point
-
Welcome, Ian! Looks like other troopers have you covered with helpful links, so check them out for sure! Andrew and Glen will especially be able to speak into Aussie resources as they’re located down under as well. Once you receive your armor, start a build thread, post lots of photos and questions, and we’ll be there alongside you to help you on your journey!1 point
-
Hi Ian. Welcome to the FISD. The journey to build a stormtrooper May seem daunting at first. The key is research. The links above will guide your research and help you immensely. There are many very knowledgeable people here on these boards that will also be a huge help. Once you are ready to begin, start a build thread for help and advice and be sure to ask lots of questions. We are here to help you get there. Looking forward to following your build.1 point
-
Hi Ian and welcome to FISD mate. This is also a good resource to use as everything is in one post with links to a lot of things that are going to come in handy for you. This one is specifically for the ANH Stunt variant, there is also the Hero version with a few differences. The Stunt ANH is by far our most popular Stormtrooper around the world. Best of luck on your new and exciting journey and don't forget, if you have any questions, please ask away, we are all here to support you in every way we can.1 point
-
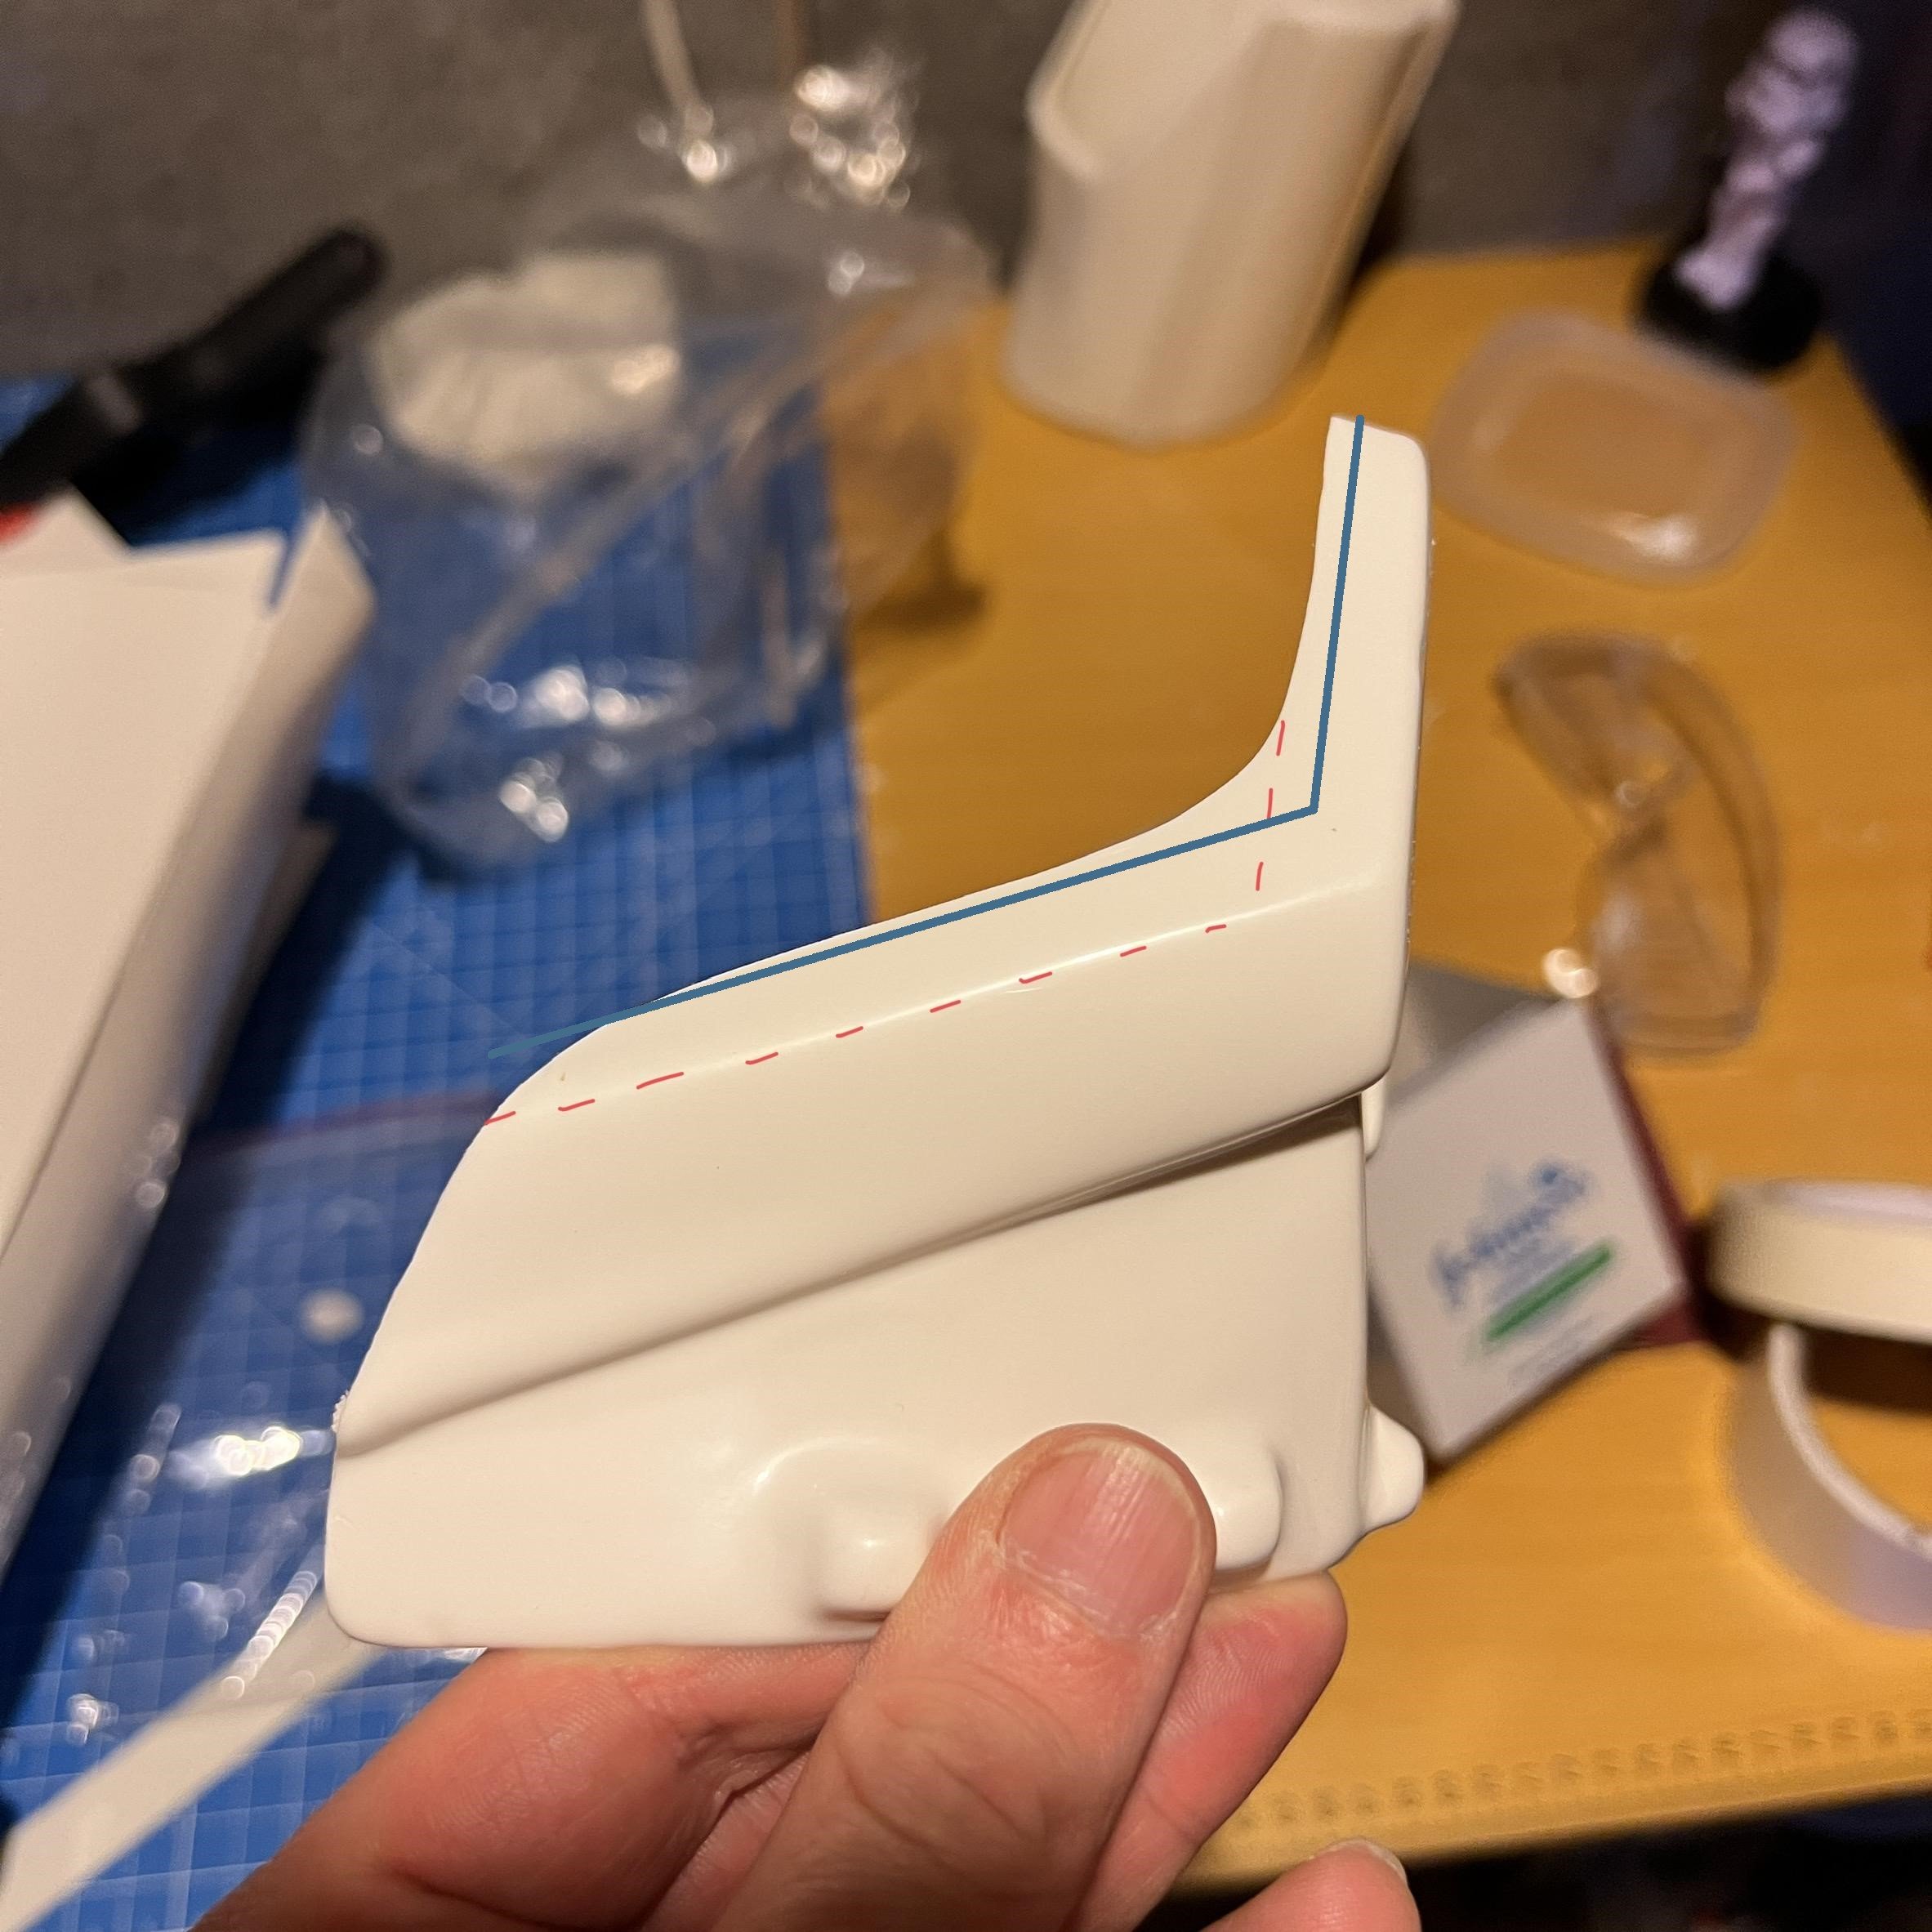
When cutting the sniper knee, make sure that when cutting the L shape, in the bend of the L - don't cut it straight edge to edge but rather more of a C shape, as you can see in the example sniper knee that Glen posted above! (hard edges can cause cracking) Regarding the right ab, are you planning on keeping material out to the blue line or do you plan on cutting it down to the red line? The red line alignment is good for the current Han snap alignment, but I think that you'd have to reposition it if the blue line is the intended line! Also make sure to not cut away the green marked "ledge", as that is where we put the screws. The only reason I'm ponting that out is because I see a dotted line where my bottom green line is, and want to make sure you don't cut that1 point
-
Good notes, yeah those are some of the things I figured I would need. Just wanted to get basic approval as soon as I could to get reinstated as a TK and the stuff I’ve been doing when I was previously with my FOTK Considering I do the edits for most photos in our garrison I did what I could for backdrop until I can get a better option. I can work with that for now lol. Sent from my iPhone using Tapatalk1 point
-
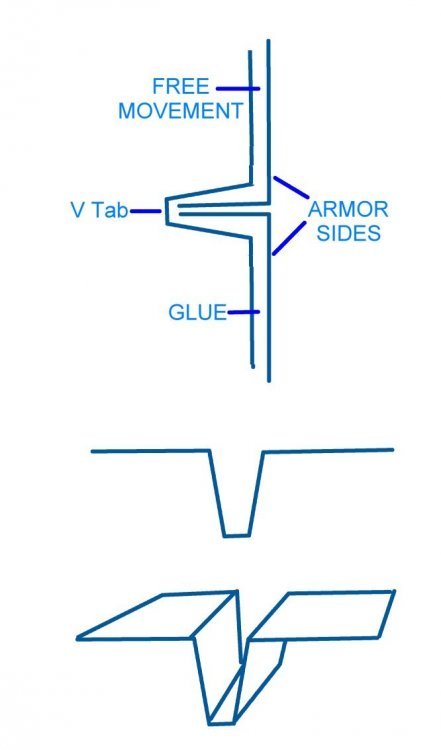
Noticed in your helmet photo the brow trim looks a little wavy, just needs a tweak to look straight. Having a completely contrasting background, full length, will help your GWL when it comes to editing your photos, perhaps keep this in mind for EIB For higher levels have a look at your posterior gap, it's pushing backwards leaving a gap in the sides V tabs can help this. Your fabric belt is slipping lower than the angle of the plastic belt, this could be brought upwards, a small tab of velcro and help it stay. Note that your shoulder bells appear to be angling backwards in the previous image, moving the strapping point further forward can help them pull inwards in the front, the gap is quite small at the back. Drop/bend your shoulder straps on the rear as they are sitting up Detonator could be rotated a little more so the 0 detail can be seen Good luck with approval
 1 point
 -
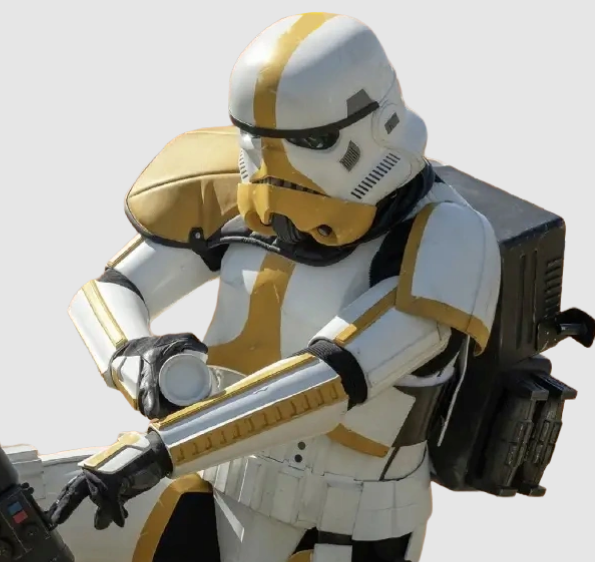
Amended to the below Although the Artillery Trooper is clad in Rogue One armor, the Pauldrons that denote rank or mission specialization are an ANH style in construction. *A Yellow ornament made of leather plastic or leather-like material, worn over the right shoulder. The Yellow is specific to Rogue One/remnant as seen in The Mandalorian. *The colored panel is divided into three sections by color matched stitching to conform to the wearers shoulder and has black piping around the outside edge. *The remainder of the Pauldron is black and divided by black stitching into 10 segments. *The neck closure is black, it is mounted on top with two silver rivets and has two silver snaps visible. *There is a black elastic strap that runs from back to front and is worn under the bicep to hold the Pauldron in place. The strap is conned to the Pauldron on top by two black snaps inlayed in black “D” shaped leather or leather-like ends. *The underside of the Pauldron is white or black regardless of top color and is divided with white or black stitching into 3 segments. The entire outside edge is finished with black piping and the underside of the neck closure is black.1 point
-
Looks good Expanded: The neck closure is black, it is mounted on top with two silver rivets and has two black silver snaps visible. 13 segments, typo should be 3 *The underside of the Pauldron is white or black regardless of top color and is divided with white or black stitching into 13 segments. Could even add color of rivets/snaps for higher levels1 point
-
I think before I'd do anything is to align the tops of the plates on the same level one more time, and possibly re-measure the placements of the marks on the AB, since right now in the image (possibly with the angle) it looks like the top is aligned above the kidney, and still the marks end below the kidney marks! (and yes the measurements are 20, 52, 53 as Glen pointed out, but one millimeter isn't a big deal, however since you are in a state where you're still measuring, might as well do it? ) Keep it up, it looks really great! The helmet looks mint by the way!1 point
-
Ab rivets look pretty good DO's references For Level 3, three domed head bifurcated (split) rivets approximately 5/16" (8mm) in diameter are present on the left side of the abdomen and kidney and are equally spaced along the depth of the armor and are painted white. Note that the measurements are from the center of the rivet. Rivets on both kidney and ab should line up horizontally. Diagram by Billhag Interior pic showing split (bifurcated) rivets You Han snap looks like it could be a little closer to the edge, looks more than 10mm Sometimes referred to as the "Han" snap, for Level 3 a single male snap on the top right corner of the ab plate is present. Note in the photos that it is the bottom of the snap that faces outward and is not painted. This is also sometimes referred to as the "Han" snap. Sniper plate should be like this NOTE: For a more screen accurate look, it is suggested that the top of the rear ridge of the sniper plate be aligned with the top ridge of the calf. Also note that the sides are angled rather than curved.
 1 point
 -
@ukswrath came up with some supports to help take any strain1 point
-
Good to see this post back from the dead What else have you got to do?1 point
-
Hi Justin, and thank you for your EIB application! CRL and EIB Application Requirements: All required photos have been submitted, and on behalf of the entire D.O. staff we are pleased to welcome you to the rank of Expert Infantry. Congratulations! Other-Armor Fit/Assembly; In this area we review observations made by your fellow troopers and the DO team. Some observations may lead to suggestions to improve the overall look of your armor, and please keep in mind that we consider both text (CRL) and pictures (screen caps/reference images) when reviewing submissions. Excellent armor Justin!!! There are a few things we would like to comment to you, but most of them are "minor" things. Starting with the helmet. -L3. Ideally placement of the ears (and screws) should closely follow the rear angle of the Trap above them. This issue is present in 99% of the applications.But as we always tell you, it will only be a requirement for centurion level in case the helmet looks very bad... We encourage you to do so, and your helmet will look spectacular. Reference images -This is a detail that we frequently suggest too. As seen in the reference image, you could trim the ends of the brow trim. Easy fix Reference images -We see that you have 2 bumps on one side and 3 on the other. Yes, it is true, there were disparities in at least one helmet in the film, but most had 3 on each side, as you can see in the reference images. You can add one more stripe. Reference images Reference images show us that the Han Snap is usually closer to the edge. However, we have seen that your return edge is very wide, so it looks like the Han is misplaced. We think you could trim the return edge a bit to be more screen-accurate. Reference images -It seems that your posterior plate is sticking out a bit and is not aligned with the kidney. Maybe you can use the famous "v tabs" to fix it. Reference images -Just a dressing issue here. When putting on your calves take care of the back closure alignment. Reference images -The angle of the sniper knee plate should be a little sharper (don't make the corner a sharp one).. If you decide to fix this, take into account the alignment indicated in the points required for centurion level, below. Reference image *************************************************** Centurion Requirements: In this section we prepare you for our highest tier of approval. Because Centurion photos must show more detail than EIB, items pertaining to Level 3 might be seen there and not here and additional photos may be required. We try to point out all that we can from what we are able to clearly see, but the final accuracy is the responsibility of the trooper. -CRL L3: There should be a minimal gap between the shoulder armor and the chest/back plates. It's very little, but we think you can reduce that gap a bit, and your armor will look much better. Small details make the difference. Reference images -L3.The plastic shoulder straps need to be held down in the back via a white elastic band to the white fabric that connects/bridges the chest and back piece. In this photo, it looks like the white elastic is there. When you submit your Centurion application (wink,wink), you can include some more clarifying images. Reference images -L3. If silk or satin gloves are worn, the hand plates have the correct visible stitching with a 5 point/star pattern, equally spread out with 2 on each side and 1 in the middle front, double stitched with 2 holes at each point and sewn to the glove at each one using black thread. Yours looks to be satin type gloves but the hand plates are affixed by an elastic strap and no stitched to them. You will have to remove the elastics and sew the hand plates to the gloves. Reference images -L3.The corners of the plastic ammo belt shall be trimmed at a 45 degree angle that that meets the outer edge of the cloth belt. You can trim the ends of the ABS belt a little. Reference images -L3. Drop boxes are vertically aligned with the end of the ammo belt with minimal gap between belt and box. You can prevent the drop boxes from moving by applying some E-6000 behind the strap. Reference image -L3. Canvas belt must be firm / sturdy in appearance. No creasing or sagging We suggest a slight haircut Reference images -L3 .Lower thigh ridge joins (front and rear) shall butt-up flush against each other. Any gaps must be backed with ABS or filled as not to be noticeable. You can glue a small square of ABS (inside), and fill the joint with ABS paste, sugru or something like that. Reference image -L3. Sniper knee plate must be aligned with the ridges on the shin. The ridges on the top do not align with the ridges on the top of the shin as required. This is a common issue. It doesn't need to be perfect, but it needs to be a lot closer for Centurion. Please, be extremely careful when removing the sniper knee plate, as it can easily break. Reference images That's all Justin. They may seem like a lot of things, but believe me, they are very simple fixes, which should not discourage you.... I look forward to seeing your Centurion application shortly.... Congratulations!!!1 point
-
Hi Erick, Glad to read you're planning to continue the process towards Centurion Level . Due to your EIB application his 7 years old, and in order to give you the best advice upon the additional requirements to achieve your goal, we would need you to add a new set of photos so we can review the current armor state, How it fits you and in general how it looks. You can post the new photos here, into the Request TK Pre-Approval section or you could submit your Centurion Application and make the requested fixes in it. You can find the required photos HERE .1 point
-
1 point