Leaderboard


Popular Content
Showing content with the highest reputation on 01/28/2023 in Posts
-
7 points
-
Next step: L4 with Chaos Division @Morgi, @Swoby, and honorary @revlimiter5 points
-
Glued on the leg greeblies: Started polishing the side seams with Novus 3, by hand. Going well, but it’s tough work. I think I’m going to get a headlight polish kit with a drill attachment. Gonna need it for the shoulders for sure. Been working on the shoulders. Wow it’s been frustrating. ABS paste, sand, and repeat. I’m still not 100% happy, but I think I’m going to call them good enough and move on to polishing.4 points
-
4 points
-
4 points
-
Or as @justjoseph63 pointed out: E-6000 is easier and more satisfying to remove. In a welcome break from the ongoing winter break, I actually got troops coming up! Can I get a "hooray!"? And to close off today's section of what's been going on lately, congrats to our newest Centurion @MaskedVengeance3 points
-
It's a visor . You just know what this 60 foot Opee sea killer is thinking: MMMM.. crunchy on the outside, soft on the inside!
 3 points
 -
Ok, that's getting framed next to my EI and Centurion certificates. You guys just wait until I finish my TD master post...3 points
-
Well I did it, will still need some work but its very close.3 points
-
Hello! I'm a current 501st member (Clone Wars Ventress) but wanted to add an armored costume. I'm in-process to buy a fully-built already-once-approved TFA Phasma and very excited! Will be posting some questions in the Phasma threads for fitting the kit to me and maintaining the chrome.2 points
-
Seriously, congratulations Centurion!!!!2 points
-
Sorry, my computer technical skills are what they used to call back on the Death Star "Total cr@p", lol. Just a bit of fun.2 points
-
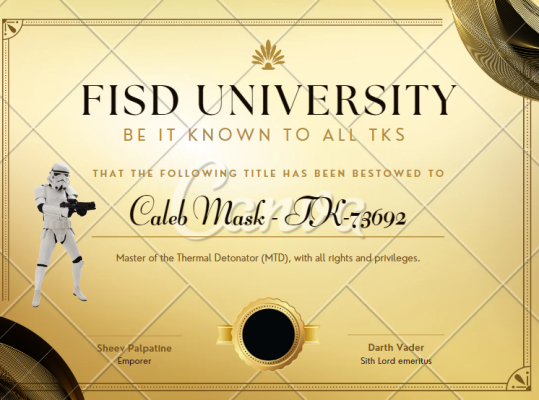
Hi Caleb, and thank you for your submission for ANH Stunt Centurion! CRL and CENTURION Application Requirements: All required photos have been submitted, and on behalf of the entire D.O. staff we are pleased to welcome you to the rank of CENTURION. Congratulations! Other-Armor Fit/Assembly; In this area we review observations made by your fellow troopers and the DO team. Some observations may lead to suggestions to improve the overall look of your armor, and please keep in mind that we consider both text (CRL) and pictures (screen caps/reference images) when reviewing submissions. Welcome to the ranks, brother, and thanks for one of the best submissions we've seen in a long time. You have not only stepped up to the plate, you have knocked it out of the park! We appreciate you taking care of the notches in such a timely fashion, and VERY smart idea of adding the reinforcements. I'm not a big fan of return edges in many areas, but in ones like this it's better to have that extra protection to prevent any potential splitting. Nice job, sir. Nice job indeed. All that being said, I would like to be the first to congratulate you on this milestone in your TK journey, and we are looking forward to seeing your HWT!
 2 points
 -
omg the batting average one I had a long health care meeting this morning. When it got to be too much, I'd glance at this thread and feel better. I also thought about memes. But mostly I lacked concentration.2 points
-
Sneak peek2 points
-
https://up.picr.de/44992453cp.jpeg[/img2 points
-
First Order Scuba Troopers Wonder which detachment will get these, do we have a submariner detachment Star Wars Resistance - No Escape: Part 1 Episode Guide1 point
-
Congrats Caleb and welcome!!!1 point
-
Thank you all. And yes I do have a second snap button to lower the thighs a bit n order the avoid it catching the cod. Like I said I just jumped into the kit to try it on and will look forward to adjusting it properly. And info you all have for me is greatly appreciated1 point
-
Congratulations!1 point
-
NICE looking set of armor there, Alan, and it looks like it fits you very well! I'm sure you will have a few small tweaks here and there, but that's to be expected. Not sure what type of strapping system you are using for the thighs, but you may want to rotate them out a bit if possible. The reason I say that is because you may find that when you walk the tops of them are catching on the cod. Having that extra space will make it much more comfortable.


 1 point
 -
Caleb Mask 73692 Centurion letter Joseph At last! https://www.whitearmor.net/eib/certificates/73692-centurion.png1 point
-
Strange but absolutely true. I thought it was just me, lol.1 point
-
Great to see you finally in your kit Alan, looking forward to your application photos and inevitable approval1 point
-
That is a great looking kit. Good luck on your approval1 point
-
I've somehow missed this. Is that bucket inside of another bucket? Very fun costume.1 point
-
I know this is an old thread but one of my garrison mates was thinking of doing this kit lol. Probably spec ops if I had to guess.1 point
-
Soft pouches can definitely help protect the armor from getting scratched in transport.1 point
-
Great news, looking forward to seeing more pics soon1 point
-
Now that I'm approved I have spare time to meme, but should probably go home and rethink my life. Multiple EIB Award Recipients1 point
-
It's close, but I feel off with the eyes still and can't figure it out. The brow is still a little low I know, the construction leaves a gap in the top that doesn't hold the trim as tight as the stunt I've noticed? Sent from my SM-G991B using Tapatalk1 point
-
True enough. I've personally never had much trouble removing superglue, so it wasn't a problem for me. Still, E6000 is definitely a better solution and wayyyy more satisfying to remove1 point
-
I built my whole E-11b and didn't read the CRL. At least it's just another counter that I need to print.1 point
-
"What do they mean by 'screen references'?"1 point
-
1 point
-
Dude I can relate to the ears.1 point
-
Me: I won't post any more memes today. Also me: I certainly am very proud -- this whole thread is awesome Did you know that you can get push-up notifications on your phone for the FISD?1 point
-
1 point
-
Hey, @T-Jay, found your twin (Oh, and I hope you didn't expect to escape ever having any memes made about you) It's a wonderful E-11 Also, no memes about the E-11 Blaster Reference so far? Shame on me1 point
-
1 point
-
1 point
-
OP (MV) Post #54: Helmet Completion You read that right. This post will cover the remaining steps in the assembly of my very first helmet. Note that internal padding and electronics will be covered in a later post. Supplies Resources CRL Helmet Alignment and Attachment Brow Trim Adjustment Extra Interior Paint Neck Opening and Attachment Trimming Ear Trimming and Painting Tube Stripes Neck S-Trim Final Helmet Exterior Questions Upcoming Pencil Masking tape Magnets Ruler Lexan scissors Xacto (hobby) blade Mounting hardware of your choice Mini trangular craft swabs (NEW, see photo below) Below are some resources links that I've previously posted when I first began my helmet work and are now particularly applicable with there I am in assembly. I've divided them into five categories: brow alignment, ears, example builds, tube stripe painting, extra build threads, plus a link to the FISD OT Gallery at the bottom. BROW ALIGNMENT Choose Your Brow Height by CableGuy (Print PDF) Helmet Alignment by CableGuy (Print PDF) EARS Helmet Ear Tutorial by gazmosis (Print PDF) Draw No Gap Ear Line by bpoodoo (Print PDF) Ear Placement by justjoseph63 (see particular posts) (Print PDF) EXAMPLE BUILDS pandatrooper's ATA Brow & Ear Section (Print entire thread PDF) Ales ATA Ear Section by Ales (Print entire thread PDF) ANH TE2 Helmet Build by TK-4510 TUBE STRIPE PAINTING Template Painting 101 by justjoseph63 (Print PDF) Tube Stripes by CableGuy (Print PDF) EXTRA BUILDS A.J.'s Helmet Work LTM's Helmet Work Cricket's Sponge Template Painting and Lid Work (several posts) zv288bot's Helmet Assembly, Scimitar's Excellent Helmet (Pages 1-3) wook1138 Helmet Progress Ensi's Helmet Work dereferenced's Photo-Heavy Posts plus Flickr album TheLorelei's Helmet Posts (across many pages) FISD OT Gallery (screen references and props used) Click image to enlarge, or navigate directly to the CRL. Helmet Alignment and Attachment To continue where I left off back in [insert month and link], while tackling my faceplate and cap alignment I had two goals: Set my brow-height at the lower end of the Stunt acceptable range; certainly not as low as Luke's Hero. Align the pieces in which away that enabled me to line up the ear screws with the rear edge of the side traps, as shown in the photo below. Though that latter goal may seem more ear-related rather than general helmet alignment related, it is relevant as I wanted to ensure I properly trimmed the cap edges so that its overlap seam with the faceplate would fall under and be obscured by the ears at the angle I wanted them to be set at. I also wanted to be sure position the screws for the face and cap in a way that would not hinder placement of the ear screws. Thus, before drilling holes for attaching the face and cap, I drew a light pencil line down from the trap rear edge to mark the lateral placement of the ear screws (knowing, of course, that the end result wouldn't be exact since I'd be somewhat at the mercy of pre-formed screw-hole dimples on the ear pieces). I also removed the ears from a WTF helmet to measure roughly where the ear screws would be placed vertically along my drawn line. If the ears are positioned as far up (high) as possible, touching the brow trim, then then top ear screw will be about 0.5 - 0.75 inches (1.27 - 1.91 cm) from the brow trim, and the second ear screw would be 1.75 - 2.00 inches (4.45 - 5.08 cm) from the brow trim. Once again, I realize this is only approximate, and the only reason I wanted to mark this on my helmet was to drill my face and cap attachment hole sufficiently away from the future ear screws areas. I then split the 1-inch (2.54 cm) difference between the ear screws area and drilled my face and cap attachment hold 0.5 inches (1.27 cm) forward from my pencil line. With the eventual addition of the two top ear holes, the three holes will essentially form a triangle. And here we have my bucket with face plate and cap attached and with magnet sachets removed for the first time. I used some extra screws, washers, and locking nuts from my lens installation, rather than rivets, to give me ease of disassembly in the future. Eventually all the internal hardware will be painted black to match the rest of the helmet interior. While I had the WTF ears off the other bucket I laid them over the top of my ATA helmet sizes to gauge what the form of the ears would cover on my cap piece so I could determine how much more plastic to trim. I had previously trimmed the flashing of my pieces very conservatively, so after taking the photos shown above I disassembled the helmet pieces and trimmed a little more ABS around the cap ear areas and the neck opening on both helmet pieces. Note that I placed blue tape over my painted traps to project against any nicks from my scissor tips. Here is where I landed after this next round of trimming. I figured I could still open up the neck area even more, but before doing so I wanted to get a basic form of my ATA ears in place, so I left things as is. Brow Trim Adjustment Through the many hours of my helmet assembly I had no doubt observed the tiny details of the sculpt and assembly details. One tiny insignificant detail that I wanted to address was one that I’d never before seen any other builder do, but once I had the idea in my head, I couldn’t rid myself of it. And what was this, you may ask? The flushness of the end of the brown trim with the helmet at the rear edge of the side traps. OCD me wanted that little tiny gap to disappear, so I set out to create a spacer on the inside of the helmet to pull the rubber brow trim right up against the cap piece. I trimmed some ABS scraps that already had a curve in them and E-6000ed them to the cap. Viola! Very clean looking if you ask me. Note that I was aware of the impact that adding a thin spacer on the inside of the cap would be. The faceplate would no longer be able to sit as flush up against the cap with the spacer in place, but I figured that added span would be easily masked with the ear pieces in place. Easily curable with a slight deeper cutout step at the top of the ear pieces. Extra Interior Paint While I had the face and cap pieces disassembled I added a little extra pint to the interior of the helmet. After finally attaching the two halves of the helmet an unpainted section was left exposed. My original can of truck bed liner spray was on fumes, but it got the job done. Neck Opening and Attachment Trimming Before moving onto the actual ears I needed to get the faceplate and cap to fit more harmoniously with each other, so first I widened the neck opening a bit, mainly on the cap piece. I added a second screw on the right side to encourage a better fitment then proceeded to evaluate the next trimming steps. Below are some before-after photos of additional trimming for both sides of the helmet. I always marked my intended trim lines with pencil to prevent accidental over trimming. Without pencil markings a reference, it can be easy to get carried away and shave off too much—something worth remembering for your entire build. At this point I had some rough-trimmed ears to use to help guide my trimming, and I used my heat gun for forming purposes for the first time. I needed a bottom section on the right-side cap to curve inwards a bit more, so I “insulated” the surrounding area with popsicle sticks (not sure if it was effective). Still not entirely happy with the form on both sides, I used an xacto blade to actually thin the plastic to create more of a flush surface at the seams. More on this again in the next EARS section! Ear Trimming and Painting Undoubtedly the ears had been a mental barrier for me for the past year, but the time had finally come, so I reviewed the helmet and ear resources I had saved (some of which are listed at the top of this post) and set to work. ATA ears have very minimal, and in some areas practically non-existent, ear trim lines fabricated into the pieces which isn’t necessarily a bad thing. My goal has been to line up the ear screws with the rear edge of the side traps, but that’s not how all builders assemble their kits, so there truly can’t be any one-size-fits-all ear trim lines. In this case of not having distinct guide lines I actually had fewer limitations on cutting locations. The trickiness of ear completion is rooted in the three-dimensional nature of the form, thus requiring trimming on the x, y, and z axes. And, because of the diversity in cap and faceplate tolerances and installation placement, there’s really no template or guide to use when trimming ears. It really simply comes down to trial and error. The perfectionist and “engineering” side of me went to work. Rather than utilize methods such as using a compass or aluminum foil, I decided to employ an elementary (literally) technique—paper mache. Essentially I would create a paper mold atop a “good enough” rough trimmed ear, and then use that mold to trim the final ear. I decided that it may be helpful to have several spare ears on hand to help perfect the technique, so I reached out to recent ATA builders to ask if they had any they could spare. (INSERT TAGGED users) @Cheeseballs, @Cali_Nole, @PajamaTrooper, answered the call, and @Cricket even sent me an old pair of RS ears. In the end I acquired five individual ATA ears, all pulled (vac-formed) from within a year of my own armor and thus all a color-match. Iza @Cheeseballs even sent me the awesome cartoon below: (And no, @Morgi, you cannot have my ears.) The first thing I did was to pencil-mark the very faint trim lines on one of my original pairs of ATA ears (ATA kits ship with two pairs), which I had already painted black on for practice. I then proceed with trimming to the lines using lexan scissors and an xacto blade. No dremmel at this point. After attaining a rough profile that was acceptable, though most definitely not the ear gaps I was after, I aligned the ears with the traps and drilled the mounting holes. I recalled seeing a technique involving drilling the holes in the ear pieces and installing tall screw posts in the cap in order to maintain proper and consistent ear placement when sanding and test fitting, shown in the photo below. With the “guide post” screws inserted from the inside of the cap I proceeded with some further trimming, and the following images reflect where I landed. Notice the ear gaps are quite pronounced due to first-time-builder over-trimming, but they would be rendered moot by the forthcoming paper molds. Happy with the semi-final profile and placement of the ears, I then moved into the paper mache phase. But first a brief explanation on why I opted for a paper medium. I had considered using molding silicone but thought it might be too messy, and the ear gaps would have posed leakage problems. I also desired to stay away from any recasting appropriateness discussions, and hence fell back on paper, and more specifically, toilet paper / bath tissue. Haha. I prepped my helmet in a wash bin, poured some water in a small container, and raided a bathroom closet for some low quality toilet paper leftover from the beginning of the pandemic. I then set alternating layers or wet and dry toilet paper atop the ears and the surrounding helmet area. The goal of this was to capture a true form of the seam between the helmet and ears, so I paid special attention to the borders of the ears where they rested on the helmet. Here is a three-stage photo sequence showing layering in progress, the completed wet mold, and the final dried product. Note that I poked hold in the wet mold so that I would later being able to discern proper seating upon the ear. As shown below, the edges of the hold did pull up from the helmet surface, due to shrinkage while drying, but the edge form capture remained most uncompromised. Here is what the inside of the paper molds looked like. Notice that even the screw head forms were captured by the mold. If I recall correctly, complete drying took between 24-48 hours, and once that was done I laid the molds over another set of fresh ears and traced the form line over via pencil. For redundancy to check my work, I then also formed two layers of aluminum foil over the helmet and ears and compared the resulting form lines to those from the toilet paper molds. As shown in the last photo ABOVE, there were some slight discrepancies between the paper and foil lines, so when I proceeded with actual ear plastic trimming I stayed conservative and followed the more shallow lines. Note that in the photo above, the ear pieces are actually a color match; there was simply some white-balance issues while photographing. With the molds complete, I was also able to determine that one of the spare ears that I had acquired was already over-trimmed for my purposes, as shown below. I then proceeding with trimming out new ear forms, which I actually planned on being a second draft of sorts. I estimated that there may be some inaccuracies with my rudimentary molds, and that I may also simply make errors due it being my first real attempt at close form fitting. (Recall that with the first set of ears I cut for molding purposes, I paid virtually no attention to the helmet-ear gaps). Here are some photos AFTER trimming with an xacto blade but BEFORE fine-tuning sanding; honestly, already passable as-is, if you ask me. Before moving on to trimming and sanding my final set of ears for actual use, I had initially decided to paper mold all my remaining new ears simply to double check that their profiles were all identical to begin with. Finding that they were, and behind quite happy with the results of my second draft ear sanding with negligible gaps, a new thought dawned on me. Rather than reusing my original paper mold for my final ears, or even remolding the helmet with my second draft ears, and could simply remove my second draft ears from the helmet, place them inside the new molds, and trace the ear edge/trim line onto the inside of the paper mold. I could then cut the paper molds along the lines and then place those molds atop brand new ears and trace the outline back onto the ears. I suspect that sounds really complex in writing, and as of now, I have not actually executed that process (other than molding the ears as shown below). To this point, the ears shown attached to the helmet above (with red background) were intended to be intermediate ears that we then be replaced by final ears. However, they turned out so well that, coupled with working on a tight deadline over the past two weeks (January 2023), I elected to keep them. There is a stray hobby blade slice that is visible upon close inspection, that that imperfection may push me to eventually redo the ears, but for now I can live with it. At one point in my build I wanted to be able to done my helmet so I actually painted up these intermediate ears, minus the rank bars. I had recently discovered little craft swabs, which looked line minimalistic and dangerously pointy q-tips, and worked GREAT for paint edge cleanup. Just dip them in a little mineral spirits and crisp straight lines are achieved in no time! Some of you may recall me having previously painted ears as documented in this post, and those were to be the FINAL ears, which remain unused at this time until I get motivated back into action. You'll notice in the ears above that there were not yet mounting holes at the bottoms of the ears so I went back and drilled them at the pre-molded areas, starting first with a small drill bit then working up in size. I think used a countersinking tool (TURNING BY HAND) to properly cradle the screws (required for higher levels of approval). To restate, DO NOT countersink using a drill or you will likely bore all the way through the soft plastic. To finish off ear installation, I spray painted the six screws with white glossy white paint and a clear enamel. I'll dive more deep into this paint process when I touch on painting the rivets for my ab and kidney armor pieces. Tube Stripes For the past several years I had intended to hand-paint my tube stripes, but when I realized that there were actually ANH-style decals that individual stripe pieces instead of one large piece of vinyl (like ESB), I changed course. There's no way I'd be able to paint, even with a template, as clean as a decal, so I purchased a set from Trooperbay (link to be added later). In preparation for application, I cleaned off the helmet tube surface with isopropyl and let it air dry for a few minutes. * Note, I've since redone my frown teeth paint job, so disregard the teeth paint. * Two of the critical factors in tube stripe application are 1) Orientation of the stripes, and 2) distance from the top of the tube/edge of the fact. First, orientation. As shown in the image below and documented by Dan "CableGuy" in this thread, the stripes should tilt or fall forward towards the front of the helmet, as opposed to appearing to be leaning backwards. Once proper orientation of the left and right sets are determined, proper placement must then be judged. The edge of the stripes are to be roughly one pencil's width from the edge of the face of the helmet, and so for my build to trimmed my decal paper to match that space. See the first photo below showing the pencil, and note that that particular decal is for the wearer's right side of the helmet. I then ran a pencil eraser over the top of each stripe to ensure maximum adhesion with the top layer of "contact paper." Convenient to have a pencil so handy. Next was to peel off the topper, and hopefully the stripes would peel off the backing paper with it. I peeled up at an angle, say perhaps 45-degrees, instead of straight parallel with the length of the decal. A few times the stripes didn't immedialy pull up, but in those cases I simply lowered the top sheet back down and and tried pulling from the other edge (essentially just changing from 45 degrees on one side to 45 degrees on the other side). In the end each stripe pulled up very well. After trimming the top rear corner of the decal paper to gain clearance from the ear (next photo below), I carefully placed the decal down onto the helmet. Screen-used helmets had varying numbers of stripes on the sides, and I opted to use all 16 stripes on Trooperbay's left-side decal, and 15 stripes on the right side. I then got my handy eraser back out and scrubbed it over the decals again to maximize their adhesion to the helmet surface (see photo below). This would hopefully combat them from peeling up with the top contact paper. Here is the final result on one side of the helmet, and I was equally satisfied with the other side as well. Neck S-Trim The final component of my helmet build was to install the S-shaped trim around the opening of the neck. Note that some armor makers provide trim that has a U-profile rather than S, but the S-profile trim (shown in the first photo below) is required for higher levels of approval. Another point of nuance is that some builders place the seam of the trim at the back of the helmet, but it's actually most hidden when set in the front at the Vocoder paint. This area of the helmet is so recessed that it's impossible for onlookers to see, while a seam in the back would, in fact, be visible. When fitting the trim it's important to try to pack it as tight as possible in order to maximize tension and thus retention. Start with one end at the Vocoder area (close-up shown below), and squeeze it onto the the helmet, trying to get as deep a fitment as possible. Once you've wrapped it all around, before cutting it to length, go back and try to squeeze more tension by working around the whole length again. You may be surprised to find that you were able to compress an addition 1cm to 1-inch onto the helmet the second time. Once you've done this you may now cut the excess trim, and I would recommend adding in an extra 1cm in length just in case. You can then try to compress it again, and if absolutely necessary, cut it shorter if it simply won't fit. Better to have to cut again then cut too short the first time. On the wide shot above you'll see that the inside of the trim may "bubble" away from the rest, which is due to the curvature of the inside edge, which is technically shorter than the outside edge. If this is really bothersome to you, you could consider gluing those areas down with E-6000. Final Helmet Exterior The big reveal. Moment of truth. Final product. Here is my first ever build helmet! This next set of images more closely reflect what my helmet now looks like after receiving feedback for my Expert Infantry (Level 2) submission. I was asked to remove some paint from the bottoms of the teeth, as it appeared to extend onto the gums. I also took the opportunity to "re-form" the end tips of the frown. First Attempt: Second/Final Update: Helmet interior ATA vs WTF Comparison Forearm pieces Printable/downloadable PDF of my entire build thread to this point contained in [THIS SHARED FOLDER]. The PDF will typically be updated after each new post and will note sequential version numbers and revision dates.1 point
-
And soon it should be here.1 point
-
Hi Alan! A belated Welcome to the FISD from my side as well! We've got a ton of TKs in Germany, several Attachés, so I can assure you, you're in good hands if you ever want some local help. Since Caleb went ahead and tagged me, I want to offer you my help as well, if that's something you're interested in -- if that's because I might know some local help, sources or simply because of the language barrier. As we say over here in the FISD: Troopers helping Troopers. So feel free to reach out at any time! Of course you can also stick to all the help and feedback you're getting on here, I can assure you that these people will help you make the most of your armor Sadly the German forum is a bit inactive, but as you're seeing there's tons of other resources waiting for you. Good luck with everything and I can't wait to see your final armor1 point
-
Awesome. Thank you for the feedback. I will have the blaster all black since that is not a problem. I will come back with questions as soon as my BBB is here. Thank you very much for your time and yes I am aiming for expert infantry so hopefully that will happen one day.1 point
-
1 point
-
As the resident expert regarding relationships, with exactly zero experience, I'd suggest you communicate and win an ally in your quest for ultimate nerd-y-ness1 point
-
1 point
-
1 point
-
1 point

.thumb.png.69856e02550a2e6d07e44a2b1bda020c.png)