Leaderboard


Popular Content
Showing content with the highest reputation on 12/31/2022 in all areas
-
Cable Guy Dan has a suit up video where he stops to explain the Velcro and a popper (snap) on his boots to hold his shins in place that might help with your decision.1 point
-
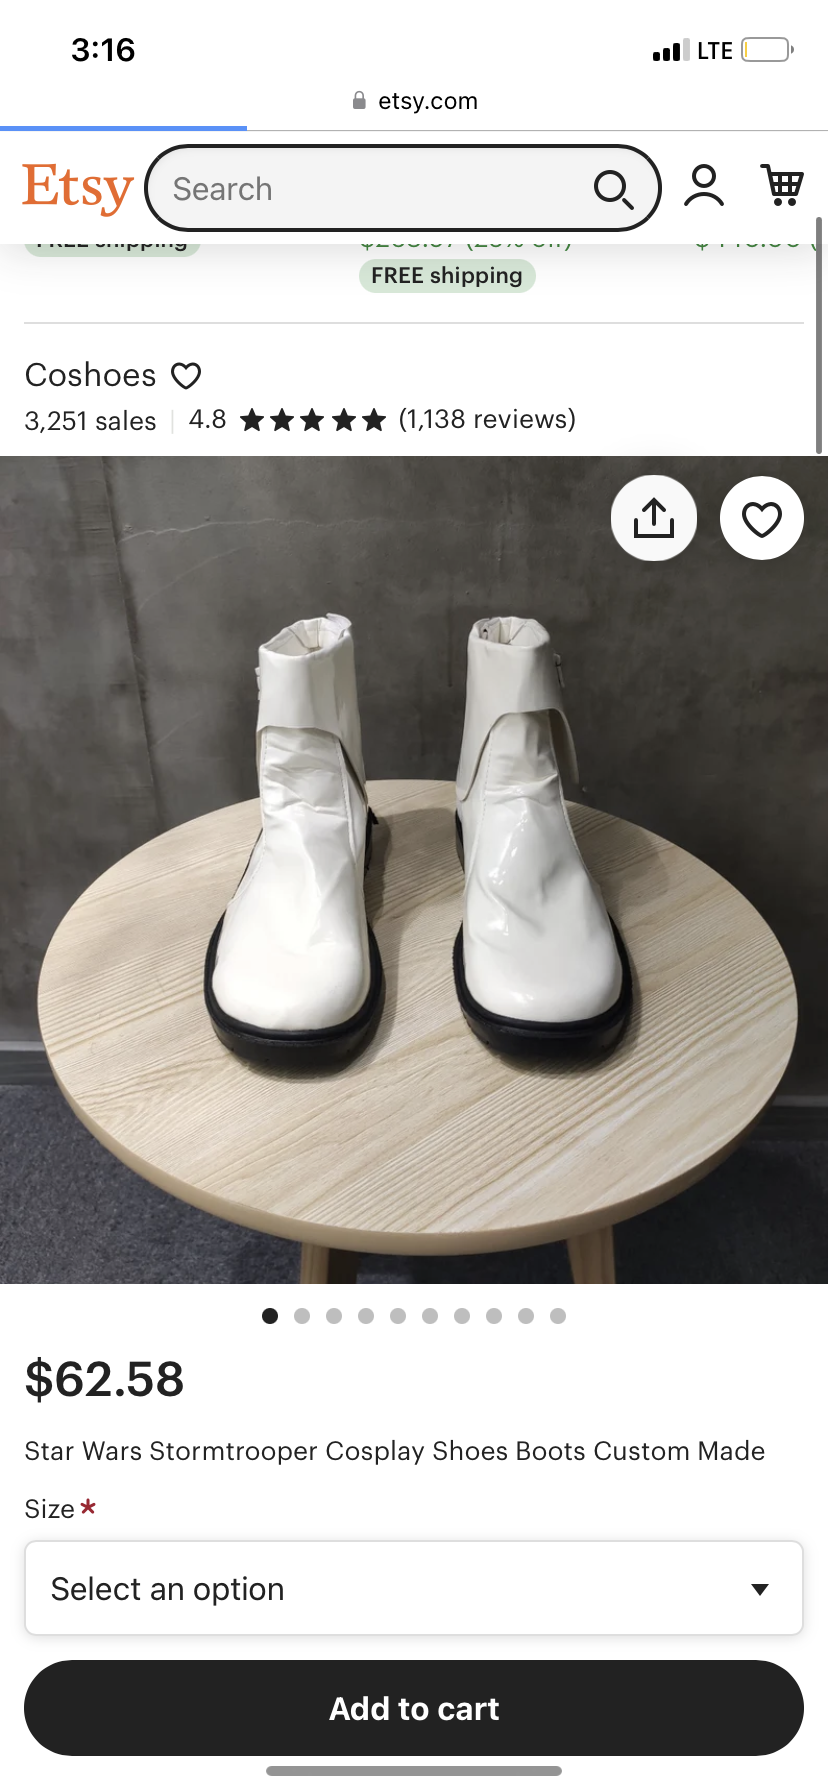
Excellent advice, Jim. Imperial Boots are incredibly well made and will stand up to years of trooping, but they do run a bit on the small side. Better a bit large, but that also gives you room to add some comfortable insoles for those longer troops.1 point
-
I would hold off on gluing the Velcro onto either your boot(s) or armor. The industrial type would probably stay adhered to your armor, but not sure about the boots. Over time (and depending how much you troop) it can lose it's connective properties, so if it's glued on it would be much harder to replace. As far as the size piece you should use, I'll let someone who uses that method give you a more precise answer. Once you find the right size, I would keep a couple of extra pieces the same size in your armor bin as a backup. You can't be too prepared!1 point
-
The fun stuff....cleaning out the holes before....primer,sand,repeat....
 1 point
 -
Received the metal holster from Dantooine Props today. Looks great. Now I just need a blaster.1 point
-
I'm not sure what your schedule is but I ordered from imperialboots and got my shoes in the same month. Probably about 3 weeks. I tried the DIY version and ended up regretting it as the fit wasn't right. So I spent almost as much with my failed ones as if I had just gotten the TKs from IB. The shipping is a bit expensive, but if you want them fast they were great for me. The boots also fit great. If you do go with Imperialboots and you wear a 10.5 size, I would recommend going with size 11. They fit me perfectly and I always wear 10 1/2 shoes.


 1 point
 -
Thank you for the awesome product and support when I had questions.1 point
-
Still not starting the FOTK yet but I officially started my deathtrooper today. Since this will be relevant for both builds, I am adding it to this build thread. So, when you order a fibreglass armour kit and BBB day arrives…. Even though it is almost irresistible to put the pieces on, it’s not a great idea as it is similar to rolling in fibreglass. I was itchy for days. I decided to coat the inside of the armour with plastidip to seal in the fibres. The issue is that it is winter here and I can not spray outside. The solution. Build a spray tent in the basement. I made a square frame with 3/4” PVC pipe and attached it to the metal support beams with rare earth magnets. Then draped plastic sheeting over the frame and closed the seams with tape. since there is no ventilation, you need to wear a respirator mask in there but it seems to be working well so far.1 point
-
Firstly some helmets are bigger than others. That said I only have fans in my helmet, I use a wired mic, then run the cable down to behind my chest where the aker amp and icomm unit are housed, keeps weight off your helmet which is a must as I have neck issues. My fans use 4 x AA battery packs which fit in nicely on the lower cheeks. Here's a few links showing how others have tackled their helmets Many of us keep the aker and icomm behind the chest, the image below is not mine, I have them tightly together held with elastic with velcro sewn on the back. Also have a small ABS ledge of angled plastic below to stop them falling down. Some use an icomm and hovi tip speakers A few keep them strapped together on their neck1 point
-
As many of you know Hasbro have released a Black Series version of the The Last Jedi First Order Stormtrooper helmet. On fist pass it looks pretty good. How good? Lets find out. For this comparison I am going to use my own Hasbro helmet ordered from Amazon and delivered in June 2021. I've been meaning to do this since it arrived but it's been a time consuming job. The exemplar will be a real screen used helmet. The images are from a The Prop Store auction that took place in 2018. This is still available for viewing at time of writing https://propstoreauction.com/view-auctions/catalog/id/138/lot/28672 but the images have been saved to the Gallery for safe keeping. The Prop Store usually take very nice photos and this is no different. There is no ruler in shot like with many auctions but they do have dimensions which we can use to at least check ball park numbers. A brief word on the images. The perspective on this is not perfect. It's taken hours to get as close as I have and I've had to settle. The "correct" look will depend a lot on the lens focal length and the angle, matching this has been hard but I've gotten close enough. If I don't call something out specifically assume "close enough" in person. For reference these are all 70mm f/8 on a full frame camera, just in case that means anything to you, angle was as best I could to match the reference but it's trickier than it sounds. All images below link to a higher resolution version. Front View Starting at the front we can see the general shape and line are very good though there are some differences and issues that will need to be addressed: The beak shape is good. There is a gap along the the front edge that looks to be for air flow. For accuracy this should be filled but I think leaving it isn't the biggest crime. The panel gaps aren't the same, a bit tight at the front and a bit loose at the top on the Hasbro. The top is looking like a hard fix but the front could be improved with a little sanding, just to round over the hard edge. The Hasbro has a ring around the vocoder, this is a show stopper. It will need to be cut from the face portion and attached to the lower panel, and and gaps filled and edges cleaned up. The "holder" is fine as is as that is a separate part on the screen used helmet. Hex mesh isn't perfect but is certainly close enough. The side vents are correctly located and sized. The screen used helmet uses a thicker shell so has a slightly different look. The screen used helmet also has these open where the Hasbro has an inner and an outer cover. The Hasbro also has a ramp down into the vents, this is square on the screen used and should be removed (see gallery for a closer image). The rubber brow trim on the Hasbro looks to be a good match for the screen used helmet. The Hasbro comes with accurate bubble lenses. They aren't flawless but are better than some I've seen and gives better peripheral vision than my OT. Left Side View The left side has a really good profile, to the point I was able to almost perfectly align them in photoshop. There is a button on the side of the Hasbro. This will need to be removed and replaced with something, the button is too tall to just glue in and fill the gap. The lower nubbin under the telephone cut out is marginally smaller and taller but nothing major. The trapezoid on the screen used helmet is a decal. The Hasbro has this as a separate part in black plastic. Ideally this would be glued in and the gaps filled and smoothed. The black band around the bottom is also a decal, see img6 in the gallery for a close up on the other side. Again this is black plastic on the Hasbro. The biggest issue with the helmet, in my opinion anyway, is now visible. The false panel line that runs the rear circumference parallel to the black band. This will need to be filed in with care to look good. Rear View The shape is again excellent. The false panel line previously mentioned is more visible here, or more accurately not visible. There are 2 small speaker vents on the Hasbro helmet in the black band, these will need to be filled. Right Side View The right side adds nothing new that's not already been mentioned. Aerator The hasbro aerator is cheap metal, possibly zinc plated. The screen used looks to be either vacuum metalized or some kind of paint process. Size seems good and is a good representation. The ring issue is very visible here. Care will be needed to ensure the cut lines are correct. Clips The clips are okay, but not great. The "lift tab" is is chamfered not round. The clip tip should also be more tapered towards the front. The clip well on the screen used helmet is slightly deeper, in keeping with what we've seen on other areas of the helmet. These clips are a separate part so are easy to replace with a new part once designed. Size The prop store stated the screen used size as 32 cm x 27 cm x 30 cm (12 ¾” x 10 ¾” x 12”). Using some large calipers I found the hasbro helmet to be approximately similar, around 1cm larger in each dimension. It's hard to know exactly how the real helmet was measured but the widest points where all around 1cm more than what prop store stated. This puts the Hasbro at around 3-4% oversized worst case, but depending on your armour that may or may not look better than 100% accurate due to the comparative proportions. Other There are some mould line issues and a few shrink marks on the surface. However these are all reasonably small and nothing that won't be fixed during paint preparation. I've not covered the insides as it's not a visible accuracy issue. Some will wish to refit the supplied liner, others remove it. Whilst the strapping is rubbish the actual inner shell is not bad should you wish to use it. There is also electronics in the helmet, I must admit I have no idea what that do other than they are there and there is a button and some speakers. Given the speaker vents need to be filled you may as well remove the electronics and save some weight. Conclusions The helmet is, on the whole, really good. Yes there are 4 major issues: The front ring, the speakers, button and the false panel line. However there are no big impossible to fix issues. There is a thread already documenting how to break down the helmet and does cover some changes, though I would approach some differently. I think with at least the big items fixed, and preferably some of others you could have a really good helmet once paint matched to your armour. I also can't see any reason why a GML should reject one after the mods.1 point