Leaderboard


Popular Content
Showing content with the highest reputation on 10/27/2022 in Posts
-
Three new threads added to the compilation, including Dan's armor dressing video and a couple posts by Adam (including the awesome Leia Leveller E-11 recreation).2 points
-
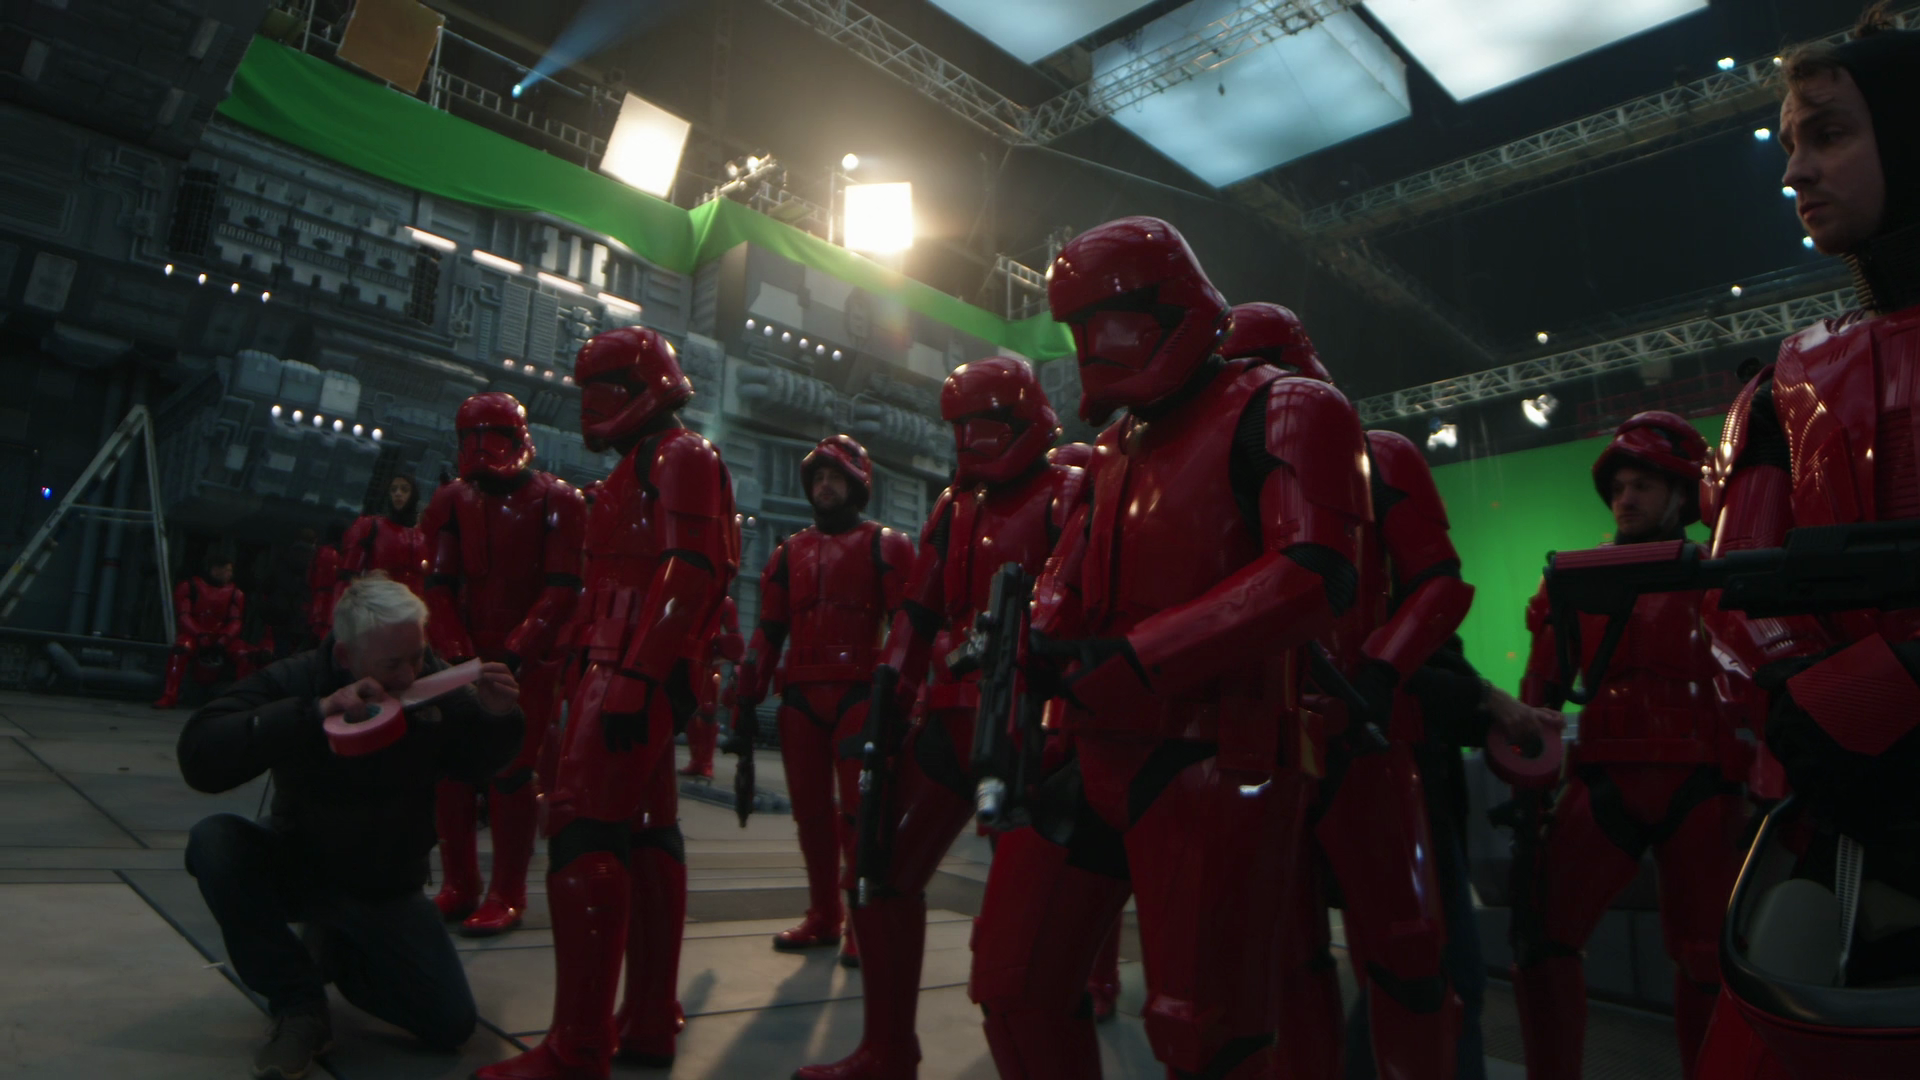
Hi everyone. Due to the nature of the NDA’s I of course was not allowed to take any pictures. But what I can tell you is this is pretty darn spot on what you guys have stayed here. I have extensive photos of my rogue one armor that I can’t post for a king time because it will affect my work. The rise of skywalker FOTK that I wore I only wore it once for a fitting because we were going to use them for Previz. But I never wore it again. They just gave us the helmets hahaha so I have a few photos of that. So here are my inputs. Helmet details are spot on. neck seal, there were two types. 11 rib and 8 rib neck seals. Zipper is worn front or back. There were two reasons why they were worn in the front, 1 because some pointed their heads down to see and therefore zipper was visible in rhe back. 2 the zipper was worn in the back and since they clothing tag it down to the under suit s lot of guys would take it off when undressing first break or lunch, and then put it on zipping it in the front. So either is acceptable. I cousins remember how they attached the chest to the back and yoke but sides were Velcro. shoulder bells bad the tab and it was metal but I don’t think they is necessary and I’ll explain it later. Tab can be any material. Since our kits are abs I highly recommend abs tabs. That’s what I’ve done Shoulder bells attached to bicep via a clip and forearms slid up. Picatinny rail moved box aside and you zipped up the forearms and box was velcroed down . gaskets were rubber silicon and for me I thought they were soft. They were trimmed in a fabric that protected them on the edges and an elastic back with a buckle in the front. Elbows and forearms were attached but we can separate them but they were attached via the elbow gasket Same with the legs. Thighs and shins were attached as well via gasket and spats were attached to shins but I didn’t see how. torso had a cross cross strap system that had a thin pad on it and torso zipper up the back. The thermal detonator and butt plate were attached by a webbing and came down the back and the belt pinned it down and buckled inside the pouch. the blasters I saw had many variations. Some didn’t have d rings. Some did and the rings were either black or white. I thought I saw one silver one but not sure. D ring plates were both silver and white. But there were quite a few black d rings. I think if we go white and white or silver and white ring or silver and black ring it’s good. Pistol I did not see gloves I could swear were the exact endor finders gloves and rhe hand plates had a deep groove in it. unfirtunately I didn’t have enough time to take other notes such as the boxes with black being cut out or not. It was my first day and just insane to be able to do this and I had planned on my second run to take more detailed notes and photos. However the pills on the chest I did see that they were cut out, but the box in the center of the chest, the black was painted in. And if I remember correctly the box on the wrist was painted or decal. Not one hundred percent sure. now on the overlaps, the thighs and biceps are overlaps. They are held in place by rubber bands. And they literally pry them open for you to get in. This can not be done in abs, our armor will crack. So this brings me to my next point. I hit the ground over 60 times in one day and nothing happened to my armor. It’s very thick polyurethane armor and very strong. So back to the shoulder bridge that’s why I don’t recommend metal. I contemplated leaving my biceps and thighs open and attaching a rubber material but I decided against it as the armor will crack when trooping and grow apart. The clips on the body armor were TFA clips rhat I saw while helmet clips are TLJ. Very weird. undersuit was a one piece and had shiny built in. But I heard there’s other sets with shiny shorts but couldn’t confirm it. Boots are exact imperial boots first order boots and they may get it from the same maker. I have my actual boots, neck seal, gloves and undersuit that I wore for the rogue one and clone trooper on kenobi. The gloves for the rogue one and clone are again exact gloves from Endor finders like the first order gloves and the boots for the first order snd rogue one and clones are the exact same boots. the thermal detonator is a separate piece screwed in to the back plate just like the clone and rogue one. The TD is hollow and it has a black pvc like tube that slides in. You can take it out but I don’t remember what kept it in. I’ve made my TD hollowed out and with the pvc tube and it is much lighter. Also on rhe other side of rhe tube I painted to match TFA: cod pieces are polyurethane so they flex but there are also rubber vids as well and shoulder bells and chest pieces for stunts. That’s why the cod is flexing in pics. holsters were actual functioning metal ones, the ones I saw. mall the armor parts are polyurethane and very thick and durable. the thighs are attached by two straps to the torso just like the rogue one armor except the rogue one armor had ribbing material to cover them. I didn’t notice that it n this armor. the torso had leather scallops and a front flat leather plate that held the belt and the cod piece. I noticed different shaped cod pieces by the way. and the notes on the cut pieces, yes w lot of times they are cut to fit the performer. We modified armor parts all day long and that’s why you see the different shapes and cute. Oh one more thing there were also foam thermal detonators and you could barely tell they were foam. They looked just like the regular ones. Same thing with the rogue one armor. They are for stunts. I didn’t see executioner axes or batans or prods . it’s pretty much the TLJ armor and if yuu want to enforce the different cut in forearms then you can. I have my rubber gaskets but they were only the actual rubber pieces and none of the finishing. It was quite nice what they had. I just got the rubber parts themselves. The TFA I know snapped in to place even on the torso. I couldn’t tell how because it was already assembled so I’m assuming Velcro. anyway those are my four notes. My armor is almost done. I’ve made some changes to it to function the way I prefer like using smaller shoulder to bicep buckles as well as the double buckles for the thighs attach to a belt and not the toro so. With abs I just think it’s too much torque on the armor and on a belt you get a lot more freedom. The torso attach puts too much tension and weight on abs but also shoulders. That’s it for now.2 points
-
Congratulations on reaching the Expert Infantry level! IMPORTANT: PLEASE READ THIS BEFORE POSTING- In order to receive your certificate, you will need to supply information listed below in your post on this thread. Please double check your spelling and TK number, as corrections can not be made once it is generated. Do NOT add, forum names, armor designations (Stunt, Hero, HWT etc.), as these will not be listed. All information MUST be included, or your certificate will not be issued. PLEASE NOTE: One EI certificate will be issued per TK number. Your Certificate data will only be stored here and available for you to download for 12 months, after that the back end data is removed for storage purposes and you would need to request a certificate to be reproduced. Please be prudent in downloading and saving your file to a PC or device. ONCE YOUR CERTIFICATE IS GENERATED, A LINK WILL BE ADDED TO YOUR REQUEST POST 1. First Name 2. Last name 3. 501st ID (TK number) 4. Paper size* (See below) 5. The name of the DO that did your final approval. (Sha Sha or myself). This is an example of how your post should look. Nothing more, nothing less: Joseph Pedigo 10963 EIB letter size Sha Sha PLEASE READ THIS CAREFULLY BEFORE SUBMITTING YOUR REQUEST!!!! * If you are American and want a letter (8 1/2 x 11) size certificate, (suggested) write Letter. If you want an A4 sized certificate, write A4. PLEASE NOTE that the A4 is a completely different size than the letter, and those in the U.S. may have trouble printing it. It also will NOT fit correctly in a standard 8 1/2 x 11 frame. It comes in a 300 dpi png-format picture, so you can send it straight to your printer if you want. *************************************************************************************************************************************************************************** I try my best to get these to you within 24 hours, but it may take up to 48. If you haven't received it within that time frame, please feel free to PM me. Please do NOT "BUMP" your request.1 point
-
Shortening the upper ab straps would do the job .1 point
-
I was also thinking making these cuts if it makes sense. It would look a little cleaner imo. In red.
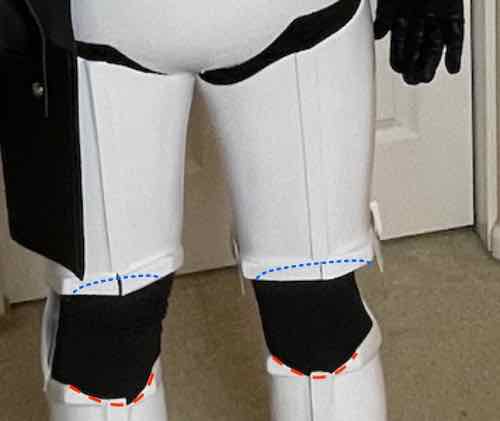 1 point
 -
If I may, you can do the mobility cuts whenever you want, just take care to do not pass the ridges CRL for Level 3 states: Any mobility cuts on the back do not extend beyond the top of the raised ridge.1 point
-
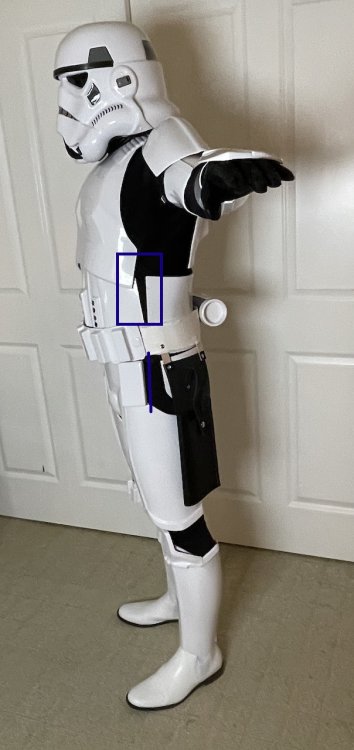
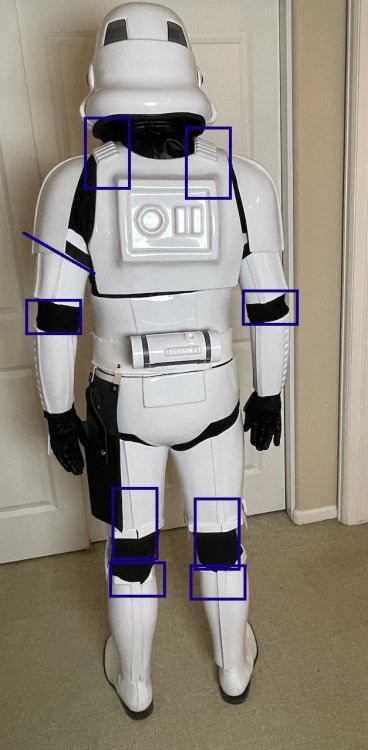
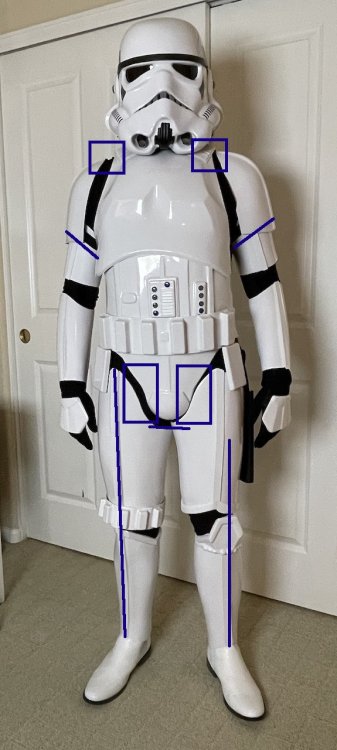
Looking good, just a couple of picky things, more for higher levels You may want to extend the bicep elastic from the shoulder bells, the hooks are pulling the bottom elastic down on an angle while the elastic under the bells is pulling the biceps upwards, this would also allow you to reduce some of the dark area at your elbow and wrist. I find it really useful having a full length mirror handy as my photographer doesn't look at everything I do. Note your thigh gaps differs, one is almost touching your cod, left shin off center to thigh cover ridge too. Should bell gap next to shoulder straps appears a little different on both sides, no issues you adjusting these between photos. V angle gap on the sides. Also drop box not quite at the end of the plastic belt section. Again adjustments between photos can help Lastly backplate not centered so your shoulder straps are not sitting right. Here you can see the bicep hook pulling down the elastic shoulder bell straps again. Note the gaps at your elbows different on back photo. You could also fill the gaps between the lower thigh ridges. Lastly your shin heights at the back don't align across the top properly, outsides higher than insides. And make sure you use a contrasting background, your GML/GWL will thank you as it makes it easier for editing your photos (also for EIB) Good luck with approval.
 1 point
 -
Amazing work Adam! Would be an honor to troop with you some day!1 point
-
Congrats trooper!!1 point
-
Also for anyone looking keep an eye on your local FB sales groups as well as local for sale/trade/markets, I have found a few mannequins quite cheaply from stores closing down or updating their mannequins, can save quite a few $'s1 point
-
I normally find gaffa tape on at least one trooper, TROS was a perfect example of gaffa tape usage, again I don't know why they just don't glue the thighs shut, it's such a common issue.
 1 point
 -
It’s not surprising though. There’s definitely been some laziness with regard to production for these shows. TBs with knee armor incorrectly worn. Shores with visible gaffer tape holding things together.1 point
-
Thanks Gerald1 point
-
@Sly11 @MaskedVengeance @TKSpartan @Doggydoc @Chemi Thanks for the kind words y'all!! HA!!! I should have an Antenna Trigger Warning on the thread. Sorry in advance Joseph.1 point
-
Congrats on EIB.1 point
-
Hi Glen, Thanks for your photo1 point
-
Galton HoTK-28823EIBA4 sizeChemi Congrats, trooper!! https://www.whitearmor.net/eib/certificates/28823-eib.png1 point
-
OP (MV) Post #52: A baby changes everything It's been a while troopers, for a build update at least. This short post is simply to say that I've made extensive progress on my build, and I'm in the process of compiling several thread updates for posting. In regular conversation some of you probably heard me give August, September, or October completion times, but something else has been occupying my time. Constantly moving targets over the past two years notwithstanding, I was really aiming to complete my build prior to the arrival of my second daughter, but both physical/time and mental barriers kept me from doing so. In fact, I worked right down to the wire before delivery, and on the day our baby was born (nearly three weeks early) I had stayed up until 2:21AM trimming and fitting pieces. Little did I know that we'd be heading to the hospital seven hours later, followed by virtually no sleep the next two nights (and coming weeks). Over the past two months I've picked back up my lexan scissors, sandpaper, E-6000, and daughter (HAHA), and can see the light at the end of the tunnel. Helmet completion Faceplate and cap attachment Ear trimming and fitment Neck opening sizing and S-trim installation Tube stripes Biceps Forearms1 point
-
Welcome to the Legion Trooper Congratulations!!1 point
-
I FINISHED IT!!! I've got a bunch of pix to put up and will try to sound coherent whist being excited to have the HWT pack I saw on Kenobi. (totally geeking out here) I sourced all my parts from amazon. I know there's better places, but this was the easiest for me. I work a lot so just getting to hit an order button on one site really helped. I couldn't find everything in 5v, so I settled on 12v lights. I figured I could make the power work easier than finding 5v pilot lights and toggles. LEDs are easy but those pilot lights are a pain. Pilot light: The "Keenso" red 4 pack is a match for the lamps used in Kenobi. 12 volt, about $6.50. They bulbs are not held in those metal housings very firmly. I added a bit of glue to each internally. Toggle switch: I absolutely hate the ones I got, but they match the screen used pack. This is the "Twidec" 8 pack SPST. 12 volt, about $10. If anyone else builds a Kenobi pack, try to get a switch that has a screw mount on the back. Mine clip on and would not stay in place on my thick radio box. I had to cut off the clip mounts to keep the switches from pushing themselves out and glue them in place. Easy, but annoying. LEDs: Any white LED will work. These are 3mm "Edgelec" in a 20 pack for $7. Pre-wired, non-flashing, 12 volt. All the white ones in my parts bin were 5v, so I had to buy these. The Kenobi pack has a whip antenna, so I needed one too. Metra 14" universal. It's not lightweight either, but it seems to be the exact one used. (About $19) I removed my printed blocking plate and used the round one that came with the antenna. It's a lot more sturdy than my printed one and covers all but one hole. I set the printed one aside in a bag with the screws for reinstallation in the future if I needed. And yeah, the base got sanded to match the pack shape before I finished the project. I held the laser cut fascia on with just a few dots of E6000 so that I could peel it off later for this purpose. I glued some speaker cloth over the radio face. I have tons of it from my daughter's jawa kit and like the look of the radio having a speaker element. This isn't on the Kenobi pack, but seemed like a worthwhile small addition. Er... the dremel slipped and I cut a bunch. Oops. Actually, this was planned. I want sound to be able to escape from the radio box, so I cut some ports to be hidden by the speaker cloth. Speaker cloth and fascia reinstalled. Switches!!! installed. And I figured out a decent mounting method for my Disney Parks radio knobs. I want the knobs to still be able to spin like the 3D printed ones could. A 2" machine screw is long enough to let the knob mount to the radio surface. I double nutted the screw near the top so that the knobs could spin without unscrewing the hardware. Inside the case, the screws are held in with nyloc bolts to prevent loosening. Three LEDs per knob. Overkill? Very likely. But I have all of these LEDs and I need to get enough load to prevent my power supply from shutting down by itself... Nine LEDs on the radio itself will help that. I drilled things and made a wiring harness for the inside of the pack. This connects the red lights on top of the vent and button box as well as the two white LEDs on the drop siphon. I glued it in place along the outer edges of the pack to prevent the straps from bothering things. Near the internal LED connection, the wiring harness has some metal worm clamps holding them in place. Here's the finished internal radio box. I spent WAAYYYYY too long running these wires, but I'm nearly as proud of this as I am of the whole pack. Nine LEDs worth of wiring and the pack's internal wiring harness all got neatly sorted and tucked, allowing the radio box to be opened without being a rat's nest. The power pack is a "TalentCell" 12v 3000mAh tiny guy from amazon. It weighs 400g and can power both 12v and 5v. It has an on/off switch (hiding behind the plug in this shot) to turn the pack on and off. It should run the pack for a couple days before needing a recharge. It was about $28. I've also got a little Bluetooth speaker velcro'd inside. It won't live in here permanently, but I wanted to see how it works. Spoiler: AMAZINGLY!!! The hollow interior of the radio box gives everything a slightly more tinny sound. The TK Chatter loop sounds super authentic coming out of this. Stupid loud too. And lastly, I added expanded metal to the face plate cut out holes. Whilst wiring things up I nearly put my stupid finger through that speaker cloth at least five times. I know it would have been punctured accidentally on a near-future troop. Some mesh protection seemed to be in order. And as a bonus, it looks super cool from the front when the light happens to hit it. The last bit I needed was the Imperial Cog for on top of the wipe box. I lasered this tiny 40mm guy out from the same acrylic I used on the radio face plate. It's delicate but securely glued to the top and away from harm. Hopefully it won't shatter right away... or ever? And here it is... my finished Kenobi pack. Daylight with power off. Blaster side. I used 3 strips of velcro tape to keep the blaster from moving around. Top. You can almost see the wipe bottle cog and my reshaping of the antenna base. In the dark garage with lights on!!! I wanted this since July. It's SO satisfying to have it. And with that, I think this build is complete. My first troop with it is tomorrow evening at a Make-A-Wish trunk or treat. If I get a good photo, I'll post.1 point
-
Congratulations on the EIB approval. Awesome job1 point
-
1 point
-
Congratulations Trooper! welcome to the first station EIB, just few adjustments to the finish line Centurion !1 point
-
Congratulations trooper, well done on your 2nd ANH version1 point