Leaderboard


Popular Content
Showing content with the highest reputation on 07/18/2021 in Posts
-
Started working on the rubies helmet today. First I ripped out the padding and eye material, then removed the velcro and rivets that were to hold the helmet halves together. I tried 2 kinds of super glue and hotglue to get the halves to stick together. Nothing wanted to hold to this plastic. So I gave up on that and went with rivets. Not completely happy with it. But overall it will work for now. I ordered a 3d printer so I might just do that for a quality helmet. Sent from my SM-G991U using Tapatalk2 points
-
Oh and an fyi I used small screwdrivers seeing how the tshirt got stuck to my fingers with the super glue and was pretty painful ripping it from my skin hahaha.2 points
-
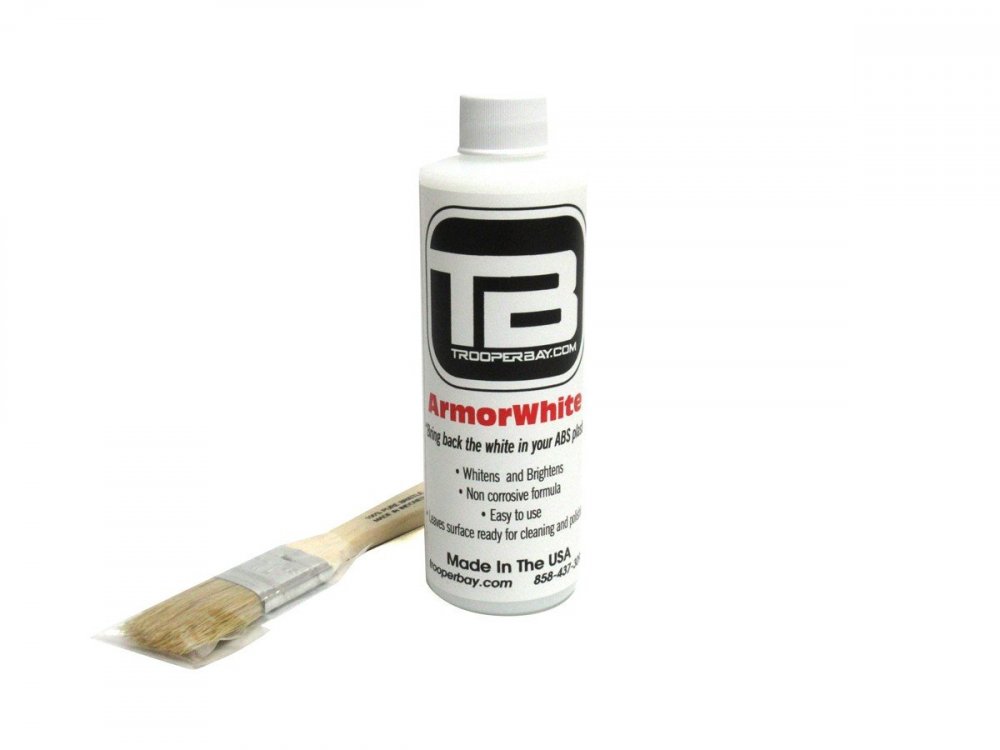
https://trooperbay.com/trooperbay-armorwhite-plastic-whitening-gel
 2 points
 -
As the Boy Scout motto says, "Be prepared". In most cases, if taken care of a well built set of armor should last a long, long time. Inspecting the various components before an event is suggested, but when the inevitable "Oh crap" moments occur having things at-the-ready can really help. Not just for you, but for a fellow trooper as well! The following is a list of suggested items to have with you for "wardrobe malfunctions" which happen to many of us during a troop. I'm not saying you have to have each and every item shown below, so the choices are yours for what to include. 1. Gaffer's ("gaffa") tape (white/2" (5 cm) wide: This is a heavy cotton cloth tape with great adhesive properties, and is widely used in theatre, film and television productions. Although strong, it can be torn by hand as needed, leaves little or no residue and will generally not damage most surfaces. If you look closely, it was used a LOT in the first SW films, and is a good temporary fix for cracks/splits. -- alternatively -- 2. Duct tape (white/2" (5 cm) wide: Everyone knows it has a powerful adhesive property and super strength, but it leaves behind a strong, sticky residue which can be difficult to remove, especially if left on for extended periods. Rubbing alcohol, Goo Gone or even cooking oil can remove it, but it is not easy so therefore is not suggested. In case you have a strapping issue (snaps pop out, strap disconnects from an armor piece, etc.) it's not a huge deal if you are prepared. Installing/setting snaps in the field is not always possible (unless you have a hammer/snap setting device) and can take time. Though temporary, a quicker alternative is to use nylon strapping (you probably have a few feet left over from your build) cut to length with Velcro (cut to size) in lieu of the snaps. 3. Black 2" (5 cm) wide nylon strapping 2' (60 cm) long: Black 1" (2.5 cm) wide nylon strapping 2' (60 cm) long. Industrial Strength Velcro *** (2" x 4" sections) *** Although very strong, it will a leave residue from the adhesive backing. This can be removed from your armor with Goo-Gone or a similar product. NOTE: If you want to be extra prepared, having lengths of other materials (nylon.elastic, white Velcro etc.) used in your build are encouraged. 4. CA (Super) Glue (Single use sizes) 5. Zip-Kicker I am not a fan of using CA glue on any armor part, but in an emergency it can certainly come in handy. If needed, I highly suggest using the GEL type, as it will not run like the regular type does. Available at most craft and "Dollar" stores. Zip Kicker is an accelerant that will set CA glue instantly. There are other name brands, but I used this one as an example. Available in a spray or aerosol. 6. Razor knife 7. Lexan scissors 8. Sanding sponge Having a sharp razor knife on hand will come in handy for many things, including cutting strapping, Velcro, etc. For safety, I recommend the folding type as seen below, and always have a new blade in it. Dull blades are useless. Be CAREFUL when cutting. As TKs, we are not known for our shooting accuracy, especially when missing our trigger finger. Lexan scissors are great for cutting/trimming ABS, especially if you need to cut shims for cracks/splits (see below). Do NOT use these to cut Industrial Strength Velcro. The adhesive will gum up the blades. A sanding sponge is perfect to have in case you need to smooth out any rough edges that may be cutting into you or snagging your under suit. Scrap ABS A piece of scrap ABS about 2" x 6" can be used to make emergency shims for cracks. Just cut it to the width/length needed and CA glue it to the inside of the affected area. 9. USB battery charger/power supply 10. Batteries Whether you use the rechargeable USB type or regular type for your fan system, etc. having a backup is always a good idea. 11. Screwdriver (multi-bit) 12. Small pliers Although these may only be needed for those with the "classic" strapping system, they can be used to tighten helmet screws and such. I have loaned mine to those with costumes from Lord Vader to Boba Fett on troops. It's better to "have em' and not need em' than need em' and not have em'". I have the "stubby" type screwdriver as seen below, as it takes up less room and all the bits are stored in the handle. 13. Lens de-fogger Even if using a good fan system in your bucket, you can still get fogged lenses. Not only is it annoying, it's dangerous, as our field of vision is not the best to begin with. You can purchase a product designed to prevent this, or (as I do) rub a bit of shaving cream (foam type) inside and polish it out before each troop. Your choice. 14. Magic Eraser 15. Paint pens For minor scuffs on shiny white armor the Magic erasers really do the trick. A single one will last a LONG time. Paint pens are a quick and easy fix for deeper scratches in your armor (white) or touch-ups on the ear bumps, etc. (black). I suggest the Acrylic type (not the oil based) paint as it can be more easily removed if/when needed. 16. Adhesive bandages It happens. Cuts, armor bite, blisters, etc. I suggest having a few of each in various sizes, especially as they don't take up much room. 17. Disinfecting wipes Let's face it. We wear compression suits and plastic so we sweat, and sweat can smell bad. To keep my bin from having the aroma of a gym locker I use these to wipe down my armor before putting it away after each use. Your fellow trooping mates (and the public) will thank you. 18: Cleaner/Polish No Matter how careful you are with your armor, you are going to get scratches or scuffs. It happens. One way of dealing with it is to use a product that cleans and shines all at one time. Although I have not used it (yet), this product has high reviews: Link and reviews here. Thank you to Greg @Oldracer for this tip! Now, there are a lot of other items that I have seen people carry.... electrical tape, a hammer, snap setting tool, safety pins, files, etc. It all depends on your particular needs and how much room you have, but most of the above items will fit together in a medium sized plastic container. Please feel free to add anything that you feel may help, and happy trooping!1 point
-
I was able to get my bucket together with lenses in and hovi tips. I was also able to get some padding in but I'm not sure I'm going to leave them this way, add to them or switch to a different system. Below are photos of the final version for today. Next session is working on the ears and I'm thinking I may end up having to use the second pair. I'm going to start looking for fans and microphone/speaker systems so any tips or leads would be greatly appreciated. I'm open to any tips or critiques. I can say I got really good at drilling out rivets....until I got it where I wanted it. Thoughts?1 point
-
Teeth I'm enjoying this a lot more than I thought I was going to. But I still have the ears and the painting left so... yeah. I'm going to be drilling and installing the screws to hold the face and cap together, when I get time to do so. I have everything held in place and I marked out where I'm drilling.1 point
-
[emoji1] I guess we've all been there!1 point
-
Ah thanks - makes sense and the additional plastic on top would reduce the failure points. And yes, I have used a soldering iron in the past to burn holes as well. I appreciate the info, very valuable.1 point
-
congrats on approval1 point
-
Thanks brotha.1 point
-
Forgot to post the update on sniper knee fix. Well the piece of t-shirt with super glue worked great. Didn't crack again and did a pretty long walk in parade. I am going to apply same method to my other build as well.1 point
-
You guys should try my ARMOR WHITE. Works great to restore the white your armor and can be re applied as needed with no harm to the armor or paint.1 point
-
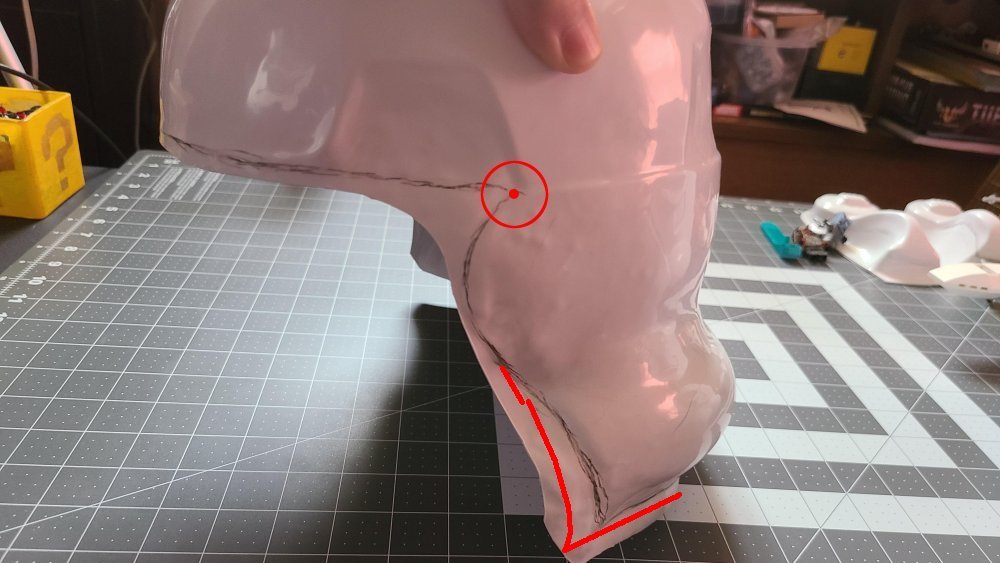
Trim lines look good, you can trim the top flair of the face plate, you may need to remove a little more once you check fit as it may still push against the curve of the cap. Ears will cover most of the backplate seams BUT just watch how deep you cut the top inner corner, also if you use a small drill bit were the trim lines meet it will stop any cracking there. I left a little more material on the lower areas of the backplae where the ears will cover, ATA ears are a little weird how they meet and you can end up with an opening between the two pieces, that's not an issue as the ears will cover but doesn't give you much room for adjusting the angle of the ears. Notice in the below images were the rubber trim stops and the trimmed corner Also watch the position/angle of the ears when you come to fit those. I trimmed a little more curved in the two front corners so the S trim didn't pinch, you can always trim off more but you can't put it back. Once assembled try putting the helmet on before cutting your S trim, you will also need to leave a little extra S trim than what you need and force the S trim to fit, the extra length will put pressure on the S trim and keep it in place, most don't need any type of glue to keep it there. Notice the curve in those front corners. And if you weren't aware you put the helmet on sideways then twist straight when putting on
 1 point
 -
I will be modifying them to make them look more the part. Mostly just wanted to get all 11 stripes on each side accounted for so I could adjust them together. Probably would been easier to print a stencil but with how the tubes are shaped it was hard to print and line up, but I got their overall positions set to be adjusted.1 point
-
Correct I did mention that1 point
-
Lovin reading through your build buddy. Hope you managed to sort this sniper knee1 point
-
Basic trim to pull lines has been done, couldn’t resist simple tape up to see how it would look. Needs a lot of trimming and sizing especially forearms and shins Sent from my iPhone using Tapatalk1 point
-
Thanks Max and welcome to the FISD. Yes, the red ones are not listed in my 501st Troop Log. Only the black ones are for official trooping events.1 point
-
Update 10: - review 2018 It is the last day of the year, so I just wanted to post a few nice pictures from troops during 2018. Yes, have been pretty active in 2018. But there is still enough space left on the Stanley box... Wishing you all a Happy New Year 2019!1 point
-
Update 09: - armor in the box For those who are wondering, if and how the TK with standard strapping fits into that box, here is how I pack it for a troop. Tetris level 1 Everything fits fine into the 113 liters box, including helmet, boots, blaster and the voice amp. Between some armor parts, there is still space left for food and drinks, emergency repair kit and spare clothes. Because the box is pretty full, you can store it vertically without everything getting mixed up inside - always good when using an elevator. Maybe this helps a few other troopers here in the decision process…1 point
-
Update 08: - transport box for the armor As participation in events became more frequently, I had to think about a suitable transport box for the armor. Up to now I attended 9 events, carrying everything in that 4 years old BBB. After seriously researching, I ended up with a Stanley box. Many here will think of the popular 190 liters box, because it is a good choice for TKs with original strapping. My TK has the standard strapping, so I looked for something smaller and found a 113 liters size. Note: It took two months with lid opened for the factory stench to evaporate… The box seems very robust. I can sit and stand on it without problems. The integrated lock is a nice feature, but be warned: I tested my key on 5 other Stanley boxes and it worked on each of them! Looks like they use the exact same lock for all boxes. Guessing a few guys (including me) will soon replace their locks. Now onto decorating the box… Was happy to have that V-groove covered in a useful way. There is space for about 60 - 70 events. Enough for me. Went on with the sides. Seen many boxes full with interesting stickers, but I had not enough to fill the sides. What I had instead, were two laser-cut imperial cogs “from an earlier project”. I am really happy with the result and do like the clean look. In case anybody wants to pick up the aluminum cover on the v-groove, then please make sure to use a sufficient thickness. My alu stripe is only 0.8mm. A bit more would be better, as these boxes might be stacked on big events.1 point
-
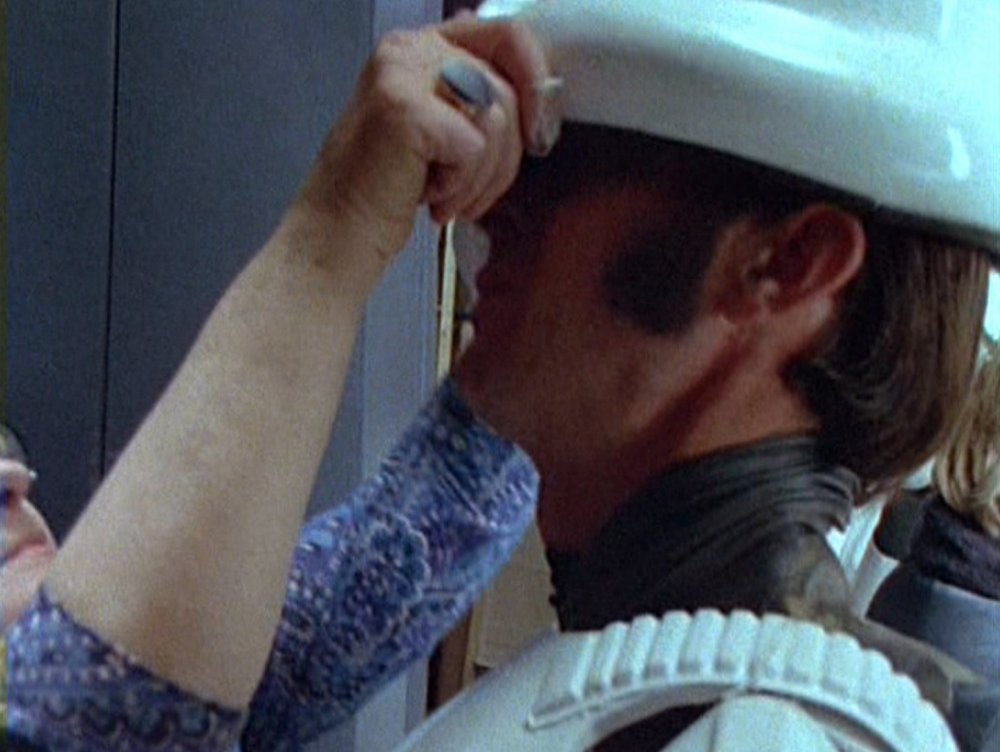
Since completing this build for a static display, many people encouraged me to “join a troop” and become a member of the 501st. But I really worried to damage the armor - and wasn’t sure about grown-ups running around in movie costumes. One day I met a Stormtrooper in a local traffic jam, identifying ourselves via stickers on the cars. Below is my current company car (shhh, my boss doesn’t know) However, we managed to talk about trooping and all this. At some later point I decided to at least try it and avoid any preconceptions. So I started into a foreign experience, that many of you know so very well… My day in white plastic On a recent Sunday morning I met 10 local people, while the only person I knew was the Trooper from the traffic jam. A few were members of the 501st, others not, but it was a very friendly atmosphere and I really felt welcomed right from the beginning. We drove to a hospital, specialized on children who require maximum care, and were asked to show up on their summer festival. The weather was perfect, a mix of sun and clouds at medium temperatures, no rain. In our dressing room we helped each other getting into the costumes and I was already sweating before we left the room. Felt good and curious. Then we went outside. After just a few steps, a mate in front of me stumbled at the stairs but immediately was caught by the handlers. Nothing happened but seeing this, my feelings mixed up with concerns and a little bit of panic - maybe just enough to also give some attention to our surroundings. We marched to the entrance hall. My lenses fogged up (no active ventilation in my display helmet) and it was hard to see anything. With unsure movement I walked in the group. Thanks to the handlers I didn’t get lost. Later I found ways to reduce fogging by adjusting the balaclava at my nose and slower breathing. The better view allowed safer movements and more interacting with people. From that point it was real fun. Some children were a bit scared, while others made big eyes and smiled. A lot of photos got taken that day and these here really don't judge the atmosphere. Many times I was able to convince shy kids to give me “high five” and pose for a nice picture, taken by the parents. Those were the best moments. And sometimes the adults were even more fascinated than the kids A few children in that hospital unfortunately were not able to leave their rooms and participate at the festival outside, so Lord Vader and I visited as much of them as we could inside their rooms. Sorry, no pictures. But it was amazing when a little boy noticed us entering his room and he said “Woah, I have an action figure from you!” Spent 4 hours in full armor that day (short event) and really felt a bit sad when going back to the dressing room. Although getting 3 serious armor bites at my left knee and a little scratch on my blaster (repaired the same day), I felt the strange need to possibly do this again, someday. We will see if that virus got me. Not saying yes, not saying no... But for the moment I really like to thank the Quettinger Stormtrooper for this ideal trooping opportunity, Alex (Memory) for being such a reliable handler and the Star Wars Fans Aachen for the friendly welcome and the photos from that interesting day.1 point
-
It's been a while... Time for a new picture. Just for fun (# 3) Seems like the Emperor has recently infiltrated the FISD to see, what his troopers are doing here. He does not look pleased...1 point
-
1 point