Leaderboard


Popular Content
Showing content with the highest reputation on 11/02/2019 in Posts
-
Just posting a few handy vocoder images from ANH. As per the photos, there is quite a common theme/style amongst the stunt helmets. As with all things ANH, there are variations and exceptions. I’m posting this based on the 501st’s usual pattern of selecting the “most common” appearance for uniformity. *note that the current CRL does not specify anything more than the vocoder must be painted black. The main thing to note is how “most” ANH stunt helmets have the “fuller” vocoder style. This is when bars 2 and 6 are quite long/tall. See pictures below. there are variations and exceptions: however, the below image shows two clearly different vocoder styles. Hero helmets have more variation, some with a fuller vocoder, others with a thinner central section.2 points
-
Holy cow I did it!! Unfortunately did not win the costume contest, but I'm so happy! Armor bites and all (ouch ouch ouch)!!2 points
-
Found some armor on sale at the Halloween store.. might take some modifications to make it fit though. Sent from my iPhone using The Force1 point
-
Thanks! Appreciate it!1 point
-
Ouch. Locally we have a product called Goo Remover, it dissolves glue residue without affecting the plastic (but can damage other plastic) always best to try on a test piece first. You may be able to find something similar at your end. Screws shouldn't be too tight I would think and would have nuts behind, just a case of using a socket or spanner behind and apply pressure to the screw head while turning. Here's a handy image of snap placement, many of us use the double snap method, can save you at a troop if one snap fails1 point
-
eh... technically the category was "Most Creative", and the winner was a DIY costume based off of an HR pun.... oh wellz.....1 point
-
Wow! Whoever beat you must have been good, you look great! (My Reserve Pilot/Bridge Crew got beat by a zombie...)1 point
-
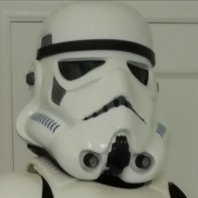
I personally don't have an issue with the vocoder, as it is pretty close to many of the Stunt ones seen onscreen: References1 point
-
1 point
-
Thanks everyone, i really appreciate all the feedback. My picture upload is now complete, unless i've missed something.1 point
-
Thanks for the info, I always find your posts very useful and informative, providing additional insight into the armour we love to wear Sent from my SM-G960F using Tapatalk1 point
-
Looking at your helmet at this stage, I would have been tempted to build it as is and glue a strip of ABS inside the tubes to close the gaps. Then position the ears strategically to hide the joint.1 point
-
Ultimately it's up to the DO's to decide1 point
-
Sorry I didn't see this when it was first posted. Just a couple of things straight up, your chest plate is not covering the ab plate, there should be no gap there, looks like your ab may be able to come a little more. Also biceps should sit just under the shoulder bell, one is and the other is not (both are not on the rear photo) moving the biceps up with allow more room at the elbow, also bring the forearms up a little, you are touching your hand plates. Tops of boots sticking out under shins. At the back of the boots you also have black lines, shouldn't be there, may need to paint this white. Also the shoulder straps on the rear are sitting upwards, may need a bend down, one appears not to be reaching the back plate. You have a very large gap on the side, you may want to even this out or try tighter strapping. Drop boxes should align with the end of the plastic belt section, adding a little glue to the straps can keep them in place, you could reduce the length of the straps also, only need a few mm's Stunt version have a higher brow trim than Hero's but should be ok for basic approval. You could also add some white to the mic tip ridges. There should be no grey on the gums around the frown, look like you may have a little paint there. A few tweaks and you should be good to go. Great work and good luck with approval1 point
-
Looking sharp, Dave! Amazing work on this armor, sir, and you are SO close to living the white armor dream! Great to see that you have the top of your ABS belt positioned right, but (and don't hate me) I noticed that your brow is riding quite high and I think I know why. If you look at the eye position in the second photo, the front is facing down and sits low in comparison to the ridge on the cap. It seems that you positioned the bottom of the face plate a little too far in, giving the side profiles a horseshoe shape and causing the eyes to look downward. (It does give it a cool menacing look, though)! Not to add to your workload, but I would seriously consider bringing the jaw (tube) out a bit and/or raising the top of the face plate, as this may affect approval. It should be pretty straightforward for a quick afternoon project, as there is no glue involved... just the re-positioning of hardware. Note how the eye tops in the reference images below closely line up with the ridge on the sides of the cap and how the angle juts out in the front. Looks like you are headed for Centurion, sir, and judging by your mad build skills so far this should be a piece of cake! Like the Home Depot motto: "You can do it, we can help".1 point
-
Hi Martyn Sure - I’ve just received the latest ones from RWA Creations (on Facebook) and they’re nice. Here’s an example (from my latest helmet build) with these templates. Helmet not complete yet but you get the idea. They’re easy to apply and are similar in design to screen used examples. The tubestripes should be approximately a pencil width from the cheek and the front fee stripes should lean forwards, towards the frown, with a template like these. See around 3:20 for a brief look at how they are positioned for painting; https://youtu.be/8c4vs-VfTRw As you’ll be clearing through the UK Garrison, I’d still suggest you get your thread started over there. I’ll happily help you with your build. :-) Dan1 point