Leaderboard


Popular Content
Showing content with the highest reputation on 12/25/2018 in Posts
-
We start a little earlier than you guys in the rest of the world so here's to you all, Merry Christmas to you and yours (yes I suppose rebels too) and all the best for 2019. Presents unwrapped, turkey stuffed, vege's in the oven and Yorkshire pudding mix ready to go, must be time for a festive Bloody Mary, must be 12 oclock somewhere in the world CHEERS5 points
-
Merry Christmas!2 points
-
Merry Christmas everyone Sent from my iPhone using Tapatalk2 points
-
Right back atcha' brother, and really digging the Tiki mugs... I can't think of a better way to dive into a bloody Mary on Christmas day! Wishing all the best to you and yours, and can't wait to see which costume(s) you add to your collection in the upcoming year. (Send me some of that Yorkshire pud, lol).2 points
-
Merry Christmas and Happy New Year!!2 points
-
Sorry, I added the link twice. Edited. Yes, my heart literally stopped when I found it in a flea market on the bottom of a box among other trash. I instantly new what it was.2 points
-
Awesome pic. Merry Christmas. Sent from my iPhone using Tapatalk2 points
-
Merry Christmas!! Sent from my iPhone using Tapatalk2 points
-
Merry Christmas Glen! Merry Christmas everyone!2 points
-
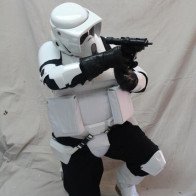
You all are so kind! Gloves are sorted out now. I finally had a free bit of time today to unpack my BBB sans helmet and even had enough time to get started on trimming the thermal detonator pieces, so not a bad Christmas eve at all!
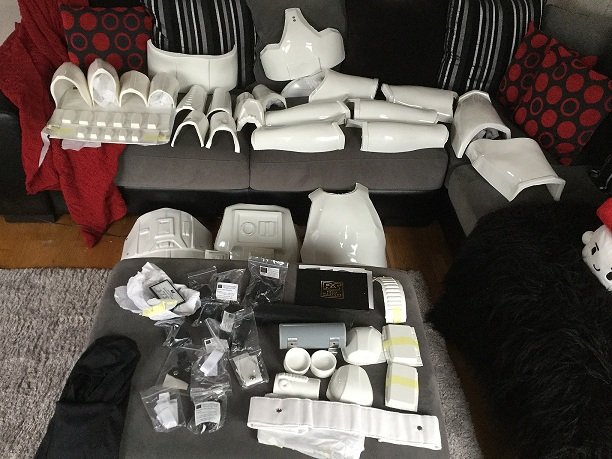 2 points
 -
Congratulations trooper1 point
-
Hi Oscar, and thank you for your EI submission! CRL and EIB Application Requirements: All required submission photos have been posted, and I am very pleased to announce your armor displays all the necessary elements to qualify for ANH Stunt Expert Infantry. On behalf of the entire D.O. staff, congratulations! Other-Armor Fit/Assembly: In this section we review observations made by your fellow troopers and ourselves. Some observations may lead to suggestions to improve the overall look of your armor. Overall a really nice build, sir. The higher levels are all about the details and there are a few items to go over, so let's get going, shall we? Starting with your bucket (NICE paint job, by the way), it looks as if the bottom left ear screw is a little high. This is not a deal breaker, but it should match the one on your right side. Reference image It looks as if you may have your S-trim on in reverse. On most types, there is a flatter side (shown below in green) and a rounder side (shown below in red). As in the reference image, it should be the flat side that faces out. This is a super easy fix... just remove and then reverse it! Reference image The outside (black) part and screens of the hovi-mic tips are good to go, but the inside should be white. It looks as if you may have some sort of electronics in there.. (?) Reference image Your tube stripes are the right distance from the cheek, but unfortunately they are on the wrong sides. Note how the the tops should lean forward instead of back. Reference image Your bicep/forearm alignment is a perfect as it gets, Oscar, but you should adjust the strapping on that connection to lower the forearms, as there should be a gap there. Doing this will also do 2 other things... it will help eliminate the gap between your wrists and hand guards as well a give you more mobility for bending your arms. Reference image Not a huge issue, but your ABS belt could be trimmed a bit at the top and bottom for a more screen accurate look. Reference image There are a few areas where your cover strips go beyond the connections, especially on the top of the rear left thigh. I would recommend a 2 minutes with a Dremel tool and some sandpaper for these. It will give you a more uniform appearance and prevent that point from poking into you. Reference image Your left calf armor is significantly higher in the back than the right one and needs to be lowered to level them out. The length is good and matches the right one, but it wants to ride up for some reason. Some troopers have rigged up stirrup system using an elastic band attached to the inside of the bottom, which goes on under your boot and keeps it from raising up. Reference images The rear cover strip on your left thigh needs to be trimmed up just a bit to where it ends at the top of the ridge. Reference image A simple dressing issue here... make sure that your neck seal is tucked in all the way. Reference image Lastly, the scope on an E-11 can (and should) have a bit of brass "weathering", but this is way too much, lol. I can of black spray paint would do wonders for this, (just be sure to mask off the other areas). Reference image Centurion Suggestions:In this section we prepare you for Centurion. More photos may be requested that allow us to make better decisions on possible adjustment etc. If there are any areas of concern they will be discussed here. Because Centurion photos show much more detail than EIB, items pertaining to Centurion might be seen there and not here. We try to point out all we can from what is seen but the final accuracy is the responsibility of the trooper. The return edge in the "bump" sections on your wrist openings need 2 minutes with a Dremel or file to remove the remaining bit in the corners. Easy peasy. The difference in the width between where the rear of the thigh ammo pack connects on the lower thigh ridge is pretty far off, and the spacing on each side of the cover strip needs to be equal or very close. It may be the angle of the photo, but it also looks as if the inside connection needs to come down a bit. The rear tops of the tabs should be almost perfectly level with the tops of the ridges. Shimming the outside half may be a possibility, but that would leave a large gap in the ridge. Replacing the thigh would probably be a better option, as these issues will need to be addressed before we can move you to Centurion. Reference image (Note that the seam is in the center) Reference images. (Note that the difference between the rear of the thigh ammo pack tabs are nearly identical in distance from the "bend" in the lower ridge of the thigh on each side). Looks like you have a bit of work in front of you, brother, but don't get discouraged! I have the utmost faith that you will come through with flying colors! Now get out there and proudly represent the Empire and the ISG as it's newest Expert Infantryman!1 point
-
Got some new paint brushes from Santa…and a bottle of 40 Creek. Shall we begin? I masked off the ears for paint. Looks pretty good good so far. I started here then the teeth after. It’s a good idea to do a coat then let it set up for a while then do another coat…then let it dry. I know this because I didn’t do that. I think I did a pretty good job on the teeth. Starting to look like a trooper. I also redid the side vent stripes. I’m happier with them but still might do them again. The vocoder looks ok. Will do some touch-ups on it after it dries a bit. While doing the vocoder I pawed up the teeth and ears that weren’t yet dry. Patience. It’s been preached every step of the way and it’s necessary. Lesson learned. The unmasked ear. I painted the screws white, all flat heads now, and touched up the areas that bled into the masking. Here you can see the results of impatience. The black went on too soon and the grey bled through. I’ll fix it later. I ordered some helmet padding on amazon. My plan is to paint the inside of the bucket black. I’m also going to try to make some custom covers for the inside screws and nuts if the padding doesn’t cover themaqa. I’m tossing around the ABS paste mould idea or a heat and press to fit ABS cap. Also still tossing around the idea of painting the tears and traps. The stickers look good but paint has a feel I like when I touch it…and it just seems to look a bit nicer.1 point
-
---------1 point
-
Congratulations! Looking sharp!1 point
-
Ugh why is everyone in the 501st so elitist! Yeah he's missing a few minor details but geez, we gotta stop being so hung up on that!1 point
-
Yes. It is real. Only selling on ebay. Put the item nr in the searchbar on ebay. 1737036342581 point