Leaderboard


Popular Content
Showing content with the highest reputation on 10/07/2017 in Posts
-
You can see the CRL here: http://databank.501st.com/databank/Costuming:TK_TLJ_Executioner Troopers - you can now build this costume with full confidence that it will be approvable by your GML. Numerous people helped bring this costume to life and contributed to the CRL, but the 3 troopers who really helped make it possible are: Glen (TK-85421) - 1st approved Kit (TK-44840) - CRL model Jim (TK-82480) - armor maker Without their diligence, persistence, and true grit, this costume would still be sitting in draft form. Please join me in congratulating Glen, Kit, and Jim on a job well done, and thanks for their service to FISD and the Legion. With unquestioned loyalty, Daetrin TK-8020 FISD Founder | DL3 points
-
You can see the CRL here: http://databank.501st.com/databank/Costuming:TK_rogue_one Troopers - you can now build this costume with full confidence that it will be approvable by your GML. This particular CRL was painful to get all the way though. We had lots of fits and starts, and it's unusual that it would take most of a year after a movie to come out for us to get it live. This is a pretty cool costume and not only will it be a distinct TK unto itself, it is also the basis of the Jeddha trooper. So like stormtroopers and sandtroopers, you can have fun going dirty or staying clean. So, if you have done this costume, go bug your GML to get approved. If you have not started one, kits are on sale and make great additions to your costume hobby. Special thanks to Jim T. who was the power behind bringing this costume to life with his talent, hard work and creativity. UPDATE: I also want to shout out to Henry TK-80421 for all his research and dedication on getting the blaster all figured out. This is huge. With unquestioned loyalty, TK-8020 "Daetrin"2 points
-
The first time I started working on a CRL was in December 2006, and FISD has usually been really good about getting CRLs going. We had a whole photoshop team in place back in the day to crank out all those images - it was a huge deal. But never have I seen 3 - yes 3 - CRLs go live in the same day. We are so very fortunate to have members around the world chip in and contribute their time, talents, and patience to helping get these through. Members of the Philippines Garrison in particular photographed a lot of parts and got them CRL ready which was a huge boost. I'm really stoked that after all this time, people can do their Rogue One builds in confidence knowing there is no longer a moving target. People who have already done an FOTK can see quickly what few parts/mods are needed to having a The Last Jedi TK ready to go with plenty of time to finish before the movie. Or, go full on TLJ Executioner. What a fantastic time to be a Legion stormtrooper, don't you think?2 points
-
Visit went very well! Sent from my HTC U11 using Tapatalk2 points
-
Pretzel, Biggest thing, relax. Go with the flow. Sent from my SM-G930P using Tapatalk2 points
-
And forarms.. some clean-up and then glue the elastic and put the arms together....but that's for tomorrow2 points
-
measure twice cut once.....2 points
-
Some great photos, well done troops "mission completed"1 point
-
Fantastic effort, well done all involved1 point
-
You were a huge part1 point
-
The CRL is here: https://databank.501st.com/databank/Costuming:TK_TLJ Troopers - you can now build this costume with full confidence that it will be approvable by your GML. Once again, Jim & members of the Philippine Garrison worked quickly to bring this costume to life and get all the photos set up. We are grateful to their contributions to FISD. If you haven't been keeping track, that is 3 CRLs fully live on the same day. I don't think I've ever seen in all the years this occur before. Kudo's as well do the Legion LMO team for making this possible. It's a great time to be a stormtrooper in the 501st Legion! With unquestioned loyalty, Daetrin TK-8020 FISD Founder | DL1 point
-
I made this schematic drawing of an E11 blaster to show what type of components I used for the blasters I've built. I think a picture tells more than a thousand words, therefore instead of a list I decided to go with this: If you have any enquiry about any of these parts, I can gladly link in where I got them. Mostly on ebay, and directly from Adafruits, they have amazing neopixel stuff.1 point
-
Arms strapped in...on to next mission, thermal detonator1 point
-
It'd be a little work, but if -- as it looks to be -- the yoke is missing the projecting tabs at the top of the shoulder... Well, my current plan, pending having the kit parts in hand, is to drill some tiny countersunk screw holes on both sides of the join, epoxy and screw both to a flat piece of something sturdy that will project out to be that tab, then fill and smooth. This means painting (or other coating), but I'm planning to do that anyway, so not a bother. With a solid anchor substrate and appropriate coating material(s), that should both minimize any flexing at that exact point and minimize any damage any minor flexing might cause. I know a lot of y'all have next to no faith in Anovos, but the people I know there are calmly certain that their first shipment of the Standard line FOTK armor will be arriving from their factories in China to their warehouse by the end of October. We'll see. I know a lot about what they've had to deal with in getting the Star Wars license that had never been an issue before. Even though I really (reallyreallyREALLY) want this in time to roll it out at the TLJ premiere, I've been in this hobby long enough to have learned to be patient and expect things I order... when I see them. Two years for Gio's Kenneth Cole Pit Crew replica boots. Little communication, no shipping notification. Just came home one day and they were on the doorstep. Two years waiting for a FOTK kit and helmet from Anovos, from when they first showed them off at the Celebration before TFA opened. I had hoped they'd be available before now. I am hopeful they may yet be in time for TLJ. I only just pre-ordered when both were finally live a couple weeks ago. But, ultimately, this is still a hobby. I'm not going to die or lose my job or go to jail if a particular costume isn't finished by a particular date. So I fight down my desire for instant gratification and keep plugging along with what I do have control over.1 point
-
Today I’ve been making the snaps to be fitted inside the arms and thighs First cut abs strips to hold the male snapper Drilled hole in centre Before snap fitted And after All done Then fitted the reinforcement to the ab and chest fir the brackets Then moved onto the drop boxes Measured where to drill the hole on the inner piece, one inch down and in the middle Fitted the elastic with the pop rivets Not too sure if they need a tad more trimming... what do you think? Thought it’s best to check before I glue And they are then fitted here Getting there bit by bit [emoji3] Sent from my iPhone using Tapatalk1 point
-
Just understand that you are a big part of their day to "forget the norm." When I visited, I used a lot of "Hello". Some will recognize you... some won't, but all will appreciate you being there. Just be yourself and take things slow. It was definitely a different experience for me as well. This is why we do what we do brother! Sent from my SM-G900V using Tapatalk1 point
-
Can't wait Sent from my SM-T820 using Tapatalk1 point
-
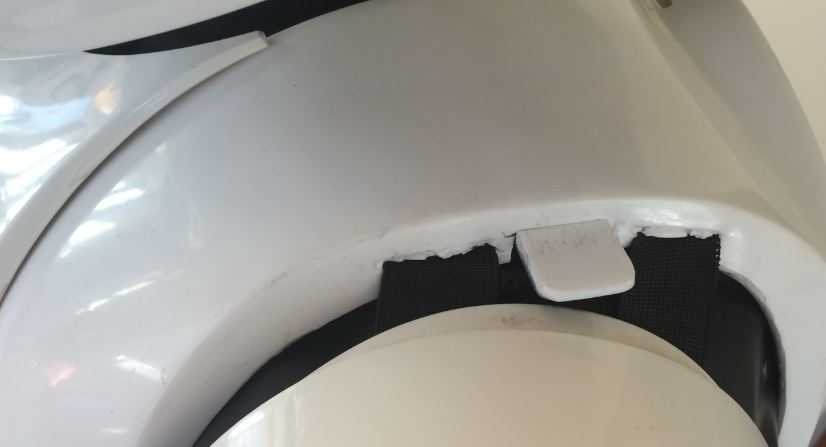
Most important thing I notice is that this blaster was cast from a mold and not 3D printed like all the TFA blasters. This probably explains the reason of that extra flashlight by the way. They had to add it because they were probably unable to make the former system work with casting. The handle is also looking different. Much slimier, with a weird cut-out to the back. Overall, this blaster is probably better suited for screen-use, but doesn't look as clean and sharp as the ones from TFA. I like the sling mounts though. One really funny thing is that the white cap on the magazine is glued on backwards! Haha, I wonder if all the blasters in the film will have that same issue.1 point
-
Hey guys! Sorry again for lack of updates lately. There's been a lot of birthdays going on and I've also been once again doing a lot of research, specifically on helmet electronics (Talking system and fan system), but more on that later. My new leather strapping came in for my holster! As you can see, the color looks spot on! And the width is perfect as well. Excited to install these! I also finally assembled my TD pack!! This has been a long process being that my first go at the painting ended up dripping so I had to completely sand all the paint off and start from scratch. But here we are! I bent the edges in a little because I wasn't happy with how it was laying on the pipe. I wanted it to be more fit to the curve of the pipe. Stoked that Mark has already painted the heads on these screws to be black, one less thing I gotta do! I also applied some soft Velcro to the brackets to prevent scratches to my beautiful armor! I got this amazing tip from another build thread (I plan on giving a reference list of all the threads I learned from at the end of my build!). And then I began gluing some more snap plates in place. The finish line is in site!! Sent from my iPhone using Tapatalk1 point
-
Hey everyone! So this is my first time posting anything on the forums here. I have just lurked around trying to make a decision on what armor to purchase for a while. BUT! I finally took the plunge last week when an unexpected opportunity presented itself. Someone was selling their unopened Anovos armor for the same price that it would cost to order from Anovos themselves. The perk obviously being that ordering from this person would not take an indefinite amount of time before I would receive the kit. I just got the kit and will probably start trimming tomorrow. But I thought that first I'd start a build thread for anyone that wants to follow along, or better yet, help me out in any way they can haha. This is my first build, so I'm a bit nervous. But extremely excited too! Here goes nothing!1 point
-
Trying to get some sort of alignment at the front..impossible. Lucky the knee ammo pack will hide the join. With long legs i have tried to maximize the white to show less back at the knee. I Have decide my belt is way too white so have resorted to the oldest forgers trick in the book.... A quick stain of tea. Got my side split pins in. Decided to add some extra strips of ABS for strength. Pressure in this area is anticipated to increase with age.1 point
-
I bought a Rubies toy E-11 and while I was working on the shoes I decided to experiment with painting techniques on this thing. I went way overboard with the paint job on what is a kids toy but I had my reasons. I wanted it to look cool with his costume but I also wanted to test my painting/weathering on this toy because I have an E-22 being 3D printed for me which should arrive in about a week. I needed to work up my painting skills before the E-22 arrived. So, keep in mind some of what I did here was a bit of an experiment and some things worked while other ideas failed. In the end it came out pretty good though. Here's the blaster as purchased. Plastic in a nice white and orange color scheme...kinda like a push-pop. Tip: If you want a really nice finish, particularly a metallic finish on anything plastic, you need to really sand it down smooth. Most of this blaster is smooth but i should have sanded off the lettering and there are some bad areas on T-tracks that needed smoothing out. My original paint concept was as follows: Paint a metallic aluminum finish with a dark metal top coat and then use sand paper to wear thru that top coat for a weathered effect. Ultimately this technique didn't work well and I mostly abandoned it halfway thru the paint job. I ended up doing a lot of dry-brush weathering to get the effect. At the end, the product was a bit of distressing and dry-brushing. First I primed it black with Krylon primer. A couple good coats did the trick. It dries pretty fast but i let it sit overnight. I've taken to wearing a glove while I paint to avoid overspray on my hand. Next was to provide a base coat of metallic silver. I used this so that any distress marks would be really shiny. An aluminum paint wouldn't be as bright. I think a key step that I missed here would have been to apply a matte finish clear-coat over the black primer making it more durable and less likely to be damaged by the distressing. I painted everything except the grip which I believe on the sterlings was black plastic. Then I did some masking to paint the scope a brass color. I didn't have brass so I used gold figuring it would be close enough and not much of the color would be visible anyways. Now here's where things got complicated and a lot of experimenting occurred. I needed to figure out what paints and colors I would use for the top coats. I wanted a rich, multi-layered look simulating metals. I went to a hobby shop and picked up some metallic paints and I also swung buy an auto paint store to get a metal flake paint. Below are tests on some ABS scraps of (3) metallic paints to see the colors. I new I wanted a couple different tones on the blaster. Here are the paints I used. Some were Tamiya spray cans. One was a metallic paint. And when I really got crazy I used these ALCLAD metal paints which are amazing...and pricey. The pain I ended up using as the main base color was the auto paint. This was an enamel lacquer paint which was Graphite with metallic flakes. This stuff was really nasty and required the organic vapor respirator that I used with the contact cement. I thinned it a bit with medium reducer and sprayed it thru my airbrush. It took several coats to cover. Part of it was learning to airbrush again after 35 years. Here's what i looked like after that base coat. It had a nice metallic look to it but the metal flakes were a bit grainier than I'd hoped. So I used the Vallejo Gunmetal metallic to add some tone variety as it's a bit darker that the Graphite base coat. This paint isn't as bad as the auto paint but I still used the respirator. In this photo you can see that I've painted the back of the blaster with the Gun Metal color which is a lot darker. Here the whole thing has been coated except for the grip. Next I masked off to paint the grip. I used a Tamiya semi-gloss black that was left over from some other project. Now it was starting to look pretty good. Next step was to airbush a bit of Tamiya Smoke on to some areas to add more tone and start the weathering process. Basically I darkened the T-tracks and painted in dark areas in the crevices around the blaster. The paint jar is in the photo above. The photos below show the darkened areas. Next I started the distressing which was basically sandpaper scratching thru the various top coats to reveal the layer below. I used 400 grit but that seemed to chew all the way down to the white plastic. Could have been to low a grit or I didn't have the technique down. So I used 800 with various passes. I tried to knock down the finish at the corners and where regular hand holding would have naturally worn away the finish, also at moving parts. Many of the effects came out well. There was a lot of subtly now in the finish on various parts of the blaster. But I wasn't in any way successful replicating scratches that exposed the bare aluminum below. So I tried another paint experiment. I went out and got ALCLAD metallic paints which can create some amazing finishes. Again this was a bit of experimenting. I sanded down the folding stock area to be really smooth then primed it with the ALCLAD primer/filler. Then painted it with ALCLAD gloss black which is the recommended base coat for their metallic top coats. I then used ALCLAD Duraluminum to paint this area with some darker spots in Gun Metal. I was super happy with these ALCLAD paints. The finish on this area is much more realistic than the rest of the blaster. I'll be using ALCLAD on my E-22. I did a terrible job documenting the ALCLAD painting steps and weathering so I'll explain as best I can. The ALCLAD finish was great but needed to be distressed. I used a bit of sanding but then I decided to do dry-brushing to create most of the distressed/worn look on the folding stock. First I added dark grimy areas around the blaster with the Tamiya smoke color mixed with some matte black to darken it. I dry-brushed this into the grooves and joints all around the blaster. Then I dry-brushed Tamiya metallic silver spray paint to simulate scratches and heavily worn areas all over the blaster. This gave those nice bright and shiny pops around the piece. I also dry-brushed the gold color and the semi-gloss black over the scope to get the worn look. That part wasn't too succesful but I learned how not to do it I guess. Here's the final product. My Hyperfirm E-11 is in the background for reference. The photo below most accurately shows the color. It's not as black as my E-11 but I was trying for a more realistic metal look. Some of the other photos you'll see make it look much lighter or darker...all depends on the lighting. Well that's the end of the build. I hope you find it useful. On to the next project! For reference. Here are some of the reference photos i used when researching the finish.1 point
-
Whew! Actually it was a team effort. Glen - you got the first application bringing this kit to life, and did a lot of work on the CRL, Jim/Kit from the PI on getting reference photos turned so quickly and validating everything, whew! And of course Jim T. for knocking out helmets everyone can love. This is really a great day. The base CRL for TLJ will go live soon - only waiting on 2 photos left.1 point
-
Or, they just want to make them harder for fans to build...that's a lot of little detail on that puppy.1 point
-
ROTFLHMS - great one!1 point
-
Poor Kylo1 point
-
Look what they did to Kylo1 point
-
Yea no the TFA yoke was one piece.
 1 point
 -
Thanks for those youtube links! They were helpful.1 point
-
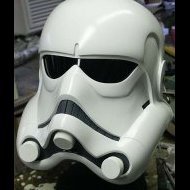
Shame what they did with the shoulders, but explains why they say "it doesn't need painting" had a feeling something wouldn't be right. Anyone that has put one of these kits together would have been wondering the same thing1 point
-
Fantastic Job. I'm sure you'll be asked for commissions!1 point
-
As long as you are doing Phasma (or for that matter Captain Cardinal), yes. The cape covers the hinge. As I understand it, for the standard FO white grunt the screen suits did not have a yoke per se, but a combined one-piece back/underchest made of a flexible (and apparently proprietary) material that allowed one to put it on like a tank top. Pretty much like you see in the Gwen Christie photo except no seams, hinges, or anything like that. Apparently Anovos was unable to replicate that in a manner that would allow for mass production, so they took the Phasma route.1 point
-
Hi Guys! Here's an update on the footware. I looked at lots of options from rain boots to kid sized chelsea style boots and decided to go the cheap route and make some shoes/boots myself. I took an old pair of shoes that are starting to get small for him and are really beat up. The idea was to form foam around them to sorta replicate real boots. I started off with a paper template. First step was to make the cover over the toes. This needed to be a separate piece from the back shoe cover so it can flex a bit when he takes a step. I made the paper patter, cut it out of 4mm foam which would be more flexible and less bulky than the 6mm. When cutting these foam pieces I always cut a bit bigger than needed and trimmed off material as I fitted it over the shoe. The back portion would have to wrap all the way around, meeting up with the front piece. And it would have to still allow access to velcro the shoe. Apply some contact cement, and a lot to the shoe as it soaks in the cement on the first application. I applied the back piece first. Now this was a good start but I didn't look right. Took me a few tries to determine the best option was to cut another piece and layer it over the ones that I had just glued down. This second piece would allow me to make a cover flap to hide the shoe velcro and allow me to add the side detail which is a design element on the real boots. Again, start off with a paper pattern and refine it as you go. Here I'm test fitting. Once I was happy with the general look I cut out the side area and glued in a scrap piece of white elastic. This was hot glued. Here's the back side. I glued all the edges too. Here's the piece contact cemented in place over the original pieces. Once this was set, I added a bit of detail around this white elastic by scoring some lines with my xacto to simulate a stitching pattern. Then I hit it with the heat gun to open up the score. I replicated the same for the left shoe. Back to the right shoe, I didn't make the elastic on this side as this was the original piece I had glued down...poor planning. So I just scored some lines to replicate the shape. I figure this is the inside of his foot so who's gonna notice anyways. Next I added some velcro to close the cover flap. Here they are ready for painting. I then used white Plasti-dip and finished them off with white Krylon Fusion spray paint. Nice and shiny. I also painted the edge of the sole black along with the toe tip. Here's the top flap, still allows access to the main shoe velcro. Nice and simple! That wraps up the costume. Next post I'll show how I transformed the Rubies toy E-11 from this. Into this.1 point
-
trigger frame assembly phototype help from my little 3d printing friend1 point
-
I am very excited for you. It was not but a couple of years ago that I got my big brown box. I was excited and terrified at once. Good luck on the build, we will help. If uncertain, ask!1 point
-
Yaahh!! So excited to see how it turns out!! Unfortunately, you're way ahead of me on the armor building path. I haven't settled on a kit to buy yet. So I won't have much tips or tricks to contribute :-/1 point
-
So my one of my 3D printers is having some major problems right now so my red F11-D and SE-44C will have to wait until I can get it all sorted out. I ordered the dye for my gloves and boots. I purchased my armor kit last night so once it's ready and I go pick it up I'll post it as well. As per the suggestion/references that Pereginus/Jonah put up in my CRL discussion I added the Phasma boot/armor parts to the my kit order. I also received the Rusteoleum I was going to use. How fitting that it's called Cardinal Red! I'll be using this for the armor and to add more of a gloss to the 3D printed pieces. Thanks for checking out my build thread!1 point
-
A new garrison has formed covering the thirty-one counties of Western Pennsylvania. If you get a chance please check them out and share their social media pages. https://www.facebook.com/501stStarKillerGarrison/ https://twitter.com/501stStarkiller https://www.instagram.com/501ststarkillergarrison/1 point
-
Any LGBT troopers here sign off!! Sent from my iPhone using Tapatalk1 point
-
So a little under two weeks ago I made the long distance drive with my parents to my newfound home of BGSU in Ohio for college to study accounting! To make sure I was taking a slice of home with me, even though I've left my kit behind, I brought a collage of all my troops up to the current moment, with room to grow to hold up to 25 troops per frame! I finally got this hung up a couple of days ago, and thought I should post it here! My complete trooping log can be found either in my signature, or with the full image set on Imgur at http://imgur.com/a/Z1wHN1 point
-
Guys - this thread is for LGBT troopers to express support for each other, and as 501st members they have the right to do so. If you want to discuss politics, go somewhere else, or your posts will be deleted.1 point